
You also want an ePaper? Increase the reach of your titles
YUMPU automatically turns print PDFs into web optimized ePapers that Google loves.
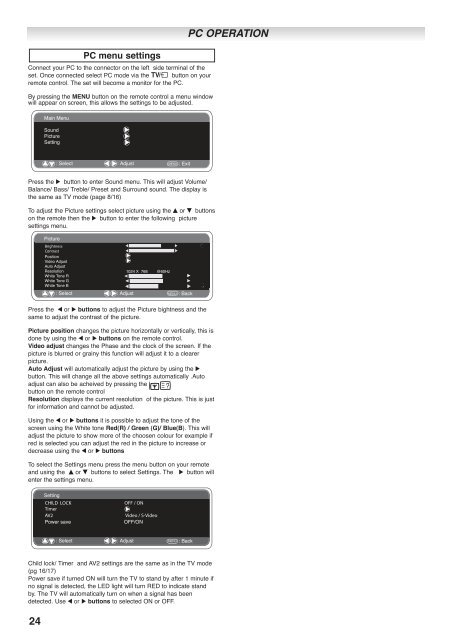
Connect your PC to the connector on the left side terminal of the<br />
set. Once connected select PC mode via the v button on your<br />
remote control. The set will become a monitor for the PC.<br />
By pressing the MENU button on the remote control a menu window<br />
will appear on screen, this allows the settings to be adjusted.<br />
Press the 8 button to enter Sound menu. This will adjust Volume/<br />
Balance/ Bass/ Treble/ Preset and Surround sound. The display is<br />
the same as TV mode (page 8/16)<br />
To adjust the Picture settings select picture using the e or d buttons<br />
on the remote then the 8 button to enter the following picture<br />
settings menu.<br />
Press the 7 or 8 buttons to adjust the Picture bightness and the<br />
same to adjust the contrast of the picture.<br />
Picture position changes the picture horizontally or vertically, this is<br />
done by using the 7 or 8 buttons on the remote control.<br />
Video adjust changes the Phase and the clock of the screen. If the<br />
picture is blurred or grainy this function will adjust it to a clearer<br />
picture.<br />
Auto Adjust will automatically adjust the picture by using the 8<br />
button. This will change all the above settings automatically .Auto<br />
adjust can also be acheived by pressing the rD<br />
button on the remote control<br />
Resolution displays the current resolution of the picture. This is just<br />
for information and cannot be adjusted.<br />
Using the 7 or 8 buttons it is possible to adjust the tone of the<br />
screen using the White tone Red(R) / Green (G)/ Blue(B). This will<br />
adjust the picture to show more of the choosen colour for example if<br />
red is selected you can adjust the red in the picture to increase or<br />
decrease using the 7 or 8 buttons<br />
To select the Settings menu press the menu button on your remote<br />
and using the e or d buttons to select Settings. The 8 button will<br />
enter the settings menu.<br />
Child lock/ Timer and AV2 settings are the same as in the TV mode<br />
(pg 16/17)<br />
Power save if turned ON will turn the TV to stand by after 1 minute if<br />
no signal is detected, the LED light will turn RED to indicate stand<br />
by. The TV will automatically turn on when a signal has been<br />
detected. Use 7 or 8 buttons to selected ON or OFF.<br />
24<br />
Main Menu<br />
Sound<br />
Picture<br />
Setting<br />
PC menu settings<br />
: Select : Adjust MENU : Exit<br />
Picture<br />
Brightness<br />
Contrast<br />
Position<br />
Video Adjust<br />
Auto Adjust<br />
Resolution<br />
White Tone R<br />
White Tone G<br />
White Tone B<br />
1024 X 768 @60Hz<br />
: Select : Adjust MENU : Back<br />
Setting<br />
CHILD LOCK OFF / ON<br />
Timer<br />
AV2 Video / S-Video<br />
Power save OFF/ON<br />
: Select : Adjust MENU : Back<br />
PC OPERATION