
You also want an ePaper? Increase the reach of your titles
YUMPU automatically turns print PDFs into web optimized ePapers that Google loves.
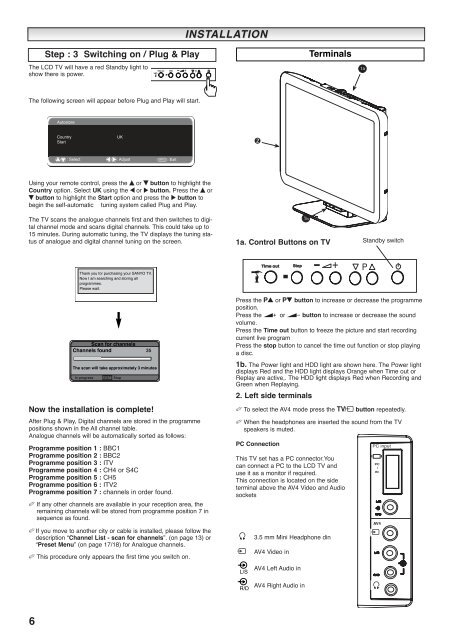
The LCD TV will have a red Standby light to<br />
show there is power.<br />
The following screen will appear before Plug and Play will start.<br />
Using your remote control, press the e or d button to highlight the<br />
Country option. Select UK using the 7 or 8 button. Press the e or<br />
d button to highlight the Start option and press the 8 button to<br />
begin the self-automatic tuning system called Plug and Play.<br />
The TV scans the analogue channels first and then switches to digital<br />
channel mode and scans digital channels. This could take up to<br />
15 minutes. During automatic tuning, the TV displays the tuning status<br />
of analogue and digital channel tuning on the screen.<br />
Now the installation is complete!<br />
After Plug & Play, Digital channels are stored in the programme<br />
positions shown in the All channel table.<br />
Analogue channels will be automatically sorted as follows:<br />
Programme position 1 : BBC1<br />
Programme position 2 : BBC2<br />
Programme position 3 : ITV<br />
Programme position 4 : CH4 or S4C<br />
Programme position 5 : CH5<br />
Programme position 6 : ITV2<br />
Programme position 7 : channels in order found.<br />
✐ If any other channels are available in your reception area, the<br />
remaining channels will be stored from programme position 7 in<br />
sequence as found.<br />
✐ If you move to another city or cable is installed, please follow the<br />
description “Channel List - scan for channels”. (on page 13) or<br />
“Preset Menu” (on page 17/18) for Analogue channels.<br />
✐ This procedure only appears the first time you switch on.<br />
6<br />
Step : 3 Switching on / Plug & Play<br />
Autostore<br />
Country UK<br />
Start<br />
Thank you for purchasing your SANYO TV.<br />
Now I am searching and storing all<br />
programmes.<br />
Please wait.<br />
Scan for channels<br />
Channels found<br />
The scan will take approximately 3 minutes<br />
In progress RET Stop<br />
35<br />
Time out Stop -<br />
: Select : Adjust MENU : Exit<br />
INSTALLA<br />
INSTALLATION<br />
TION<br />
+ P<br />
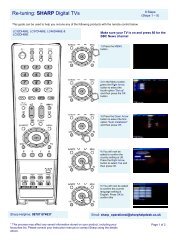
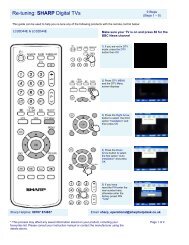
1a. Control Buttons on TV<br />
Press the 5 or 6 button to increase or decrease the programme<br />
position.<br />
Press the 1 or 2 button to increase or decrease the sound<br />
volume.<br />
Press the Time out button to freeze the picture and start recording<br />
current live program<br />
Press the stop button to cancel the time out function or stop playing<br />
a disc.<br />
1b. The Power light and HDD light are shown here. The Power light<br />
displays Red and the HDD light displays Orange when Time out or<br />
Replay are active,. The HDD light displays Red when Recording and<br />
Green when Replaying.<br />
2. Left side terminals<br />
✐ To select the AV4 mode press the v button repeatedly.<br />
✐ When the headphones are inserted the sound from the TV<br />
speakers is muted.<br />
PC Connection<br />
This TV set has a PC connector.You<br />
can connect a PC to the LCD TV and<br />
use it as a monitor if required.<br />
This connection is located on the side<br />
terminal above the AV4 Video and Audio<br />
sockets<br />
L/S<br />
R/D<br />
Time out Stop -<br />
3.5 mm Mini Headphone din<br />
AV4 Video in<br />
AV4 Left Audio in<br />
AV4 Right Audio in<br />
1b<br />
Terminals<br />
+ P<br />
Standby switch<br />
PC input<br />
PC<br />
I<br />
IN<br />
AV4