Installation and Maintenance Instructions - ETO Doors
Installation and Maintenance Instructions - ETO Doors
Installation and Maintenance Instructions - ETO Doors

You also want an ePaper? Increase the reach of your titles
YUMPU automatically turns print PDFs into web optimized ePapers that Google loves.
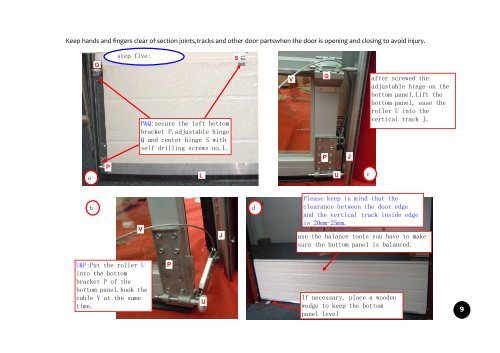
Keep h<strong>and</strong>s <strong>and</strong> fingers clear of section joints,tracks <strong>and</strong> other door partswhen the door is opening <strong>and</strong> closing to avoid injury.<br />
a<br />
b<br />
Q<br />
P<br />
step five:<br />
P&Q:secure the left bottom<br />
bracket P,adjustable hinge<br />
Q <strong>and</strong> center hinge S with<br />
self drilling screws no.1.<br />
V<br />
U&P:Put the roller U<br />
into the bottom<br />
bracket P of the<br />
bottom panel.hook the<br />
cable V at the same<br />
time.<br />
P<br />
L<br />
U<br />
J<br />
S<br />
d<br />
V<br />
Q<br />
P<br />
U<br />
J<br />
use the balance tools you have to make<br />
sure the bottom panel is balanced.<br />
If necessary, place a wooden<br />
wedge to keep the bottom<br />
panel level<br />
c<br />
after screwed the<br />
adjustable hinge on the<br />
bottom panel,Lift the<br />
bottom panel, ease the<br />
roller U into the<br />
vertical track J.<br />
Please keep in mind that the<br />
clearance between the door edge<br />
<strong>and</strong> the vertical track inside edge<br />
is 20mm-25mm.<br />
9