Download/ view the Prodigy Express (DCC01) - Gaugemaster.com
Download/ view the Prodigy Express (DCC01) - Gaugemaster.com
Download/ view the Prodigy Express (DCC01) - Gaugemaster.com

You also want an ePaper? Increase the reach of your titles
YUMPU automatically turns print PDFs into web optimized ePapers that Google loves.
GAUGEMASTER<br />
PRODIGY EXPRESS<br />
<strong>DCC01</strong> USER MANUAL<br />
Version 1.1 2011
T A B L E O F C O N T E N T S<br />
1 Getting Started<br />
Introduction<br />
Specifications and Features<br />
Quick Start<br />
Connecting to Your Layout<br />
Running a Loco<br />
Controlling Accessory Functions<br />
Recalling Locos<br />
Saving Locos<br />
Deleting Locos<br />
Emergency Stopping<br />
Speed Steps<br />
Overload and Short Circuit<br />
Programming Decoders<br />
Programming Loco on <strong>the</strong> Program Track<br />
Programming Locos on <strong>the</strong> Main Track<br />
Reading Loco’s Decoder Values on <strong>the</strong> Program Track<br />
Configuration Variables – CVs<br />
Most Commonly Used CVs<br />
A Word About CV #29<br />
Consisting<br />
Advanced Consisting<br />
Programming Advanced Consists<br />
Running Advanced Consists<br />
Clearing Advanced Consists<br />
General Trouble Shooting<br />
Checklist for General Problems<br />
Special Trouble Shooting<br />
Contact Details
Getting Started<br />
Introduction<br />
Note Although <strong>the</strong>re are Quick-start instructions on <strong>the</strong> back of <strong>the</strong> Cab/ Handheld, please read<br />
<strong>the</strong>se instructions thoroughly to better understand and enjoy your <strong>Prodigy</strong> <strong>Express</strong> DCC system.<br />
Specifications and Features<br />
Input: 15-16 volts DC, 2 Amps. It <strong>com</strong>es with a universal switching power supply (good for USA and<br />
Europe)<br />
Output: DCC signal with 14.5 VA, for HO and N scales<br />
Maximum Current: 2 Amps<br />
Note Although you can draw more than 2 amps for short periods of time, it is not re<strong>com</strong>mended<br />
Maximum number of Cabs: Use up to 20 Cabs<br />
Address Capability: 2-digit (1-127) or 4-digit (1-9,999)<br />
Speed Steps: 14/28/128<br />
Accessory Functions: 16 (F0-F15)<br />
Advanced Consisting<br />
Program Loco on Program Track<br />
Program Loco on Main Track<br />
Read Loco on Program Track<br />
Quick Start<br />
Connecting to Your Layout<br />
1. Using a small flat-bladed screwdriver attach two wires from <strong>the</strong> Main Track layout to <strong>the</strong> terminals<br />
marked Main Track and two wires from <strong>the</strong> Program Track to <strong>the</strong> terminals marked Program Track.<br />
2. Plug <strong>the</strong> power supply into <strong>the</strong> base unit.<br />
3. Plug <strong>the</strong> AC line cord into a wall outlet.<br />
4. Double check all wiring, <strong>the</strong> power light should be on and you are ready to run your decoder<br />
equipped locos.<br />
Running a Loco<br />
To run a loco, you have to first know its address. Most decoders you purchase have <strong>the</strong> factory default<br />
address #3. Read your decoder and/or loco manual for your decoder address.<br />
To select a loco, press <strong>the</strong> LOCO key. Using <strong>the</strong> numeric keypad (0 - 9), enter <strong>the</strong> loco address. Press<br />
ENTER. You have just acquired <strong>the</strong> loco.<br />
The Cab will automatically remember <strong>the</strong> loco address for later recall.<br />
Use <strong>the</strong> DIRECTION key to set <strong>the</strong> loco’s direction. Turn <strong>the</strong> THROTTLE knob slowly to increase <strong>the</strong><br />
loco’s speed. The selected loco, or current loco, will begin moving. You can also tap <strong>the</strong> +1 or -1 to<br />
adjust <strong>the</strong> loco’s speed. Do not hold <strong>the</strong> -1 key, since this is also <strong>the</strong> DEL key and will delete <strong>the</strong> loco.<br />
To toggle <strong>the</strong> headlight (F0) on or off, press 0.<br />
Controlling Accessory Functions<br />
To control accessory functions F1 - F9, press 1 - 9. To control F10 – F15, press SHIFT, <strong>the</strong>n input <strong>the</strong><br />
two digit function number. Only functions up to F12 will show in <strong>the</strong> display, F13 to F15 will be<br />
activated but will not be displayed on <strong>the</strong> screen.
Recalling Locos<br />
To call up previous locos stored in <strong>the</strong> memory, press RECALL. You can recall up to 25 locos.<br />
Saving Locos<br />
Recall back <strong>the</strong> five locos you wish to use in your next session, making sure all functions are off and <strong>the</strong><br />
throttle is set to zero. To save <strong>the</strong> last five locos unplug <strong>the</strong> hand unit before turning off <strong>the</strong> power, SVdA<br />
will be displayed briefly confirming <strong>the</strong> save. After you have reset your five locos you can shut down <strong>the</strong><br />
power to your DCC system and layout.<br />
Tip Use <strong>the</strong> DELETE button to remove any unused locos from <strong>the</strong> stack before saving your favorite five.<br />
Note Although <strong>the</strong> Cab can recall up to 25 locos for operation, if you “power off” <strong>the</strong> Cab from <strong>the</strong> base<br />
unit, it will only retain <strong>the</strong> last five locos previously saved.<br />
Deleting Locos<br />
The Cab can store up to 25 locos. If you select a new loco when <strong>the</strong> Cab is full, <strong>the</strong> new loco will replace<br />
<strong>the</strong> current loco. The current loco will be lost. To prevent this, we re<strong>com</strong>mend you recall unused locos<br />
and delete <strong>the</strong>m by pressing and holding DEL for 2 seconds.<br />
Emergency Stopping<br />
For emergency stopping of <strong>the</strong> current loco, press STOP. Pressing and holding STOP for 2 seconds will<br />
stop <strong>the</strong> Main Track output. The 2 lights on <strong>the</strong> base unit will blink. To restore <strong>the</strong> Main Track output,<br />
press and hold STOP for 2 seconds again.<br />
Speed Steps<br />
Speed steps are incremental steps <strong>the</strong> loco takes to go from 0 to top speed. There are three speed<br />
steps: 14, 28 and 128. The higher <strong>the</strong> speed steps setting, <strong>the</strong> higher <strong>the</strong> number of different speeds on<br />
which <strong>the</strong> loco can operate. When you enter a new loco address (an address that has not been stored in<br />
<strong>the</strong> Cab’s memory) <strong>Prodigy</strong> <strong>Express</strong> will set 28 speed steps as <strong>the</strong> default setting for that address. In<br />
order to operate your loco properly, you may need to change <strong>the</strong> speed steps setting to match <strong>the</strong><br />
decoder’s speed steps. To select o<strong>the</strong>r speed steps settings, press SPD STEP repeatedly until you see<br />
your desired speed steps setting. Then press ENTER. The selected speed steps setting will apply only<br />
to that address.<br />
Note Use of <strong>the</strong> speed step button will not alter <strong>the</strong> speed step originally programmed into <strong>the</strong> decoder.<br />
It only matches <strong>the</strong> throttle to <strong>the</strong> decoder.<br />
Overload and Short Circuit<br />
The base unit is rated at 2 amps. It is up to you to note how many locos and accessories can be run on<br />
<strong>the</strong> layout at <strong>the</strong> same time without triggering <strong>the</strong> circuit protector. If <strong>the</strong>re is an overload or short circuit,<br />
<strong>the</strong> base unit will stop Main Track output for 2 seconds <strong>the</strong>n resume. Please remove <strong>the</strong> overload or<br />
short circuit for proper operation. When operating larger layouts with numerous locos and accessories<br />
being operated at <strong>the</strong> same time you may need a DCC power booster.<br />
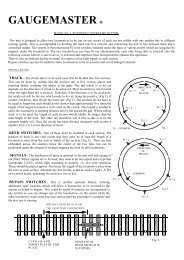
Some <strong>com</strong>mon point wiring is shown below.
Programming Decoders<br />
The <strong>Prodigy</strong> <strong>Express</strong> allows you to easily program most NMRA <strong>com</strong>patible decoders. It guides you step<br />
by step through <strong>the</strong> programming process. No hexadecimal numbers are needed, to program decoders<br />
with this system. The <strong>Prodigy</strong> <strong>Express</strong> allows you to program decoders on a separate Program Track or<br />
on <strong>the</strong> Main Track layout, all without affecting any o<strong>the</strong>r locos operating on <strong>the</strong> Main Track.<br />
Decoder Terminology<br />
Note: Before you start programming, please familiarize yourself with <strong>the</strong> following terminology.<br />
Loco Address: The address is <strong>the</strong> number assigned to a decoder to identify <strong>the</strong> decoder.<br />
Start Voltage: This is <strong>the</strong> voltage required to start <strong>the</strong> loco’s motor and over<strong>com</strong>e its weight and friction<br />
to make it begin to move. You can program your loco with a start voltage so that it will begin to move as<br />
soon as <strong>the</strong> throttle is turned.<br />
Top Voltage: The top voltage (top speed) is <strong>the</strong> voltage (speed) at full throttle.<br />
Acceleration Rate: This rate simulates <strong>the</strong> drag of a heavy load as <strong>the</strong> loco speeds up so when you<br />
increase <strong>the</strong> speed setting, <strong>the</strong> loco will gradually increase its speed.<br />
Deceleration Rate: This rate simulates <strong>the</strong> drag of a heavy load as <strong>the</strong> loco slows down so when you<br />
decrease <strong>the</strong> speed setting, <strong>the</strong> loco will gradually decrease its speed.<br />
Programming Loco on <strong>the</strong> Program Track<br />
1. Place <strong>the</strong> loco on <strong>the</strong> Program Track. Press PROG to select “Prog Prog Track”. Press ENTER.<br />
2. First, “Adr” will flash, prompting you to program <strong>the</strong> loco address. Using 0 - 9, enter <strong>the</strong> loco address<br />
followed by ENTER, or press ENTER to skip.<br />
Note: For <strong>the</strong> beginner or if you want to only program <strong>the</strong> loco address, you can stop right here.<br />
Put <strong>the</strong> loco back on <strong>the</strong> Main Track. Select <strong>the</strong> loco by pressing LOCO <strong>the</strong>n enter <strong>the</strong> loco address and<br />
press ENTER. Now you can run <strong>the</strong> loco.<br />
3. Next, “SV” will flash, prompting you to program <strong>the</strong> Start Voltage. Input data and <strong>the</strong>n press ENTER.<br />
4. Next, “Acc” will flash, prompting you to program <strong>the</strong> acceleration rate. Input data and <strong>the</strong>n press<br />
ENTER.<br />
5. Next, “dEc” will flash, prompting you to program <strong>the</strong> deceleration rate. Input data and <strong>the</strong>n press<br />
ENTER.<br />
6. Next, “TV” will flash, prompting you to program <strong>the</strong> Top Voltage. Input data <strong>the</strong>n press ENTER.<br />
7. Finally, “CV#” will flash, prompting you to program a CV (Configuration Variable).<br />
At this point, you have already finished most of <strong>the</strong> decoder programming.<br />
You can stop programming here by pressing ENTER.<br />
8. If you want to program a CV, enter a CV number. Press ENTER. Then enter CV data. Press ENTER.<br />
“CV#” will flash again, prompting you to program ano<strong>the</strong>r CV. To skip, press ENTER.<br />
Note Programming a CV with incorrect data can cause a decoder malfunction.<br />
Read your decoder manual carefully before programming a CV<br />
Programming Locos on <strong>the</strong> Main Track<br />
Programming on <strong>the</strong> Main Track can save you <strong>the</strong> effort of moving a loco to <strong>the</strong> Program Track for<br />
programming. However, you have to know <strong>the</strong> loco address in order to program on <strong>the</strong> Main Track.<br />
O<strong>the</strong>rwise you have to program <strong>the</strong> loco on <strong>the</strong> Program Track. Not all decoders support <strong>the</strong> Program<br />
on Main feature. Please read your decoder’s manual to check whe<strong>the</strong>r <strong>the</strong> decoder supports this<br />
feature.<br />
1. To program on <strong>the</strong> Main Track, press PROG to select “Prog Main Track”.<br />
Press ENTER. The current loco address will flash, prompting you to program <strong>the</strong> current loco.<br />
2. To program <strong>the</strong> current loco, press ENTER; to program ano<strong>the</strong>r loco, enter its address and press<br />
ENTER.<br />
3. The rest of <strong>the</strong> programming procedures are <strong>the</strong> same as <strong>the</strong> Programming on Program Track<br />
procedures (see above). We re<strong>com</strong>mend you bring <strong>the</strong> loco to a stop before programming because if<br />
<strong>the</strong> moving loco has a bad pickup, it may fail to receive <strong>the</strong> program <strong>com</strong>mand, causing a malfunction.<br />
Reading Loco’s Decoder Values on <strong>the</strong> Program Track<br />
The <strong>Prodigy</strong> <strong>Express</strong> DCC system gives you <strong>the</strong> ability to read back CV values of a decoder equipped<br />
loco on <strong>the</strong> Program Track. This feature is useful if you do not remember <strong>the</strong> decoder address or what<br />
CV values your decoder has. Not all decoders support this feature. Please read your decoder’s manual<br />
to check whe<strong>the</strong>r it supports this feature.<br />
1. Place <strong>the</strong> loco on <strong>the</strong> Program Track.<br />
2. Press PROG to select “rEAd Prog Track” <strong>the</strong>n press ENTER.<br />
3. First, “Adr” will flash, prompting you to read <strong>the</strong> loco address. Press ENTER to read, this might take<br />
several second. If <strong>the</strong> decoder does not support read back feature, you will receive an “Err” (Error<br />
message).
4. Next “CV#” will flash, prompting you to read a CV. To read a CV, enter a CV number and press<br />
ENTER. After reading a CV, press ENTER. “CV#” will flash again, prompting you to read ano<strong>the</strong>r CV. To<br />
end <strong>the</strong> read process, press ENTER.<br />
More about Decoder Read Back<br />
Not all decoders support <strong>the</strong> read back feature. Although <strong>Prodigy</strong> <strong>Express</strong> has read back functions, it<br />
may still fail to read back <strong>the</strong> decoders. This does not mean that your <strong>Prodigy</strong> <strong>Express</strong> is defective. No<br />
DCC system in <strong>the</strong> world is able to read all decoders 100%. This will not affect <strong>the</strong> operation of <strong>the</strong><br />
decoder because you are always able to program your decoder.<br />
NOTE: The <strong>Prodigy</strong> <strong>Express</strong> will display <strong>the</strong> loco’s active address which could be it’s consist address if<br />
activated.<br />
Configuration Variables – CVs<br />
Configuration Variables, also known as CVs, receive and hold entered data that allow <strong>the</strong> decoder to be<br />
tailored to a specific loco or accessory. Some CVs are also called registers. The <strong>Prodigy</strong> <strong>Express</strong> DCC<br />
system allows you to perform most basic programming without having to concern yourself with CVs or<br />
registers. Of course, if you want to program CVs to custom tailor your decoders or select certain<br />
functions, <strong>the</strong> <strong>Prodigy</strong> <strong>Express</strong> has this capability.<br />
Most Commonly Used CVs<br />
The CVs listed on <strong>the</strong> chart are contained in almost all decoders, with additional CVs for extra functions<br />
– sound or light – in more specialized decoders. See <strong>the</strong> decoder manufacturer’s instruction manual for<br />
a list of CVs contained in that specific decoder and what values to enter for those CVs.<br />
A Word About CV #29<br />
CV29 is <strong>the</strong> most important CV of <strong>the</strong> decoder. Improperly programming <strong>the</strong> CV29 may cause decoder<br />
malfunction. We do not re<strong>com</strong>mend you program CV29 yourself because <strong>the</strong> unit will take care of it for<br />
you in most cases. When you program your decoder’s address with <strong>Prodigy</strong> <strong>Express</strong>, it will<br />
automatically program CV29. If you want to reverse <strong>the</strong> loco’s polarity or set 14 speed steps, you have<br />
to reprogram CV29 after programming <strong>the</strong> loco’s address. Please use <strong>the</strong> following table to reprogram<br />
CV29.<br />
More About Programming Lo<strong>com</strong>otive Address on <strong>the</strong> Program Track or Main Track<br />
To program a lo<strong>com</strong>otive address involves programming a series of CVs such as CV1, CV17, CV18,<br />
CV19 and CV29. This can be somewhat <strong>com</strong>plicated. For most decoders, <strong>Prodigy</strong> <strong>Express</strong><br />
automatically handles this for you when programming <strong>the</strong> loco address. However, it may fail to program<br />
some old decoders and some new sound decoders made by QSI®. It does not mean that you cannot<br />
program <strong>the</strong>se decoders. It only means you cannot use <strong>the</strong> <strong>Prodigy</strong> <strong>Express</strong>’s easy address<br />
programming feature. For QSI® decoders please refer to your decoder’s manual and use CV<br />
programming to program <strong>the</strong> loco address.<br />
<strong>Prodigy</strong> <strong>Express</strong>' default setting CV29 = 2 CV29 = 34<br />
Change polarity only CV29 = 3 CV29 = 35<br />
Change to 14 speed steps only CV29 = 0 CV29 = 32<br />
Change polarity & 14 speed steps CV29 = 1 CV29 = 33<br />
CV # Register # Function<br />
1 1 Short address<br />
2 2 Start voltage<br />
3 3 Acceleration rate (momentum)<br />
4 4 Deceleration rate (momentum)<br />
5 --- Top voltage<br />
6 --- Mid voltage<br />
7 --- Manufacturer version #<br />
8 --- Manufacturer ID #<br />
17 --- Extended address - upper & lower bytes, 4 digit addresses<br />
18 --- Extended address - upper & lower bytes, 4 digit addresses<br />
19 --- Advance consist<br />
29 5 Configuration data #1<br />
For some old decoders, you have to skip <strong>the</strong> Addr programming and use <strong>the</strong> CV program mode to<br />
program CV29 with a value of 2 and CV1 with a short address (1-127). Detailed steps are as follows:<br />
1. Press Prog to select Prog Prog Track<br />
2. Press Enter six times until CV# displays on <strong>the</strong> screen<br />
3. To select CV29, press 29 and Enter<br />
4. CV data displays. Press 2 and Enter<br />
5. CV# displays again. Select CV1 by pressing 1 <strong>the</strong>n press Enter<br />
6. CV data displays. Press <strong>the</strong> loco address (1-127) and <strong>the</strong>n Enter
Consisting<br />
Sometimes more than one loco is needed to haul heavy loads. These grouped locos are known as a<br />
multiple unit or a consist. The <strong>Prodigy</strong> <strong>Express</strong> DCC system allows you to build consists quickly and<br />
easily.<br />
Advanced Consisting<br />
You can only apply Advanced Consisting to a mobile decoder that has CV19 to support this feature.<br />
When you program a loco into an Advanced Consist, you actually program <strong>the</strong> consist number into <strong>the</strong><br />
decoder’s CV19, which will override <strong>the</strong> decoder’s original address. Therefore, <strong>the</strong> loco will no longer<br />
respond to <strong>com</strong>mands addressed to its original address, but ra<strong>the</strong>r only to <strong>com</strong>mands addressed to <strong>the</strong><br />
consist number. All decoders in <strong>the</strong> consist will receive <strong>the</strong> <strong>com</strong>mand addressed to <strong>the</strong> consist number<br />
at <strong>the</strong> same time and act as one until you clear <strong>the</strong> consist. The base unit does not hold <strong>the</strong> consist<br />
information. With Advanced Consists, always remember to clear <strong>the</strong> consist when you are finished or<br />
<strong>the</strong> locos will still run as part of <strong>the</strong> consist next time you use <strong>the</strong>m.<br />
Programming Advanced Consists<br />
1. Press PROG until “Cons SET” flashes in <strong>the</strong> LCD display. Then press ENTER.<br />
2. “Cons #” will display, prompting you to enter a consist number. Enter a consist number, (a short<br />
address 1-127) followed by ENTER.<br />
Note Write down <strong>the</strong> consist number. You will need it later to clear <strong>the</strong> Advanced Consist.<br />
3. “Add Loco” will display, prompting you to add a loco into <strong>the</strong> consist group. Enter <strong>the</strong> address of a<br />
loco you want to add. Press DIRECTION if you want <strong>the</strong> loco’s direction reversed (forward is <strong>the</strong> default<br />
setting). Then press ENTER.<br />
4. “Add Loco” will display again, prompting you to add ano<strong>the</strong>r loco into <strong>the</strong> consist group. You can add<br />
as many locos into your consist as you would like. To end programming, press ENTER.<br />
Running Advanced Consists<br />
Running Advanced Consist is just like running a single loco.<br />
After setting up your consist group, use <strong>the</strong> consist number to run <strong>the</strong> consist.<br />
1. Press <strong>the</strong> LOCO key. Make sure “Loco” appears on <strong>the</strong> LCD. If not, press <strong>the</strong> LOCO key again. Enter<br />
<strong>the</strong> consist number and press ENTER.<br />
2. Turn <strong>the</strong> throttle and all <strong>the</strong> locos in <strong>the</strong> consist will start moving toge<strong>the</strong>r. To control an individual<br />
loco’s accessory functions use ei<strong>the</strong>r <strong>the</strong> consist number or <strong>the</strong> loco’s original address. Read your<br />
decoder’s manual to find how to control <strong>the</strong> accessory functions.<br />
Clearing Advanced Consists<br />
1. Press PROG until “Cons cLr” flashes in <strong>the</strong> display. Then press ENTER.<br />
2. “Cons#” will display, prompting you to input <strong>the</strong> consist number. Enter number of <strong>the</strong> consist you want<br />
to clear and press ENTER.<br />
Once you clear <strong>the</strong> consist, each loco will respond immediately to its original speed <strong>com</strong>mand.<br />
Note If you forget <strong>the</strong> consist number, each loco’s address in <strong>the</strong> consist must be reprogrammed on <strong>the</strong><br />
Program Track, or program CV19 to zero, in each loco.<br />
Many of our DCC manuals are available on-line in our <strong>Download</strong> section<br />
www.gaugemaster.<strong>com</strong>
General Trouble Shooting<br />
It takes <strong>the</strong> Command Station, <strong>the</strong> decoders and your layout to make <strong>the</strong> DCC system work. This<br />
Trouble Shooting Section has been arranged in a manner easiest for you to find <strong>the</strong> cause of your<br />
problem. Please go through this section in <strong>the</strong> exact order it appears because each following set of<br />
instructions assumes that <strong>the</strong> preceding set has been tested and that <strong>com</strong>ponent of <strong>the</strong> DCC system<br />
found not defective.<br />
1. Plug in <strong>the</strong> power supply of <strong>the</strong> base unit. The pilot light should turn on.<br />
If not, make sure <strong>the</strong> power supply is securely plugged into <strong>the</strong> base unit and into a working AC wall<br />
outlet. Then unplug <strong>the</strong> power, wait 3 seconds and plug back in. If power light still does not turn on, send<br />
<strong>the</strong> unit in for repair.<br />
2. Check <strong>the</strong> Main Track output.<br />
Place an analog loco or test light on <strong>the</strong> Main Track. The loco should buzz or <strong>the</strong> test light should light. If<br />
not, check all connections and make sure <strong>the</strong> rear green plug is securely plugged in. Make sure <strong>the</strong><br />
screws on <strong>the</strong> green plug are tightened on <strong>the</strong> wire and not on <strong>the</strong> wire cover (insulator). If <strong>the</strong> analog<br />
loco still does not buzz or <strong>the</strong> test light does not light, send <strong>the</strong> unit in for repair. It is better to use a<br />
V.O.M (multi-meter) on <strong>the</strong> A.C. scale to check for track power, as DCC track power is A.C., not D.C.<br />
3. Check <strong>the</strong> <strong>com</strong>munication between <strong>the</strong> base unit and <strong>the</strong> Cab.<br />
Press key 2. F2 should momentarily display on <strong>the</strong> LCD and <strong>the</strong> Link light should blink. If <strong>the</strong>re is still no<br />
<strong>com</strong>munication, send <strong>the</strong> unit in for repair.<br />
4. Your loco may have a pickup problem.<br />
You should periodically clean your track and your loco’s wheels. Oxide coating or dirt on ei<strong>the</strong>r <strong>the</strong> track<br />
or loco’s wheels often causes intermittent and jerky operation.<br />
If you pass <strong>the</strong> above steps, you’re Command Station and Cabs are fine. The problem may lie in<br />
<strong>the</strong> decoder.<br />
5. Your decoder may have lost its memory or is in Advanced Consist mode (CV19 is not 0).<br />
Reprogram <strong>the</strong> loco address and try again.<br />
6. Your decoder may have too much momentum. Program <strong>the</strong> loco with zero acceleration and<br />
deceleration rates.<br />
7. The current loco speed <strong>com</strong>mand may not match <strong>the</strong> decoder’s speed steps.<br />
Reprogram your decoder’s address. When you program <strong>the</strong> decoder with <strong>Prodigy</strong> <strong>Express</strong> it will<br />
automatically set <strong>the</strong> decoder’s speed steps to 28/128. Select 28 or 128 speed steps on <strong>the</strong> base unit<br />
and <strong>the</strong>n try to run <strong>the</strong> loco.<br />
8. Check <strong>the</strong> decoder wiring and make sure everything is correctly installed.<br />
9. Remove <strong>the</strong> decoder and test it on a decoder tester to make sure <strong>the</strong> decoder is fine.<br />
10. If <strong>the</strong> decoder is fine, check <strong>the</strong> loco to make sure <strong>the</strong> loco is fine before installing <strong>the</strong><br />
decoder.<br />
Checklist for General Problems<br />
1. Clean your layout and <strong>the</strong> loco’s wheels.<br />
2. Check <strong>the</strong> layout’s wiring.<br />
3. Reprogram loco address and o<strong>the</strong>r data.<br />
4. Reset <strong>the</strong> base unit by unplugging power supply.<br />
5. Check loco for proper decoder installation.<br />
6. Check wiring from <strong>the</strong> base unit to your layout.<br />
7. Check for short circuits and/or stray objects lying across track rails.<br />
8. Make sure <strong>the</strong> Link light flashes when you press F2.
Special Trouble Shooting<br />
The loco’s headlight turns itself off<br />
When you press 0 to turn on <strong>the</strong> loco’s headlight, <strong>the</strong> base unit will send <strong>the</strong> <strong>com</strong>mand to <strong>the</strong> decoder to<br />
turn on <strong>the</strong> loco’s headlight. The base unit will not continuously send <strong>the</strong> accessory <strong>com</strong>mand to <strong>the</strong><br />
decoder like <strong>the</strong> speed <strong>com</strong>mand. When <strong>the</strong> loco hits a dirty track and loses its power, it will reset and<br />
lose <strong>the</strong> accessory <strong>com</strong>mand. You should clean <strong>the</strong> track and <strong>the</strong> loco’s wheel to improve <strong>the</strong> loco’s<br />
pickup.<br />
During operation all locos stop responding<br />
Unplug <strong>the</strong> power supply, wait 3 seconds and turn <strong>the</strong> power back on. If all <strong>the</strong> locos start to run and <strong>the</strong><br />
system shuts down again, you may have too many locos and accessories connected to track power.<br />
Remove some locos and try again.<br />
Your loco doesn’t work while o<strong>the</strong>r locos work<br />
The decoder may have lost its memory. Reprogram loco address.<br />
Your Cab operates locos but cannot program on <strong>the</strong> Program Track<br />
If <strong>the</strong> Link light flashes when you enter a data and press ENTER, <strong>the</strong>n test <strong>the</strong> Program Track output.<br />
To test, place an analog loco on <strong>the</strong> Program Track. During <strong>the</strong> programming process, <strong>the</strong> Link light<br />
should be on and <strong>the</strong> analog loco should buzz. If <strong>the</strong> Link light is on and <strong>the</strong> analog loco does not buzz,<br />
it is a defective Program Track output.<br />
Your <strong>Prodigy</strong> <strong>Express</strong> system is designed as a quick and easy introduction into DCC,<br />
replacing <strong>the</strong> hand set with any of <strong>the</strong> <strong>Prodigy</strong> Advance controllers will expand <strong>the</strong><br />
system with additional features. This will include accessory decoder and route<br />
operation – fast clock and old style consisting – extended READ and system options.<br />
PC interface and wireless control is also available with some products.<br />
Your <strong>Prodigy</strong> Advance products carry a 1 YEAR GUARANTEE subject to <strong>the</strong> usual conditions<br />
Your statutory rights are not affected<br />
If you believe your unit is faulty, please telephone us in <strong>the</strong> first instance. We will<br />
advise you of your best course of action. If it involves sending anything back, please<br />
send it to <strong>the</strong> address below via insured post and packed securely.<br />
<strong>Gaugemaster</strong> Controls Ltd, <strong>Gaugemaster</strong> House, Ford Road, Arundel, West Sussex BN18 OBN<br />
Tel. No: 01903 884321 Fax. No: 01903 884377 Email: gaugemaster@gaugemaster.co.uk<br />
Web: www.gaugemaster.<strong>com</strong><br />
Registered in England. Reg. No: 2714470
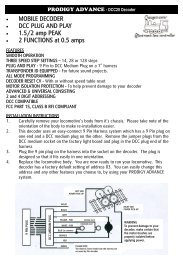
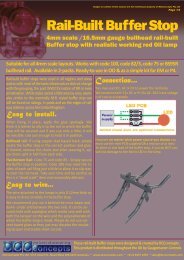
The LCD main display icons are used in all operation to display both numbers<br />
and symbols<br />
Function icons are displayed when operating loco functions<br />
FWD / REV and SPEED icons display <strong>the</strong> loco speed and direction of travel<br />
The LAMP icon (F0) illuminates when <strong>the</strong> loco lights are activated
The MAIN / PROG / TRACK and DATA icons are displayed in programming<br />
and (READ) modes; <strong>the</strong> shift icon is not used on <strong>the</strong> <strong>Express</strong> hand set.
The table below can be used to list loco address and special