Chapter 1 Introduction to Autodesk Inventor - Goodheart-Willcox
Chapter 1 Introduction to Autodesk Inventor - Goodheart-Willcox
Chapter 1 Introduction to Autodesk Inventor - Goodheart-Willcox

You also want an ePaper? Increase the reach of your titles
YUMPU automatically turns print PDFs into web optimized ePapers that Google loves.
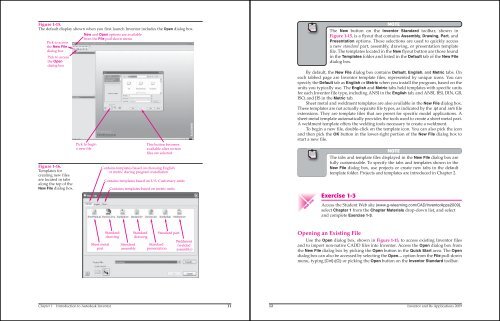
Figure 1-15.<br />
The default display shown when you first launch Inven<strong>to</strong>r includes the Open dialog box.<br />
Pick <strong>to</strong> access<br />
the New File<br />
dialog box<br />
Pick <strong>to</strong> access<br />
the Open<br />
dialog box<br />
Figure 1-16.<br />
Templates for<br />
creating new files<br />
are located in tabs<br />
along the <strong>to</strong>p of the<br />
New File dialog box.<br />
New and Open options are available<br />
from the File pull-down menu<br />
Pick <strong>to</strong> begin<br />
a new file<br />
Sheet metal<br />
part<br />
This but<strong>to</strong>n becomes<br />
available after certain<br />
files are selected<br />
Contains templates based on choosing English<br />
or metric during program installation<br />
Contains templates based on U.S. Cus<strong>to</strong>mary units<br />
Contains templates based on metric units<br />
Standard<br />
drawing<br />
Standard<br />
assembly<br />
Standard<br />
drawing<br />
Standard<br />
presentation<br />
Standard part<br />
Weldment<br />
(welded<br />
assembly)<br />
<strong>Chapter</strong> 1 <strong>Introduction</strong> <strong>to</strong> Au<strong>to</strong>desk Inven<strong>to</strong>r 11<br />
When Au<strong>to</strong>CAD is<br />
configured <strong>to</strong> display<br />
a screen menu, the<br />
commands appear in<br />
a separate screen.<br />
NOTE<br />
The New but<strong>to</strong>n on the Inven<strong>to</strong>r Standard <strong>to</strong>olbar, shown in<br />
Figure 1-15, is a fl yout that contains Assembly, Drawing, Part, and<br />
Presentation options. These selections are used <strong>to</strong> quickly access<br />
a new standard part, assembly, drawing, or presentation template<br />
fi le. The templates located in the New fl yout but<strong>to</strong>n are those found<br />
in the Templates folder and listed in the Default tab of the New File<br />
dialog box.<br />
By default, the New File dialog box contains Default, English, and Metric tabs. On<br />
each tabbed page are Inven<strong>to</strong>r template files, represented by unique icons. You can<br />
specify the Default tab as English or Metric when you install the program, based on the<br />
units you typically use. The English and Metric tabs hold templates with specific units<br />
for each Inven<strong>to</strong>r file type, including ANSI in the English tab, and ANSI, BSI, DIN, GB,<br />
ISO, and JIS in the Metric tab.<br />
Sheet metal and weldment templates are also available in the New File dialog box.<br />
These templates are not actually separate file types, as indicated by the .ipt and .iam file<br />
extensions. They are template files that are preset for specific model applications. A<br />
sheet metal template au<strong>to</strong>matically provides the <strong>to</strong>ols used <strong>to</strong> create a sheet metal part.<br />
A weldment template offers the welding <strong>to</strong>ols necessary <strong>to</strong> create a weldment.<br />
To begin a new file, double-click on the template icon. You can also pick the icon<br />
and then pick the OK but<strong>to</strong>n in the lower-right portion of the New File dialog box <strong>to</strong><br />
start a new file.<br />
When Au<strong>to</strong>CAD is<br />
configured <strong>to</strong> display<br />
a screen menu, the<br />
commands appear in<br />
a separate screen.<br />
Web site<br />
NOTE<br />
The tabs and template fi les displayed in the New File dialog box are<br />
fully cus<strong>to</strong>mizable. To specify the tabs and templates shown in the<br />
New File dialog box, use projects or create new tabs in the default<br />
template folder. Projects and templates are introduced in <strong>Chapter</strong> 2.<br />
Exercise 1-3<br />
Access the Student Web site (www.g-wlearning.com/CAD/Inven<strong>to</strong>rApps2009),<br />
select <strong>Chapter</strong> 1 from the <strong>Chapter</strong> Materials drop-down list, and select<br />
and complete Exercise 1-3.<br />
Opening an Existing File<br />
Use the Open dialog box, shown in Figure 1-15, <strong>to</strong> access existing Inven<strong>to</strong>r files<br />
and <strong>to</strong> import non-native CADD files in<strong>to</strong> Inven<strong>to</strong>r. Access the Open dialog box from<br />
the New File dialog box by picking the Open but<strong>to</strong>n in the Quick Start area. The Open<br />
dialog box can also be accessed by selecting the Open… option from the File pull-down<br />
menu, typing [Ctrl]+[O]; or picking the Open but<strong>to</strong>n on the Inven<strong>to</strong>r Standard <strong>to</strong>olbar.<br />
12 Inven<strong>to</strong>r and Its Applications 2009