Chapter 1 Introduction to Autodesk Inventor - Goodheart-Willcox
Chapter 1 Introduction to Autodesk Inventor - Goodheart-Willcox
Chapter 1 Introduction to Autodesk Inventor - Goodheart-Willcox

You also want an ePaper? Increase the reach of your titles
YUMPU automatically turns print PDFs into web optimized ePapers that Google loves.
When Au<strong>to</strong>CAD is<br />
configured <strong>to</strong> display<br />
a screen menu, the<br />
commands appear in<br />
a separate screen.<br />
NOTE<br />
You can open existing fi les directly from Microsoft Windows<br />
Explorer, or you may be able <strong>to</strong> fi nd fi les using the quick document<br />
access area located near the bot<strong>to</strong>m of the File pull-down menu. This<br />
area lists the path and fi le name of several previously used documents.<br />
The fi les are listed in the order they were opened, and each<br />
path is associated with a number. Number 1 is the most recently<br />
opened fi le.<br />
When you access the Open dialog box, the folder assigned <strong>to</strong> the active project<br />
is displayed, allowing you <strong>to</strong> quickly access files associated with the active project.<br />
However, you can navigate <strong>to</strong> any file on your computer or the network. Files do not<br />
have <strong>to</strong> be in the active project <strong>to</strong> be opened. The Open dialog box functions much like<br />
similar dialog boxes found in other Windows applications.<br />
Use the Files of type drop-down list <strong>to</strong> specify the type of files <strong>to</strong> display in the<br />
Open dialog box. Then use the Look in drop-down list, the Go To Last Folder Visited,<br />
Up One Level, Create New Folder, and View Menu but<strong>to</strong>ns along the <strong>to</strong>p of the dialog<br />
box, and the Preview area as needed <strong>to</strong> locate the desired file. Once you select a file,<br />
the Options... but<strong>to</strong>n may become available. Picking this but<strong>to</strong>n opens the File Open<br />
Options dialog box. The choices available in this dialog box vary depending on the<br />
selected file type. To open a file, double-click on the file icon, or pick the icon and then<br />
pick the Open but<strong>to</strong>n in the lower-right portion of the New File dialog box.<br />
When Au<strong>to</strong>CAD is<br />
configured <strong>to</strong> display<br />
a screen menu, the<br />
commands appear in<br />
a separate screen.<br />
Web site<br />
PROFESSIONAL TIP<br />
If you forget where an Inven<strong>to</strong>r fi le has been placed, you can use the<br />
Windows search <strong>to</strong>ol <strong>to</strong> fi nd it, but Inven<strong>to</strong>r also has a method of<br />
fi nding fi les that may be quicker. The Inven<strong>to</strong>r search <strong>to</strong>ol is conveniently<br />
located in the Open dialog box. Pick the Find... but<strong>to</strong>n <strong>to</strong> open<br />
the Find: Inven<strong>to</strong>r Files dialog box.<br />
NOTE<br />
Double-clicking on an Inven<strong>to</strong>r fi le in Microsoft Windows Explorer<br />
causes Inven<strong>to</strong>r <strong>to</strong> start, if it is not already running, and opens the<br />
selected fi le.<br />
Exercise 1-4<br />
Access the Student Web site (www.g-wlearning.com/CAD/Inven<strong>to</strong>rApps2009),<br />
select <strong>Chapter</strong> 1 from the <strong>Chapter</strong> Materials drop-down list, and select<br />
and complete Exercise 1-4.<br />
Saving Your Work<br />
A model or drawing you want <strong>to</strong> keep must be saved. Typically, the first step<br />
in creating a model or drawing is <strong>to</strong> save the file in an appropriate location using a<br />
descriptive name or code. Then, as you work, save the file frequently; at least every five<br />
<strong>to</strong> ten minutes, in case of a sudden loss of power or a computer problem that may cause<br />
the loss of your file.<br />
<strong>Chapter</strong> 1 <strong>Introduction</strong> <strong>to</strong> Au<strong>to</strong>desk Inven<strong>to</strong>r 13<br />
Using the Save Tool<br />
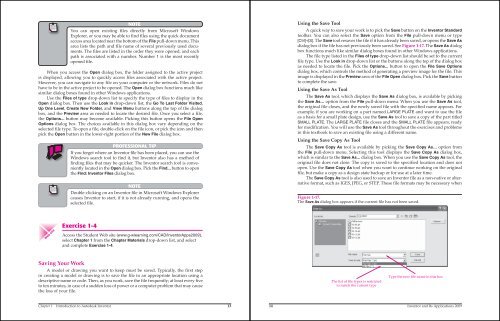
A quick way <strong>to</strong> save your work is <strong>to</strong> pick the Save but<strong>to</strong>n on the Inven<strong>to</strong>r Standard<br />
<strong>to</strong>olbar. You can also select the Save option from the File pull-down menu or type<br />
[Ctrl]+[S]. The Save <strong>to</strong>ol resaves the file if it has already been saved, or opens the Save As<br />
dialog box if the file has not previously been saved. See Figure 1-17. The Save As dialog<br />
box functions much like similar dialog boxes found in other Windows applications.<br />
The file type listed in the Files of type drop-down list should be set <strong>to</strong> the current<br />
file type. Use the Look in drop-down list or the but<strong>to</strong>ns along the <strong>to</strong>p of the dialog box<br />
as needed <strong>to</strong> locate the file. Pick the Options... but<strong>to</strong>n <strong>to</strong> open the File Save Options<br />
dialog box, which controls the method of generating a preview image for the file. This<br />
image is displayed in the Preview area of the File Open dialog box. Pick the Save but<strong>to</strong>n<br />
<strong>to</strong> complete the save.<br />
Using the Save As Tool<br />
The Save As <strong>to</strong>ol, which displays the Save As dialog box, is available by picking<br />
the Save As… option from the File pull-down menu. When you use the Save As <strong>to</strong>ol,<br />
the original file closes, and the newly saved file with the specified name appears. For<br />
example, if you are working on a part named LARGE PLATE and want <strong>to</strong> use the file<br />
as a basis for a small plate design, use the Save As <strong>to</strong>ol <strong>to</strong> save a copy of the part titled<br />
SMALL PLATE. The LARGE PLATE file closes and the SMALL PLATE file appears, ready<br />
for modification. You will use the Save As <strong>to</strong>ol throughout the exercises and problems<br />
in this textbook <strong>to</strong> save an existing file using a different name.<br />
Using the Save Copy As Tool<br />
The Save Copy As <strong>to</strong>ol is available by picking the Save Copy As… option from<br />
the File pull-down menu. Selecting this <strong>to</strong>ol displays the Save Copy As dialog box,<br />
which is similar <strong>to</strong> the Save As... dialog box. When you use the Save Copy As <strong>to</strong>ol, the<br />
original file does not close. The copy is saved <strong>to</strong> the specified location and does not<br />
open. Use the Save Copy As <strong>to</strong>ol when you want <strong>to</strong> continue working on the original<br />
file, but make a copy as a design state backup or for use at a later time.<br />
The Save Copy As <strong>to</strong>ol is also used <strong>to</strong> save an Inven<strong>to</strong>r file as a non-native or alternative<br />
format, such as IGES, JPEG, or STEP. These file formats may be necessary when<br />
Figure 1-17.<br />
The Save As dialog box appears if the current file has not been saved.<br />
The list of file types is restricted<br />
<strong>to</strong> match the current type<br />
Type the new file name in this box<br />
14 Inven<strong>to</strong>r and Its Applications 2009