Rail-Built Buffer Stop - Gaugemaster.com
Rail-Built Buffer Stop - Gaugemaster.com
Rail-Built Buffer Stop - Gaugemaster.com

Create successful ePaper yourself
Turn your PDF publications into a flip-book with our unique Google optimized e-Paper software.
Images & content of this manual are the intellectual property of DCCconcepts Pty Ltd<br />
Page 3/4<br />
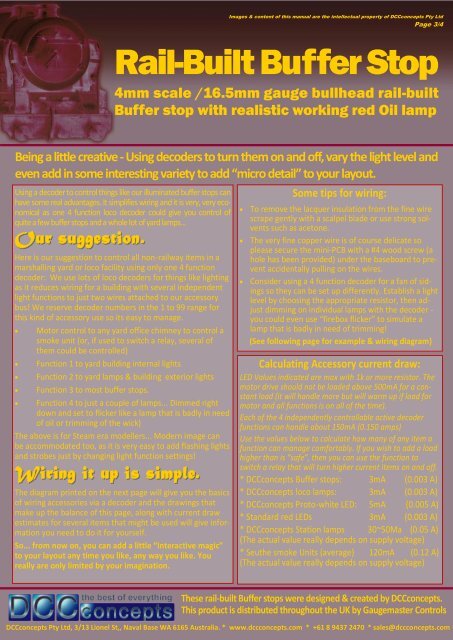
<strong>Rail</strong>-<strong>Built</strong> <strong>Buffer</strong> <strong>Stop</strong><br />
4mm scale /16.5mm gauge bullhead rail-built<br />
<strong>Buffer</strong> stop with realistic working red Oil lamp<br />
Being a little creative - Using decoders to turn them on and off, vary the light level and<br />
even add in some interesting variety to add “micro detail” to your layout.<br />
Using a decoder to control things like our illuminated buffer stops can<br />
have some real advantages. It simplifies wiring and it is very, very economical<br />
as one 4 function loco decoder could give you control of<br />
quite a few buffer stops and a whole lot of yard lamps...<br />
Our suggestion.<br />
Here is our suggestion to control all non-railway items in a<br />
marshalling yard or loco facility using only one 4 function<br />
decoder: We use lots of loco decoders for things like lighting<br />
as it reduces wiring for a building with several independent<br />
light functions to just two wires attached to our accessory<br />
bus! We reserve decoder numbers in the 1 to 99 range for<br />
this kind of accessory use so its easy to manage.<br />
Motor control to any yard office chimney to control a<br />
smoke unit (or, if used to switch a relay, several of<br />
them could be controlled)<br />
Function 1 to yard building internal lights<br />
Function 2 to yard lamps & building exterior lights<br />
Function 3 to most buffer stops.<br />
Function 4 to just a couple of lamps... Dimmed right<br />
down and set to flicker like a lamp that is badly in need<br />
of oil or trimming of the wick)<br />
The above is for Steam era modellers... Modern image can<br />
be ac<strong>com</strong>modated too, as it is very easy to add flashing lights<br />
and strobes just by changing light function settings!<br />
Wiring it up is simple.<br />
The diagram printed on the next page will give you the basics<br />
of wiring accessories via a decoder and the drawings that<br />
make up the balance of this page, along with current draw<br />
estimates for several items that might be used will give information<br />
you need to do it for yourself.<br />
So... from now on, you can add a little “Interactive magic”<br />
to your layout any time you like, any way you like. You<br />
really are only limited by your imagination.<br />
Some tips for wiring:<br />
To remove the lacquer insulation from the fine wire<br />
scrape gently with a scalpel blade or use strong solvents<br />
such as acetone.<br />
The very fine copper wire is of course delicate so<br />
please secure the mini-PCB with a #4 wood screw (a<br />
hole has been provided) under the baseboard to prevent<br />
accidentally pulling on the wires.<br />
Consider using a 4 function decoder for a fan of sidings<br />
so they can be set up differently. Establish a light<br />
level by choosing the appropriate resistor, then adjust<br />
dimming on individual lamps with the decoder -<br />
you could even use “firebox flicker” to simulate a<br />
lamp that is badly in need of trimming!<br />
(See following page for example & wiring diagram)<br />
Calculating Accessory current draw:<br />
LED Values indicated are max with 1k or more resistor. The<br />
motor drive should not be loaded above 500mA for a constant<br />
load (it will handle more but will warm up if load for<br />
motor and all functions is on all of the time).<br />
Each of the 4 independently controllable active decoder<br />
functions can handle about 150mA (0.150 amps)<br />
Use the values below to calculate how many of any item a<br />
function can manage <strong>com</strong>fortably. If you wish to add a load<br />
higher than is “safe”, then you can use the function to<br />
switch a relay that will turn higher current items on and off.<br />
* DCCconcepts <strong>Buffer</strong> stops: 3mA (0.003 A)<br />
* DCCconcepts loco lamps: 3mA (0.003 A)<br />
* DCCconcepts Proto-white LED: 5mA (0.005 A)<br />
* Standard red LEDs 3mA (0.003 A)<br />
* DCCconcepts Station lamps 30~50Ma (0.05 A)<br />
(The actual value really depends on supply voltage)<br />
* Seuthe smoke Units (average) 120mA (0.12 A)<br />
(The actual value really depends on supply voltage)<br />
These rail-built <strong>Buffer</strong> stops were designed & created by DCCconcepts.<br />
This product is distributed throughout the UK by <strong>Gaugemaster</strong> Controls<br />
DCCconcepts Pty Ltd, 3/13 Lionel St,, Naval Base WA 6165 Australia. * www.dccconcepts.<strong>com</strong> * +61 8 9437 2470 * sales@dccconcepts.<strong>com</strong>