MC68HC908JW32, MC68HC908JW32 - Data Sheet - Freescale
MC68HC908JW32, MC68HC908JW32 - Data Sheet - Freescale
MC68HC908JW32, MC68HC908JW32 - Data Sheet - Freescale

You also want an ePaper? Increase the reach of your titles
YUMPU automatically turns print PDFs into web optimized ePapers that Google loves.
<strong>MC68HC908JW32</strong><br />
<strong>Data</strong> <strong>Sheet</strong><br />
M68HC08<br />
Microcontrollers<br />
<strong>MC68HC908JW32</strong><br />
Rev. 6<br />
3/2009<br />
freescale.com
<strong>MC68HC908JW32</strong><br />
<strong>Data</strong> <strong>Sheet</strong><br />
To provide the most up-to-date information, the revision of our documents on the World Wide Web will be<br />
the most current. Your printed copy may be an earlier revision. To verify you have the latest information<br />
available, refer to:<br />
http://www.freescale.com<br />
<strong>Freescale</strong> and the <strong>Freescale</strong> logo are trademarks of <strong>Freescale</strong> Semiconductor, Inc.<br />
This product incorporates SuperFlash® technology licensed from SST.<br />
© <strong>Freescale</strong> Semiconductor, Inc., 2005, 2006, 2009. All rights reserved.<br />
<strong>MC68HC908JW32</strong> <strong>Data</strong> <strong>Sheet</strong>, Rev. 6<br />
<strong>Freescale</strong> Semiconductor 3
The following revision history table summarizes changes contained in this document. For your<br />
convenience, the page number designators have been linked to the appropriate location.<br />
Revision History<br />
Date<br />
Revision<br />
Level<br />
Description<br />
January, 2005 2 First general release.<br />
March, 2005 3<br />
Second general release.<br />
Cleaned typos.<br />
Table 4-1. Instruction Set Summary — Updated definition for the STOP instruction and<br />
added WAIT instruction.<br />
5.4 I/O Signals — Removed subsections referring to VDDA and VSSA .<br />
October, 2006 4<br />
Figure 5-1. CGM Block Diagram — Corrected references to V DDA and<br />
V SSA to V DD and V SS .<br />
Figure 5-3. CGM External Connections — Removed V DD connection to V DDPLL.<br />
Figure 5-10. PLL Filter — Corrected reference to V SSA to V SS .<br />
Figure 7-1. Monitor Mode Circuit — Corrected V DDPLL connection.<br />
October, 2006 5<br />
Chapter 20 Ordering Information and Mechanical Specifications — Combined ordering<br />
information and mechanical specifications. Updated package dimensions to the latest<br />
available at time of publication.<br />
1.7.2 Analog Power Supply (VDDPLL and VSSPLL ) — Reworked for clarity.<br />
March, 2009 6<br />
Figure 1-3. 48-Pin LQFP and QFN Pin Assignment — Corrected pin numbers 37 through 48<br />
Added 48-pin LQFP package information<br />
Added 52-pin LQFP package information<br />
Added five port B pins for the 52-pin package, and added supporting information<br />
In Table 5-1. Numeric Examples, corrected numeric example values<br />
In Chapter 6 System Integration Module (SIM), updated functional details<br />
In Chapter 7 Monitor Mode (MON), updated and corrected functional details<br />
In Chapter 18 Break Module (BRK), corrected break module information<br />
In 19.8 Crystal Oscillator Characteristics, corrected crystal characteristics<br />
<strong>MC68HC908JW32</strong> <strong>Data</strong> <strong>Sheet</strong>, Rev. 6<br />
4 <strong>Freescale</strong> Semiconductor
List of Chapters<br />
Chapter 1 General Description. . . . . . . . . . . . . . . . . . . . . . . . . . . . . . . . . . . . . . . . . . . . . . . .17<br />
Chapter 2 Memory. . . . . . . . . . . . . . . . . . . . . . . . . . . . . . . . . . . . . . . . . . . . . . . . . . . . . . . . . .25<br />
Chapter 3 Configuration Registers (CONFIG) . . . . . . . . . . . . . . . . . . . . . . . . . . . . . . . . . . .41<br />
Chapter 4 Central Processor Unit (CPU). . . . . . . . . . . . . . . . . . . . . . . . . . . . . . . . . . . . . . . .45<br />
Chapter 5 Clock Generator Module (CGM) . . . . . . . . . . . . . . . . . . . . . . . . . . . . . . . . . . . . . .57<br />
Chapter 6 System Integration Module (SIM) . . . . . . . . . . . . . . . . . . . . . . . . . . . . . . . . . . . . .75<br />
Chapter 7 Monitor Mode (MON) . . . . . . . . . . . . . . . . . . . . . . . . . . . . . . . . . . . . . . . . . . . . . . .93<br />
Chapter 8 Timer Interface Module (TIM) . . . . . . . . . . . . . . . . . . . . . . . . . . . . . . . . . . . . . . .107<br />
Chapter 9 Timebase Module (TBM) . . . . . . . . . . . . . . . . . . . . . . . . . . . . . . . . . . . . . . . . . . .123<br />
Chapter 10 Serial Peripheral Interface Module (SPI) . . . . . . . . . . . . . . . . . . . . . . . . . . . . .127<br />
Chapter 11 USB 2.0 FS Module . . . . . . . . . . . . . . . . . . . . . . . . . . . . . . . . . . . . . . . . . . . . . .147<br />
Chapter 12 PS2 Clock Generator (PS2CLK) . . . . . . . . . . . . . . . . . . . . . . . . . . . . . . . . . . . .163<br />
Chapter 13 Input/Output (I/O) Ports. . . . . . . . . . . . . . . . . . . . . . . . . . . . . . . . . . . . . . . . . . .167<br />
Chapter 14 External Interrupt (IRQ). . . . . . . . . . . . . . . . . . . . . . . . . . . . . . . . . . . . . . . . . . .185<br />
Chapter 15 Keyboard Interrupt Module (KBI) . . . . . . . . . . . . . . . . . . . . . . . . . . . . . . . . . . .191<br />
Chapter 16 Computer Operating Properly (COP) . . . . . . . . . . . . . . . . . . . . . . . . . . . . . . . .197<br />
Chapter 17 Low-Voltage Inhibit (LVI). . . . . . . . . . . . . . . . . . . . . . . . . . . . . . . . . . . . . . . . . .201<br />
Chapter 18 Break Module (BRK) . . . . . . . . . . . . . . . . . . . . . . . . . . . . . . . . . . . . . . . . . . . . .205<br />
Chapter 19 Electrical Specifications . . . . . . . . . . . . . . . . . . . . . . . . . . . . . . . . . . . . . . . . . .211<br />
Chapter 20 Ordering Information and Mechanical Specifications . . . . . . . . . . . . . . . . . .221<br />
<strong>MC68HC908JW32</strong> <strong>Data</strong> <strong>Sheet</strong>, Rev. 6<br />
<strong>Freescale</strong> Semiconductor 5
List of Chapters<br />
<strong>MC68HC908JW32</strong> <strong>Data</strong> <strong>Sheet</strong>, Rev. 6<br />
6 <strong>Freescale</strong> Semiconductor
Table of Contents<br />
List of Chapters<br />
Table of Contents<br />
Chapter 1<br />
General Description<br />
1.1 Introduction . . . . . . . . . . . . . . . . . . . . . . . . . . . . . . . . . . . . . . . . . . . . . . . . . . . . . . . . . . . . . . . . 17<br />
1.2 Features. . . . . . . . . . . . . . . . . . . . . . . . . . . . . . . . . . . . . . . . . . . . . . . . . . . . . . . . . . . . . . . . . . . 17<br />
1.3 MCU Block Diagram . . . . . . . . . . . . . . . . . . . . . . . . . . . . . . . . . . . . . . . . . . . . . . . . . . . . . . . . . 18<br />
1.4 Pin Assignments . . . . . . . . . . . . . . . . . . . . . . . . . . . . . . . . . . . . . . . . . . . . . . . . . . . . . . . . . . . . 19<br />
1.5 Clock Tree . . . . . . . . . . . . . . . . . . . . . . . . . . . . . . . . . . . . . . . . . . . . . . . . . . . . . . . . . . . . . . . . . 20<br />
1.6 Power Management. . . . . . . . . . . . . . . . . . . . . . . . . . . . . . . . . . . . . . . . . . . . . . . . . . . . . . . . . . 21<br />
1.7 Pin Function . . . . . . . . . . . . . . . . . . . . . . . . . . . . . . . . . . . . . . . . . . . . . . . . . . . . . . . . . . . . . . . . 21<br />
1.7.1 Power Supply Pins (V DD and V SS ). . . . . . . . . . . . . . . . . . . . . . . . . . . . . . . . . . . . . . . . . . . . 21<br />
1.7.2 Analog Power Supply (V DDPLL and V SSPLL ) . . . . . . . . . . . . . . . . . . . . . . . . . . . . . . . . . . . . 22<br />
1.7.3 Internal Voltage Regulator Supply (REG25V, REG33V, and V SS33 ) . . . . . . . . . . . . . . . . . . 22<br />
1.7.4 Oscillator Pins (OSC1 and OSC2) . . . . . . . . . . . . . . . . . . . . . . . . . . . . . . . . . . . . . . . . . . . . 22<br />
1.7.5 External Reset Pin (RST). . . . . . . . . . . . . . . . . . . . . . . . . . . . . . . . . . . . . . . . . . . . . . . . . . . 23<br />
1.7.6 External Interrupt Pin (IRQ) . . . . . . . . . . . . . . . . . . . . . . . . . . . . . . . . . . . . . . . . . . . . . . . . . 23<br />
1.7.7 External Filter Capacitor Pin (CGMXFC) . . . . . . . . . . . . . . . . . . . . . . . . . . . . . . . . . . . . . . . 23<br />
1.7.8 Port A Input/Output (I/O) Pins (PTA7–PTA0). . . . . . . . . . . . . . . . . . . . . . . . . . . . . . . . . . . . 23<br />
1.7.9 Port B Input/Output (I/O) Pins (PTB7–PTB0). . . . . . . . . . . . . . . . . . . . . . . . . . . . . . . . . . . . 23<br />
1.7.10 Port C Input/Output (I/O) Pins (PTC3–PTC0) . . . . . . . . . . . . . . . . . . . . . . . . . . . . . . . . . . . 23<br />
1.7.11 Port D Input/Output (I/O) Pins (PTD7–PTD0) . . . . . . . . . . . . . . . . . . . . . . . . . . . . . . . . . . . 23<br />
1.7.12 Port E Input/Output (I/O) Pins (PTE7–PTE2). . . . . . . . . . . . . . . . . . . . . . . . . . . . . . . . . . . . 23<br />
Chapter 2<br />
Memory<br />
2.1 Introduction . . . . . . . . . . . . . . . . . . . . . . . . . . . . . . . . . . . . . . . . . . . . . . . . . . . . . . . . . . . . . . . . 25<br />
2.2 Input/Output I/O Section . . . . . . . . . . . . . . . . . . . . . . . . . . . . . . . . . . . . . . . . . . . . . . . . . . . . . . 25<br />
2.3 Monitor ROM . . . . . . . . . . . . . . . . . . . . . . . . . . . . . . . . . . . . . . . . . . . . . . . . . . . . . . . . . . . . . . . 25<br />
2.4 Random-Access Memory (RAM) . . . . . . . . . . . . . . . . . . . . . . . . . . . . . . . . . . . . . . . . . . . . . . . . 35<br />
2.5 FLASH Memory . . . . . . . . . . . . . . . . . . . . . . . . . . . . . . . . . . . . . . . . . . . . . . . . . . . . . . . . . . . . . 35<br />
2.5.1 Functional Description . . . . . . . . . . . . . . . . . . . . . . . . . . . . . . . . . . . . . . . . . . . . . . . . . . . . . 35<br />
2.5.2 FLASH Control Register. . . . . . . . . . . . . . . . . . . . . . . . . . . . . . . . . . . . . . . . . . . . . . . . . . . . 36<br />
2.5.3 FLASH Page Erase Operation . . . . . . . . . . . . . . . . . . . . . . . . . . . . . . . . . . . . . . . . . . . . . . . 36<br />
2.5.4 FLASH Mass Erase Operation. . . . . . . . . . . . . . . . . . . . . . . . . . . . . . . . . . . . . . . . . . . . . . . 37<br />
2.5.5 FLASH Program Operation . . . . . . . . . . . . . . . . . . . . . . . . . . . . . . . . . . . . . . . . . . . . . . . . . 37<br />
2.5.6 FLASH Protection . . . . . . . . . . . . . . . . . . . . . . . . . . . . . . . . . . . . . . . . . . . . . . . . . . . . . . . . 38<br />
2.5.7 FLASH Block Protect Register . . . . . . . . . . . . . . . . . . . . . . . . . . . . . . . . . . . . . . . . . . . . . . . 40<br />
<strong>MC68HC908JW32</strong> <strong>Data</strong> <strong>Sheet</strong>, Rev. 6<br />
<strong>Freescale</strong> Semiconductor 7
Table of Contents<br />
Chapter 3<br />
Configuration Registers (CONFIG)<br />
3.1 Introduction . . . . . . . . . . . . . . . . . . . . . . . . . . . . . . . . . . . . . . . . . . . . . . . . . . . . . . . . . . . . . . . . 41<br />
3.2 Functional Description . . . . . . . . . . . . . . . . . . . . . . . . . . . . . . . . . . . . . . . . . . . . . . . . . . . . . . . . 41<br />
3.3 Configuration Register 1 (CONFIG1). . . . . . . . . . . . . . . . . . . . . . . . . . . . . . . . . . . . . . . . . . . . . 42<br />
3.4 Configuration Register 2 (CONFIG2). . . . . . . . . . . . . . . . . . . . . . . . . . . . . . . . . . . . . . . . . . . . . 43<br />
Chapter 4<br />
Central Processor Unit (CPU)<br />
4.1 Introduction . . . . . . . . . . . . . . . . . . . . . . . . . . . . . . . . . . . . . . . . . . . . . . . . . . . . . . . . . . . . . . . . 45<br />
4.2 Features. . . . . . . . . . . . . . . . . . . . . . . . . . . . . . . . . . . . . . . . . . . . . . . . . . . . . . . . . . . . . . . . . . . 45<br />
4.3 CPU Registers . . . . . . . . . . . . . . . . . . . . . . . . . . . . . . . . . . . . . . . . . . . . . . . . . . . . . . . . . . . . . . 45<br />
4.3.1 Accumulator . . . . . . . . . . . . . . . . . . . . . . . . . . . . . . . . . . . . . . . . . . . . . . . . . . . . . . . . . . . . . 46<br />
4.3.2 Index Register . . . . . . . . . . . . . . . . . . . . . . . . . . . . . . . . . . . . . . . . . . . . . . . . . . . . . . . . . . . 46<br />
4.3.3 Stack Pointer . . . . . . . . . . . . . . . . . . . . . . . . . . . . . . . . . . . . . . . . . . . . . . . . . . . . . . . . . . . . 47<br />
4.3.4 Program Counter . . . . . . . . . . . . . . . . . . . . . . . . . . . . . . . . . . . . . . . . . . . . . . . . . . . . . . . . . 47<br />
4.3.5 Condition Code Register . . . . . . . . . . . . . . . . . . . . . . . . . . . . . . . . . . . . . . . . . . . . . . . . . . . 48<br />
4.4 Arithmetic/Logic Unit (ALU) . . . . . . . . . . . . . . . . . . . . . . . . . . . . . . . . . . . . . . . . . . . . . . . . . . . . 49<br />
4.5 Low-Power Modes . . . . . . . . . . . . . . . . . . . . . . . . . . . . . . . . . . . . . . . . . . . . . . . . . . . . . . . . . . . 49<br />
4.5.1 Wait Mode . . . . . . . . . . . . . . . . . . . . . . . . . . . . . . . . . . . . . . . . . . . . . . . . . . . . . . . . . . . . . . 49<br />
4.5.2 Stop Mode . . . . . . . . . . . . . . . . . . . . . . . . . . . . . . . . . . . . . . . . . . . . . . . . . . . . . . . . . . . . . . 49<br />
4.6 CPU During Break Interrupts . . . . . . . . . . . . . . . . . . . . . . . . . . . . . . . . . . . . . . . . . . . . . . . . . . . 49<br />
4.7 Instruction Set Summary . . . . . . . . . . . . . . . . . . . . . . . . . . . . . . . . . . . . . . . . . . . . . . . . . . . . . . 50<br />
4.8 Opcode Map . . . . . . . . . . . . . . . . . . . . . . . . . . . . . . . . . . . . . . . . . . . . . . . . . . . . . . . . . . . . . . . 55<br />
Chapter 5<br />
Clock Generator Module (CGM)<br />
5.1 Introduction . . . . . . . . . . . . . . . . . . . . . . . . . . . . . . . . . . . . . . . . . . . . . . . . . . . . . . . . . . . . . . . . 57<br />
5.2 Features. . . . . . . . . . . . . . . . . . . . . . . . . . . . . . . . . . . . . . . . . . . . . . . . . . . . . . . . . . . . . . . . . . . 57<br />
5.3 Functional Description . . . . . . . . . . . . . . . . . . . . . . . . . . . . . . . . . . . . . . . . . . . . . . . . . . . . . . . . 57<br />
5.3.1 Oscillator Module . . . . . . . . . . . . . . . . . . . . . . . . . . . . . . . . . . . . . . . . . . . . . . . . . . . . . . . . . 59<br />
5.3.2 Phase-Locked Loop Circuit (PLL) . . . . . . . . . . . . . . . . . . . . . . . . . . . . . . . . . . . . . . . . . . . . 59<br />
5.3.3 PLL Circuits . . . . . . . . . . . . . . . . . . . . . . . . . . . . . . . . . . . . . . . . . . . . . . . . . . . . . . . . . . . . . 60<br />
5.3.4 Acquisition and Tracking Modes . . . . . . . . . . . . . . . . . . . . . . . . . . . . . . . . . . . . . . . . . . . . . 61<br />
5.3.5 Manual and Automatic PLL Bandwidth Modes . . . . . . . . . . . . . . . . . . . . . . . . . . . . . . . . . . 61<br />
5.3.6 Programming the PLL . . . . . . . . . . . . . . . . . . . . . . . . . . . . . . . . . . . . . . . . . . . . . . . . . . . . . 62<br />
5.3.7 Special Programming Exceptions . . . . . . . . . . . . . . . . . . . . . . . . . . . . . . . . . . . . . . . . . . . . 64<br />
5.3.8 Base Clock Selector Circuit . . . . . . . . . . . . . . . . . . . . . . . . . . . . . . . . . . . . . . . . . . . . . . . . . 64<br />
5.3.9 CGM External Connections . . . . . . . . . . . . . . . . . . . . . . . . . . . . . . . . . . . . . . . . . . . . . . . . . 65<br />
5.4 I/O Signals . . . . . . . . . . . . . . . . . . . . . . . . . . . . . . . . . . . . . . . . . . . . . . . . . . . . . . . . . . . . . . . . . 66<br />
5.4.1 Crystal Amplifier Input Pin (OSC1). . . . . . . . . . . . . . . . . . . . . . . . . . . . . . . . . . . . . . . . . . . . 66<br />
5.4.2 Crystal Amplifier Output Pin (OSC2) . . . . . . . . . . . . . . . . . . . . . . . . . . . . . . . . . . . . . . . . . . 66<br />
5.4.3 External Filter Capacitor Pin (CGMXFC) . . . . . . . . . . . . . . . . . . . . . . . . . . . . . . . . . . . . . . . 66<br />
5.4.4 Oscillator Output Frequency Signal (CGMXCLK) . . . . . . . . . . . . . . . . . . . . . . . . . . . . . . . . 66<br />
5.4.5 CGM Reference Clock (CGMRCLK) . . . . . . . . . . . . . . . . . . . . . . . . . . . . . . . . . . . . . . . . . . 66<br />
<strong>MC68HC908JW32</strong> <strong>Data</strong> <strong>Sheet</strong>, Rev. 6<br />
8 <strong>Freescale</strong> Semiconductor
5.4.6 CGM VCO Clock Output (CGMVCLK) . . . . . . . . . . . . . . . . . . . . . . . . . . . . . . . . . . . . . . . . . 66<br />
5.4.7 CGM Base Clock Output (CGMOUT) . . . . . . . . . . . . . . . . . . . . . . . . . . . . . . . . . . . . . . . . . 66<br />
5.4.8 CGM CPU Interrupt (CGMINT) . . . . . . . . . . . . . . . . . . . . . . . . . . . . . . . . . . . . . . . . . . . . . . 66<br />
5.5 CGM Registers . . . . . . . . . . . . . . . . . . . . . . . . . . . . . . . . . . . . . . . . . . . . . . . . . . . . . . . . . . . . . 67<br />
5.5.1 PLL Control Register . . . . . . . . . . . . . . . . . . . . . . . . . . . . . . . . . . . . . . . . . . . . . . . . . . . . . . 67<br />
5.5.2 PLL Bandwidth Control Register . . . . . . . . . . . . . . . . . . . . . . . . . . . . . . . . . . . . . . . . . . . . . 69<br />
5.5.3 PLL Multiplier Select Registers . . . . . . . . . . . . . . . . . . . . . . . . . . . . . . . . . . . . . . . . . . . . . . 70<br />
5.5.4 PLL VCO Range Select Register . . . . . . . . . . . . . . . . . . . . . . . . . . . . . . . . . . . . . . . . . . . . . 70<br />
5.5.5 PLL Reference Divider Select Register . . . . . . . . . . . . . . . . . . . . . . . . . . . . . . . . . . . . . . . . 71<br />
5.6 Interrupts . . . . . . . . . . . . . . . . . . . . . . . . . . . . . . . . . . . . . . . . . . . . . . . . . . . . . . . . . . . . . . . . . . 71<br />
5.7 Special Modes . . . . . . . . . . . . . . . . . . . . . . . . . . . . . . . . . . . . . . . . . . . . . . . . . . . . . . . . . . . . . . 72<br />
5.7.1 Wait Mode . . . . . . . . . . . . . . . . . . . . . . . . . . . . . . . . . . . . . . . . . . . . . . . . . . . . . . . . . . . . . . 72<br />
5.7.2 Stop Mode . . . . . . . . . . . . . . . . . . . . . . . . . . . . . . . . . . . . . . . . . . . . . . . . . . . . . . . . . . . . . . 72<br />
5.7.3 CGM During Break Interrupts. . . . . . . . . . . . . . . . . . . . . . . . . . . . . . . . . . . . . . . . . . . . . . . . 72<br />
5.8 Acquisition/Lock Time Specifications. . . . . . . . . . . . . . . . . . . . . . . . . . . . . . . . . . . . . . . . . . . . . 73<br />
5.8.1 Acquisition/Lock Time Definitions . . . . . . . . . . . . . . . . . . . . . . . . . . . . . . . . . . . . . . . . . . . . 73<br />
5.8.2 Parametric Influences on Reaction Time . . . . . . . . . . . . . . . . . . . . . . . . . . . . . . . . . . . . . . . 73<br />
5.8.3 Choosing a Filter . . . . . . . . . . . . . . . . . . . . . . . . . . . . . . . . . . . . . . . . . . . . . . . . . . . . . . . . . 74<br />
Chapter 6<br />
System Integration Module (SIM)<br />
6.1 Introduction . . . . . . . . . . . . . . . . . . . . . . . . . . . . . . . . . . . . . . . . . . . . . . . . . . . . . . . . . . . . . . . . 75<br />
6.2 SIM Bus Clock Control and Generation . . . . . . . . . . . . . . . . . . . . . . . . . . . . . . . . . . . . . . . . . . . 77<br />
6.2.1 Bus Timing . . . . . . . . . . . . . . . . . . . . . . . . . . . . . . . . . . . . . . . . . . . . . . . . . . . . . . . . . . . . . . 77<br />
6.2.2 Clock Start-up from POR or LVI Reset . . . . . . . . . . . . . . . . . . . . . . . . . . . . . . . . . . . . . . . . 78<br />
6.2.3 Clocks in Stop Mode and Wait Mode . . . . . . . . . . . . . . . . . . . . . . . . . . . . . . . . . . . . . . . . . . 78<br />
6.3 Reset and System Initialization . . . . . . . . . . . . . . . . . . . . . . . . . . . . . . . . . . . . . . . . . . . . . . . . . 78<br />
6.3.1 External Pin Reset . . . . . . . . . . . . . . . . . . . . . . . . . . . . . . . . . . . . . . . . . . . . . . . . . . . . . . . . 78<br />
6.3.2 Active Resets from Internal Sources . . . . . . . . . . . . . . . . . . . . . . . . . . . . . . . . . . . . . . . . . . 79<br />
6.3.2.1 Power-On Reset . . . . . . . . . . . . . . . . . . . . . . . . . . . . . . . . . . . . . . . . . . . . . . . . . . . . . . . . 79<br />
6.3.2.2 Computer Operating Properly (COP) Reset . . . . . . . . . . . . . . . . . . . . . . . . . . . . . . . . . . . 80<br />
6.3.2.3 Illegal Opcode Reset . . . . . . . . . . . . . . . . . . . . . . . . . . . . . . . . . . . . . . . . . . . . . . . . . . . . 80<br />
6.3.2.4 Illegal Address Reset . . . . . . . . . . . . . . . . . . . . . . . . . . . . . . . . . . . . . . . . . . . . . . . . . . . . 81<br />
6.3.2.5 Low-Voltage Inhibit (LVI) Reset . . . . . . . . . . . . . . . . . . . . . . . . . . . . . . . . . . . . . . . . . . . . 81<br />
6.3.2.6 Universal Serial Bus (USB) Reset . . . . . . . . . . . . . . . . . . . . . . . . . . . . . . . . . . . . . . . . . . 81<br />
6.4 SIM Counter. . . . . . . . . . . . . . . . . . . . . . . . . . . . . . . . . . . . . . . . . . . . . . . . . . . . . . . . . . . . . . . . 81<br />
6.4.1 SIM Counter During Power-On Reset . . . . . . . . . . . . . . . . . . . . . . . . . . . . . . . . . . . . . . . . . 81<br />
6.4.2 SIM Counter During Stop Mode Recovery. . . . . . . . . . . . . . . . . . . . . . . . . . . . . . . . . . . . . . 81<br />
6.4.3 SIM Counter and Reset States . . . . . . . . . . . . . . . . . . . . . . . . . . . . . . . . . . . . . . . . . . . . . . 82<br />
6.5 Exception Control. . . . . . . . . . . . . . . . . . . . . . . . . . . . . . . . . . . . . . . . . . . . . . . . . . . . . . . . . . . . 82<br />
6.5.1 Interrupts . . . . . . . . . . . . . . . . . . . . . . . . . . . . . . . . . . . . . . . . . . . . . . . . . . . . . . . . . . . . . . . 82<br />
6.5.1.1 Hardware Interrupts . . . . . . . . . . . . . . . . . . . . . . . . . . . . . . . . . . . . . . . . . . . . . . . . . . . . . 83<br />
6.5.1.2 SWI Instruction . . . . . . . . . . . . . . . . . . . . . . . . . . . . . . . . . . . . . . . . . . . . . . . . . . . . . . . . . 84<br />
6.5.2 Interrupt Status Registers . . . . . . . . . . . . . . . . . . . . . . . . . . . . . . . . . . . . . . . . . . . . . . . . . . 84<br />
6.5.2.1 Interrupt Status Register 1 . . . . . . . . . . . . . . . . . . . . . . . . . . . . . . . . . . . . . . . . . . . . . . . . 85<br />
6.5.2.2 Interrupt Status Register 2 . . . . . . . . . . . . . . . . . . . . . . . . . . . . . . . . . . . . . . . . . . . . . . . . 85<br />
6.5.2.3 Interrupt Status Register 3 . . . . . . . . . . . . . . . . . . . . . . . . . . . . . . . . . . . . . . . . . . . . . . . . 85<br />
<strong>MC68HC908JW32</strong> <strong>Data</strong> <strong>Sheet</strong>, Rev. 6<br />
<strong>Freescale</strong> Semiconductor 9
Table of Contents<br />
6.5.3 Reset . . . . . . . . . . . . . . . . . . . . . . . . . . . . . . . . . . . . . . . . . . . . . . . . . . . . . . . . . . . . . . . . . . 87<br />
6.5.4 Break Interrupts . . . . . . . . . . . . . . . . . . . . . . . . . . . . . . . . . . . . . . . . . . . . . . . . . . . . . . . . . . 87<br />
6.5.5 Status Flag Protection in Break Mode . . . . . . . . . . . . . . . . . . . . . . . . . . . . . . . . . . . . . . . . . 87<br />
6.6 Low-Power Modes . . . . . . . . . . . . . . . . . . . . . . . . . . . . . . . . . . . . . . . . . . . . . . . . . . . . . . . . . . . 87<br />
6.6.1 Wait Mode . . . . . . . . . . . . . . . . . . . . . . . . . . . . . . . . . . . . . . . . . . . . . . . . . . . . . . . . . . . . . . 87<br />
6.6.2 Stop Mode . . . . . . . . . . . . . . . . . . . . . . . . . . . . . . . . . . . . . . . . . . . . . . . . . . . . . . . . . . . . . . 89<br />
6.7 SIM Registers . . . . . . . . . . . . . . . . . . . . . . . . . . . . . . . . . . . . . . . . . . . . . . . . . . . . . . . . . . . . . . 90<br />
6.7.1 SIM Break Status Register. . . . . . . . . . . . . . . . . . . . . . . . . . . . . . . . . . . . . . . . . . . . . . . . . .90<br />
6.7.2 SIM Reset Status Register . . . . . . . . . . . . . . . . . . . . . . . . . . . . . . . . . . . . . . . . . . . . . . . . . 90<br />
6.7.3 SIM Break Flag Control Register . . . . . . . . . . . . . . . . . . . . . . . . . . . . . . . . . . . . . . . . . . . . 91<br />
Chapter 7<br />
Monitor Mode (MON)<br />
7.1 Introduction . . . . . . . . . . . . . . . . . . . . . . . . . . . . . . . . . . . . . . . . . . . . . . . . . . . . . . . . . . . . . . . . 93<br />
7.2 Features. . . . . . . . . . . . . . . . . . . . . . . . . . . . . . . . . . . . . . . . . . . . . . . . . . . . . . . . . . . . . . . . . . . 93<br />
7.3 Functional Description . . . . . . . . . . . . . . . . . . . . . . . . . . . . . . . . . . . . . . . . . . . . . . . . . . . . . . . . 93<br />
7.3.1 Entering Monitor Mode. . . . . . . . . . . . . . . . . . . . . . . . . . . . . . . . . . . . . . . . . . . . . . . . . . . . . 95<br />
7.3.2 <strong>Data</strong> Format . . . . . . . . . . . . . . . . . . . . . . . . . . . . . . . . . . . . . . . . . . . . . . . . . . . . . . . . . . . . . 96<br />
7.3.3 Break Signal. . . . . . . . . . . . . . . . . . . . . . . . . . . . . . . . . . . . . . . . . . . . . . . . . . . . . . . . . . . . . 96<br />
7.3.4 Baud Rate . . . . . . . . . . . . . . . . . . . . . . . . . . . . . . . . . . . . . . . . . . . . . . . . . . . . . . . . . . . . . . 97<br />
7.3.5 Commands. . . . . . . . . . . . . . . . . . . . . . . . . . . . . . . . . . . . . . . . . . . . . . . . . . . . . . . . . . . . . . 97<br />
7.4 Security . . . . . . . . . . . . . . . . . . . . . . . . . . . . . . . . . . . . . . . . . . . . . . . . . . . . . . . . . . . . . . . . . . 101<br />
7.5 ROM-Resident Routines . . . . . . . . . . . . . . . . . . . . . . . . . . . . . . . . . . . . . . . . . . . . . . . . . . . . . 103<br />
7.5.1 PRGRNGE . . . . . . . . . . . . . . . . . . . . . . . . . . . . . . . . . . . . . . . . . . . . . . . . . . . . . . . . . . . . . 104<br />
7.5.2 ERARNGE . . . . . . . . . . . . . . . . . . . . . . . . . . . . . . . . . . . . . . . . . . . . . . . . . . . . . . . . . . . . . 105<br />
7.5.3 LDRNGE . . . . . . . . . . . . . . . . . . . . . . . . . . . . . . . . . . . . . . . . . . . . . . . . . . . . . . . . . . . . . . 106<br />
Chapter 8<br />
Timer Interface Module (TIM)<br />
8.1 Introduction . . . . . . . . . . . . . . . . . . . . . . . . . . . . . . . . . . . . . . . . . . . . . . . . . . . . . . . . . . . . . . . 107<br />
8.2 Features. . . . . . . . . . . . . . . . . . . . . . . . . . . . . . . . . . . . . . . . . . . . . . . . . . . . . . . . . . . . . . . . . . 107<br />
8.3 Pin Name Conventions . . . . . . . . . . . . . . . . . . . . . . . . . . . . . . . . . . . . . . . . . . . . . . . . . . . . . . 107<br />
8.4 Functional Description . . . . . . . . . . . . . . . . . . . . . . . . . . . . . . . . . . . . . . . . . . . . . . . . . . . . . . . 108<br />
8.4.1 TIM Counter Prescaler . . . . . . . . . . . . . . . . . . . . . . . . . . . . . . . . . . . . . . . . . . . . . . . . . . . . 109<br />
8.4.2 Input Capture . . . . . . . . . . . . . . . . . . . . . . . . . . . . . . . . . . . . . . . . . . . . . . . . . . . . . . . . . . . 109<br />
8.4.3 Output Compare. . . . . . . . . . . . . . . . . . . . . . . . . . . . . . . . . . . . . . . . . . . . . . . . . . . . . . . . . 110<br />
8.4.3.1 Unbuffered Output Compare . . . . . . . . . . . . . . . . . . . . . . . . . . . . . . . . . . . . . . . . . . . . . 110<br />
8.4.3.2 Buffered Output Compare . . . . . . . . . . . . . . . . . . . . . . . . . . . . . . . . . . . . . . . . . . . . . . . 110<br />
8.4.4 Pulse Width Modulation (PWM) . . . . . . . . . . . . . . . . . . . . . . . . . . . . . . . . . . . . . . . . . . . . . 111<br />
8.4.4.1 Unbuffered PWM Signal Generation . . . . . . . . . . . . . . . . . . . . . . . . . . . . . . . . . . . . . . . 111<br />
8.4.4.2 Buffered PWM Signal Generation . . . . . . . . . . . . . . . . . . . . . . . . . . . . . . . . . . . . . . . . . 112<br />
8.4.4.3 PWM Initialization . . . . . . . . . . . . . . . . . . . . . . . . . . . . . . . . . . . . . . . . . . . . . . . . . . . . . . 112<br />
8.5 Interrupts . . . . . . . . . . . . . . . . . . . . . . . . . . . . . . . . . . . . . . . . . . . . . . . . . . . . . . . . . . . . . . . . . 113<br />
8.6 Low-Power Modes . . . . . . . . . . . . . . . . . . . . . . . . . . . . . . . . . . . . . . . . . . . . . . . . . . . . . . . . . . 113<br />
8.6.1 Wait Mode . . . . . . . . . . . . . . . . . . . . . . . . . . . . . . . . . . . . . . . . . . . . . . . . . . . . . . . . . . . . . 113<br />
8.6.2 Stop Mode . . . . . . . . . . . . . . . . . . . . . . . . . . . . . . . . . . . . . . . . . . . . . . . . . . . . . . . . . . . . . 114<br />
<strong>MC68HC908JW32</strong> <strong>Data</strong> <strong>Sheet</strong>, Rev. 6<br />
10 <strong>Freescale</strong> Semiconductor
8.7 TIM During Break Interrupts. . . . . . . . . . . . . . . . . . . . . . . . . . . . . . . . . . . . . . . . . . . . . . . . . . . 114<br />
8.8 I/O Signals . . . . . . . . . . . . . . . . . . . . . . . . . . . . . . . . . . . . . . . . . . . . . . . . . . . . . . . . . . . . . . . . 114<br />
8.8.1 TIM Clock Pin (PTC1/TCLK1) . . . . . . . . . . . . . . . . . . . . . . . . . . . . . . . . . . . . . . . . . . . . . . 114<br />
8.9 I/O Registers . . . . . . . . . . . . . . . . . . . . . . . . . . . . . . . . . . . . . . . . . . . . . . . . . . . . . . . . . . . . . . 114<br />
8.9.1 TIM Status and Control Register . . . . . . . . . . . . . . . . . . . . . . . . . . . . . . . . . . . . . . . . . . . . 115<br />
8.9.2 TIM Counter Registers . . . . . . . . . . . . . . . . . . . . . . . . . . . . . . . . . . . . . . . . . . . . . . . . . . . . 116<br />
8.9.3 TIM Counter Modulo Registers . . . . . . . . . . . . . . . . . . . . . . . . . . . . . . . . . . . . . . . . . . . . . 117<br />
8.9.4 TIM Channel Status and Control Registers . . . . . . . . . . . . . . . . . . . . . . . . . . . . . . . . . . . . 117<br />
8.9.5 TIM Channel Registers . . . . . . . . . . . . . . . . . . . . . . . . . . . . . . . . . . . . . . . . . . . . . . . . . . . 120<br />
Chapter 9<br />
Timebase Module (TBM)<br />
9.1 Introduction . . . . . . . . . . . . . . . . . . . . . . . . . . . . . . . . . . . . . . . . . . . . . . . . . . . . . . . . . . . . . . . 123<br />
9.2 Features. . . . . . . . . . . . . . . . . . . . . . . . . . . . . . . . . . . . . . . . . . . . . . . . . . . . . . . . . . . . . . . . . . 123<br />
9.3 Functional Description . . . . . . . . . . . . . . . . . . . . . . . . . . . . . . . . . . . . . . . . . . . . . . . . . . . . . . . 123<br />
9.4 Timebase Register Description . . . . . . . . . . . . . . . . . . . . . . . . . . . . . . . . . . . . . . . . . . . . . . . . 124<br />
9.5 Interrupts . . . . . . . . . . . . . . . . . . . . . . . . . . . . . . . . . . . . . . . . . . . . . . . . . . . . . . . . . . . . . . . . . 125<br />
9.6 Low-Power Modes . . . . . . . . . . . . . . . . . . . . . . . . . . . . . . . . . . . . . . . . . . . . . . . . . . . . . . . . . . 126<br />
9.6.1 Wait Mode . . . . . . . . . . . . . . . . . . . . . . . . . . . . . . . . . . . . . . . . . . . . . . . . . . . . . . . . . . . . . 126<br />
9.6.2 Stop Mode . . . . . . . . . . . . . . . . . . . . . . . . . . . . . . . . . . . . . . . . . . . . . . . . . . . . . . . . . . . . . 126<br />
Chapter 10<br />
Serial Peripheral Interface Module (SPI)<br />
10.1 Introduction . . . . . . . . . . . . . . . . . . . . . . . . . . . . . . . . . . . . . . . . . . . . . . . . . . . . . . . . . . . . . . . 127<br />
10.2 Features. . . . . . . . . . . . . . . . . . . . . . . . . . . . . . . . . . . . . . . . . . . . . . . . . . . . . . . . . . . . . . . . . . 127<br />
10.3 Pin Name Conventions and I/O Register Addresses . . . . . . . . . . . . . . . . . . . . . . . . . . . . . . . . 127<br />
10.4 Functional Description . . . . . . . . . . . . . . . . . . . . . . . . . . . . . . . . . . . . . . . . . . . . . . . . . . . . . . . 128<br />
10.4.1 Master Mode . . . . . . . . . . . . . . . . . . . . . . . . . . . . . . . . . . . . . . . . . . . . . . . . . . . . . . . . . . . 128<br />
10.4.2 Slave Mode . . . . . . . . . . . . . . . . . . . . . . . . . . . . . . . . . . . . . . . . . . . . . . . . . . . . . . . . . . . . 130<br />
10.5 Transmission Formats . . . . . . . . . . . . . . . . . . . . . . . . . . . . . . . . . . . . . . . . . . . . . . . . . . . . . . . 130<br />
10.5.1 Clock Phase and Polarity Controls. . . . . . . . . . . . . . . . . . . . . . . . . . . . . . . . . . . . . . . . . . . 130<br />
10.5.2 Transmission Format When CPHA = 0 . . . . . . . . . . . . . . . . . . . . . . . . . . . . . . . . . . . . . . . 131<br />
10.5.3 Transmission Format When CPHA = 1 . . . . . . . . . . . . . . . . . . . . . . . . . . . . . . . . . . . . . . . 132<br />
10.5.4 Transmission Initiation Latency . . . . . . . . . . . . . . . . . . . . . . . . . . . . . . . . . . . . . . . . . . . . . 132<br />
10.6 Queuing Transmission <strong>Data</strong> . . . . . . . . . . . . . . . . . . . . . . . . . . . . . . . . . . . . . . . . . . . . . . . . . . 133<br />
10.7 Error Conditions . . . . . . . . . . . . . . . . . . . . . . . . . . . . . . . . . . . . . . . . . . . . . . . . . . . . . . . . . . . . 134<br />
10.7.1 Overflow Error . . . . . . . . . . . . . . . . . . . . . . . . . . . . . . . . . . . . . . . . . . . . . . . . . . . . . . . . . . 135<br />
10.7.2 Mode Fault Error . . . . . . . . . . . . . . . . . . . . . . . . . . . . . . . . . . . . . . . . . . . . . . . . . . . . . . . . 136<br />
10.8 Interrupts . . . . . . . . . . . . . . . . . . . . . . . . . . . . . . . . . . . . . . . . . . . . . . . . . . . . . . . . . . . . . . . . . 137<br />
10.9 Resetting the SPI . . . . . . . . . . . . . . . . . . . . . . . . . . . . . . . . . . . . . . . . . . . . . . . . . . . . . . . . . . . 139<br />
10.10 Low-Power Modes . . . . . . . . . . . . . . . . . . . . . . . . . . . . . . . . . . . . . . . . . . . . . . . . . . . . . . . . . . 139<br />
10.10.1 Wait Mode . . . . . . . . . . . . . . . . . . . . . . . . . . . . . . . . . . . . . . . . . . . . . . . . . . . . . . . . . . . . . 139<br />
10.10.2 Stop Mode . . . . . . . . . . . . . . . . . . . . . . . . . . . . . . . . . . . . . . . . . . . . . . . . . . . . . . . . . . . . . 139<br />
10.11 SPI During Break Interrupts . . . . . . . . . . . . . . . . . . . . . . . . . . . . . . . . . . . . . . . . . . . . . . . . . . . 139<br />
10.12 I/O Signals . . . . . . . . . . . . . . . . . . . . . . . . . . . . . . . . . . . . . . . . . . . . . . . . . . . . . . . . . . . . . . . . 140<br />
<strong>MC68HC908JW32</strong> <strong>Data</strong> <strong>Sheet</strong>, Rev. 6<br />
<strong>Freescale</strong> Semiconductor 11
Table of Contents<br />
10.12.1 MISO (Master In/Slave Out). . . . . . . . . . . . . . . . . . . . . . . . . . . . . . . . . . . . . . . . . . . . . . . . 140<br />
10.12.2 MOSI (Master Out/Slave In). . . . . . . . . . . . . . . . . . . . . . . . . . . . . . . . . . . . . . . . . . . . . . . . 140<br />
10.12.3 SPSCK (Serial Clock) . . . . . . . . . . . . . . . . . . . . . . . . . . . . . . . . . . . . . . . . . . . . . . . . . . . . 140<br />
10.12.4 SS (Slave Select) . . . . . . . . . . . . . . . . . . . . . . . . . . . . . . . . . . . . . . . . . . . . . . . . . . . . . . . . 141<br />
10.12.5 CGND (Clock Ground) . . . . . . . . . . . . . . . . . . . . . . . . . . . . . . . . . . . . . . . . . . . . . . . . . . . . 142<br />
10.13 I/O Registers . . . . . . . . . . . . . . . . . . . . . . . . . . . . . . . . . . . . . . . . . . . . . . . . . . . . . . . . . . . . . . 142<br />
10.13.1 SPI Control Register . . . . . . . . . . . . . . . . . . . . . . . . . . . . . . . . . . . . . . . . . . . . . . . . . . . . . 142<br />
10.13.2 SPI Status and Control Register . . . . . . . . . . . . . . . . . . . . . . . . . . . . . . . . . . . . . . . . . . . . 143<br />
10.13.3 SPI <strong>Data</strong> Register . . . . . . . . . . . . . . . . . . . . . . . . . . . . . . . . . . . . . . . . . . . . . . . . . . . . . . . 145<br />
Chapter 11<br />
USB 2.0 FS Module<br />
11.1 Introduction . . . . . . . . . . . . . . . . . . . . . . . . . . . . . . . . . . . . . . . . . . . . . . . . . . . . . . . . . . . . . . . 147<br />
11.2 Features. . . . . . . . . . . . . . . . . . . . . . . . . . . . . . . . . . . . . . . . . . . . . . . . . . . . . . . . . . . . . . . . . . 147<br />
11.3 USB Module Architecture. . . . . . . . . . . . . . . . . . . . . . . . . . . . . . . . . . . . . . . . . . . . . . . . . . . . . 148<br />
11.3.1 USB Transceiver . . . . . . . . . . . . . . . . . . . . . . . . . . . . . . . . . . . . . . . . . . . . . . . . . . . . . . . . 148<br />
11.3.2 USB Control Logic . . . . . . . . . . . . . . . . . . . . . . . . . . . . . . . . . . . . . . . . . . . . . . . . . . . . . . . 149<br />
11.3.3 USB Endpoint Configuration . . . . . . . . . . . . . . . . . . . . . . . . . . . . . . . . . . . . . . . . . . . . . . . 149<br />
11.3.4 USB Requestor Processor . . . . . . . . . . . . . . . . . . . . . . . . . . . . . . . . . . . . . . . . . . . . . . . . . 150<br />
11.3.4.1 Configuration Process . . . . . . . . . . . . . . . . . . . . . . . . . . . . . . . . . . . . . . . . . . . . . . . . . . 151<br />
11.3.4.2 Control Endpoint 0 . . . . . . . . . . . . . . . . . . . . . . . . . . . . . . . . . . . . . . . . . . . . . . . . . . . . . 151<br />
11.3.5 Endpoint Controller . . . . . . . . . . . . . . . . . . . . . . . . . . . . . . . . . . . . . . . . . . . . . . . . . . . . . . 151<br />
11.3.5.1 OUT endpoint <strong>Data</strong> Transfer . . . . . . . . . . . . . . . . . . . . . . . . . . . . . . . . . . . . . . . . . . . . . 152<br />
11.3.5.2 IN endpoint <strong>Data</strong> Transfer . . . . . . . . . . . . . . . . . . . . . . . . . . . . . . . . . . . . . . . . . . . . . . . 152<br />
11.4 Interrupt Source . . . . . . . . . . . . . . . . . . . . . . . . . . . . . . . . . . . . . . . . . . . . . . . . . . . . . . . . . . . . 152<br />
11.5 USB Module Registers. . . . . . . . . . . . . . . . . . . . . . . . . . . . . . . . . . . . . . . . . . . . . . . . . . . . . . . 153<br />
11.5.1 USB Control Register (USBCR). . . . . . . . . . . . . . . . . . . . . . . . . . . . . . . . . . . . . . . . . . . . . 155<br />
11.5.2 USB Status Register (USBSR) . . . . . . . . . . . . . . . . . . . . . . . . . . . . . . . . . . . . . . . . . . . . . 156<br />
11.5.3 USB Status Interrupt Mask Register (USIMR) . . . . . . . . . . . . . . . . . . . . . . . . . . . . . . . . . . 157<br />
11.5.4 USB Endpoint 0 Control/Status Register (UEP0CSR) . . . . . . . . . . . . . . . . . . . . . . . . . . . . 158<br />
11.5.5 USB Endpoint 1–4 Control Status Register (UEP1CSR–UEP4CSR) . . . . . . . . . . . . . . . . 159<br />
11.5.6 USB Endpoint 1–4 <strong>Data</strong> Size Register (UEP1DSR–UEP4DSR) . . . . . . . . . . . . . . . . . . . . 161<br />
11.5.7 USB Endpoint 1/2 and 3/4 Base Pointer Register (UEP12BPR–UEP34BPR). . . . . . . . . . 161<br />
11.5.8 USB Interface Control Register (UINTFCR). . . . . . . . . . . . . . . . . . . . . . . . . . . . . . . . . . . . 162<br />
11.5.9 USB Endpoint 0 <strong>Data</strong> Register 7–0 (UE0D7–UE0D0) . . . . . . . . . . . . . . . . . . . . . . . . . . . . 162<br />
Chapter 12<br />
PS2 Clock Generator (PS2CLK)<br />
12.1 Introduction . . . . . . . . . . . . . . . . . . . . . . . . . . . . . . . . . . . . . . . . . . . . . . . . . . . . . . . . . . . . . . . 163<br />
12.2 Functional Description . . . . . . . . . . . . . . . . . . . . . . . . . . . . . . . . . . . . . . . . . . . . . . . . . . . . . . . 163<br />
12.3 PS2 Clock Generator Control and Status Registers . . . . . . . . . . . . . . . . . . . . . . . . . . . . . . . . 164<br />
Chapter 13<br />
Input/Output (I/O) Ports<br />
13.1 Introduction . . . . . . . . . . . . . . . . . . . . . . . . . . . . . . . . . . . . . . . . . . . . . . . . . . . . . . . . . . . . . . . 167<br />
13.2 Port A . . . . . . . . . . . . . . . . . . . . . . . . . . . . . . . . . . . . . . . . . . . . . . . . . . . . . . . . . . . . . . . . . . . . 170<br />
<strong>MC68HC908JW32</strong> <strong>Data</strong> <strong>Sheet</strong>, Rev. 6<br />
12 <strong>Freescale</strong> Semiconductor
13.2.1 Port A <strong>Data</strong> Register . . . . . . . . . . . . . . . . . . . . . . . . . . . . . . . . . . . . . . . . . . . . . . . . . . . . . 170<br />
13.2.2 <strong>Data</strong> Direction Register A. . . . . . . . . . . . . . . . . . . . . . . . . . . . . . . . . . . . . . . . . . . . . . . . . . 171<br />
13.3 Port B . . . . . . . . . . . . . . . . . . . . . . . . . . . . . . . . . . . . . . . . . . . . . . . . . . . . . . . . . . . . . . . . . . . . 172<br />
13.3.1 Port B <strong>Data</strong> Register . . . . . . . . . . . . . . . . . . . . . . . . . . . . . . . . . . . . . . . . . . . . . . . . . . . . . 172<br />
13.3.2 <strong>Data</strong> Direction Register B. . . . . . . . . . . . . . . . . . . . . . . . . . . . . . . . . . . . . . . . . . . . . . . . . . 172<br />
13.4 Port C. . . . . . . . . . . . . . . . . . . . . . . . . . . . . . . . . . . . . . . . . . . . . . . . . . . . . . . . . . . . . . . . . . . . 174<br />
13.4.1 Port C <strong>Data</strong> Register . . . . . . . . . . . . . . . . . . . . . . . . . . . . . . . . . . . . . . . . . . . . . . . . . . . . . 174<br />
13.4.2 <strong>Data</strong> Direction Register C . . . . . . . . . . . . . . . . . . . . . . . . . . . . . . . . . . . . . . . . . . . . . . . . . 175<br />
13.5 Port D. . . . . . . . . . . . . . . . . . . . . . . . . . . . . . . . . . . . . . . . . . . . . . . . . . . . . . . . . . . . . . . . . . . . 176<br />
13.5.1 Port D <strong>Data</strong> Register . . . . . . . . . . . . . . . . . . . . . . . . . . . . . . . . . . . . . . . . . . . . . . . . . . . . . 176<br />
13.5.2 <strong>Data</strong> Direction Register D . . . . . . . . . . . . . . . . . . . . . . . . . . . . . . . . . . . . . . . . . . . . . . . . . 176<br />
13.6 Port E . . . . . . . . . . . . . . . . . . . . . . . . . . . . . . . . . . . . . . . . . . . . . . . . . . . . . . . . . . . . . . . . . . . . 178<br />
13.6.1 Port E <strong>Data</strong> Register . . . . . . . . . . . . . . . . . . . . . . . . . . . . . . . . . . . . . . . . . . . . . . . . . . . . . 178<br />
13.6.2 <strong>Data</strong> Direction Register E. . . . . . . . . . . . . . . . . . . . . . . . . . . . . . . . . . . . . . . . . . . . . . . . . . 180<br />
13.7 Port Options . . . . . . . . . . . . . . . . . . . . . . . . . . . . . . . . . . . . . . . . . . . . . . . . . . . . . . . . . . . . . . . 182<br />
13.7.1 Port Option Control Register 1 . . . . . . . . . . . . . . . . . . . . . . . . . . . . . . . . . . . . . . . . . . . . . . 182<br />
13.7.2 Port Option Control Register 2 . . . . . . . . . . . . . . . . . . . . . . . . . . . . . . . . . . . . . . . . . . . . . . 182<br />
13.7.3 Pullup Control Register (PULLCR). . . . . . . . . . . . . . . . . . . . . . . . . . . . . . . . . . . . . . . . . . . 183<br />
Chapter 14<br />
External Interrupt (IRQ)<br />
14.1 Introduction . . . . . . . . . . . . . . . . . . . . . . . . . . . . . . . . . . . . . . . . . . . . . . . . . . . . . . . . . . . . . . . 185<br />
14.2 Features. . . . . . . . . . . . . . . . . . . . . . . . . . . . . . . . . . . . . . . . . . . . . . . . . . . . . . . . . . . . . . . . . . 185<br />
14.3 Functional Description . . . . . . . . . . . . . . . . . . . . . . . . . . . . . . . . . . . . . . . . . . . . . . . . . . . . . . . 185<br />
14.4 IRQ Pin . . . . . . . . . . . . . . . . . . . . . . . . . . . . . . . . . . . . . . . . . . . . . . . . . . . . . . . . . . . . . . . . . . 187<br />
14.5 PTE3/D– Pin . . . . . . . . . . . . . . . . . . . . . . . . . . . . . . . . . . . . . . . . . . . . . . . . . . . . . . . . . . . . . . 188<br />
14.6 IRQ Module During Break Interrupts . . . . . . . . . . . . . . . . . . . . . . . . . . . . . . . . . . . . . . . . . . . . 188<br />
14.7 IRQ Status and Control Register . . . . . . . . . . . . . . . . . . . . . . . . . . . . . . . . . . . . . . . . . . . . . . . 188<br />
14.8 IRQ Option Control Register . . . . . . . . . . . . . . . . . . . . . . . . . . . . . . . . . . . . . . . . . . . . . . . . . . 189<br />
Chapter 15<br />
Keyboard Interrupt Module (KBI)<br />
15.1 Introduction . . . . . . . . . . . . . . . . . . . . . . . . . . . . . . . . . . . . . . . . . . . . . . . . . . . . . . . . . . . . . . . 191<br />
15.2 Features. . . . . . . . . . . . . . . . . . . . . . . . . . . . . . . . . . . . . . . . . . . . . . . . . . . . . . . . . . . . . . . . . . 191<br />
15.3 Pin Name Conventions . . . . . . . . . . . . . . . . . . . . . . . . . . . . . . . . . . . . . . . . . . . . . . . . . . . . . . 191<br />
15.4 Functional Description . . . . . . . . . . . . . . . . . . . . . . . . . . . . . . . . . . . . . . . . . . . . . . . . . . . . . . . 192<br />
15.4.1 Keyboard Initialization . . . . . . . . . . . . . . . . . . . . . . . . . . . . . . . . . . . . . . . . . . . . . . . . . . . . 193<br />
15.5 I/O Registers . . . . . . . . . . . . . . . . . . . . . . . . . . . . . . . . . . . . . . . . . . . . . . . . . . . . . . . . . . . . . . 194<br />
15.5.1 Keyboard Status and Control Register. . . . . . . . . . . . . . . . . . . . . . . . . . . . . . . . . . . . . . . . 194<br />
15.5.2 Keyboard Interrupt Enable Register. . . . . . . . . . . . . . . . . . . . . . . . . . . . . . . . . . . . . . . . . . 195<br />
15.6 Low-Power Modes . . . . . . . . . . . . . . . . . . . . . . . . . . . . . . . . . . . . . . . . . . . . . . . . . . . . . . . . . . 195<br />
15.6.1 Wait Mode . . . . . . . . . . . . . . . . . . . . . . . . . . . . . . . . . . . . . . . . . . . . . . . . . . . . . . . . . . . . . 195<br />
15.6.2 Stop Mode . . . . . . . . . . . . . . . . . . . . . . . . . . . . . . . . . . . . . . . . . . . . . . . . . . . . . . . . . . . . . 195<br />
15.7 Keyboard Module During Break Interrupts. . . . . . . . . . . . . . . . . . . . . . . . . . . . . . . . . . . . . . . . 195<br />
<strong>MC68HC908JW32</strong> <strong>Data</strong> <strong>Sheet</strong>, Rev. 6<br />
<strong>Freescale</strong> Semiconductor 13
Table of Contents<br />
Chapter 16<br />
Computer Operating Properly (COP)<br />
16.1 Introduction . . . . . . . . . . . . . . . . . . . . . . . . . . . . . . . . . . . . . . . . . . . . . . . . . . . . . . . . . . . . . . . 197<br />
16.2 Functional Description . . . . . . . . . . . . . . . . . . . . . . . . . . . . . . . . . . . . . . . . . . . . . . . . . . . . . . . 197<br />
16.3 I/O Signals . . . . . . . . . . . . . . . . . . . . . . . . . . . . . . . . . . . . . . . . . . . . . . . . . . . . . . . . . . . . . . . . 198<br />
16.3.1 CGMRCLK . . . . . . . . . . . . . . . . . . . . . . . . . . . . . . . . . . . . . . . . . . . . . . . . . . . . . . . . . . . . . 198<br />
16.3.2 STOP Instruction . . . . . . . . . . . . . . . . . . . . . . . . . . . . . . . . . . . . . . . . . . . . . . . . . . . . . . . . 198<br />
16.3.3 COPCTL Write . . . . . . . . . . . . . . . . . . . . . . . . . . . . . . . . . . . . . . . . . . . . . . . . . . . . . . . . . . 198<br />
16.3.4 Power-On Reset. . . . . . . . . . . . . . . . . . . . . . . . . . . . . . . . . . . . . . . . . . . . . . . . . . . . . . . . . 198<br />
16.3.5 Internal Reset. . . . . . . . . . . . . . . . . . . . . . . . . . . . . . . . . . . . . . . . . . . . . . . . . . . . . . . . . . . 198<br />
16.3.6 Reset Vector Fetch . . . . . . . . . . . . . . . . . . . . . . . . . . . . . . . . . . . . . . . . . . . . . . . . . . . . . . 199<br />
16.3.7 COPD (COP Disable). . . . . . . . . . . . . . . . . . . . . . . . . . . . . . . . . . . . . . . . . . . . . . . . . . . . . 199<br />
16.3.8 COPRS (COP Rate Select) . . . . . . . . . . . . . . . . . . . . . . . . . . . . . . . . . . . . . . . . . . . . . . . . 199<br />
16.4 COP Control Register . . . . . . . . . . . . . . . . . . . . . . . . . . . . . . . . . . . . . . . . . . . . . . . . . . . . . . . 199<br />
16.5 Interrupts . . . . . . . . . . . . . . . . . . . . . . . . . . . . . . . . . . . . . . . . . . . . . . . . . . . . . . . . . . . . . . . . . 199<br />
16.6 Monitor Mode . . . . . . . . . . . . . . . . . . . . . . . . . . . . . . . . . . . . . . . . . . . . . . . . . . . . . . . . . . . . . . 200<br />
16.7 Low-Power Modes . . . . . . . . . . . . . . . . . . . . . . . . . . . . . . . . . . . . . . . . . . . . . . . . . . . . . . . . . . 200<br />
16.7.1 Wait Mode . . . . . . . . . . . . . . . . . . . . . . . . . . . . . . . . . . . . . . . . . . . . . . . . . . . . . . . . . . . . . 200<br />
16.7.2 Stop Mode . . . . . . . . . . . . . . . . . . . . . . . . . . . . . . . . . . . . . . . . . . . . . . . . . . . . . . . . . . . . . 200<br />
16.8 COP Module During Break Mode . . . . . . . . . . . . . . . . . . . . . . . . . . . . . . . . . . . . . . . . . . . . . . 200<br />
Chapter 17<br />
Low-Voltage Inhibit (LVI)<br />
17.1 Introduction . . . . . . . . . . . . . . . . . . . . . . . . . . . . . . . . . . . . . . . . . . . . . . . . . . . . . . . . . . . . . . . 201<br />
17.2 Features. . . . . . . . . . . . . . . . . . . . . . . . . . . . . . . . . . . . . . . . . . . . . . . . . . . . . . . . . . . . . . . . . . 201<br />
17.3 Functional Description . . . . . . . . . . . . . . . . . . . . . . . . . . . . . . . . . . . . . . . . . . . . . . . . . . . . . . . 201<br />
17.3.1 Low V DD Detector . . . . . . . . . . . . . . . . . . . . . . . . . . . . . . . . . . . . . . . . . . . . . . . . . . . . . . . 202<br />
17.3.2 Polled LVI Operation . . . . . . . . . . . . . . . . . . . . . . . . . . . . . . . . . . . . . . . . . . . . . . . . . . . . . 202<br />
17.3.3 Forced Reset Operation. . . . . . . . . . . . . . . . . . . . . . . . . . . . . . . . . . . . . . . . . . . . . . . . . . . 202<br />
17.3.4 Voltage Hysteresis Protection . . . . . . . . . . . . . . . . . . . . . . . . . . . . . . . . . . . . . . . . . . . . . . 202<br />
17.4 LVI Status Register . . . . . . . . . . . . . . . . . . . . . . . . . . . . . . . . . . . . . . . . . . . . . . . . . . . . . . . . . 203<br />
17.5 LVI Interrupts . . . . . . . . . . . . . . . . . . . . . . . . . . . . . . . . . . . . . . . . . . . . . . . . . . . . . . . . . . . . . . 203<br />
17.6 Low-Power Modes . . . . . . . . . . . . . . . . . . . . . . . . . . . . . . . . . . . . . . . . . . . . . . . . . . . . . . . . . . 203<br />
17.6.1 Wait Mode . . . . . . . . . . . . . . . . . . . . . . . . . . . . . . . . . . . . . . . . . . . . . . . . . . . . . . . . . . . . . 203<br />
17.6.2 Stop Mode . . . . . . . . . . . . . . . . . . . . . . . . . . . . . . . . . . . . . . . . . . . . . . . . . . . . . . . . . . . . . 203<br />
Chapter 18<br />
Break Module (BRK)<br />
18.1 Introduction . . . . . . . . . . . . . . . . . . . . . . . . . . . . . . . . . . . . . . . . . . . . . . . . . . . . . . . . . . . . . . . 205<br />
18.2 Features. . . . . . . . . . . . . . . . . . . . . . . . . . . . . . . . . . . . . . . . . . . . . . . . . . . . . . . . . . . . . . . . . . 205<br />
18.3 Functional Description . . . . . . . . . . . . . . . . . . . . . . . . . . . . . . . . . . . . . . . . . . . . . . . . . . . . . . . 206<br />
18.3.1 Flag Protection During Break Interrupts. . . . . . . . . . . . . . . . . . . . . . . . . . . . . . . . . . . . . . . 206<br />
18.3.2 CPU During Break Interrupts . . . . . . . . . . . . . . . . . . . . . . . . . . . . . . . . . . . . . . . . . . . . . . . 206<br />
18.3.3 TIMI and TIM2 During Break Interrupts . . . . . . . . . . . . . . . . . . . . . . . . . . . . . . . . . . . . . . . 207<br />
18.3.4 COP During Break Interrupts . . . . . . . . . . . . . . . . . . . . . . . . . . . . . . . . . . . . . . . . . . . . . . . 207<br />
<strong>MC68HC908JW32</strong> <strong>Data</strong> <strong>Sheet</strong>, Rev. 6<br />
14 <strong>Freescale</strong> Semiconductor
18.4 Low-Power Modes . . . . . . . . . . . . . . . . . . . . . . . . . . . . . . . . . . . . . . . . . . . . . . . . . . . . . . . . . . 207<br />
18.4.1 Wait Mode . . . . . . . . . . . . . . . . . . . . . . . . . . . . . . . . . . . . . . . . . . . . . . . . . . . . . . . . . . . . . 207<br />
18.5 Break Module Registers. . . . . . . . . . . . . . . . . . . . . . . . . . . . . . . . . . . . . . . . . . . . . . . . . . . . . . 207<br />
18.5.1 Break Status and Control Register. . . . . . . . . . . . . . . . . . . . . . . . . . . . . . . . . . . . . . . . . . . 207<br />
18.5.2 Break Address Registers . . . . . . . . . . . . . . . . . . . . . . . . . . . . . . . . . . . . . . . . . . . . . . . . . . 208<br />
18.5.3 SIM Break Status Register. . . . . . . . . . . . . . . . . . . . . . . . . . . . . . . . . . . . . . . . . . . . . . . . . 208<br />
18.5.4 SIM Break Flag Control Register . . . . . . . . . . . . . . . . . . . . . . . . . . . . . . . . . . . . . . . . . . . . 209<br />
Chapter 19<br />
Electrical Specifications<br />
19.1 Introduction . . . . . . . . . . . . . . . . . . . . . . . . . . . . . . . . . . . . . . . . . . . . . . . . . . . . . . . . . . . . . . . 211<br />
19.2 Absolute Maximum Ratings . . . . . . . . . . . . . . . . . . . . . . . . . . . . . . . . . . . . . . . . . . . . . . . . . . . 211<br />
19.3 Functional Operating Range . . . . . . . . . . . . . . . . . . . . . . . . . . . . . . . . . . . . . . . . . . . . . . . . . . 212<br />
19.4 Thermal Characteristics . . . . . . . . . . . . . . . . . . . . . . . . . . . . . . . . . . . . . . . . . . . . . . . . . . . . . . 212<br />
19.5 DC Electrical Characteristics . . . . . . . . . . . . . . . . . . . . . . . . . . . . . . . . . . . . . . . . . . . . . . . . . . 213<br />
19.6 Control Timing . . . . . . . . . . . . . . . . . . . . . . . . . . . . . . . . . . . . . . . . . . . . . . . . . . . . . . . . . . . . . 214<br />
19.7 Internal RC Clock Timing . . . . . . . . . . . . . . . . . . . . . . . . . . . . . . . . . . . . . . . . . . . . . . . . . . . . . 214<br />
19.8 Crystal Oscillator Characteristics . . . . . . . . . . . . . . . . . . . . . . . . . . . . . . . . . . . . . . . . . . . . . . . 215<br />
19.9 USB DC Electrical Characteristic. . . . . . . . . . . . . . . . . . . . . . . . . . . . . . . . . . . . . . . . . . . . . . . 215<br />
19.10 Timer Interface Module Characteristics . . . . . . . . . . . . . . . . . . . . . . . . . . . . . . . . . . . . . . . . . . 216<br />
19.11 FLASH Program/Erase Timing . . . . . . . . . . . . . . . . . . . . . . . . . . . . . . . . . . . . . . . . . . . . . . . . 216<br />
19.12 CGM Electrical Specifications . . . . . . . . . . . . . . . . . . . . . . . . . . . . . . . . . . . . . . . . . . . . . . . . . 216<br />
19.13 5.0V SPI Characteristics . . . . . . . . . . . . . . . . . . . . . . . . . . . . . . . . . . . . . . . . . . . . . . . . . . . . . 217<br />
Chapter 20<br />
Ordering Information and Mechanical Specifications<br />
20.1 Introduction . . . . . . . . . . . . . . . . . . . . . . . . . . . . . . . . . . . . . . . . . . . . . . . . . . . . . . . . . . . . . . . 221<br />
20.2 Ordering Information . . . . . . . . . . . . . . . . . . . . . . . . . . . . . . . . . . . . . . . . . . . . . . . . . . . . . . . . 221<br />
20.3 Package Dimensions . . . . . . . . . . . . . . . . . . . . . . . . . . . . . . . . . . . . . . . . . . . . . . . . . . . . . . . . 221<br />
<strong>MC68HC908JW32</strong> <strong>Data</strong> <strong>Sheet</strong>, Rev. 6<br />
<strong>Freescale</strong> Semiconductor 15
Table of Contents<br />
<strong>MC68HC908JW32</strong> <strong>Data</strong> <strong>Sheet</strong>, Rev. 6<br />
16 <strong>Freescale</strong> Semiconductor
Chapter 1<br />
General Description<br />
1.1 Introduction<br />
The <strong>MC68HC908JW32</strong> is a member of the low-cost, high-performance M68HC08 Family of 8-bit<br />
microcontroller units (MCUs). All MCUs in the family use the enhanced M68HC08 central processor unit<br />
(CPU08) and are available with a variety of modules, memory sizes and types, and package types.<br />
1.2 Features<br />
Features of the <strong>MC68HC908JW32</strong> include:<br />
• High-performance M68HC08 architecture<br />
• Fully upward-compatible object code with M6805, M146805, and M68HC05 Families<br />
• 8-MHz internal bus frequency<br />
• 88-kHz internal RC clock for timebase wakeup<br />
• 32-Kbytes of on-chip FLASH memory with security (1)<br />
• 1-Kbytes of on-chip random-access memory (RAM)<br />
• On-chip programming firmware for use with host PC computer<br />
• Clock generation module (CGM)<br />
• Up to 34 general-purpose 5V input/output (I/O) pins, including:<br />
– Keyboard interrupts on 8 pins<br />
– Direct drive for normal LED on 8 pins<br />
– High current drive for PS/2 connection on 2 pins (with USB module disabled)<br />
• Serial peripheral interface module (SPI)<br />
• PS2 clock generator module<br />
• 16-bit, 2-channel timer interface module (TIM) with selectable rising and falling edges input<br />
capture, output compare, PWM capability on each channel, and external clock input option<br />
• Full universal serial bus (USB) specification 2.0 full-speed functions:<br />
– 12 Mbps data rate<br />
– On-chip 3.3V regulator<br />
– Endpoint 0 with 8-byte transmit buffer and 8-byte receive buffer<br />
– 64 bytes endpoint buffer to share among endpoints 1–4<br />
• System protection features:<br />
– Optional computer operating properly (COP) reset<br />
– Optional low-voltage detection with reset<br />
– Illegal opcode detection with reset<br />
– Illegal address detection with reset<br />
• Low-power design (fully static with stop and wait modes)<br />
• Master reset pin with internal pull-up and power-on reset<br />
1. No security feature is absolutely secure. However, <strong>Freescale</strong>’s strategy is to make reading or copying the FLASH/ROM<br />
difficult for unauthorized users.<br />
<strong>MC68HC908JW32</strong> <strong>Data</strong> <strong>Sheet</strong>, Rev. 6<br />
<strong>Freescale</strong> Semiconductor 17
General Description<br />
• External asynchronous interrupt pin with internal pull-up (IRQ)<br />
• 48-pin quad flat non-leaded package (QFN)<br />
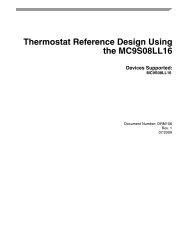
1.3 MCU Block Diagram<br />
CPU<br />
REGISTERS<br />
M68HC08 CPU<br />
ARITHMETIC/LOGIC<br />
UNIT (ALU)<br />
CONTROL AND STATUS REGISTERS — 96 BYTES<br />
USER FLASH — 32,768 BYTES<br />
USER RAM — 1,024 BYTES<br />
MONITOR ROM — 1,472 BYTES<br />
USER FLASH VECTOR SPACE — 48 BYTES<br />
(1)(2) RST<br />
(1)(3) IRQ<br />
VDD VSS VDDPLL VSSPLL REG25V<br />
REG33V<br />
VSS33 OSCILLATORS AND<br />
CLOCK GENERATOR MODULE<br />
INTERNAL RC OSCILLATOR<br />
OSC1<br />
X-TAL OSCILLATOR<br />
OSC2<br />
CGMXFC PHASE-LOCKED LOOP<br />
SYSTEM INTEGRATION<br />
MODULE<br />
EXTERNAL INTERRUPT<br />
MODULE<br />
COMPUTER OPERATING<br />
PROPERLY MODULE<br />
POWER-ON RESET<br />
MODULE<br />
POWER<br />
INTERNAL REGULATOR<br />
INTERNAL BUS<br />
KEYBOARD INTERRUPT<br />
MODULE<br />
2-CHANNEL TIMER INTERFACE<br />
MODULE<br />
TIMEBASE<br />
MODULE<br />
BREAK<br />
MODULE<br />
LOW-VOLTAGE INHIBIT<br />
MODULE<br />
PS2 CLOCK GENERATOR<br />
MODULE<br />
SERIAL PERIPHERAL<br />
INTERFACE MODULE<br />
USB MODULE<br />
USB<br />
USB ENDPOINT FS<br />
Figure 1-1. <strong>MC68HC908JW32</strong> Block Diagram<br />
<strong>MC68HC908JW32</strong> <strong>Data</strong> <strong>Sheet</strong>, Rev. 6<br />
18 <strong>Freescale</strong> Semiconductor<br />
TRANSCEIVER<br />
DDRA<br />
DDRB<br />
DDRD<br />
PORTA<br />
PORTB<br />
PORTD<br />
PTA7/KBA7 (3)<br />
PTA6/KBA6 (3)<br />
PTA5/KBA5 (3)<br />
PTA4/KBA4 (3)<br />
PTA3/KBA3 (3)<br />
PTA2/KBA2 (3)<br />
PTA1/KBA1 (3)<br />
PTA0/KBA0 (3)<br />
PTB5 (2)(4)<br />
PTB1 (2)(4)<br />
PTB0 (2)(4)<br />
PTB6 (2)(4)(5)<br />
PTB7 (2)(4)(5)<br />
PTB4 (2)(4)(5)<br />
PTB3 (2)(4)(5)<br />
PTB2 (2)(4)(5)<br />
PTC3<br />
PTC2/T1CH1<br />
PTC1/TCLK1<br />
PTC0/T1CH0<br />
PTD7 (2)<br />
PTD6<br />
PTD5<br />
PTD4<br />
PTD3 (2)<br />
PTD2 (2)<br />
PTD1<br />
PTD0<br />
PTE7/SS<br />
PTE6/MISO<br />
PTE5/MOSI<br />
PTE4/SPCLK<br />
PTE3/D– (2)(4)<br />
PTE2/PS2CLK/D+ (2)(4)<br />
(1) Pin contains integrated pullup device.<br />
(2) Pin contains configurable pullup device.<br />
(3) Pin contains integrated pullup device when configured as KBI.<br />
(4) Pin is open-drain when configured as output, with high current capability.<br />
(5) Pin available on 52-pin LQFP only.<br />
DDRC<br />
DDRE<br />
PORTC<br />
PORTE
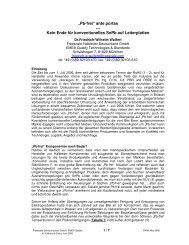
1.4 Pin Assignments<br />
PTA0/KBA0<br />
PTC1/TCLK1<br />
PTC3<br />
PTB7<br />
PTB6<br />
PTB5<br />
PTB4<br />
PTC0/T1CH0<br />
PTE7/SS<br />
PTE6/MISO<br />
PTE5/MOSI<br />
PTE4/SPCLK<br />
NC<br />
1<br />
2<br />
3<br />
4<br />
5<br />
6<br />
7<br />
8<br />
9<br />
10<br />
11<br />
12<br />
13<br />
PTA1/KBA1<br />
52<br />
14<br />
PTD0<br />
PTA2/KBA2<br />
51<br />
15<br />
PTD1<br />
PTA3/KBA3<br />
50<br />
16<br />
PTD2<br />
PTA4/KBA4<br />
49<br />
17<br />
PTD3<br />
V SS<br />
48<br />
18<br />
PTD4<br />
REG25V<br />
47<br />
19<br />
PTD5<br />
V DD<br />
46<br />
20<br />
PTD6<br />
Figure 1-2. 52-Pin LQFP Pin Assignment<br />
<strong>MC68HC908JW32</strong> <strong>Data</strong> <strong>Sheet</strong>, Rev. 6<br />
Pin Assignments<br />
<strong>Freescale</strong> Semiconductor 19<br />
PTC2/T1CH1<br />
45<br />
21<br />
NC<br />
PTA5/KBA5<br />
44<br />
22<br />
NC<br />
PTA6/KBA6<br />
43<br />
23<br />
NC<br />
IRQ<br />
42<br />
24<br />
NC<br />
RESET<br />
41<br />
25<br />
NC<br />
PTA7/KBA7<br />
40<br />
26<br />
PTD7<br />
39<br />
38<br />
37<br />
36<br />
35<br />
34<br />
33<br />
32<br />
31<br />
30<br />
29<br />
28<br />
27<br />
NC = No Connection<br />
V DDPLL<br />
CGMXFC<br />
VSSPLL REG33V<br />
PTE3/D–<br />
PTE2/PS2CLK/D+<br />
V SS33<br />
PTB3<br />
PTB2<br />
PTB1<br />
PTB0<br />
OSC2<br />
OSC1
General Description<br />
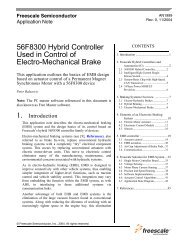
1.5 Clock Tree<br />
PTD0<br />
PTD1<br />
Figure 1-3. 48-Pin LQFP and QFN Pin Assignment<br />
Figure 1-4 shows the clock tree diagram for the <strong>MC68HC908JW32</strong>.<br />
88-kHz<br />
IRC<br />
XTAL<br />
Clock<br />
PTA0/KBA0<br />
NC<br />
NC<br />
PTC1/TCLK1<br />
PTC3<br />
PTB5<br />
PTC0/T1CH0<br />
PTE7/SS<br />
PTE6/MISO<br />
PTE5/MOSI<br />
PTE4/SPCLK<br />
CGMXCLK<br />
PLL<br />
NC<br />
1<br />
2<br />
3<br />
4<br />
5<br />
6<br />
7<br />
8<br />
9<br />
10<br />
11<br />
12<br />
÷2<br />
÷3<br />
PTA1/KBA1<br />
48<br />
13<br />
BCS<br />
PTA2/KBA2<br />
47<br />
14<br />
PTA3/KBA3<br />
46<br />
15<br />
PTD2<br />
CGM<br />
CGMOUT<br />
CGMVCLK<br />
PTA4/KBA4<br />
45<br />
16<br />
PTD3<br />
V SS<br />
44<br />
17<br />
PTD4<br />
REG25V<br />
43<br />
18<br />
PTD5<br />
VDD PTC2/T1CH1<br />
42<br />
19<br />
PTD6<br />
PTC1/TCLK1<br />
SIM<br />
÷2<br />
Figure 1-4. Clock Tree Diagram<br />
<strong>MC68HC908JW32</strong> <strong>Data</strong> <strong>Sheet</strong>, Rev. 6<br />
20 <strong>Freescale</strong> Semiconductor<br />
41<br />
20<br />
NC<br />
USB<br />
PTA5/KBA5<br />
40<br />
21<br />
NC<br />
PS[2:0]<br />
PTA6/KBA6<br />
39<br />
22<br />
PTD7<br />
IRQ<br />
38<br />
23<br />
NC<br />
RESET<br />
37<br />
24<br />
NC<br />
36<br />
35<br />
34<br />
33<br />
32<br />
31<br />
30<br />
29<br />
28<br />
27<br />
26<br />
25<br />
PTA7/KBA7<br />
VDDPLL CGMXFC<br />
VSSPLL REG33V<br />
PTE3/D–<br />
PTE2/PS2CLK/D+<br />
VSS33 PTB1<br />
PTB0<br />
OSC2<br />
OSC1<br />
NC = No Connection<br />
TBM<br />
TIMER CPU RAM FLASH<br />
KBI BREAK PS2CLK<br />
SPI
1.6 Power Management<br />
Figure 1-5 shows the power management diagram for <strong>MC68HC908JW32</strong>.<br />
V DD<br />
V SS<br />
1.7 Pin Function<br />
CORE<br />
2.5V<br />
Regulator<br />
PLL<br />
2.5V<br />
Regulator<br />
3.3V<br />
Regulator<br />
2.5V<br />
2.5V<br />
3.3V<br />
CPU RAM FLASH<br />
SIM BREAK PS2CLK<br />
CGM OSC<br />
USB<br />
PHY<br />
1.7.1 Power Supply Pins (V DD and V SS )<br />
GPIO Pad Ring<br />
Figure 1-5. Power Management Diagram<br />
<strong>MC68HC908JW32</strong> <strong>Data</strong> <strong>Sheet</strong>, Rev. 6<br />
Power Management<br />
V DD and V SS are the power supply and ground pins. The MCU operates from a single power supply.<br />
Fast signal transitions on MCU pins place high, short-duration current demands on the power supply. To<br />
prevent noise problems, take special care to provide power supply bypassing at the MCU as Figure 1-6<br />
shows. Place the C1 bypass capacitor as close to the MCU as possible. Use a high-frequency-response<br />
ceramic capacitor for C1. C2 is an optional bulk current bypass capacitor for use in applications that<br />
require the port pins to source high current levels.<br />
<strong>Freescale</strong> Semiconductor 21<br />
SPI<br />
USB<br />
SIE<br />
TBM<br />
LVI<br />
Circuitry<br />
TIMER<br />
POR<br />
Circuitry<br />
REG25V<br />
V DDPLL<br />
V SSPLL<br />
REG33V<br />
V SS33
General Description<br />
V DD<br />
V SS must be grounded for proper MCU operation.<br />
Figure 1-6. Power Supply Bypassing<br />
1.7.2 Analog Power Supply (V DDPLL and V SSPLL )<br />
V DDPLL is the internal voltage regulator supply for the CGM module of the device. It is recommended that<br />
a decoupling capacitor be connected between the V DDPLL and V SSPLL pins placing it as close to the pins<br />
as possible.<br />
1.7.3 Internal Voltage Regulator Supply (REG25V, REG33V, and V SS33 )<br />
VREG25 is the internal core voltage regulator supply. VREG33 and VSS33 are the internal USB voltage<br />
regulator supply.<br />
1.7.4 Oscillator Pins (OSC1 and OSC2)<br />
The OSC1 and OSC2 pins are the connections for the on-chip oscillator circuit.<br />
V DD<br />
MCU<br />
C1<br />
0.1 µF<br />
+<br />
C2<br />
<strong>MC68HC908JW32</strong> <strong>Data</strong> <strong>Sheet</strong>, Rev. 6<br />
22 <strong>Freescale</strong> Semiconductor<br />
V SS<br />
NOTE: Component values shown<br />
represent typical applications.
1.7.5 External Reset Pin (RST)<br />
<strong>MC68HC908JW32</strong> <strong>Data</strong> <strong>Sheet</strong>, Rev. 6<br />
Pin Function<br />
A logic 0 on the RST pin forces the MCU to a known start-up state. RST is bidirectional, allowing a reset<br />
of the entire system. It is driven low when any internal reset source is asserted. A schmitt-trigger and a<br />
spike filter is associated with this pin so that the device is more robust to EMC noise.This pin also contains<br />
an internal pullup resistor.<br />
1.7.6 External Interrupt Pin (IRQ)<br />
IRQ is an asynchronous external interrupt pin. This pin contains an internal pullup resistor.<br />
1.7.7 External Filter Capacitor Pin (CGMXFC)<br />
CGMXFC is an external filter connection for the on-chip PLL.<br />
1.7.8 Port A Input/Output (I/O) Pins (PTA7–PTA0)<br />
PTA7–PTA0 are special function, bidirectional ports pins. These pins are shared with KBI module.<br />
1.7.9 Port B Input/Output (I/O) Pins (PTB7–PTB0)<br />
PTB7–PTB0 are special function, bidirectional ports pins. These pins can be programmable as<br />
open-drain output with high current sourcing capability and has built-in programmable pull up resistor.<br />
1.7.10 Port C Input/Output (I/O) Pins (PTC3–PTC0)<br />
PTC0–PTC3 are bidirectional ports pins. PTC0–PTC2 are shared with TIMER channel 0, channel 1 and<br />
TCLK1 pins respectively.<br />
1.7.11 Port D Input/Output (I/O) Pins (PTD7–PTD0)<br />
PTD7–PTD0 are bidirectional ports pins. Pullup option are associated with PTD2, 3 and 7. The option is<br />
default enabled after reset.<br />
1.7.12 Port E Input/Output (I/O) Pins (PTE7–PTE2)<br />
PTE7–PTE2 are special function, bidirectional ports pins. PTE2–PTE3 are shared with USB 2.0 FS<br />
module. PTE2 is shared with PS2 clock module. PTE4–PTE7 are shared with SPI module.<br />
<strong>Freescale</strong> Semiconductor 23
General Description<br />
<strong>MC68HC908JW32</strong> <strong>Data</strong> <strong>Sheet</strong>, Rev. 6<br />
24 <strong>Freescale</strong> Semiconductor
Chapter 2<br />
Memory<br />
2.1 Introduction<br />
The CPU08 can address 64 Kbytes of memory space. The memory map, shown in Figure 2-1, includes:<br />
• 32,768 bytes of user FLASH<br />
• 1,024 bytes of RAM<br />
• 64 bytes of USB buffer RAM<br />
• 48 bytes of user-defined vectors<br />
• 1,472 bytes of monitor ROM<br />
2.2 Input/Output I/O Section<br />
Addresses $0000–$005F, shown in Figure 2-2, contain most of the control, status, and data registers.<br />
Additional I/O registers have these addresses:<br />
• $1090; PLL control registers, PTCL<br />
• $1091; PLL bandwidth control register, PBWC<br />
• $1092; PLL multiplier select register high, PMSH<br />
• $1093; PLL multiplier select register low, PMSL<br />
• $1094; PLL VCO range select register, PMRS<br />
• $1095; PLL Reference divider select register, PMDS<br />
• $FE00; Break status register, BSR<br />
• $FE01; Reset status register, RSR<br />
• $FE02; Reserved<br />
• $FE03; Break flag control register, BFCR<br />
• $FE04; Interrupt status register 1, INT1<br />
• $FE05; Interrupt status register 2, INT2<br />
• $FE06; Interrupt status register 2, INT3<br />
• $FE07; Reserved<br />
• $FE08; FLASH control register, FLCR<br />
• $FE09; FLASH block protect register, FLBPR<br />
• $FE0A; Reserved<br />
• $FE0B; Reserved<br />
• $FE0C; Break Address Register High, BRKH<br />
• $FE0D; Break Address Register Low, BRKL<br />
• $FE0E; Break status and control register, BRKSCR<br />
• $FFFF; COP control register, COPCTL<br />
2.3 Monitor ROM<br />
The 1024 bytes at addresses $FA00–$FDFF and 448 bytes at addresses $FE10–$FFCF are reserved<br />
ROM addresses that contain the instructions for the monitor functions. (See Chapter 7 Monitor Mode<br />
(MON).)<br />
<strong>MC68HC908JW32</strong> <strong>Data</strong> <strong>Sheet</strong>, Rev. 6<br />
<strong>Freescale</strong> Semiconductor 25
Memory<br />
$0000<br />
↓<br />
$005F<br />
$0060<br />
↓<br />
$045F<br />
$0460<br />
↓<br />
$0FFF<br />
$1000<br />
↓<br />
$103F<br />
$1040<br />
↓<br />
$108F<br />
$1090<br />
↓<br />
$1095<br />
$1096<br />
↓<br />
$6FFF<br />
$7000<br />
↓<br />
$EFFF<br />
$F000<br />
↓<br />
$F9FF<br />
$FA00<br />
↓<br />
$FDFF<br />
I/O Registers<br />
96 Bytes<br />
RAM<br />
1,024 Bytes<br />
Unimplemented<br />
2,976 Bytes<br />
USB Buffer RAM<br />
64 Bytes<br />
Unimplemented<br />
80 Bytes<br />
CGM Control Registers<br />
6 bytes<br />
Unimplemented<br />
24,426<br />
FLASH<br />
32,768 Bytes<br />
Unimplemented<br />
3,559 Bytes<br />
Monitor ROM 1<br />
1,024 Bytes<br />
$FE00 Break Status Register (BSR)<br />
$FE01 Reset Status Register (RSR)<br />
$FE02 Reserved<br />
$FE03 Break Flag Control Register (BFCR)<br />
$FE04 Interrupt Status Register 1 (INT1)<br />
$FE05 Interrupt Status Register 2 (INT2)<br />
$FE06 Interrupt Status Register 3 (INT3)<br />
$FE07 Reserved<br />
$FE08 FLASH Control Register (FLCR)<br />
$FE09 FLASH Block Protect Register (FLBPR)<br />
$FE0A Reserved<br />
$FE0B Reserved<br />
$FE0C Break Address High Register (BRKH)<br />
$FE0D Break Address Low Register (BRKL)<br />
$FE0E Break Status and Control Register (BRKSCR)<br />
$FE0F LVI Status Register (LVISR)<br />
$FE10<br />
↓<br />
$FFCF<br />
$FFD0<br />
↓<br />
$FFFF<br />
Monitor ROM 2<br />
448 Bytes<br />
FLASH Vectors<br />
48 Bytes<br />
Figure 2-1. Memory Map<br />
<strong>MC68HC908JW32</strong> <strong>Data</strong> <strong>Sheet</strong>, Rev. 6<br />
26 <strong>Freescale</strong> Semiconductor
<strong>MC68HC908JW32</strong> <strong>Data</strong> <strong>Sheet</strong>, Rev. 6<br />
Monitor ROM<br />
Addr. Register Name Bit 7 6 5 4 3 2 1 Bit 0<br />
$0000<br />
$0001<br />
$0002<br />
$0003<br />
$0004<br />
$0005<br />
$0006<br />
$0007<br />
$0008<br />
$0009<br />
$000A<br />
Port A <strong>Data</strong> Register<br />
(PTA)<br />
Port B <strong>Data</strong> Register<br />
(PTB)<br />
Port C <strong>Data</strong> Register<br />
(PTC)<br />
Port D <strong>Data</strong> Register<br />
(PTD)<br />
<strong>Data</strong> Direction Register A<br />
(DDRA)<br />
<strong>Data</strong> Direction Register B<br />
(DDRB)<br />
<strong>Data</strong> Direction Register C<br />
(DDRC)<br />
<strong>Data</strong> Direction Register D<br />
(DDRD)<br />
Port E <strong>Data</strong> Register<br />
(PTE)<br />
<strong>Data</strong> Direction Register E<br />
(DDRE)<br />
Timer 1 Status and Control<br />
Register (T1SC)<br />
$000B Reserved<br />
$000C<br />
Timer 1 Counter Register<br />
High (T1CNTH)<br />
Read:<br />
Write:<br />
PTA7 PTA6 PTA5 PTA4 PTA3 PTA2 PTA1 PTA0<br />
Reset: Unaffected by reset<br />
Read:<br />
Write:<br />
PTB7 PTB6 PTB5 PTB4 PTB3 PTB2 PTB1 PTB0<br />
Reset: Unaffected by reset<br />
Read:<br />
Write:<br />
Reset: Unaffected by reset<br />
Read:<br />
Write:<br />
PTC3 PTC2 PTC1 PTC0<br />
PTD7 PTD6 PTD5 PTD4 PTD3 PTD2 PTD1 PTD0<br />
Reset: Unaffected by reset<br />
Read:<br />
Write:<br />
DDRA7 DDRA6 DDRA5 DDRA4 DDRA3 DDRA2 DDRA1 DDRA0<br />
Reset: 0 0 0 0 0 0 0 0<br />
Read:<br />
Write:<br />
DDRB7 DDRB6 DDRB5 DDRB4 DDRB3 DDRB2 DDRB1 DDRB0<br />
Reset: 0 0 0 0 0 0 0 0<br />
Read:<br />
Write:<br />
DDRC3 DDRC2 DDRC1 DDRC0<br />
Reset: 0 0 0 0 0 0 0 0<br />
Read:<br />
Write:<br />
DDRD7 DDRD6 DDRD5 DDRD4 DDRD3 DDRD2 DDRD1 DDRD0<br />
Reset: 0 0 0 0 0 0 0 0<br />
Read:<br />
Write:<br />
PTE7 PTE6 PTE5 PTE4 PTE3 PTE2<br />
Reset: Unaffected by reset<br />
Read:<br />
Write:<br />
DDRE7 DDRE6 DDRE5 DDRE4 DDRE3 DDRE2<br />
Reset: 0 0 0 0 0 0 0 0<br />
Read: TOF<br />
0 0<br />
TOIE TSTOP<br />
Write: 0 TRST<br />
PS2 PS1 PS0<br />
Reset: 0 0 1 0 0 0 0 0<br />
Read:<br />
Write:<br />
R R R R R R R R<br />
Read: Bit15 Bit14 Bit13 Bit12 Bit11 Bit10 Bit9 Bit8<br />
Write:<br />
Reset: 0 0 0 0 0 0 0 0<br />
= Unimplemented R = Reserved U = Unaffected by reset<br />
Figure 2-2. Control, Status, and <strong>Data</strong> Registers (<strong>Sheet</strong> 1 of 7)<br />
<strong>Freescale</strong> Semiconductor 27
Memory<br />
Addr. Register Name Bit 7 6 5 4 3 2 1 Bit 0<br />
$000D<br />
$000E<br />
$000F<br />
$0010<br />
$0011<br />
$0012<br />
$0013<br />
$0014<br />
$0015<br />
$0016<br />
$0017<br />
$0018<br />
$0019<br />
Timer 1 Counter Register<br />
Low (T1CNTL)<br />
Timer 1 Counter Modulo<br />
Register High (T1MODH)<br />
Timer 1 Counter Modulo<br />
Register Low (T1MODL)<br />
Timer 1 Channel 0 Status and<br />
Control Register (T1SC0)<br />
Timer 1 Channel 0 Register<br />
High (T1CH0H)<br />
Timer 1 Channel 0 Register<br />
Low (T1CH0L)<br />
Timer 1 Channel 1 Status and<br />
Control Register (T1SC1)<br />
Timer 1 Channel 1<br />
Register High<br />
(T1CH1H)<br />
Timer 1 Channel 1<br />
Register Low<br />
(T1CH1L)<br />
Keyboard Status and Control<br />
Register<br />
(KBSCR)<br />
Keyboard Interrupt Enable<br />
Register (KBIER)<br />
Timebase Control Register<br />
(TBCR)<br />
PS2 Clock Generator<br />
Control and Satus<br />
Register (PS2CSR)<br />
Read: Bit7 Bit6 Bit5 Bit4 Bit3 Bit2 Bit1 Bit0<br />
Write:<br />
Reset: 0 0 0 0 0 0 0 0<br />
Read:<br />
Write:<br />
Bit15 Bit14 Bit13 Bit12 Bit11 Bit10 Bit9 Bit8<br />
Reset: 1 1 1 1 1 1 1 1<br />
Read:<br />
Write:<br />
Bit7 Bit6 Bit5 Bit4 Bit3 Bit2 Bit1 Bit0<br />
Reset: 1 1 1 1 1 1 1 1<br />
Read: CH0F<br />
Write: 0<br />
CH0IE MS0B MS0A ELS0B ELS0A TOV0 CH0MAX<br />
Reset: 0 0 0 0 0 0 0 0<br />
Read:<br />
Write:<br />
Bit15 Bit14 Bit13 Bit12 Bit11 Bit10 Bit9 Bit8<br />
Reset: Indeterminate after reset<br />
Read:<br />
Write:<br />
Bit7 Bit6 Bit5 Bit4 Bit3 Bit2 Bit1 Bit0<br />
Reset: Indeterminate after reset<br />
Read: CH1F<br />
Write: 0<br />
CH1IE<br />
<strong>MC68HC908JW32</strong> <strong>Data</strong> <strong>Sheet</strong>, Rev. 6<br />
28 <strong>Freescale</strong> Semiconductor<br />
0<br />
MS1A ELS1B ELS1A TOV1 CH1MAX<br />
Reset: 0 0 0 0 0 0 0 0<br />
Read:<br />
Write:<br />
Bit15 Bit14 Bit13 Bit12 Bit11 Bit10 Bit9 Bit8<br />
Reset: Indeterminate after reset<br />
Read:<br />
Write:<br />
Bit7 Bit6 Bit5 Bit4 Bit3 Bit2 Bit1 Bit0<br />
Reset: Indeterminate after reset<br />
Read: 0 0 0 0 KEYF 0<br />
Write: ACKK<br />
IMASKK MODEK<br />
Reset: 0 0 0 0 0 0 0 0<br />
Read:<br />
Write:<br />
KBIE7 KBIE6 KBIE5 KBIE4 KBIE3 KBIE2 KBIE1 KBIE0<br />
Reset: 0 0 0 0 0 0 0 0<br />
Read: TBIF<br />
0<br />
TBR2 TBR1 TBR0<br />
Write: TACK<br />
TBIE TBON R<br />
Reset: 0 0 0 0 0 0 0 0<br />
Read: PSTATUS<br />
Write:<br />
PS2IF PRE CSEL1 CSEL0 PS2IEN CLKEN PS2EN<br />
Reset: 0 0 0 0 0 0 0 0<br />
= Unimplemented R = Reserved U = Unaffected by reset<br />
Figure 2-2. Control, Status, and <strong>Data</strong> Registers (<strong>Sheet</strong> 2 of 7)
$001A<br />
Port Option<br />
Control Register 1<br />
(POCR1)<br />
Read:<br />
Write:<br />
<strong>MC68HC908JW32</strong> <strong>Data</strong> <strong>Sheet</strong>, Rev. 6<br />
Monitor ROM<br />
Addr. Register Name Bit 7 6 5 4 3 2 1 Bit 0<br />
$001B<br />
$001C<br />
$001D<br />
$001E<br />
$001F<br />
$0020<br />
to<br />
$003D<br />
$003E<br />
Port Option<br />
Control Register 2<br />
(POCR2)<br />
IRQ Option<br />
Control Register<br />
(IOCR)<br />
Configuration Register 2<br />
(CONFIG2)<br />
IRQ Status and Control<br />
Register (ISCR)<br />
Configuration Register<br />
(CONFIG) †<br />
LEDB7 LEDB6 LEDB5 LEDB4 LEDB3 LEDB2 LEDB1 LEDB0<br />
Reset: 0 0 0 0 0 0 0 0<br />
Read: 0 0<br />
Write:<br />
PTD7PD PTD3PD PTD2PD DPPULLEN PTE3P PTE2P<br />
Reset: 0 0 0 0 0 0 0 0<br />
Read: 0 0 0 0 0 PTE3IF<br />
Write:<br />
Reset:<br />
Read: STOP_<br />
Write:<br />
XCLKEN<br />
STOP_RC<br />
CLKEN<br />
PTE3IE IRQPD<br />
R VREG33D URSTD<br />
Reset: 0 0 0 0 0 0 0 0<br />
Read: 0 0 0 0 IRQF 0<br />
Write: ACK<br />
IMASK MODE<br />
Reset: 0 0 0 0 0 0 0 0<br />
Read: COPRS LVISTOP LVIRSTD LVIPWRD SSREC STOP COPD<br />
Write:<br />
† One-time writable register after each reset.<br />
Reserved<br />
Pullup Control Register<br />
(PULLCR)<br />
$003F Reserved<br />
$0040<br />
$0041<br />
$0042<br />
$0043<br />
USB Endpoint 0<br />
<strong>Data</strong> Register 0<br />
(UE0D0)<br />
USB Endpoint 0<br />
<strong>Data</strong> Register 1<br />
(UE0D1)<br />
USB Endpoint 0<br />
<strong>Data</strong> Register 2<br />
(UE0D2)<br />
USB Endpoint 0<br />
<strong>Data</strong> Register 3<br />
(UE0D3)<br />
Reset: 0 0 0 0 0 0 0 0<br />
Read:<br />
Write:<br />
R R R R R R R R<br />
Read: PULL7EN PULL6EN PULL5EN PULL4EN PULL3EN PULL2EN PULL1EN PULL0EN<br />
Write:<br />
Reset: 0 0 0 0 0 0 0 0<br />
Read:<br />
Write:<br />
R R R R R R R R<br />
Read: UE0D07_OUT UE0D06_OUT UE0D05_OUT UE0D04_OUT UE0D03_OUT UE0D02_OUT UE0D01_OUT UE0D00_OUT<br />
Write: UE0D07_IN UE0D06_IN UE0D05_IN UE0D04_IN UE0D03_IN UE0D02_IN UE0D01_IN UE0D00_IN<br />
Reset: Unaffected by reset<br />
Read: UE0D17_OUT UE0D16_OUT UE0D15_OUT UE0D14_OUT UE0D13_OUT UE0D12_OUT UE0D11_OUT UE0D10_OUT<br />
Write: UE0D17_IN UE0D16_IN UE0D15_IN UE0D14_IN UE0D13_IN UE0D12_IN UE0D11_IN UE0D10_IN<br />
Reset: Unaffected by reset<br />
Read: UE0D27_OUT UE0D26_OUT UE0D25_OUT UE0D24_OUT UE0D23_OUT UE0D22_OUT UE0D21_OUT UE0D20_OUT<br />
Write: UE0D27_IN UE0D26_IN UE0D25_IN UE0D24_IN UE0D23_IN UE0D22_IN UE0D21_IN UE0D20_IN<br />
Reset: Unaffected by reset<br />
Read: UE0D37_OUT UE0D36_OUT UE0D35_OUT UE0D34_OUT UE0D33_OUT UE0D32_OUT UE0D31_OUT UE0D30_OUT<br />
Write: UE0D37_IN UE0D36_IN UE0D35_IN UE0D34_IN UE0D33_IN UE0D32_IN UE0D31_IN UE0D30_IN<br />
Reset: Unaffected by reset<br />
= Unimplemented R = Reserved U = Unaffected by reset<br />
Figure 2-2. Control, Status, and <strong>Data</strong> Registers (<strong>Sheet</strong> 3 of 7)<br />
<strong>Freescale</strong> Semiconductor 29
Memory<br />
Addr. Register Name Bit 7 6 5 4 3 2 1 Bit 0<br />
$0044<br />
$0045<br />
$0046<br />
$0047<br />
USB Endpoint 0<br />
<strong>Data</strong> Register 4<br />
(UE0D4)<br />
USB Endpoint 0<br />
<strong>Data</strong> Register 5<br />
(UE0D5)<br />
USB Endpoint 0<br />
<strong>Data</strong> Register 6<br />
(UE0D6)<br />
USB Endpoint 0<br />
<strong>Data</strong> Register 7<br />
(UE0D7)<br />
$0048 Unimplemented<br />
$0049 Unimplemented<br />
$004A Unimplemented<br />
$004B Unimplemented<br />
$004C<br />
$004D<br />
$004E<br />
SPI Control Register<br />
(SPCR)<br />
SPI Status and Control<br />
Register<br />
(SPSCR)<br />
SPI <strong>Data</strong> Register<br />
(SPDR)<br />
$004F Reserved<br />
$0050 Reserved<br />
Read: UE0D47_OUT UE0D46_OUT UE0D45_OUT UE0D44_OUT UE0D43_OUT UE0D42_OUT UE0D41_OUT UE0D40_OUT<br />
Write: UE0D47_IN UE0D46_IN UE0D45_IN UE0D44_IN UE0D43_IN UE0D42_IN UE0D41_IN UE0D40_IN<br />
Reset: Unaffected by reset<br />
Read: UE0D57_OUT UE0D56_OUT UE0D55_OUT UE0D54_OUT UE0D53_OUT UE0D52_OUT UE0D51_OUT UE0D50_OUT<br />
Write: UE0D57_IN UE0D56_IN UE0D55_IN UE0D54_IN UE0D53_IN UE0D52_IN UE0D51_IN UE0D50_IN<br />
Reset: Unaffected by reset<br />
Read: UE0D67_OUT UE0D66_OUT UE0D65_OUT UE0D64_OUT UE0D63_OUT UE0D62_OUT UE0D61_OUT UE0D60_OUT<br />
Write: UE0D67_IN UE0D66_IN UE0D65_IN UE0D64_IN UE0D63_IN UE0D62_IN UE0D61_IN UE0D60_IN<br />
Reset: Unaffected by reset<br />
Read: UE0D77_OUT UE0D76_OUT UE0D75_OUT UE0D74_OUT UE0D73_OUT UE0D72_OUT UE0D71_OUT UE0D70_OUT<br />
Write: UE0D77_IN UE0D76_IN UE0D75_IN UE0D74_IN UE0D73_IN UE0D72_IN UE0D71_IN UE0D70_IN<br />
Reset: Unaffected by reset<br />
Read:<br />
Write:<br />
Read:<br />
Write:<br />
Read:<br />
Write:<br />
Read:<br />
Write:<br />
Reset:<br />
Read:<br />
Write:<br />
SPRIE R SPMSTR CPOL CPHA SPWOM SPE SPTIE<br />
Reset: 0 0 1 0 1 0 0 0<br />
Read: SPRF<br />
Write:<br />
ERRIE<br />
OVRF MODF SPTE<br />
<strong>MC68HC908JW32</strong> <strong>Data</strong> <strong>Sheet</strong>, Rev. 6<br />
MODFEN SPR1 SPR0<br />
Reset: 0 0 0 0 1 0 0 0<br />
Read: R7 R6 R5 R4 R3 R2 R1 R0<br />
Write: T7 T6 T5 T4 T3 T2 T1 T0<br />
Reset: Unaffected by reset<br />
Read:<br />
Write:<br />
Read:<br />
Write:<br />
R R R R R R R R<br />
R R R R R R R R<br />
= Unimplemented R = Reserved U = Unaffected by reset<br />
Figure 2-2. Control, Status, and <strong>Data</strong> Registers (<strong>Sheet</strong> 4 of 7)<br />
30 <strong>Freescale</strong> Semiconductor
$0051<br />
$0052<br />
$0053<br />
USB Control Register<br />
(USBCR)<br />
USB Status Register<br />
(USBSR)<br />
USB Status Interrupt Mask<br />
Register (USIMR)<br />
<strong>MC68HC908JW32</strong> <strong>Data</strong> <strong>Sheet</strong>, Rev. 6<br />
Monitor ROM<br />
Addr. Register Name Bit 7 6 5 4 3 2 1 Bit 0<br />
$0054<br />
$0055<br />
$0056<br />
$0057<br />
$0058<br />
$0059<br />
$005A<br />
$005B<br />
$005C<br />
$005D<br />
USB EPO Control/Status<br />
Register (UEP0CSR)<br />
USB EP1 Control/Status<br />
Register (UEP1CSR)<br />
USB EP2 Control/Status<br />
Register (UEP2CSR)<br />
USB EP3 Control/Status<br />
Register (UEP3CSR)<br />
USB EP4 Control/Status<br />
Register<br />
(UEP4CSR)<br />
USB EP1 <strong>Data</strong> Size Register<br />
(UEP1DSR)<br />
USB EP2 <strong>Data</strong> Size Register<br />
(UEP2DSR)<br />
USB EP3 <strong>Data</strong> Size Register<br />
(UEP3DSR)<br />
USB EP4 <strong>Data</strong> Size Register<br />
(UEP4DSR)<br />
USB EP 1/2 Base Pointer<br />
Register<br />
(UEP12BPR)<br />
Read:<br />
0<br />
USBEN USBCLKEN TFC4IE TFC3IE TFC2IE TFC1IE TFC0IE<br />
Write: RESUME<br />
Reset: 0 0 0 0 0 0 0 0<br />
Read: CONFIG<br />
Write:<br />
SETUP SOF CONFIG_CHG USBRST RESUMEF SUSPND<br />
Reset: 0 0 0 0 0 0 0 0<br />
Read: 0<br />
Write: EP0_STALL<br />
SETUPIE SOFIE<br />
CONFIG_<br />
CHGIE<br />
USBRE-<br />
SETIE<br />
RESUME-<br />
FIE<br />
SUSPNDIE<br />
Reset: 0 0 0 0 0 0 0 0<br />
Read: DSIZE3_OUT DSIZE2_OUT DSIZE1_OUT DSIZE0_OUT<br />
Write: DSIZE3_IN DSIZE2_IN DSIZE1_IN DSIZE0_IN<br />
DVALID_IN TFRC_IN DVALID_OUT TFRC_OUT<br />
Reset: 0 0 0 0 0 0 0 0<br />
Read: 0<br />
MODE1 MODE0<br />
Write: STALL<br />
DIR SIZE1 SIZE0 DVALID TFRC<br />
Reset: 0 0 0 0 0 0 0 0<br />
Read: 0<br />
MODE1 MODE0<br />
Write: STALL<br />
DIR SIZE1 SIZE0 DVALID TFRC<br />
Reset: 0 0 0 0 0 0 0 0<br />
Read: 0<br />
MODE1 MODE0<br />
Write: STALL<br />
DIR SIZE1 SIZE0 DVALID TFRC<br />
Reset: 0 0 0 0 0 0 0 0<br />
Read: 0<br />
MODE1 MODE0<br />
Write: STALL<br />
DIR SIZE1 SIZE0 DVALID TFRC<br />
Reset: 0 0 0 0 0 0 0 0<br />
Read:<br />
Write:<br />
DSIZE6 DSIZE5 DSIZE4 DSIZE3 DSIZE2 DSIZE1 DSIZE0<br />
Reset: 0 0 0 0 0 0 0 0<br />
Read:<br />
Write:<br />
DSIZE6 DSIZE5 DSIZE4 DSIZE3 DSIZE2 DSIZE1 DSIZE0<br />
Reset: 0 0 0 0 0 0 0 0<br />
Read:<br />
Write:<br />
DSIZE6 DSIZE5 DSIZE4 DSIZE3 DSIZE2 DSIZE1 DSIZE0<br />
Reset: 0 0 0 0 0 0 0 0<br />
Read:<br />
Write:<br />
DSIZE6 DSIZE5 DSIZE4 DSIZE3 DSIZE2 DSIZE1 DSIZE0<br />
Reset: 0 0 0 0 0 0 0 0<br />
Read:<br />
Write:<br />
BASE22 BASE21 BASE20 BASE12 BASE11 BASE10<br />
Reset: 0 0 0 0 0 0 0 0<br />
= Unimplemented R = Reserved U = Unaffected by reset<br />
Figure 2-2. Control, Status, and <strong>Data</strong> Registers (<strong>Sheet</strong> 5 of 7)<br />
<strong>Freescale</strong> Semiconductor 31
Memory<br />
Addr. Register Name Bit 7 6 5 4 3 2 1 Bit 0<br />
$005E<br />
$005F<br />
$1090<br />
$1091<br />
$1092<br />
$1093<br />
$1094<br />
$1095<br />
$FE00<br />
USB EP 3/4 Base Pointer<br />
Register<br />
(UEP34BPR)<br />
USB Interface Control<br />
Register (UINTFCR)<br />
PLL Control Register<br />
(PTCL)<br />
PLL Bandwidth Control<br />
Register<br />
(PBWC)<br />
PLL Multiplier Select<br />
Register High (PMSH)<br />
PLL Multiplier Select<br />
Register Low (PMSL)<br />
PLL VCO Range Select<br />
Register (PMRS)<br />
PLL Reference Divider<br />
Select Register (PMDS)<br />
Break Status Register<br />
(BSR)<br />
Note: Writing a logic 0 clears SBSW.<br />
$FE01<br />
Reset Status Register<br />
(RSR)<br />
$FE02 Reserved<br />
$FE03<br />
Break Flag Control<br />
Register (BFCR)<br />
Read:<br />
Write:<br />
BASE42 BASE41 BASE40 BASE32 BASE31 BASE30<br />
Reset: 0 0 0 0 0 0 0 0<br />
Read:<br />
Write:<br />
EP4INT EP3INT EP2INT EP1INT<br />
Reset: 0 0 0 0 0 0 0 0<br />
Read:<br />
Write:<br />
PLLIE<br />
PLLF<br />
<strong>MC68HC908JW32</strong> <strong>Data</strong> <strong>Sheet</strong>, Rev. 6<br />
PLLON BCS PRE1 PRE0 VPR1 VPR0<br />
Reset: 0 0 1 0 0 0 0 0<br />
Read:<br />
Write:<br />
AUTO<br />
LOCK<br />
32 <strong>Freescale</strong> Semiconductor<br />
ACQ<br />
0 0 0 0<br />
Reset: 0 0 0 0 0 0 0<br />
Read: 0 0 0 0<br />
Write:<br />
MUL11 MUL10 MUL9 MUL8<br />
Reset: 0 0 0 0 0 0 0 0<br />
Read:<br />
Write:<br />
MUL7 MUL6 MUL5 MUL4 MUL3 MUL2 MUL1 MUL0<br />
Reset: 0 1 0 0 0 0 0 0<br />
Read:<br />
Write:<br />
VRS7 VRS6 VRS5 VRS4 VRS3 VRS2 VRS1 VRS0<br />
Reset: 0 1 0 0 0 0 0 0<br />
Read: 0 0 0 0<br />
Write:<br />
RDS3 RDS2 RDS1 RDS0<br />
Reset: 0 0 0 0 0 0 0 1<br />
Read:<br />
SBSW<br />
R R R R R R<br />
Write: See note<br />
Reset: 0<br />
Read: POR PIN COP ILOP ILAD USB LVI 0<br />
Write:<br />
POR: 1 0 0 0 0 0 1 0<br />
Read:<br />
Write:<br />
Read:<br />
Write:<br />
Reset: 0<br />
R R R R R R R R<br />
BCFE R R R R R R R<br />
= Unimplemented R = Reserved U = Unaffected by reset<br />
Figure 2-2. Control, Status, and <strong>Data</strong> Registers (<strong>Sheet</strong> 6 of 7)<br />
R<br />
R
<strong>MC68HC908JW32</strong> <strong>Data</strong> <strong>Sheet</strong>, Rev. 6<br />
Monitor ROM<br />
Addr. Register Name Bit 7 6 5 4 3 2 1 Bit 0<br />
$FE04<br />
$FE05<br />
$FE06<br />
Interrupt Status Register 1<br />
(INT1)<br />
Interrupt Status Register 2<br />
(INT2)<br />
Interrupt Status Register 3<br />
(INT3)<br />
$FE07 Reserved<br />
$FE08<br />
$FE09<br />
FLASH Control Register<br />
(FLCR)<br />
FLASH Block Protect<br />
Register (FLBPR)<br />
$FE0A Reserved<br />
$FE0B Reserved<br />
$FE0C<br />
$FE0D<br />
$FE0E<br />
$FE0F<br />
$FFFF<br />
Break Address High<br />
Register (BRKH)<br />
Break Address low<br />
Register (BRKL)<br />
Break Status and Control<br />
Register (BRKSCR)<br />
LVI Sttatusl Register<br />
(LVISR)<br />
COP Control Register<br />
(COPCTL)<br />
Read: IF6 IF5 IF4 IF3 IF2 IF1 0 0<br />
Write: R R R R R R R R<br />
Reset: 0 0 0 0 0 0 0 0<br />
Read: IF14 IF13 IF12 IF11 IF10 IF9 IF8 IF7<br />
Write: R R R R R R R R<br />
Reset: 0 0 0 0 0 0 0 0<br />
Read: 0 0 0 0 0 0 0 IF15<br />
Write: R R R R R R R R<br />
Read:<br />
Write:<br />
0 0 0 0 0 0 0 0<br />
R R R R R R R R<br />
Read: 0 0 0 0<br />
Write:<br />
HVEN MASS ERASE PGM<br />
Reset: 0 0 0 0 0 0 0 0<br />
Read:<br />
Write:<br />
BPR7 BPR6 BPR5 BPR4 BPR3 BPR2 BPR1 BPR0<br />
Reset: 0 0 0 0 0 0 0 0<br />
Read:<br />
Write:<br />
Read:<br />
Write:<br />
Read:<br />
Write:<br />
R R R R R R R R<br />
R R R R R R R R<br />
Bit15 Bit14 Bit13 Bit12 Bit11 Bit10 Bit9 Bit8<br />
Reset: 0 0 0 0 0 0 0 0<br />
Read:<br />
Write:<br />
Bit7 Bit6 Bit5 Bit4 Bit3 Bit2 Bit1 Bit0<br />
Reset: 0 0 0 0 0 0 0 0<br />
Read:<br />
Write:<br />
BRKE BRKA<br />
0 0 0 0 0 0<br />
Reset: 0 0 0 0 0 0 0 0<br />
Read: LVIOUT 0 0 0 0 0 0 0<br />
Write:<br />
Reset: 0 0 0 0 0 0 0 0<br />
Read: Low byte of reset vector<br />
Write: Writing clears COP counter (any value)<br />
Reset: Unaffected by reset<br />
= Unimplemented R = Reserved U = Unaffected by reset<br />
Figure 2-2. Control, Status, and <strong>Data</strong> Registers (<strong>Sheet</strong> 7 of 7)<br />
<strong>Freescale</strong> Semiconductor 33
Memory<br />
Table 2-1 is a list of vector locations.<br />
Table 2-1. Vector Addresses<br />
Vector Vector Address Vector<br />
Lowest<br />
IF15<br />
$FFDE Timebase Vector (High)<br />
$FFDF Timebase Vector (Low)<br />
IF14<br />
$FFE0<br />
$FFE1<br />
Keyboard Vector (High)<br />
Keyboard Vector (Low)<br />
IF13<br />
$FFE2<br />
$FFE3<br />
SPI Transmit Vector (High)<br />
SPI Transmit Vector (Low)<br />
IF12<br />
$FFE4<br />
$FFE5<br />
SPI Receive Vector (High)<br />
SPI Receive Vector (Low)<br />
IF11<br />
$FFE6<br />
$FFE7<br />
Reserved<br />
Reserved<br />
IF10<br />
$FFE8<br />
$FFE9<br />
Reserved<br />
Reserved<br />
IF9<br />
$FFEA<br />
$FFEB<br />
Reserved<br />
Reserved<br />
IF8<br />
$FFEC<br />
$FFED<br />
PS2 Interrupt Vector (High)<br />
PS2 Interrupt Vector (Low)<br />
IF7<br />
$FFEE<br />
$FFEF<br />
Timer 1 Overflow Vector (High)<br />
Timer 1 Overflow Vector (Low)<br />
IF6<br />
$FFF0<br />
$FFF1<br />
Timer 1 Channel 1 Vector (High)<br />
Timer 1 Channel 1 Vector (Low)<br />
IF5<br />
$FFF2<br />
$FFF3<br />
Timer 1 Channel 0 Vector (High)<br />
Timer 1 Channel 0 Vector (Low)<br />
IF4<br />
$FFF4<br />
$FFF5<br />
PLL Vector (High)<br />
PLL Vector (Low)<br />
IF3<br />
$FFF6<br />
$FFF7<br />
IRQ Vector (High)<br />
IRQ Vector (Low)<br />
IF2<br />
$FFF8<br />
$FFF9<br />
USB Endpoint Vector (High)<br />
USB Endpoint Vector (Low)<br />
IF1<br />
$FFFA<br />
$FFFB<br />
USB System Vector (High)<br />
USB System Vector (Low)<br />
—<br />
$FFFC<br />
$FFFD<br />
SWI Vector (High)<br />
SWI Vector (Low)<br />
Highest<br />
—<br />
$FFFE<br />
$FFFF<br />
Reset Vector (High)<br />
Reset Vector (Low)<br />
<strong>MC68HC908JW32</strong> <strong>Data</strong> <strong>Sheet</strong>, Rev. 6<br />
34 <strong>Freescale</strong> Semiconductor
2.4 Random-Access Memory (RAM)<br />
<strong>MC68HC908JW32</strong> <strong>Data</strong> <strong>Sheet</strong>, Rev. 6<br />
Random-Access Memory (RAM)<br />
Addresses $0060 through $045F are RAM locations. The location of the stack RAM is programmable.<br />
The 16-bit stack pointer allows the stack to be anywhere in the 64k-byte memory space.<br />
NOTE<br />
For correct operation, the stack pointer must point only to RAM locations.<br />
Within page zero are 160 bytes of RAM. Because the location of the stack RAM is programmable, all page<br />
zero RAM locations can be used for I/O control and user data or code. When the stack pointer is moved<br />
from its reset location at $00FF out of page zero, direct addressing mode instructions can efficiently<br />
access all page zero RAM locations. Page zero RAM, therefore, provides ideal locations for frequently<br />
accessed global variables.<br />
Before processing an interrupt, the CPU uses five bytes of the stack to save the contents of the CPU<br />
registers.<br />
NOTE<br />
For M6805 compatibility, the H register is not stacked.<br />
During a subroutine call, the CPU uses two bytes of the stack to store the return address. The stack<br />
pointer decrements during pushes and increments during pulls.<br />
NOTE<br />
Be careful when using nested subroutines. The CPU may overwrite data in<br />
the RAM during a subroutine or during the interrupt stacking operation.<br />
2.5 FLASH Memory<br />
This sub-section describes the operation of the embedded FLASH memory. This memory can be read,<br />
programmed, and erased from a single external supply. The program and erase operations are enabled<br />
through the use of an internal charge pump.<br />
2.5.1 Functional Description<br />
The FLASH memory consists of an array of 32,768 bytes for user memory plus a block of 48 bytes for<br />
user interrupt vectors and one byte for the mask option register. An erased bit reads as logic 1 and a<br />
programmed bit reads as a logic 0. The FLASH memory page size is defined as 512 bytes, and is the<br />
minimum size that can be erased in a page erase operation. Program and erase operations are facilitated<br />
through control bits in FLASH control register (FLCR). The address ranges for the FLASH memory are:<br />
• $7000–$EFFF; user memory, 32,768 bytes<br />
• $FFD0–$FFFF; user interrupt vectors, 48 bytes<br />
Programming tools are available from <strong>Freescale</strong>. Contact your local <strong>Freescale</strong> representative for more<br />
information.<br />
NOTE<br />
A security feature prevents viewing of the FLASH contents. (1)<br />
1. No security feature is absolutely secure. However, <strong>Freescale</strong>’s strategy is to make reading or copying the FLASH difficult for<br />
unauthorized users.<br />
<strong>Freescale</strong> Semiconductor 35
Memory<br />
2.5.2 FLASH Control Register<br />
The FLASH control register (FLCR) controls FLASH program and erase operation.<br />
Address: $FE08<br />
Bit 7 6 5 4 3 2 1 Bit 0<br />
Read:<br />
Write:<br />
0 0 0 0<br />
HVEN MASS ERASE PGM<br />
Reset: 0 0<br />
= Unimplemented<br />
0 0 0 0 0 0<br />
HVEN — High Voltage Enable Bit<br />
This read/write bit enables the charge pump to drive high voltages for program and erase operations<br />
in the array. HVEN can only be set if either PGM = 1 or ERASE = 1 and the proper sequence for<br />
program or erase is followed.<br />
1 = High voltage enabled to array and charge pump on<br />
0 = High voltage disabled to array and charge pump off<br />
MASS — Mass Erase Control Bit<br />
This read/write bit configures the memory for mass erase operation or page erase operation when the<br />
ERASE bit is set.<br />
1 = Mass erase operation selected<br />
0 = Page erase operation selected<br />
ERASE — Erase Control Bit<br />
This read/write bit configures the memory for erase operation. ERASE is interlocked with the PGM bit<br />
such that both bits cannot be equal to 1 or set to 1 at the same time.<br />
1 = Erase operation selected<br />
0 = Erase operation not selected<br />
PGM — Program Control Bit<br />
This read/write bit configures the memory for program operation. PGM is interlocked with the ERASE<br />
bit such that both bits cannot be equal to 1 or set to 1 at the same time.<br />
1 = Program operation selected<br />
0 = Program operation not selected<br />
2.5.3 FLASH Page Erase Operation<br />
Figure 2-3. FLASH Control Register (FLCR)<br />
Use the following procedure to erase a page of FLASH memory. A page consists of 512 consecutive<br />
bytes starting from addresses $X000, $X200, $X400, $X600, $X800, $XA00, $XC00 or $XE00. The<br />
48-byte user interrupt vectors cannot be erased by the page erase operation because of security reasons.<br />
Mass erase is required to erase this page.<br />
1. Set the ERASE bit and clear the MASS bit in the FLASH control register.<br />
2. Write any data to any FLASH location within the page address range desired.<br />
3. Wait for a time, t nvs (5 µs).<br />
4. Set the HVEN bit.<br />
5. Wait for a time t erase (20 ms).<br />
6. Clear the ERASE bit.<br />
<strong>MC68HC908JW32</strong> <strong>Data</strong> <strong>Sheet</strong>, Rev. 6<br />
36 <strong>Freescale</strong> Semiconductor
7. Wait for a time, tnvh (5 µs).<br />
8. Clear the HVEN bit<br />
9. After time, trcv (1 µs), the memory can be accessed in read mode again.<br />
NOTE<br />
Programming and erasing of FLASH locations cannot be performed by<br />
code being executed from the FLASH memory. While these operations<br />
must be performed in the order as shown, but other unrelated operations<br />
may occur between the steps.<br />
2.5.4 FLASH Mass Erase Operation<br />
Use the following procedure to erase the entire FLASH memory:<br />
1. Set both the ERASE bit and the MASS bit in the FLASH control register.<br />
2. Write any data to any FLASH location within the FLASH memory address range.<br />
3. Wait for a time, tnvs (5 µs).<br />
4. Set the HVEN bit.<br />
5. Wait for a time tme (200 ms).<br />
6. Clear the ERASE bit.<br />
7. Wait for a time, tnvh1 (100 µs).<br />
8. Clear the HVEN bit.<br />
9. After time, trcv (1 µs), the memory can be accessed in read mode again.<br />
NOTE<br />
Programming and erasing of FLASH locations cannot be performed by<br />
code being executed from the FLASH memory. While these operations<br />
must be performed in the order as shown, but other unrelated operations<br />
may occur between the steps.<br />
2.5.5 FLASH Program Operation<br />
<strong>MC68HC908JW32</strong> <strong>Data</strong> <strong>Sheet</strong>, Rev. 6<br />
FLASH Memory<br />
Programming of the FLASH memory is done on a row basis. A row consists of 64 consecutive bytes<br />
starting from addresses $XX00, $XX40, $XX800 or $XXC00. Use the following procedure to program a<br />
row of FLASH memory. (Figure 2-4 shows a flowchart of the programming algorithm.)<br />
1. Set the PGM bit. This configures the memory for program operation and enables the latching of<br />
address and data for programming.<br />
2. Write any data to any FLASH location within the address range of the row to be programmed.<br />
3. Wait for a time, t nvs (5 µs).<br />
4. Set the HVEN bit.<br />
5. Wait for a time, t pgs (10 µs).<br />
6. Write data to the FLASH location to be programmed.<br />
7. Wait for time, t prog (20 µs to 40 µs).<br />
8. Repeat steps 6 and 7 until all bytes within the row are programmed.<br />
9. Clear the PGM bit.<br />
10. Wait for time, t nvh (5 µs).<br />
11. Clear the HVEN bit.<br />
12. After time, t rcv (1 µs), the memory can be accessed in read mode again.<br />
<strong>Freescale</strong> Semiconductor 37
Memory<br />
This program sequence is repeated throughout the memory until all data is programmed.<br />
2.5.6 FLASH Protection<br />
NOTE<br />
The time between each FLASH address change (step 6 to step 6), or the<br />
time between the last FLASH addressed programmed to clearing the PGM<br />
bit (step 6 to step 9), must not exceed the maximum programming time,<br />
t prog max.<br />
NOTE<br />
Programming and erasing of FLASH locations cannot be performed by<br />
code being executed from the FLASH memory. While these operations<br />
must be performed in the order shown, other unrelated operations may<br />
occur between the steps.<br />
Due to the ability of the on-board charge pump to erase and program the FLASH memory in the target<br />
application, provision is made to protect pages of memory from unintentional erase or program operations<br />
due to system malfunction. This protection is done by use of a FLASH block protect register (FLBPR).<br />
The FLBPR determines the range of the FLASH memory which is to be protected. The range of the<br />
protected area starts from a location defined by FLBPR and ends to the bottom of the FLASH memory<br />
($FFFF). When the memory is protected, the HVEN bit cannot be set in either erase or program<br />
operations.<br />
NOTE<br />
The 48 bytes of user interrupt vectors ($FFD0–$FFFF) are always<br />
protected, regardless of the value in the FLASH block protect register. A<br />
mass erase is required to erase these locations.<br />
<strong>MC68HC908JW32</strong> <strong>Data</strong> <strong>Sheet</strong>, Rev. 6<br />
38 <strong>Freescale</strong> Semiconductor
Algorithm for programming<br />
a row (64 bytes) of FLASH memory<br />
Set PGM bit<br />
Write any data to any FLASH address<br />
within the row address range desired<br />
Wait for a time, t nvs<br />
Set HVEN bit<br />
Wait for a time, t pgs<br />
Write data to the FLASH address<br />
to be programmed<br />
Wait for a time, t prog<br />
Completed<br />
programming<br />
this row?<br />
NOTE:<br />
The time between each FLASH address change (step 6 to step 6), or<br />
the time between the last FLASH address programmed<br />
to clearing PGM bit (step 6 to step 9)<br />
must not exceed the maximum programming<br />
time, tPROG max.<br />
This row program algorithm assumes the row/s<br />
to be programmed are initially erased.<br />
1<br />
2<br />
3<br />
4<br />
5<br />
6<br />
7<br />
Figure 2-4. FLASH Programming Flowchart<br />
<strong>MC68HC908JW32</strong> <strong>Data</strong> <strong>Sheet</strong>, Rev. 6<br />
Clear PGM bit<br />
Wait for a time, t nvh<br />
Clear HVEN bit<br />
Wait for a time, t rcv<br />
FLASH Memory<br />
<strong>Freescale</strong> Semiconductor 39<br />
N<br />
9<br />
10<br />
11<br />
12<br />
Y<br />
End of Programming
Memory<br />
2.5.7 FLASH Block Protect Register<br />
The FLASH block protect register is implemented as an 8-bit I/O register. The value in this register<br />
determines the starting address of the protected range within the FLASH memory.<br />
Address: $FE09<br />
Bit 7 6 5 4 3 2 1 Bit 0<br />
Read:<br />
Write:<br />
BPR7 BPR6 BPR5 BPR4 BPR3 BPR2 BPR1 BPR0<br />
Reset: 0 0 0 0 0 0 0 0<br />
Figure 2-5. FLASH Block Protect Register (FLBPR)<br />
BPR[7:0] — FLASH Block Protect Bits<br />
BPR[7:1] represent bits [15:9] of a 16-bit memory address. Bits [8:0] are logic 0’s.<br />
BPR0 is used only for BPR[7:0] = $FF, for no block protection.<br />
The resultant 16-bit address is used for specifying the start address of the FLASH memory for block<br />
protection. The FLASH is protected from this start address to the end of FLASH memory, at $FFFF.<br />
With this mechanism, the protect start address can be X000, X200, etc. (at page boundaries — 512<br />
bytes) within the FLASH memory.<br />
Examples of protect start address:<br />
<strong>MC68HC908JW32</strong> <strong>Data</strong> <strong>Sheet</strong>, Rev. 6<br />
16-bit memory address<br />
Start address of FLASH block protect 0 0 0 0 0 0 0 0 0<br />
BPR[7:1]<br />
Table 2-2 FLASH Block Protect Range<br />
BPR[7:0] Protected Range<br />
$00–$70 The entire FLASH memory is protected.<br />
$70 or $71<br />
(0111 000x)<br />
$72 or $73<br />
(0111 001x)<br />
$74 or $75<br />
(0111 010x)<br />
$EE or $EF<br />
(1110 111x)<br />
$7000 to $FFFF<br />
(The entire FLASH memory is protected.)<br />
and so on...<br />
$7200 to $FFFF<br />
$7400 to $FFFF<br />
$EE00 to $FFFF<br />
$F0 - $FF The entire FLASH memory is NOT protected. (1)<br />
1. The 48-byte user vectors ($FFD0–$FFFF), which are always protected.<br />
40 <strong>Freescale</strong> Semiconductor
Chapter 3<br />
Configuration Registers (CONFIG)<br />
3.1 Introduction<br />
This section describes the configuration registers, CONFIG1 and CONFIG2. The configuration registers<br />
enable or disable these options:<br />
• Computer operating properly module (COP)<br />
• COP timeout period (262,128 or 8176 CGMRCLK cycles)<br />
• Low-voltage inhibit (LVI) module power<br />
• LVI module reset<br />
• LVI module in stop mode<br />
• LVI module voltage trip point selection<br />
• STOP instruction<br />
• Stop mode recovery time (32 CGMXCLK cycles or 4096 CGMXCLK cycles)<br />
• Oscillator during stop mode<br />
Addr. Register Name Bit 7 6 5 4 3 2 1 Bit 0<br />
$001D<br />
Configuration Register 2<br />
(CONFIG2)<br />
Read:<br />
Write:<br />
STOP_<br />
XCLKEN<br />
STOP_RC<br />
CLKEN<br />
R VREG33D URSTD<br />
Reset: 0 0 0 0 0 0 0 0<br />
$001F<br />
Configuration Register 1<br />
(CONFIG1) †<br />
Read:<br />
Write:<br />
COPRS LVISTOP LVIRSTD LVIPWRD SSREC STOP COPD<br />
Reset:<br />
† One-time writable register after each reset.<br />
0 0<br />
= Unimplemented<br />
0 0 0 0 0 0<br />
3.2 Functional Description<br />
Figure 3-1. CONFIG Registers Summary<br />
The configuration registers are used in the initialization of various options. The configuration register<br />
(CONFIG1) can be written once after each reset but CONFIG2 register can perform multiple write. All of<br />
the configuration register bits are cleared during reset. Since the various options affect the operation of<br />
the MCU, it is recommended that these registers be written immediately after reset. The configuration<br />
registers are located at $001D and $001F. The configuration registers may be read at anytime.<br />
<strong>MC68HC908JW32</strong> <strong>Data</strong> <strong>Sheet</strong>, Rev. 6<br />
<strong>Freescale</strong> Semiconductor 41
Configuration Registers (CONFIG)<br />
3.3 Configuration Register 1 (CONFIG1)<br />
Address: $001F<br />
Bit 7 6 5 4 3 2 1 Bit 0<br />
Read:<br />
Write:<br />
COPRS LVISTOP LVIRSTD LVIPWRD SSREC STOP COPD<br />
Reset: 0 0 0 0 0 0 0 0<br />
= Unimplemented<br />
Figure 3-2. Configuration Register 1 (CONFIG1)<br />
COPRS — COP Rate Select<br />
COPRS selects the COP time-out period. Reset clears COPRS. (See Chapter 16 Computer Operating<br />
Properly (COP).)<br />
1 = COP time out period = 8176 CGMRCLK cycles<br />
0 = COP time out period = 262,128 CGMRCLK cycles<br />
LVISTOP — Low Voltage Inhibit Enable in STOP mode bit<br />
When the LVIPWRD bit is clear or the LVIREGD is clear, setting the LVISTOP bit enables the LVI to<br />
operate during STOP mode. Reset clears LVISTOP.<br />
1 = Low voltage inhibit enabled during stop mode<br />
0 = Low voltage inhibit disable during stop mode<br />
LVIRSTD — LVI Reset Disable Bit<br />
LVIRSTD disables the reset signal from the LVI module.<br />
1 = LVI module resets disabled<br />
0 = LVI module resets enabled<br />
LVIPWRD — LVI Power Disable Bit<br />
LVIPWRD disables the LVI module completely. When it is set, LVI trip for VDD is disabled.<br />
1 = LVI module power and LVI trip for VDD disabled<br />
0 = LVI module power and LVI trip for VDD is enabled<br />
SSREC — Short Stop Recovery<br />
SSREC enables the CPU to exit stop mode with a delay of 32 CGMXCLK cycles instead of a 4096<br />
CGMXCLK cycle delay.<br />
1 = Stop mode recovery after 32 CGMXCLK cycles<br />
0 = Stop mode recovery after 4096 CGMXCLK cycles<br />
NOTE<br />
Exiting stop mode by pulling reset will result in the long stop recovery.<br />
If using an external crystal oscillator, do not set the SSREC bit.<br />
NOTE<br />
When the LVISTOP is enabled, the system stabilization time for power on<br />
reset and long stop recovery (both 4096 CGMXCLK cycles) gives a delay<br />
longer than the enable time for the LVI. There is no period where the MCU<br />
is not protected from a low power condition. However, when using the short<br />
stop recovery configuration option, the 32 CGMXCLK delay is less than the<br />
LVI’s turn-on time and there exists a period in start-up where the LVI is not<br />
protecting the MCU.<br />
<strong>MC68HC908JW32</strong> <strong>Data</strong> <strong>Sheet</strong>, Rev. 6<br />
42 <strong>Freescale</strong> Semiconductor
<strong>MC68HC908JW32</strong> <strong>Data</strong> <strong>Sheet</strong>, Rev. 6<br />
Configuration Register 2 (CONFIG2)<br />
STOP — STOP Instruction Enable<br />
STOP enables the STOP instruction.<br />
1 = STOP instruction enabled<br />
0 = STOP instruction treated as illegal opcode<br />
COPD — COP Disable Bit<br />
COPD disables the COP module. (See Chapter 16 Computer Operating Properly (COP).)<br />
1 = COP module disabled<br />
0 = COP module enabled<br />
3.4 Configuration Register 2 (CONFIG2)<br />
Address: $001D<br />
Bit 7 6 5 4 3 2 1 Bit 0<br />
Read:<br />
Write:<br />
STOP_<br />
XCLKEN<br />
STOP_RC<br />
CLKEN<br />
R VREG33D URSTD<br />
Reset: 0 0 0 0 0 0 0 0<br />
= Unimplemented †† Reset by POR only.<br />
Figure 3-3. Configuration Register 2 (CONFIG2)<br />
STOP_XCLKEN — Crystal Oscillator Stop Mode Enable<br />
Setting STOP_XCLKEN enables the external crystal (XTAL) oscillator to continue operating during<br />
stop mode, in the other words, SIMOSCEN hold high during STOP mode. When this bit is cleared, the<br />
external XTAL oscillator will be disabled during stop mode. Reset clears this bit.<br />
1 = XTAL oscillator enabled during stop mode<br />
0 = XTAL oscillator disabled during stop mode<br />
STOP_RCCLKEN — RC clock Stop Mode Enable<br />
Setting STOP_RCCLKEN enables the internal RC clock to continue operating during STOP mode.<br />
When this bit is cleared, the internal RC clock will be disabled during STOP mode. Reset clears this bit.<br />
1 = Internal RC clock enabled during stop mode<br />
0 = Internal RC clock disable during stop mode<br />
VREG33D — 3.3V USB Regulator Disable Bit<br />
VREG33D disables the USB 3.3V regulator completely.<br />
1 = VREG33 regulator is disabled<br />
0 = VREG33 regulator is enabled<br />
URSTD — USB Reset Disable Bit<br />
URSTD disables the USB reset signal generating an internal reset to the CPU and internal registers.<br />
Instead, it will generate an interrupt request to CPU.<br />
1 = USB reset generates a interrupt request to CPU<br />
0 = USB reset generates a chip reset<br />
<strong>Freescale</strong> Semiconductor 43
Configuration Registers (CONFIG)<br />
<strong>MC68HC908JW32</strong> <strong>Data</strong> <strong>Sheet</strong>, Rev. 6<br />
44 <strong>Freescale</strong> Semiconductor
Chapter 4<br />
Central Processor Unit (CPU)<br />
4.1 Introduction<br />
The M68HC08 CPU (central processor unit) is an enhanced and fully object-code-compatible version of<br />
the M68HC05 CPU. The CPU08 Reference Manual (document order number CPU08RM/AD) contains a<br />
description of the CPU instruction set, addressing modes, and architecture.<br />
4.2 Features<br />
Features of the CPU include:<br />
• Object code fully upward-compatible with M68HC05 Family<br />
• 16-bit stack pointer with stack manipulation instructions<br />
• 16-bit index register with x-register manipulation instructions<br />
• 8-MHz CPU internal bus frequency<br />
• 64-Kbyte program/data memory space<br />
• 16 addressing modes<br />
• Memory-to-memory data moves without using accumulator<br />
• Fast 8-bit by 8-bit multiply and 16-bit by 8-bit divide instructions<br />
• Enhanced binary-coded decimal (BCD) data handling<br />
• Modular architecture with expandable internal bus definition for extension of addressing range<br />
beyond 64 Kbytes<br />
• Low-power stop and wait modes<br />
4.3 CPU Registers<br />
Figure 4-1 shows the five CPU registers. CPU registers are not part of the memory map.<br />
<strong>MC68HC908JW32</strong> <strong>Data</strong> <strong>Sheet</strong>, Rev. 6<br />
<strong>Freescale</strong> Semiconductor 45
Central Processor Unit (CPU)<br />
15<br />
15<br />
15<br />
4.3.1 Accumulator<br />
Figure 4-1. CPU Registers<br />
The accumulator is a general-purpose 8-bit register. The CPU uses the accumulator to hold operands<br />
and the results of arithmetic/logic operations.<br />
4.3.2 Index Register<br />
H X<br />
7<br />
7 0<br />
V 1 1 H I N Z C<br />
ACCUMULATOR (A)<br />
INDEX REGISTER (H:X)<br />
STACK POINTER (SP)<br />
PROGRAM COUNTER (PC)<br />
Bit 7 6 5 4 3 2 1 Bit 0<br />
Read:<br />
Write:<br />
Reset: Unaffected by reset<br />
Figure 4-2. Accumulator (A)<br />
The 16-bit index register allows indexed addressing of a 64-Kbyte memory space. H is the upper byte of<br />
the index register, and X is the lower byte. H:X is the concatenated 16-bit index register.<br />
In the indexed addressing modes, the CPU uses the contents of the index register to determine the<br />
conditional address of the operand.<br />
The index register can serve also as a temporary data storage location.<br />
Bit<br />
15 14 13 12 11 10 9 8 7 6 5 4 3 2 1<br />
Read:<br />
Write:<br />
Reset: 0 0 0 0 0 0 0 0 X X X X X X X X<br />
X = Indeterminate<br />
Figure 4-3. Index Register (H:X)<br />
<strong>MC68HC908JW32</strong> <strong>Data</strong> <strong>Sheet</strong>, Rev. 6<br />
CONDITION CODE REGISTER (CCR)<br />
CARRY/BORROW FLAG<br />
ZERO FLAG<br />
NEGATIVE FLAG<br />
INTERRUPT MASK<br />
HALF-CARRY FLAG<br />
TWO’S COMPLEMENT OVERFLOW FLAG<br />
46 <strong>Freescale</strong> Semiconductor<br />
0<br />
0<br />
0<br />
0<br />
Bit<br />
0
4.3.3 Stack Pointer<br />
<strong>MC68HC908JW32</strong> <strong>Data</strong> <strong>Sheet</strong>, Rev. 6<br />
CPU Registers<br />
The stack pointer is a 16-bit register that contains the address of the next location on the stack. During a<br />
reset, the stack pointer is preset to $00FF. The reset stack pointer (RSP) instruction sets the least<br />
significant byte to $FF and does not affect the most significant byte. The stack pointer decrements as data<br />
is pushed onto the stack and increments as data is pulled from the stack.<br />
In the stack pointer 8-bit offset and 16-bit offset addressing modes, the stack pointer can function as an<br />
index register to access data on the stack. The CPU uses the contents of the stack pointer to determine<br />
the conditional address of the operand.<br />
4.3.4 Program Counter<br />
Bit<br />
15 14 13 12 11 10 9 8 7 6 5 4 3 2 1<br />
Read:<br />
Write:<br />
Reset: 0 0 0 0 0 0 0 0 1 1 1 1 1 1 1 1<br />
Figure 4-4. Stack Pointer (SP)<br />
NOTE<br />
The location of the stack is arbitrary and may be relocated anywhere in<br />
random-access memory (RAM). Moving the SP out of page 0 ($0000 to<br />
$00FF) frees direct address (page 0) space. For correct operation, the<br />
stack pointer must point only to RAM locations.<br />
The program counter is a 16-bit register that contains the address of the next instruction or operand to be<br />
fetched.<br />
Normally, the program counter automatically increments to the next sequential memory location every<br />
time an instruction or operand is fetched. Jump, branch, and interrupt operations load the program<br />
counter with an address other than that of the next sequential location.<br />
During reset, the program counter is loaded with the reset vector address located at $FFFE and $FFFF.<br />
The vector address is the address of the first instruction to be executed after exiting the reset state.<br />
Bit<br />
15 14 13 12 11 10 9 8 7 6 5 4 3 2 1<br />
Read:<br />
Write:<br />
Reset: Loaded with vector from $FFFE and $FFFF<br />
Figure 4-5. Program Counter (PC)<br />
<strong>Freescale</strong> Semiconductor 47<br />
Bit<br />
0<br />
Bit<br />
0
Central Processor Unit (CPU)<br />
4.3.5 Condition Code Register<br />
The 8-bit condition code register contains the interrupt mask and five flags that indicate the results of the<br />
instruction just executed. Bits 6 and 5 are set permanently to 1. The following paragraphs describe the<br />
functions of the condition code register.<br />
Bit 7 6 5 4 3 2 1 Bit 0<br />
Read:<br />
Write:<br />
V 1 1 H I N Z C<br />
Reset: X<br />
X = Indeterminate<br />
1 1 X 1 X X X<br />
Figure 4-6. Condition Code Register (CCR)<br />
V — Overflow Flag<br />
The CPU sets the overflow flag when a two's complement overflow occurs. The signed branch<br />
instructions BGT, BGE, BLE, and BLT use the overflow flag.<br />
1 = Overflow<br />
0 = No overflow<br />
H — Half-Carry Flag<br />
The CPU sets the half-carry flag when a carry occurs between accumulator bits 3 and 4 during an<br />
add-without-carry (ADD) or add-with-carry (ADC) operation. The half-carry flag is required for<br />
binary-coded decimal (BCD) arithmetic operations. The DAA instruction uses the states of the H and<br />
C flags to determine the appropriate correction factor.<br />
1 = Carry between bits 3 and 4<br />
0 = No carry between bits 3 and 4<br />
I — Interrupt Mask<br />
When the interrupt mask is set, all maskable CPU interrupts are disabled. CPU interrupts are enabled<br />
when the interrupt mask is cleared. When a CPU interrupt occurs, the interrupt mask is set<br />
automatically after the CPU registers are saved on the stack, but before the interrupt vector is fetched.<br />
1 = Interrupts disabled<br />
0 = Interrupts enabled<br />
NOTE<br />
To maintain M6805 Family compatibility, the upper byte of the index<br />
register (H) is not stacked automatically. If the interrupt service routine<br />
modifies H, then the user must stack and unstack H using the PSHH and<br />
PULH instructions.<br />
After the I bit is cleared, the highest-priority interrupt request is serviced first.<br />
A return-from-interrupt (RTI) instruction pulls the CPU registers from the stack and restores the<br />
interrupt mask from the stack. After any reset, the interrupt mask is set and can be cleared only by the<br />
clear interrupt mask software instruction (CLI).<br />
N — Negative Flag<br />
The CPU sets the negative flag when an arithmetic operation, logic operation, or data manipulation<br />
produces a negative result, setting bit 7 of the result.<br />
1 = Negative result<br />
0 = Non-negative result<br />
<strong>MC68HC908JW32</strong> <strong>Data</strong> <strong>Sheet</strong>, Rev. 6<br />
48 <strong>Freescale</strong> Semiconductor
<strong>MC68HC908JW32</strong> <strong>Data</strong> <strong>Sheet</strong>, Rev. 6<br />
Arithmetic/Logic Unit (ALU)<br />
Z — Zero Flag<br />
The CPU sets the zero flag when an arithmetic operation, logic operation, or data manipulation<br />
produces a result of $00.<br />
1 = Zero result<br />
0 = Non-zero result<br />
C — Carry/Borrow Flag<br />
The CPU sets the carry/borrow flag when an addition operation produces a carry out of bit 7 of the<br />
accumulator or when a subtraction operation requires a borrow. Some instructions — such as bit test<br />
and branch, shift, and rotate — also clear or set the carry/borrow flag.<br />
1 = Carry out of bit 7<br />
0 = No carry out of bit 7<br />
4.4 Arithmetic/Logic Unit (ALU)<br />
The ALU performs the arithmetic and logic operations defined by the instruction set.<br />
Refer to the CPU08 Reference Manual (document order number CPU08RM/AD) for a description of the<br />
instructions and addressing modes and more detail about the architecture of the CPU.<br />
4.5 Low-Power Modes<br />
The WAIT and STOP instructions put the MCU in low power-consumption standby modes.<br />
4.5.1 Wait Mode<br />
The WAIT instruction:<br />
• Clears the interrupt mask (I bit) in the condition code register, enabling interrupts. After exit from<br />
wait mode by interrupt, the I bit remains clear. After exit by reset, the I bit is set.<br />
• Disables the CPU clock<br />
4.5.2 Stop Mode<br />
The STOP instruction:<br />
• Clears the interrupt mask (I bit) in the condition code register, enabling external interrupts. After<br />
exit from stop mode by external interrupt, the I bit remains clear. After exit by reset, the I bit is set.<br />
• Disables the CPU clock<br />
After exiting stop mode, the CPU clock begins running after the oscillator stabilization delay.<br />
4.6 CPU During Break Interrupts<br />
If a break module is present on the MCU, the CPU starts a break interrupt by:<br />
• Loading the instruction register with the SWI instruction<br />
• Loading the program counter with $FFFC:$FFFD or with $FEFC:$FEFD in monitor mode<br />
The break interrupt begins after completion of the CPU instruction in progress. If the break address<br />
register match occurs on the last cycle of a CPU instruction, the break interrupt begins immediately.<br />
A return-from-interrupt instruction (RTI) in the break routine ends the break interrupt and returns the MCU<br />
to normal operation if the break interrupt has been deasserted.<br />
<strong>Freescale</strong> Semiconductor 49
Central Processor Unit (CPU)<br />
4.7 Instruction Set Summary<br />
Table 4-1 provides a summary of the M68HC08 instruction set.<br />
Source<br />
Form<br />
ADC #opr<br />
ADC opr<br />
ADC opr<br />
ADC opr,X<br />
ADC opr,X<br />
ADC ,X<br />
ADC opr,SP<br />
ADC opr,SP<br />
ADD #opr<br />
ADD opr<br />
ADD opr<br />
ADD opr,X<br />
ADD opr,X<br />
ADD ,X<br />
ADD opr,SP<br />
ADD opr,SP<br />
Table 4-1. Instruction Set Summary (<strong>Sheet</strong> 1 of 6)<br />
Operation Description<br />
<strong>MC68HC908JW32</strong> <strong>Data</strong> <strong>Sheet</strong>, Rev. 6<br />
Effect<br />
on CCR<br />
V H I N Z C<br />
Add with Carry A ← (A) + (M) + (C) ↕ ↕ – ↕ ↕ ↕<br />
Add without Carry A ← (A) + (M) ↕ ↕ – ↕ ↕ ↕<br />
50 <strong>Freescale</strong> Semiconductor<br />
Address<br />
Mode<br />
IMM<br />
DIR<br />
EXT<br />
IX2<br />
IX1<br />
IX<br />
SP1<br />
SP2<br />
IMM<br />
DIR<br />
EXT<br />
IX2<br />
IX1<br />
IX<br />
SP1<br />
SP2<br />
Opcode<br />
A9<br />
B9<br />
C9<br />
D9<br />
E9<br />
F9<br />
9EE9<br />
9ED9<br />
AB<br />
BB<br />
CB<br />
DB<br />
EB<br />
FB<br />
9EEB<br />
9EDB<br />
AIS #opr Add Immediate Value (Signed) to SP SP ← (SP) + (16 « M) – – – – – – IMM A7 ii 2<br />
AIX #opr Add Immediate Value (Signed) to H:X H:X ← (H:X) + (16 « M) – – – – – – IMM AF ii 2<br />
AND #opr<br />
AND opr<br />
AND opr<br />
AND opr,X<br />
AND opr,X<br />
AND ,X<br />
AND opr,SP<br />
AND opr,SP<br />
ASL opr<br />
ASLA<br />
ASLX<br />
ASL opr,X<br />
ASL ,X<br />
ASL opr,SP<br />
ASR opr<br />
ASRA<br />
ASRX<br />
ASR opr,X<br />
ASR opr,X<br />
ASR opr,SP<br />
Logical AND A ← (A) & (M) 0 – – ↕ ↕ –<br />
Arithmetic Shift Left<br />
(Same as LSL)<br />
C<br />
b7<br />
↕ – – ↕ ↕ ↕<br />
IMM<br />
DIR<br />
EXT<br />
IX2<br />
IX1<br />
IX<br />
SP1<br />
SP2<br />
DIR<br />
INH<br />
INH<br />
IX1<br />
IX<br />
SP1<br />
DIR<br />
INH<br />
INH<br />
IX1<br />
IX<br />
SP1<br />
A4<br />
B4<br />
C4<br />
D4<br />
E4<br />
F4<br />
9EE4<br />
9ED4<br />
38<br />
48<br />
58<br />
68<br />
78<br />
9E68<br />
37<br />
47<br />
57<br />
67<br />
77<br />
9E67<br />
Arithmetic Shift Right<br />
b7<br />
b0<br />
C<br />
↕ – – ↕ ↕ ↕<br />
ff<br />
ff<br />
BCC rel Branch if Carry Bit Clear PC ← (PC) + 2 + rel ? (C) = 0 – – – – – – REL 24 rr 3<br />
DIR (b0) 11 dd 4<br />
DIR (b1) 13 dd 4<br />
DIR (b2) 15 dd 4<br />
BCLR n, opr Clear Bit n in M Mn ← 0 – – – – – –<br />
DIR (b3)<br />
DIR (b4)<br />
17<br />
19<br />
dd<br />
dd<br />
4<br />
4<br />
DIR (b5) 1B dd 4<br />
DIR (b6) 1D dd 4<br />
DIR (b7) 1F dd 4<br />
BCS rel Branch if Carry Bit Set (Same as BLO) PC ← (PC) + 2 + rel ? (C) = 1 – – – – – – REL 25 rr 3<br />
BEQ rel Branch if Equal PC ← (PC) + 2 + rel ? (Z) = 1 – – – – – – REL 27 rr 3<br />
BGE opr<br />
Branch if Greater Than or Equal To<br />
(Signed Operands)<br />
PC ← (PC) + 2 + rel ? (N ⊕ V) = 0 – – – – – – REL 90 rr 3<br />
BGT opr<br />
Branch if Greater Than (Signed<br />
Operands)<br />
PC ← (PC) + 2 + rel ? (Z) | (N ⊕ V) = 0 – – – – – – REL 92 rr 3<br />
BHCC rel Branch if Half Carry Bit Clear PC ← (PC) + 2 + rel ? (H) = 0 – – – – – – REL 28 rr 3<br />
BHCS rel Branch if Half Carry Bit Set PC ← (PC) + 2 + rel ? (H) = 1 – – – – – – REL 29 rr 3<br />
BHI rel Branch if Higher PC ← (PC) + 2 + rel ? (C) | (Z) = 0 – – – – – – REL 22 rr 3<br />
b0<br />
0<br />
Operand<br />
ii<br />
dd<br />
hh ll<br />
ee ff<br />
ff<br />
ff<br />
ee ff<br />
ii<br />
dd<br />
hh ll<br />
ee ff<br />
ff<br />
ff<br />
ee ff<br />
ii<br />
dd<br />
hh ll<br />
ee ff<br />
ff<br />
ff<br />
ee ff<br />
dd<br />
ff<br />
ff<br />
dd<br />
Cycles<br />
2<br />
3<br />
4<br />
4<br />
3<br />
2<br />
4<br />
5<br />
2<br />
3<br />
4<br />
4<br />
3<br />
2<br />
4<br />
5<br />
2<br />
3<br />
4<br />
4<br />
3<br />
2<br />
4<br />
5<br />
4<br />
1<br />
1<br />
4<br />
3<br />
5<br />
4<br />
1<br />
1<br />
4<br />
3<br />
5
BHS rel<br />
Source<br />
Form<br />
Branch if Higher or Same<br />
(Same as BCC)<br />
Table 4-1. Instruction Set Summary (<strong>Sheet</strong> 2 of 6)<br />
Operation Description<br />
<strong>MC68HC908JW32</strong> <strong>Data</strong> <strong>Sheet</strong>, Rev. 6<br />
Effect<br />
on CCR<br />
V H I N Z C<br />
Instruction Set Summary<br />
PC ← (PC) + 2 + rel ? (C) = 0 – – – – – – REL 24 rr 3<br />
BIH rel Branch if IRQ Pin High PC ← (PC) + 2 + rel ? IRQ = 1 – – – – – – REL 2F rr 3<br />
BIL rel Branch if IRQ Pin Low PC ← (PC) + 2 + rel ? IRQ = 0 – – – – – – REL 2E rr 3<br />
BIT #opr<br />
IMM A5 ii 2<br />
BIT opr<br />
DIR B5 dd 3<br />
BIT opr<br />
EXT C5 hh ll 4<br />
BIT opr,X<br />
BIT opr,X<br />
Bit Test (A) & (M) 0 – – ↕ ↕ –<br />
IX2<br />
IX1<br />
D5<br />
E5<br />
ee ff<br />
ff<br />
4<br />
3<br />
BIT ,X<br />
IX F5 2<br />
BIT opr,SP<br />
SP1 9EE5 ff 4<br />
BIT opr,SP<br />
SP2 9ED5 ee ff 5<br />
BLE opr<br />
Branch if Less Than or Equal To<br />
(Signed Operands)<br />
PC ← (PC) + 2 + rel ? (Z) | (N ⊕ V) = 1 – – – – – – REL 93 rr 3<br />
BLO rel Branch if Lower (Same as BCS) PC ← (PC) + 2 + rel ? (C) = 1 – – – – – – REL 25 rr 3<br />
BLS rel Branch if Lower or Same PC ← (PC) + 2 + rel ? (C) | (Z) = 1 – – – – – – REL 23 rr 3<br />
BLT opr Branch if Less Than (Signed Operands) PC ← (PC) + 2 + rel ? (N ⊕ V) =1 – – – – – – REL 91 rr 3<br />
BMC rel Branch if Interrupt Mask Clear PC ← (PC) + 2 + rel ? (I) = 0 – – – – – – REL 2C rr 3<br />
BMI rel Branch if Minus PC ← (PC) + 2 + rel ? (N) = 1 – – – – – – REL 2B rr 3<br />
BMS rel Branch if Interrupt Mask Set PC ← (PC) + 2 + rel ? (I) = 1 – – – – – – REL 2D rr 3<br />
BNE rel Branch if Not Equal PC ← (PC) + 2 + rel ? (Z) = 0 – – – – – – REL 26 rr 3<br />
BPL rel Branch if Plus PC ← (PC) + 2 + rel ? (N) = 0 – – – – – – REL 2A rr 3<br />
BRA rel Branch Always PC ← (PC) + 2 + rel – – – – – – REL 20 rr 3<br />
DIR (b0) 01 dd rr 5<br />
DIR (b1) 03 dd rr 5<br />
DIR (b2) 05 dd rr 5<br />
BRCLR n,opr,rel Branch if Bit n in M Clear PC ← (PC) + 3 + rel ? (Mn) = 0 – – – – – ↕<br />
DIR (b3)<br />
DIR (b4)<br />
07<br />
09<br />
dd rr<br />
dd rr<br />
5<br />
5<br />
DIR (b5) 0B dd rr 5<br />
DIR (b6) 0D dd rr 5<br />
DIR (b7) 0F dd rr 5<br />
BRN rel Branch Never PC ← (PC) + 2 – – – – – – REL 21 rr 3<br />
DIR (b0) 00 dd rr 5<br />
DIR (b1) 02 dd rr 5<br />
DIR (b2) 04 dd rr 5<br />
BRSET n,opr,rel Branch if Bit n in M Set PC ← (PC) + 3 + rel ? (Mn) = 1 – – – – – ↕<br />
DIR (b3)<br />
DIR (b4)<br />
06<br />
08<br />
dd rr<br />
dd rr<br />
5<br />
5<br />
DIR (b5) 0A dd rr 5<br />
DIR (b6) 0C dd rr 5<br />
DIR (b7) 0E dd rr 5<br />
DIR (b0) 10 dd 4<br />
DIR (b1) 12 dd 4<br />
DIR (b2) 14 dd 4<br />
BSET n,opr Set Bit n in M Mn ← 1 – – – – – –<br />
DIR (b3)<br />
DIR (b4)<br />
16<br />
18<br />
dd<br />
dd<br />
4<br />
4<br />
DIR (b5) 1A dd 4<br />
DIR (b6) 1C dd 4<br />
PC ← (PC) + 2; push (PCL)<br />
DIR (b7) 1E dd 4<br />
BSR rel Branch to Subroutine<br />
SP ← (SP) – 1; push (PCH)<br />
SP ← (SP) – 1<br />
PC ← (PC) + rel<br />
– – – – – – REL AD rr 4<br />
CBEQ opr,rel<br />
PC ← (PC) + 3 + rel ? (A) – (M) = $00<br />
DIR 31 dd rr 5<br />
CBEQA #opr,rel<br />
PC ← (PC) + 3 + rel ? (A) – (M) = $00<br />
IMM 41 ii rr 4<br />
CBEQX #opr,rel<br />
CBEQ opr,X+,rel<br />
Compare and Branch if Equal<br />
PC ← (PC) + 3 + rel ? (X) – (M) = $00<br />
PC ← (PC) + 3 + rel ? (A) – (M) = $00<br />
– – – – – –<br />
IMM<br />
IX1+<br />
51<br />
61<br />
ii rr<br />
ff rr<br />
4<br />
5<br />
CBEQ X+,rel<br />
PC ← (PC) + 2 + rel ? (A) – (M) = $00<br />
IX+ 71 rr 4<br />
CBEQ opr,SP,rel<br />
PC ← (PC) + 4 + rel ? (A) – (M) = $00<br />
SP1 9E61 ff rr 6<br />
CLC Clear Carry Bit C ← 0 – – – – – 0 INH 98 1<br />
CLI Clear Interrupt Mask I ← 0 – – 0 – – – INH 9A 2<br />
<strong>Freescale</strong> Semiconductor 51<br />
Address<br />
Mode<br />
Opcode<br />
Operand<br />
Cycles
Central Processor Unit (CPU)<br />
Source<br />
Form<br />
CLR opr<br />
CLRA<br />
CLRX<br />
CLRH<br />
CLR opr,X<br />
CLR ,X<br />
CLR opr,SP<br />
CMP #opr<br />
CMP opr<br />
CMP opr<br />
CMP opr,X<br />
CMP opr,X<br />
CMP ,X<br />
CMP opr,SP<br />
CMP opr,SP<br />
COM opr<br />
COMA<br />
COMX<br />
COM opr,X<br />
COM ,X<br />
COM opr,SP<br />
CPHX #opr<br />
CPHX opr<br />
CPX #opr<br />
CPX opr<br />
CPX opr<br />
CPX ,X<br />
CPX opr,X<br />
CPX opr,X<br />
CPX opr,SP<br />
CPX opr,SP<br />
Clear<br />
M ← $00<br />
A ← $00<br />
X ← $00<br />
H ← $00<br />
M ← $00<br />
M ← $00<br />
M ← $00<br />
<strong>MC68HC908JW32</strong> <strong>Data</strong> <strong>Sheet</strong>, Rev. 6<br />
0 – – 0 1 –<br />
Compare A with M (A) – (M) ↕ – – ↕ ↕ ↕<br />
Complement (One’s Complement)<br />
M ← (M) = $FF – (M)<br />
A ← (A) = $FF – (M)<br />
X ← (X) = $FF – (M)<br />
M ← (M) = $FF – (M)<br />
M ← (M) = $FF – (M)<br />
M ← (M) = $FF – (M)<br />
0 – – ↕ ↕ 1<br />
52 <strong>Freescale</strong> Semiconductor<br />
DIR<br />
INH<br />
INH<br />
INH<br />
IX1<br />
IX<br />
SP1<br />
IMM<br />
DIR<br />
EXT<br />
IX2<br />
IX1<br />
IX<br />
SP1<br />
SP2<br />
DIR<br />
INH<br />
INH<br />
IX1<br />
IX<br />
SP1<br />
Compare H:X with M (H:X) – (M:M + 1) ↕ – – ↕ ↕ ↕ IMM<br />
DIR<br />
IMM<br />
DIR<br />
EXT<br />
Compare X with M (X) – (M) ↕ – – ↕ ↕ ↕<br />
IX2<br />
IX1<br />
IX<br />
SP1<br />
SP2<br />
DAA Decimal Adjust A (A) 10 U – – ↕ ↕ ↕ INH 72 2<br />
DBNZ opr,rel<br />
DBNZA rel<br />
DBNZX rel<br />
DBNZ opr,X,rel<br />
DBNZ X,rel<br />
DBNZ opr,SP,rel<br />
DEC opr<br />
DECA<br />
DECX<br />
DEC opr,X<br />
DEC ,X<br />
DEC opr,SP<br />
Decrement and Branch if Not Zero<br />
Decrement<br />
DIV Divide<br />
EOR #opr<br />
EOR opr<br />
EOR opr<br />
EOR opr,X<br />
EOR opr,X<br />
EOR ,X<br />
EOR opr,SP<br />
EOR opr,SP<br />
INC opr<br />
INCA<br />
INCX<br />
INC opr,X<br />
INC ,X<br />
INC opr,SP<br />
A ← (A) – 1 or M ← (M) – 1 or X ← (X) – 1<br />
PC ← (PC) + 3 + rel ? (result) ≠ 0<br />
PC ← (PC) + 2 + rel ? (result) ≠ 0<br />
PC ← (PC) + 2 + rel ? (result) ≠ 0<br />
PC ← (PC) + 3 + rel ? (result) ≠ 0<br />
PC ← (PC) + 2 + rel ? (result) ≠ 0<br />
PC ← (PC) + 4 + rel ? (result) ≠ 0<br />
M ← (M) – 1<br />
A ← (A) – 1<br />
X ← (X) – 1<br />
M ← (M) – 1<br />
M ← (M) – 1<br />
M ← (M) – 1<br />
A ← (H:A)/(X)<br />
H ← Remainder<br />
– – – – – –<br />
↕ – – ↕ ↕ –<br />
Exclusive OR M with A A ← (A ⊕ M) 0 – – ↕ ↕ –<br />
Increment<br />
Table 4-1. Instruction Set Summary (<strong>Sheet</strong> 3 of 6)<br />
Operation Description<br />
M ← (M) + 1<br />
A ← (A) + 1<br />
X ← (X) + 1<br />
M ← (M) + 1<br />
M ← (M) + 1<br />
M ← (M) + 1<br />
Effect<br />
on CCR<br />
V H I N Z C<br />
DIR<br />
INH<br />
INH<br />
IX1<br />
IX<br />
SP1<br />
DIR<br />
INH<br />
INH<br />
IX1<br />
IX<br />
SP1<br />
3F<br />
4F<br />
5F<br />
8C<br />
6F<br />
7F<br />
9E6F<br />
A1<br />
B1<br />
C1<br />
D1<br />
E1<br />
F1<br />
9EE1<br />
9ED1<br />
33<br />
43<br />
53<br />
63<br />
73<br />
9E63<br />
65<br />
75<br />
A3<br />
B3<br />
C3<br />
D3<br />
E3<br />
F3<br />
9EE3<br />
9ED3<br />
3B<br />
4B<br />
5B<br />
6B<br />
7B<br />
9E6B<br />
3A<br />
4A<br />
5A<br />
6A<br />
7A<br />
9E6A<br />
dd<br />
ff<br />
ff<br />
ii<br />
dd<br />
hh ll<br />
ee ff<br />
ff<br />
ff<br />
ee ff<br />
dd<br />
ff<br />
ff<br />
ii ii+1<br />
dd<br />
ii<br />
dd<br />
hh ll<br />
ee ff<br />
ff<br />
ff<br />
ee ff<br />
dd rr<br />
rr<br />
rr<br />
ff rr<br />
rr<br />
ff rr<br />
dd<br />
ff<br />
ff<br />
3<br />
1<br />
1<br />
1<br />
3<br />
2<br />
4<br />
2<br />
3<br />
4<br />
4<br />
3<br />
2<br />
4<br />
5<br />
4<br />
1<br />
1<br />
4<br />
3<br />
5<br />
3<br />
4<br />
2<br />
3<br />
4<br />
4<br />
3<br />
2<br />
4<br />
5<br />
– – – – ↕ ↕ INH 52 7<br />
↕ – – ↕ ↕ –<br />
Address<br />
Mode<br />
IMM<br />
DIR<br />
EXT<br />
IX2<br />
IX1<br />
IX<br />
SP1<br />
SP2<br />
DIR<br />
INH<br />
INH<br />
IX1<br />
IX<br />
SP1<br />
Opcode<br />
A8<br />
B8<br />
C8<br />
D8<br />
E8<br />
F8<br />
9EE8<br />
9ED8<br />
3C<br />
4C<br />
5C<br />
6C<br />
7C<br />
9E6C<br />
Operand<br />
ii<br />
dd<br />
hh ll<br />
ee ff<br />
ff<br />
ff<br />
ee ff<br />
dd<br />
ff<br />
ff<br />
Cycles<br />
5<br />
3<br />
3<br />
5<br />
4<br />
6<br />
4<br />
1<br />
1<br />
4<br />
3<br />
5<br />
2<br />
3<br />
4<br />
4<br />
3<br />
2<br />
4<br />
5<br />
4<br />
1<br />
1<br />
4<br />
3<br />
5
Source<br />
Form<br />
JMP opr<br />
JMP opr<br />
JMP opr,X<br />
JMP opr,X<br />
JMP ,X<br />
JSR opr<br />
JSR opr<br />
JSR opr,X<br />
JSR opr,X<br />
JSR ,X<br />
LDA #opr<br />
LDA opr<br />
LDA opr<br />
LDA opr,X<br />
LDA opr,X<br />
LDA ,X<br />
LDA opr,SP<br />
LDA opr,SP<br />
LDHX #opr<br />
LDHX opr<br />
LDX #opr<br />
LDX opr<br />
LDX opr<br />
LDX opr,X<br />
LDX opr,X<br />
LDX ,X<br />
LDX opr,SP<br />
LDX opr,SP<br />
LSL opr<br />
LSLA<br />
LSLX<br />
LSL opr,X<br />
LSL ,X<br />
LSL opr,SP<br />
LSR opr<br />
LSRA<br />
LSRX<br />
LSR opr,X<br />
LSR ,X<br />
LSR opr,SP<br />
MOV opr,opr<br />
MOV opr,X+<br />
MOV #opr,opr<br />
MOV X+,opr<br />
Jump PC ← Jump Address – – – – – –<br />
Jump to Subroutine<br />
PC ← (PC) + n (n = 1, 2, or 3)<br />
Push (PCL); SP ← (SP) – 1<br />
Push (PCH); SP ← (SP) – 1<br />
PC ← Unconditional Address<br />
<strong>MC68HC908JW32</strong> <strong>Data</strong> <strong>Sheet</strong>, Rev. 6<br />
– – – – – –<br />
Load A from M A ← (M) 0 – – ↕ ↕ –<br />
Instruction Set Summary<br />
<strong>Freescale</strong> Semiconductor 53<br />
DIR<br />
EXT<br />
IX2<br />
IX1<br />
IX<br />
DIR<br />
EXT<br />
IX2<br />
IX1<br />
IX<br />
IMM<br />
DIR<br />
EXT<br />
IX2<br />
IX1<br />
IX<br />
SP1<br />
SP2<br />
Load H:X from M H:X ← (M:M + 1) 0 – – ↕ ↕ – IMM<br />
DIR<br />
IMM<br />
DIR<br />
EXT<br />
Load X from M X ← (M) 0 – – ↕ ↕ –<br />
IX2<br />
IX1<br />
IX<br />
SP1<br />
SP2<br />
Logical Shift Left<br />
(Same as ASL)<br />
↕ – – ↕ ↕ ↕<br />
Logical Shift Right 0<br />
C ↕ – – 0 ↕ ↕<br />
b7<br />
b0<br />
Move<br />
Table 4-1. Instruction Set Summary (<strong>Sheet</strong> 4 of 6)<br />
Operation Description<br />
C<br />
b7<br />
(M) Destination ← (M) Source<br />
H:X ← (H:X) + 1 (IX+D, DIX+)<br />
0 – – ↕ ↕ –<br />
DIR<br />
INH<br />
INH<br />
IX1<br />
IX<br />
SP1<br />
DIR<br />
INH<br />
INH<br />
IX1<br />
IX<br />
SP1<br />
DD<br />
DIX+<br />
IMD<br />
IX+D<br />
BC<br />
CC<br />
DC<br />
EC<br />
FC<br />
BD<br />
CD<br />
DD<br />
ED<br />
FD<br />
A6<br />
B6<br />
C6<br />
D6<br />
E6<br />
F6<br />
9EE6<br />
9ED6<br />
45<br />
55<br />
AE<br />
BE<br />
CE<br />
DE<br />
EE<br />
FE<br />
9EEE<br />
9EDE<br />
38<br />
48<br />
58<br />
68<br />
78<br />
9E68<br />
34<br />
44<br />
54<br />
64<br />
74<br />
9E64<br />
MUL Unsigned multiply X:A ← (X) × (A) – 0 – – – 0 INH 42 5<br />
NEG opr<br />
NEGA<br />
NEGX<br />
NEG opr,X<br />
NEG ,X<br />
NEG opr,SP<br />
Negate (Two’s Complement)<br />
M ← –(M) = $00 – (M)<br />
A ← –(A) = $00 – (A)<br />
X ← –(X) = $00 – (X)<br />
M ← –(M) = $00 – (M)<br />
M ← –(M) = $00 – (M)<br />
↕ – – ↕ ↕ ↕<br />
DIR<br />
INH<br />
INH<br />
IX1<br />
IX<br />
SP1<br />
30<br />
40<br />
50<br />
60<br />
70<br />
9E60<br />
dd<br />
ff<br />
ff<br />
4<br />
1<br />
1<br />
4<br />
3<br />
5<br />
NOP No Operation None – – – – – – INH 9D 1<br />
NSA Nibble Swap A A ← (A[3:0]:A[7:4]) – – – – – – INH 62 3<br />
ORA #opr<br />
IMM AA ii 2<br />
ORA opr<br />
DIR BA dd 3<br />
ORA opr<br />
EXT CA hh ll 4<br />
ORA opr,X<br />
ORA opr,X<br />
Inclusive OR A and M A ← (A) | (M) 0 – – ↕ ↕ –<br />
IX2<br />
IX1<br />
DA<br />
EA<br />
ee ff<br />
ff<br />
4<br />
3<br />
ORA ,X<br />
IX FA 2<br />
ORA opr,SP<br />
SP1 9EEA ff 4<br />
ORA opr,SP<br />
SP2 9EDA ee ff 5<br />
PSHA Push A onto Stack Push (A); SP ← (SP) – 1 – – – – – – INH 87 2<br />
PSHH Push H onto Stack Push (H); SP ← (SP) – 1 – – – – – – INH 8B 2<br />
PSHX Push X onto Stack Push (X); SP ← (SP) – 1 – – – – – – INH 89 2<br />
b0<br />
0<br />
Effect<br />
on CCR<br />
V H I N Z C<br />
Address<br />
Mode<br />
Opcode<br />
4E<br />
5E<br />
6E<br />
7E<br />
Operand<br />
dd<br />
hh ll<br />
ee ff<br />
ff<br />
dd<br />
hh ll<br />
ee ff<br />
ff<br />
ii<br />
dd<br />
hh ll<br />
ee ff<br />
ff<br />
ff<br />
ee ff<br />
ii jj<br />
dd<br />
ii<br />
dd<br />
hh ll<br />
ee ff<br />
ff<br />
ff<br />
ee ff<br />
dd<br />
ff<br />
ff<br />
dd<br />
ff<br />
ff<br />
dd dd<br />
dd<br />
ii dd<br />
dd<br />
Cycles<br />
2<br />
3<br />
4<br />
3<br />
2<br />
4<br />
5<br />
6<br />
5<br />
4<br />
2<br />
3<br />
4<br />
4<br />
3<br />
2<br />
4<br />
5<br />
3<br />
4<br />
2<br />
3<br />
4<br />
4<br />
3<br />
2<br />
4<br />
5<br />
4<br />
1<br />
1<br />
4<br />
3<br />
5<br />
4<br />
1<br />
1<br />
4<br />
3<br />
5<br />
5<br />
4<br />
4<br />
4
Central Processor Unit (CPU)<br />
Source<br />
Form<br />
Table 4-1. Instruction Set Summary (<strong>Sheet</strong> 5 of 6)<br />
Operation Description<br />
PULA Pull A from Stack SP ← (SP + 1); Pull (A) – – – – – – INH 86 2<br />
PULH Pull H from Stack SP ← (SP + 1); Pull (H) – – – – – – INH 8A 2<br />
PULX Pull X from Stack SP ← (SP + 1); Pull (X) – – – – – – INH 88 2<br />
ROL opr<br />
DIR 39 dd 4<br />
ROLA<br />
INH 49 1<br />
ROLX<br />
ROL opr,X<br />
ROL ,X<br />
Rotate Left through Carry C<br />
b7<br />
b0<br />
↕ – – ↕ ↕ ↕<br />
INH<br />
IX1<br />
IX<br />
59<br />
69<br />
79<br />
ff<br />
1<br />
4<br />
3<br />
ROL opr,SP<br />
SP1 9E69 ff 5<br />
ROR opr<br />
DIR 36 dd 4<br />
RORA<br />
INH 46 1<br />
RORX<br />
ROR opr,X<br />
ROR ,X<br />
Rotate Right through Carry<br />
b7<br />
b0<br />
C<br />
↕ – – ↕ ↕ ↕<br />
INH<br />
IX1<br />
IX<br />
56<br />
66<br />
76<br />
ff<br />
1<br />
4<br />
3<br />
ROR opr,SP<br />
SP1 9E66 ff 5<br />
RSP Reset Stack Pointer SP ← $FF – – – – – – INH 9C 1<br />
RTI Return from Interrupt<br />
SP ← (SP) + 1; Pull (CCR)<br />
SP ← (SP) + 1; Pull (A)<br />
SP ← (SP) + 1; Pull (X)<br />
SP ← (SP) + 1; Pull (PCH)<br />
SP ← (SP) + 1; Pull (PCL)<br />
↕ ↕ ↕ ↕ ↕ ↕ INH 80 7<br />
RTS Return from Subroutine<br />
SP ← SP + 1; Pull (PCH)<br />
SP ← SP + 1; Pull (PCL)<br />
– – – – – – INH 81 4<br />
SBC #opr<br />
SBC opr<br />
SBC opr<br />
SBC opr,X<br />
SBC opr,X<br />
SBC ,X<br />
SBC opr,SP<br />
SBC opr,SP<br />
Subtract with Carry A ← (A) – (M) – (C) ↕ – – ↕ ↕ ↕<br />
IMM<br />
DIR<br />
EXT<br />
IX2<br />
IX1<br />
IX<br />
SP1<br />
SP2<br />
A2<br />
B2<br />
C2<br />
D2<br />
E2<br />
F2<br />
9EE2<br />
9ED2<br />
ii<br />
dd<br />
hh ll<br />
ee ff<br />
ff<br />
ff<br />
ee ff<br />
2<br />
3<br />
4<br />
4<br />
3<br />
2<br />
4<br />
5<br />
SEC Set Carry Bit C ← 1 – – – – – 1 INH 99 1<br />
SEI Set Interrupt Mask I ← 1 – – 1 – – – INH 9B 2<br />
STA opr<br />
DIR B7 dd 3<br />
STA opr<br />
EXT C7 hh ll 4<br />
STA opr,X<br />
IX2 D7 ee ff 4<br />
STA opr,X Store A in M M ← (A) 0 – – ↕ ↕ – IX1 E7 ff 3<br />
STA ,X<br />
IX F7 2<br />
STA opr,SP<br />
SP1 9EE7 ff 4<br />
STA opr,SP<br />
SP2 9ED7 ee ff 5<br />
STHX opr Store H:X in M (M:M + 1) ← (H:X) 0 – – ↕ ↕ – DIR 35 dd 4<br />
STOP<br />
Enable Interrupts, Stop Processing,<br />
Refer to MCU Documentation<br />
I ← 0; Stop Processing – – 0 – – – INH 8E 1<br />
STX opr<br />
DIR BF dd 3<br />
STX opr<br />
EXT CF hh ll 4<br />
STX opr,X<br />
IX2 DF ee ff 4<br />
STX opr,X Store X in M M ← (X) 0 – – ↕ ↕ – IX1 EF ff 3<br />
STX ,X<br />
IX FF 2<br />
STX opr,SP<br />
SP1 9EEF ff 4<br />
STX opr,SP<br />
SP2 9EDF ee ff 5<br />
SUB #opr<br />
IMM A0 ii 2<br />
SUB opr<br />
DIR B0 dd 3<br />
SUB opr<br />
EXT C0 hh ll 4<br />
SUB opr,X<br />
SUB opr,X<br />
Subtract A ← (A) – (M) ↕ – – ↕ ↕ ↕<br />
IX2<br />
IX1<br />
D0<br />
E0<br />
ee ff<br />
ff<br />
4<br />
3<br />
SUB ,X<br />
IX F0 2<br />
SUB opr,SP<br />
SP1 9EE0 ff 4<br />
SUB opr,SP<br />
SP2 9ED0 ee ff 5<br />
<strong>MC68HC908JW32</strong> <strong>Data</strong> <strong>Sheet</strong>, Rev. 6<br />
Effect<br />
on CCR<br />
V H I N Z C<br />
54 <strong>Freescale</strong> Semiconductor<br />
Address<br />
Mode<br />
Opcode<br />
Operand<br />
Cycles
Source<br />
Form<br />
SWI Software Interrupt<br />
4.8 Opcode Map<br />
See Table 4-2.<br />
Table 4-1. Instruction Set Summary (<strong>Sheet</strong> 6 of 6)<br />
Operation Description<br />
PC ← (PC) + 1; Push (PCL)<br />
SP ← (SP) – 1; Push (PCH)<br />
SP ← (SP) – 1; Push (X)<br />
SP ← (SP) – 1; Push (A)<br />
SP ← (SP) – 1; Push (CCR)<br />
SP ← (SP) – 1; I ← 1<br />
PCH ← Interrupt Vector High Byte<br />
PCL ← Interrupt Vector Low Byte<br />
<strong>MC68HC908JW32</strong> <strong>Data</strong> <strong>Sheet</strong>, Rev. 6<br />
Effect<br />
on CCR<br />
V H I N Z C<br />
Opcode Map<br />
– – 1 – – – INH 83 9<br />
TAP Transfer A to CCR CCR ← (A) ↕ ↕ ↕ ↕ ↕ ↕ INH 84 2<br />
TAX Transfer A to X X ← (A) – – – – – – INH 97 1<br />
TPA Transfer CCR to A A ← (CCR) – – – – – – INH 85 1<br />
TST opr<br />
DIR 3D dd 3<br />
TSTA<br />
INH 4D 1<br />
TSTX<br />
TST opr,X<br />
Test for Negative or Zero (A) – $00 or (X) – $00 or (M) – $00 0 – – ↕ ↕ –<br />
INH<br />
IX1<br />
5D<br />
6D ff<br />
1<br />
3<br />
TST ,X<br />
IX 7D 2<br />
TST opr,SP<br />
SP1 9E6D ff 4<br />
TSX Transfer SP to H:X H:X ← (SP) + 1 – – – – – – INH 95 2<br />
TXA Transfer X to A A ← (X) – – – – – – INH 9F 1<br />
TXS Transfer H:X to SP (SP) ← (H:X) – 1 – – – – – – INH 94 2<br />
WAIT Enable Interrupts; Wait for Interrupt<br />
I bit ← 0; Inhibit CPU clocking<br />
until interrupted<br />
– – 0 – – – INH 8F 1<br />
A Accumulator n Any bit<br />
C Carry/borrow bit opr Operand (one or two bytes)<br />
CCR Condition code register PC Program counter<br />
dd Direct address of operand PCH Program counter high byte<br />
dd rr Direct address of operand and relative offset of branch instruction PCL Program counter low byte<br />
DD Direct to direct addressing mode REL Relative addressing mode<br />
DIR Direct addressing mode rel Relative program counter offset byte<br />
DIX+ Direct to indexed with post increment addressing mode rr Relative program counter offset byte<br />
ee ff High and low bytes of offset in indexed, 16-bit offset addressing SP1 Stack pointer, 8-bit offset addressing mode<br />
EXT Extended addressing mode SP2 Stack pointer 16-bit offset addressing mode<br />
ff Offset byte in indexed, 8-bit offset addressing SP Stack pointer<br />
H Half-carry bit U Undefined<br />
H Index register high byte V Overflow bit<br />
hh ll High and low bytes of operand address in extended addressing X Index register low byte<br />
I Interrupt mask Z Zero bit<br />
ii Immediate operand byte & Logical AND<br />
IMD<br />
IMM<br />
Immediate source to direct destination addressing mode<br />
Immediate addressing mode<br />
|<br />
⊕<br />
Logical OR<br />
Logical EXCLUSIVE OR<br />
INH Inherent addressing mode ( ) Contents of<br />
IX Indexed, no offset addressing mode –( ) Negation (two’s complement)<br />
IX+<br />
IX+D<br />
Indexed, no offset, post increment addressing mode<br />
Indexed with post increment to direct addressing mode<br />
#<br />
«<br />
Immediate value<br />
Sign extend<br />
IX1 Indexed, 8-bit offset addressing mode ← Loaded with<br />
IX1+ Indexed, 8-bit offset, post increment addressing mode ? If<br />
IX2 Indexed, 16-bit offset addressing mode : Concatenated with<br />
M Memory location ↕ Set or cleared<br />
N Negative bit — Not affected<br />
<strong>Freescale</strong> Semiconductor 55<br />
Address<br />
Mode<br />
Opcode<br />
Operand<br />
Cycles
56 <strong>Freescale</strong> Semiconductor<br />
<strong>MC68HC908JW32</strong> <strong>Data</strong> <strong>Sheet</strong>, Rev. 6<br />
LSB<br />
0<br />
1<br />
2<br />
3<br />
4<br />
5<br />
6<br />
7<br />
8<br />
9<br />
A<br />
B<br />
C<br />
D<br />
E<br />
F<br />
MSB<br />
Table 4-2. Opcode Map<br />
Bit Manipulation Branch Read-Modify-Write Control Register/Memory<br />
DIR DIR REL DIR INH INH IX1 SP1 IX INH INH IMM DIR EXT IX2 SP2 IX1 SP1 IX<br />
0 1 2 3 4 5 6 9E6 7 8 9 A B C D 9ED E 9EE F<br />
5<br />
BRSET0<br />
3 DIR<br />
5<br />
BRCLR0<br />
3 DIR<br />
5<br />
BRSET1<br />
3 DIR<br />
5<br />
BRCLR1<br />
3 DIR<br />
5<br />
BRSET2<br />
3 DIR<br />
5<br />
BRCLR2<br />
3 DIR<br />
5<br />
BRSET3<br />
3 DIR<br />
5<br />
BRCLR3<br />
3 DIR<br />
5<br />
BRSET4<br />
3 DIR<br />
5<br />
BRCLR4<br />
3 DIR<br />
5<br />
BRSET5<br />
3 DIR<br />
5<br />
BRCLR5<br />
3 DIR<br />
5<br />
BRSET6<br />
3 DIR<br />
5<br />
BRCLR6<br />
3 DIR<br />
5<br />
BRSET7<br />
3 DIR<br />
5<br />
BRCLR7<br />
3 DIR<br />
4 3 4 1 1 4 5 3 7 3 2 3 4 4 5 3<br />
BSET0 BRA NEG NEGA NEGX NEG NEG NEG RTI BGE SUB SUB SUB SUB SUB SUB<br />
2 DIR 2 REL 2 DIR 1 INH 1 INH 2 IX1 3 SP1 1 IX 1 INH 2 REL 2 IMM 2 DIR 3 EXT 3 IX2 4 SP2 2 IX1<br />
4<br />
BCLR0<br />
2 DIR<br />
3<br />
BRN<br />
2 REL<br />
5<br />
CBEQ<br />
3 DIR<br />
4<br />
CBEQA<br />
3 IMM<br />
4<br />
CBEQX<br />
3 IMM<br />
5<br />
CBEQ<br />
3 IX1+<br />
6<br />
CBEQ<br />
4 SP1<br />
4<br />
CBEQ<br />
2 IX+<br />
4<br />
RTS<br />
1 INH<br />
3<br />
BLT<br />
2 REL<br />
2<br />
CMP<br />
2 IMM<br />
3<br />
CMP<br />
2 DIR<br />
4<br />
CMP<br />
3 EXT<br />
4<br />
CMP<br />
3 IX2<br />
5<br />
CMP<br />
4 SP2<br />
3<br />
CMP<br />
2 IX1<br />
4<br />
BSET1<br />
2 DIR<br />
3<br />
BHI<br />
2 REL<br />
5<br />
MUL<br />
1 INH<br />
7<br />
DIV<br />
1 INH<br />
3<br />
NSA<br />
1 INH<br />
2<br />
DAA<br />
1 INH<br />
3<br />
BGT<br />
2 REL<br />
2<br />
SBC<br />
2 IMM<br />
3<br />
SBC<br />
2 DIR<br />
4<br />
SBC<br />
3 EXT<br />
4<br />
SBC<br />
3 IX2<br />
5<br />
SBC<br />
4 SP2<br />
3<br />
SBC<br />
2 IX1<br />
4 3 4 1 1 4 5 3 9 3 2 3 4 4 5 3<br />
BCLR1 BLS COM COMA COMX COM COM COM SWI BLE CPX CPX CPX CPX CPX CPX<br />
2 DIR 2 REL 2 DIR 1 INH 1 INH 2 IX1 3 SP1 1 IX 1 INH 2 REL 2 IMM 2 DIR 3 EXT 3 IX2 4 SP2 2 IX1<br />
4<br />
BSET2<br />
2 DIR<br />
3<br />
BCC<br />
2 REL<br />
4<br />
LSR<br />
2 DIR<br />
1<br />
LSRA<br />
1 INH<br />
1<br />
LSRX<br />
1 INH<br />
4<br />
LSR<br />
2 IX1<br />
5<br />
LSR<br />
3 SP1<br />
3<br />
LSR<br />
1 IX<br />
2<br />
TAP<br />
1 INH<br />
2<br />
TXS<br />
1 INH<br />
2<br />
AND<br />
2 IMM<br />
3<br />
AND<br />
2 DIR<br />
4<br />
AND<br />
3 EXT<br />
4<br />
AND<br />
3 IX2<br />
5<br />
AND<br />
4 SP2<br />
3<br />
AND<br />
2 IX1<br />
4<br />
BCLR2<br />
2 DIR<br />
3<br />
BCS<br />
2 REL<br />
4<br />
STHX<br />
2 DIR<br />
3<br />
LDHX<br />
3 IMM<br />
4<br />
LDHX<br />
2 DIR<br />
3<br />
CPHX<br />
3 IMM<br />
4<br />
CPHX<br />
2 DIR<br />
1<br />
TPA<br />
1 INH<br />
2<br />
TSX<br />
1 INH 2<br />
2<br />
BIT<br />
IMM 2<br />
3<br />
BIT<br />
DIR 3<br />
4<br />
BIT<br />
EXT 3<br />
4<br />
BIT<br />
IX2 4<br />
5<br />
BIT<br />
SP2 2<br />
3<br />
BIT<br />
IX1<br />
4<br />
BSET3<br />
2 DIR<br />
3<br />
BNE<br />
2 REL<br />
4<br />
ROR<br />
2 DIR<br />
1<br />
RORA<br />
1 INH<br />
1<br />
RORX<br />
1 INH<br />
4<br />
ROR<br />
2 IX1<br />
5<br />
ROR<br />
3 SP1<br />
3<br />
ROR<br />
1 IX<br />
2<br />
PULA<br />
1 INH<br />
2<br />
LDA<br />
2 IMM<br />
3<br />
LDA<br />
2 DIR<br />
4<br />
LDA<br />
3 EXT<br />
4<br />
LDA<br />
3 IX2<br />
5<br />
LDA<br />
4 SP2<br />
3<br />
LDA<br />
2 IX1<br />
4 3 4 1 1 4 5 3 2 1 2 3 4 4 5 3<br />
BCLR3 BEQ ASR ASRA ASRX ASR ASR ASR PSHA TAX AIS STA STA STA STA STA<br />
2 DIR 2 REL 2 DIR 1 INH 1 INH 2 IX1 3 SP1 1 IX 1 INH 1 INH 2 IMM 2 DIR 3 EXT 3 IX2 4 SP2 2 IX1<br />
4<br />
BSET4<br />
2 DIR<br />
3<br />
BHCC<br />
2 REL<br />
4<br />
LSL<br />
2 DIR<br />
1<br />
LSLA<br />
1 INH<br />
1<br />
LSLX<br />
1 INH<br />
4<br />
LSL<br />
2 IX1<br />
5<br />
LSL<br />
3 SP1<br />
3<br />
LSL<br />
1 IX<br />
2<br />
PULX<br />
1 INH<br />
1<br />
CLC<br />
1 INH<br />
2<br />
EOR<br />
2 IMM<br />
3<br />
EOR<br />
2 DIR<br />
4<br />
EOR<br />
3 EXT<br />
4<br />
EOR<br />
3 IX2<br />
5<br />
EOR<br />
4 SP2<br />
3<br />
EOR<br />
2 IX1<br />
4 3 4 1 1 4 5 3 2 1 2 3 4 4 5 3<br />
BCLR4 BHCS ROL ROLA ROLX ROL ROL ROL PSHX SEC ADC ADC ADC ADC ADC ADC<br />
2 DIR 2 REL 2 DIR 1 INH 1 INH 2 IX1 3 SP1 1 IX 1 INH 1 INH 2 IMM 2 DIR 3 EXT 3 IX2 4 SP2 2 IX1<br />
4<br />
BSET5<br />
2 DIR<br />
3<br />
BPL<br />
2 REL<br />
4<br />
DEC<br />
2 DIR<br />
1<br />
DECA<br />
1 INH<br />
1<br />
DECX<br />
1 INH<br />
4<br />
DEC<br />
2 IX1<br />
5<br />
DEC<br />
3 SP1<br />
3<br />
DEC<br />
1 IX<br />
2<br />
PULH<br />
1 INH 1<br />
2<br />
CLI<br />
INH<br />
2<br />
ORA<br />
2 IMM<br />
3<br />
ORA<br />
2 DIR<br />
4<br />
ORA<br />
3 EXT<br />
4<br />
ORA<br />
3 IX2<br />
5<br />
ORA<br />
4 SP2<br />
3<br />
ORA<br />
2 IX1<br />
4 3 5 3 3 5 6 4 2 2 2 3 4 4 5 3<br />
BCLR5 BMI DBNZ DBNZA DBNZX DBNZ DBNZ DBNZ PSHH SEI ADD ADD ADD ADD ADD ADD<br />
2 DIR 2 REL 3 DIR 2 INH 2 INH 3 IX1 4 SP1 2 IX 1 INH 1 INH 2 IMM 2 DIR 3 EXT 3 IX2 4 SP2 2 IX1<br />
4<br />
BSET6<br />
2 DIR<br />
3<br />
BMC<br />
2 REL<br />
4<br />
INC<br />
2 DIR<br />
1<br />
INCA<br />
1 INH<br />
1<br />
INCX<br />
1 INH<br />
4<br />
INC<br />
2 IX1<br />
5<br />
INC<br />
3 SP1<br />
3<br />
INC<br />
1 IX<br />
1<br />
CLRH<br />
1 INH<br />
1<br />
RSP<br />
1 INH<br />
2<br />
JMP<br />
2 DIR<br />
3<br />
JMP<br />
3 EXT<br />
4<br />
JMP<br />
3 IX2<br />
3<br />
JMP<br />
2 IX1<br />
4<br />
BCLR6<br />
2 DIR<br />
3<br />
BMS<br />
2 REL<br />
3<br />
TST<br />
2 DIR<br />
1<br />
TSTA<br />
1 INH<br />
1<br />
TSTX<br />
1 INH<br />
3<br />
TST<br />
2 IX1<br />
4<br />
TST<br />
3 SP1<br />
2<br />
TST<br />
1 IX<br />
1<br />
NOP<br />
1 INH<br />
4<br />
BSR<br />
2 REL<br />
4<br />
JSR<br />
2 DIR<br />
5<br />
JSR<br />
3 EXT<br />
6<br />
JSR<br />
3 IX2<br />
5<br />
JSR<br />
2 IX1<br />
4<br />
BSET7<br />
2 DIR 2<br />
3<br />
BIL<br />
REL<br />
5<br />
MOV<br />
3 DD<br />
4<br />
MOV<br />
2 DIX+<br />
4<br />
MOV<br />
3 IMD<br />
4<br />
MOV<br />
2 IX+D<br />
1<br />
STOP<br />
1 INH *<br />
2<br />
LDX<br />
2 IMM<br />
3<br />
LDX<br />
2 DIR<br />
4<br />
LDX<br />
3 EXT<br />
4<br />
LDX<br />
3 IX2<br />
5<br />
LDX<br />
4 SP2<br />
3<br />
LDX<br />
2 IX1<br />
4 3 3 1 1 3 4 2 1 1 2 3 4 4 5 3<br />
BCLR7 BIH CLR CLRA CLRX CLR CLR CLR WAIT TXA AIX STX STX STX STX STX<br />
2 DIR 2 REL 2 DIR 1 INH 1 INH 2 IX1 3 SP1 1 IX 1 INH 1 INH 2 IMM 2 DIR 3 EXT 3 IX2 4 SP2 2 IX1<br />
INH Inherent REL Relative SP1 Stack Pointer, 8-Bit Offset<br />
IMM Immediate IX Indexed, No Offset SP2 Stack Pointer, 16-Bit Offset<br />
DIR Direct IX1 Indexed, 8-Bit Offset IX+ Indexed, No Offset with<br />
EXT Extended IX2 Indexed, 16-Bit Offset Post Increment<br />
DD Direct-Direct IMD Immediate-Direct IX1+ Indexed, 1-Byte Offset with<br />
IX+D Indexed-Direct DIX+ Direct-Indexed Post Increment<br />
*Pre-byte for stack pointer indexed instructions<br />
LSB<br />
Low Byte of Opcode in Hexadecimal 0<br />
MSB<br />
4<br />
SUB<br />
3 SP1<br />
4<br />
CMP<br />
3 SP1<br />
4<br />
SBC<br />
3 SP1<br />
4<br />
CPX<br />
3 SP1<br />
4<br />
AND<br />
3 SP1<br />
4<br />
BIT<br />
3 SP1<br />
4<br />
LDA<br />
3 SP1<br />
4<br />
STA<br />
3 SP1<br />
4<br />
EOR<br />
3 SP1<br />
4<br />
ADC<br />
3 SP1<br />
4<br />
ORA<br />
3 SP1<br />
4<br />
ADD<br />
3 SP1<br />
4<br />
LDX<br />
3 SP1<br />
4<br />
STX<br />
3 SP1<br />
0 High Byte of Opcode in Hexadecimal<br />
5 Cycles<br />
BRSET0 Opcode Mnemonic<br />
3 DIR Number of Bytes / Addressing Mode<br />
2<br />
SUB<br />
1 IX<br />
2<br />
CMP<br />
1 IX<br />
2<br />
SBC<br />
1 IX<br />
2<br />
CPX<br />
1 IX<br />
2<br />
AND<br />
1 IX<br />
2<br />
BIT<br />
1 IX<br />
2<br />
LDA<br />
1 IX<br />
2<br />
STA<br />
1 IX<br />
2<br />
EOR<br />
1 IX<br />
2<br />
ADC<br />
1 IX<br />
2<br />
ORA<br />
1 IX<br />
2<br />
ADD<br />
1 IX<br />
2<br />
JMP<br />
1 IX<br />
4<br />
JSR<br />
1 IX<br />
2<br />
LDX<br />
1 IX<br />
2<br />
STX<br />
1 IX<br />
Central Processor Unit (CPU)
Chapter 5<br />
Clock Generator Module (CGM)<br />
5.1 Introduction<br />
This section describes the clock generator module (CGM). The CGM generates the base clock signal,<br />
CGMOUT, which is based on either the oscillator clock divided by two or the divided phase-locked loop<br />
(PLL) clock, CGMVCLK, divided by three. CGMOUT is the clock from which the SIM derives the system<br />
clocks, including the bus clock, which is at a frequency of CGMOUT 2.<br />
The PLL is a frequency generator designed for use with a crystal (4MHz) to generate a base frequency<br />
and dividing to a maximum bus frequency of 8MHz.<br />
5.2 Features<br />
Features of the CGM include:<br />
• Phase-locked loop with output frequency in integer multiples of an integer dividend of the crystal<br />
reference<br />
• Low-frequency crystal operation with low-power operation and high-output frequency resolution<br />
• Programmable prescaler for power-of-two increases in frequency<br />
• Programmable hardware voltage-controlled oscillator (VCO) for low-jitter operation<br />
• Automatic bandwidth control mode for low-jitter operation<br />
• Automatic frequency lock detector<br />
• CPU interrupt on entry or exit from locked condition<br />
• Configuration register bit to allow oscillator operation during stop mode<br />
5.3 Functional Description<br />
The CGM consists of three major sub-modules:<br />
• Oscillator module — The oscillator module generates the constant reference frequency clock,<br />
CGMRCLK (buffered CGMXCLK).<br />
• Phase-locked loop (PLL) — The PLL generates the programmable VCO frequency clock,<br />
CGMVCLK.<br />
• Base clock selector circuit — This software-controlled circuit selects either CGMXCLK divided by<br />
two or the divided VCO clock, CGMVCLK, divided by three as the base clock, CGMOUT. The SIM<br />
derives the system clocks from either CGMOUT or CGMXCLK.<br />
Figure 5-1 shows the structure of the CGM.<br />
Figure 5-2 is a summary of the CGM registers.<br />
<strong>MC68HC908JW32</strong> <strong>Data</strong> <strong>Sheet</strong>, Rev. 6<br />
<strong>Freescale</strong> Semiconductor 57
Clock Generator Module (CGM)<br />
OSC2<br />
OSC1<br />
SIMOSCEN<br />
From SIM<br />
CGMRDV<br />
CGMVDV<br />
R<br />
RDS[3:0]<br />
PHASE<br />
DETECTOR<br />
LOCK<br />
DETECTOR<br />
OSCILLATOR (OSC) MODULE<br />
REFERENCE<br />
DIVIDER<br />
INTERNAL RC OSC<br />
PHASE-LOCKED LOOP (PLL)<br />
FREQUENCY<br />
DIVIDER<br />
CGMRCLK<br />
V DD CGMXFC V SS<br />
LOOP<br />
FILTER<br />
AUTOMATIC<br />
MODE<br />
CONTROL<br />
LOCK AUTO ACQ<br />
MUL[11:0]<br />
N<br />
XTAL OSC<br />
CGMPCLK<br />
ICLK<br />
CGMXCLK<br />
CGMRCLK<br />
PLL ANALOG<br />
Figure 5-1. CGM Block Diagram<br />
<strong>MC68HC908JW32</strong> <strong>Data</strong> <strong>Sheet</strong>, Rev. 6<br />
58 <strong>Freescale</strong> Semiconductor<br />
BCS<br />
VRS[7:0]<br />
PRE[1:0]<br />
FREQUENCY<br />
DIVIDER<br />
VPR[1:0]<br />
VOLTAGE<br />
CONTROLLED<br />
OSCILLATOR<br />
INTERRUPT<br />
CONTROL<br />
PLLIE PLLF<br />
2 P<br />
L<br />
2 E<br />
÷ 2<br />
CLOCK<br />
SELECT<br />
CIRCUIT<br />
To SIM<br />
A<br />
B 1 S*<br />
*WHEN S = 1,<br />
CGMOUT = B<br />
÷ 3<br />
To Timebase Module (TBM)<br />
CGMVCLK<br />
CGMOUT<br />
To SIM<br />
SIMDIV2<br />
From SIM<br />
To USB<br />
CGMINT<br />
To SIM
5.3.1 Oscillator Module<br />
<strong>MC68HC908JW32</strong> <strong>Data</strong> <strong>Sheet</strong>, Rev. 6<br />
Functional Description<br />
Addr. Register Name Bit 7 6 5 4 3 2 1 Bit 0<br />
$1090<br />
PLL Control Register<br />
(PTCL)<br />
Read:<br />
Write:<br />
PLLIE<br />
PLLF<br />
PLLON BCS PRE1 PRE0 VPR1 VPR0<br />
Reset: 0 0 1 0 0 0 0 0<br />
$1091<br />
PLL Bandwidth Control<br />
Register<br />
Read:<br />
Write:<br />
AUTO<br />
LOCK<br />
ACQ<br />
0 0 0 0<br />
R<br />
(PBWC)<br />
Reset: 0 0 0 0 0 0 0<br />
$1092<br />
PLL Multiplier Select<br />
Register High<br />
Read:<br />
Write:<br />
0 0 0 0<br />
MUL11 MUL10 MUL9 MUL8<br />
(PMSH)<br />
Reset: 0 0 0 0 0 0 0 0<br />
$1093<br />
PLL Multiplier Select Register<br />
Low (PMSL)<br />
Read:<br />
Write:<br />
MUL7 MUL6 MUL5 MUL4 MUL3 MUL2 MUL1 MUL0<br />
Reset: 0 1 0 0 0 0 0 0<br />
$1094<br />
1095PLL VCO Range Select<br />
Register (PMRS)<br />
Read:<br />
Write:<br />
VRS7 VRS6 VRS5 VRS4 VRS3 VRS2 VRS1 VRS0<br />
Reset: 0 1 0 0 0 0 0 0<br />
$1095<br />
PLL Reference Divider Select<br />
Register (PMDS)<br />
Read:<br />
Write:<br />
0 0 0 0<br />
RDS3 RDS2 RDS1 RDS0<br />
Reset: 0 0 0 0 0 0 0 1<br />
= Unimplemented R = Reserved<br />
NOTES:<br />
1. When AUTO = 0, PLLIE is forced clear and is read-only.<br />
2. When AUTO = 0, PLLF and LOCK read as clear.<br />
3. When AUTO = 1, ACQ is read-only.<br />
4. When PLLON = 0 or VRS7:VRS0 = $0, BCS is forced clear and is read-only.<br />
5. When PLLON = 1, the PLL programming register is read-only.<br />
6. When BCS = 1, PLLON is forced set and is read-only.<br />
The oscillator module provides two clock outputs CGMXCLK and CGMRCLK to the CGM module.<br />
CGMXCLK when selected, is driven to SIM module to generate the system bus clock. CGMRCLK is used<br />
by the phase-lock-loop to provide a higher frequency system bus clock. The oscillator module also<br />
provides the reference clock for the timebase module (TBM). See Chapter 9 Timebase Module (TBM) for<br />
detailed description on TBM.<br />
5.3.2 Phase-Locked Loop Circuit (PLL)<br />
Figure 5-2. CGM I/O Register Summary<br />
The PLL is a frequency generator that can operate in either acquisition mode or tracking mode, depending<br />
on the accuracy of the output frequency. The PLL can change between acquisition and tracking modes<br />
either automatically or manually.<br />
<strong>Freescale</strong> Semiconductor 59
Clock Generator Module (CGM)<br />
5.3.3 PLL Circuits<br />
The PLL consists of these circuits:<br />
• Voltage-controlled oscillator (VCO)<br />
• Reference divider<br />
• Frequency pre-scaler<br />
• Modulo VCO frequency divider<br />
• Phase detector<br />
• Loop filter<br />
• Lock detector<br />
The operating range of the VCO is programmable for a wide range of frequencies and for maximum<br />
immunity to external noise, including supply and CGMXFC noise. The VCO frequency is bound to a range<br />
from roughly one-half to twice the center-of-range frequency, f VRS . Modulating the voltage on the<br />
CGMXFC pin changes the frequency within this range. By design, f VRS is equal to the nominal<br />
center-of-range frequency, f NOM , (125 kHz) times a linear factor, L, and a power-of-two factor, E, or<br />
(L × 2 E )f NOM .<br />
CGMRCLK is the PLL reference clock, a buffered version of CGMXCLK. CGMRCLK runs at a frequency,<br />
fRCLK , and is fed to the PLL through a programmable modulo reference divider, which divides fRCLK by a<br />
factor, R. The divider’s output is the final reference clock, CGMRDV, running at a frequency,<br />
fRDV =fRCLK /R. With an external crystal (4MHz), always set R = 1 for specified performance. With an<br />
external high-frequency clock source, use R to divide the external frequency to between 1MHz and<br />
8MHz.<br />
The VCO’s output clock, CGMVCLK, running at a frequency, fVCLK , is fed back through a programmable<br />
pre-scaler divider and a programmable modulo divider. The pre-scaler divides the VCO clock by a<br />
power-of-two factor P (the CGMPCLK) and the modulo divider reduces the VCO clock by a factor, N. The<br />
dividers’ output is the VCO feedback clock, CGMVDV, running at a frequency, fVDV =fVCLK /(N × 2P ). (See<br />
5.3.6 Programming the PLL for more information.)<br />
The phase detector then compares the VCO feedback clock, CGMVDV, with the final reference clock,<br />
CGMRDV. A correction pulse is generated based on the phase difference between the two signals. The<br />
loop filter then slightly alters the DC voltage on the external capacitor connected to CGMXFC based on<br />
the width and direction of the correction pulse. The filter can make fast or slow corrections depending on<br />
its mode, described in 5.3.4 Acquisition and Tracking Modes. The value of the external capacitor and the<br />
reference frequency determines the speed of the corrections and the stability of the PLL.<br />
The lock detector compares the frequencies of the VCO feedback clock, CGMVDV, and the final<br />
reference clock, CGMRDV. Therefore, the speed of the lock detector is directly proportional to the final<br />
reference frequency, f RDV. The circuit determines the mode of the PLL and the lock condition based on<br />
this comparison.<br />
<strong>MC68HC908JW32</strong> <strong>Data</strong> <strong>Sheet</strong>, Rev. 6<br />
60 <strong>Freescale</strong> Semiconductor
5.3.4 Acquisition and Tracking Modes<br />
<strong>MC68HC908JW32</strong> <strong>Data</strong> <strong>Sheet</strong>, Rev. 6<br />
Functional Description<br />
The PLL filter is manually or automatically configurable into one of two operating modes:<br />
• Acquisition mode — In acquisition mode, the filter can make large frequency corrections to the<br />
VCO. This mode is used at PLL start up or when the PLL has suffered a severe noise hit and the<br />
VCO frequency is far off the desired frequency. When in acquisition mode, the ACQ bit is clear in<br />
the PLL bandwidth control register. (See 5.5.2 PLL Bandwidth Control Register.)<br />
• Tracking mode — In tracking mode, the filter makes only small corrections to the frequency of the<br />
VCO. PLL jitter is much lower in tracking mode, but the response to noise is also slower. The PLL<br />
enters tracking mode when the VCO frequency is nearly correct, such as when the PLL is selected<br />
as the base clock source. (See 5.3.8 Base Clock Selector Circuit.) The PLL is automatically in<br />
tracking mode when not in acquisition mode or when the ACQ bit is set.<br />
5.3.5 Manual and Automatic PLL Bandwidth Modes<br />
The PLL can change the bandwidth or operational mode of the loop filter manually or automatically.<br />
Automatic mode is recommended for most users.<br />
In automatic bandwidth control mode (AUTO = 1), the lock detector automatically switches between<br />
acquisition and tracking modes. Automatic bandwidth control mode also is used to determine when the<br />
VCO clock, CGMVCLK, is safe to use as the source for the base clock, CGMOUT. (See 5.5.2 PLL<br />
Bandwidth Control Register.) If PLL interrupts are enabled, the software can wait for a PLL interrupt<br />
request and then check the LOCK bit. If interrupts are disabled, software can poll the LOCK bit<br />
continuously (during PLL start-up, usually) or at periodic intervals. In either case, when the LOCK bit is<br />
set, the VCO clock is safe to use as the source for the base clock. (See 5.3.8 Base Clock Selector Circuit.)<br />
If the VCO is selected as the source for the base clock and the LOCK bit is clear, the PLL has suffered a<br />
severe noise hit and the software must take appropriate action, depending on the application. (See 5.6<br />
Interrupts for information and precautions on using interrupts.)<br />
The following conditions apply when the PLL is in automatic bandwidth control mode:<br />
• The ACQ bit (See 5.5.2 PLL Bandwidth Control Register.) is a read-only indicator of the mode of<br />
the filter. (See 5.3.4 Acquisition and Tracking Modes.)<br />
• The ACQ bit is set when the VCO frequency is within a certain tolerance and is cleared when the<br />
VCO frequency is out of a certain tolerance. (See 5.8 Acquisition/Lock Time Specifications for<br />
more information.)<br />
• The LOCK bit is a read-only indicator of the locked state of the PLL.<br />
• The LOCK bit is set when the VCO frequency is within a certain tolerance and is cleared when the<br />
VCO frequency is out of a certain tolerance. (See 5.8 Acquisition/Lock Time Specifications for<br />
more information.)<br />
• CPU interrupts can occur if enabled (PLLIE = 1) when the PLL’s lock condition changes, toggling<br />
the LOCK bit. (See 5.5.1 PLL Control Register.)<br />
The PLL also may operate in manual mode (AUTO = 0). Manual mode is used by systems that do not<br />
require an indicator of the lock condition for proper operation. Such systems typically operate well below<br />
f BUSMAX.<br />
<strong>Freescale</strong> Semiconductor 61
Clock Generator Module (CGM)<br />
The following conditions apply when in manual mode:<br />
• ACQ is a writable control bit that controls the mode of the filter. Before turning on the PLL in manual<br />
mode, the ACQ bit must be clear.<br />
• Before entering tracking mode (ACQ = 1), software must wait a given time, t ACQ (See 5.8<br />
Acquisition/Lock Time Specifications.), after turning on the PLL by setting PLLON in the PLL<br />
control register (PCTL).<br />
• Software must wait a given time, t AL, after entering tracking mode before selecting the PLL as the<br />
clock source to CGMOUT (BCS = 1).<br />
• The LOCK bit is disabled.<br />
• CPU interrupts from the CGM are disabled.<br />
5.3.6 Programming the PLL<br />
The following procedure shows how to program the PLL.<br />
NOTE<br />
The round function in the following equations means that the real number<br />
should be rounded to the nearest integer number.<br />
1. Choose the desired bus frequency, fBUSDES , or the desired VCO frequency, fVCLKDES ; and then<br />
solve for the other.<br />
The relationship between fBUS and fVCLK is governed by the equation:<br />
fVCLK = 6 × fBUS 2. Choose a practical PLL reference frequency, fRCLK , and the reference clock divider, R. Typically,<br />
the reference is 4MHz and R = 1.<br />
Frequency errors to the PLL are corrected at a rate of fRCLK /R. For stability and lock time reduction,<br />
this rate must be as fast as possible. The VCO frequency must be an integer multiple of this rate.<br />
The relationship between the VCO frequency, fVCLK , and the reference frequency, fRCLK ,is<br />
2<br />
fVCLK P N<br />
= ----------- ( f<br />
R RCLK)<br />
where N is the integer range multiplier, between 1 and 4095.<br />
In cases where desired bus frequency has some tolerance, choose f RCLK to a value determined<br />
either by other module requirements (such as modules which are clocked by CGMXCLK), cost<br />
requirements, or ideally, as high as the specified range allows. See Chapter 19 Electrical<br />
Specifications.<br />
Choose the reference divider, R = 1.<br />
When the tolerance on the bus frequency is tight, choose f RCLK to an integer divisor of f BUSDES,<br />
and R = 1. If f RCLK cannot meet this requirement, use the following equation to solve for R with<br />
practical choices of f RCLK, and choose the f RCLK that gives the lowest R.<br />
⎛fVCLKDES⎞ R round RMAX ⎜------------------------- ⎟ integer<br />
⎝ fRCLK ⎠<br />
f ⎧ ⎛ VCLKDES⎞⎫<br />
=<br />
× ⎨ – ⎜------------------------- ⎟<br />
⎩ ⎝ f<br />
⎬<br />
RCLK ⎠⎭<br />
<strong>MC68HC908JW32</strong> <strong>Data</strong> <strong>Sheet</strong>, Rev. 6<br />
62 <strong>Freescale</strong> Semiconductor
3. Calculate N:<br />
4. Calculate and verify the adequacy of the VCO and bus frequencies f VCLK and f BUS .<br />
5. Select the VCO’s power-of-two range multiplier E, according to this table:<br />
6. Select a VCO linear range multiplier, L, where f NOM = 125kHz<br />
<strong>MC68HC908JW32</strong> <strong>Data</strong> <strong>Sheet</strong>, Rev. 6<br />
Functional Description<br />
7. Calculate and verify the adequacy of the VCO programmed center-of-range frequency, f VRS . The<br />
center-of-range frequency is the midpoint between the minimum and maximum frequencies<br />
attainable by the PLL.<br />
For proper operation,<br />
N round R f × VCLKDES<br />
fRCLK 2 P<br />
⎛ ⎞<br />
= ⎜------------------------------------ ⎟<br />
⎝ × ⎠<br />
f VCLK<br />
f BUS<br />
fVCLK ----------<br />
6<br />
Frequency Range E<br />
0 < f VCLK < 9,830,400 0<br />
9,830,400 ≤ f VCLK < 19,660,800 1<br />
19,660,800 ≤ f VCLK < 39,321,600 2<br />
NOTE: Do not program E to a value of 3.<br />
=<br />
=<br />
2 P N<br />
----------- ( f<br />
R RCLK)<br />
fVCLK L round<br />
2 E ⎛ ⎞<br />
= ⎜-------------------------- ⎟<br />
⎝ × f ⎠<br />
NOM<br />
fVRS L 2 E<br />
= ( × )fNOM fVRS – fVCLK fNOM 2 E<br />
×<br />
≤<br />
--------------------------<br />
2<br />
8. Verify the choice of P, R, N, E, and L by comparing f VCLK to f VRS and f VCLKDES. For proper<br />
operation, f VCLK must be within the application’s tolerance of f VCLKDES, and f VRS must be as close<br />
as possible to f VCLK.<br />
NOTE<br />
Exceeding the recommended maximum bus frequency or VCO frequency<br />
can crash the MCU.<br />
<strong>Freescale</strong> Semiconductor 63
Clock Generator Module (CGM)<br />
9. Program the PLL registers accordingly:<br />
a. In the PRE bits of the PLL control register (PCTL), program the binary equivalent of P.<br />
b. In the VPR bits of the PLL control register (PCTL), program the binary equivalent of E.<br />
c. In the PLL multiplier select register low (PMSL) and the PLL multiplier select register high<br />
(PMSH), program the binary equivalent of N.<br />
d. In the PLL VCO range select register (PMRS), program the binary coded equivalent of L.<br />
e. In the PLL reference divider select register (PMDS), program the binary coded equivalent<br />
of R.<br />
NOTE<br />
The values for P, E, N, L, and R can only be programmed when the PLL is<br />
off (PLLON = 0).<br />
Table 5-1 provides numeric examples (numbers are in hexadecimal notation):<br />
5.3.7 Special Programming Exceptions<br />
The programming method described in 5.3.6 Programming the PLL does not account for three possible<br />
exceptions. A value of 0 for R, N, or L is meaningless when used in the equations given. To account for<br />
these exceptions:<br />
• A 0 value for R or N is interpreted exactly the same as a value of 1.<br />
• A 0 value for L disables the PLL and prevents its selection as the source for the base clock.<br />
See 5.3.8 Base Clock Selector Circuit.<br />
5.3.8 Base Clock Selector Circuit<br />
Table 5-1. Numeric Examples<br />
CGMVCLK CGMPCLK f BUS f RCLK R N P E L<br />
48 MHz 24 MHz 8 MHz 4 MHz 1 0C 0 2 60<br />
48 MHz 24 MHz 8 MHz 4 MHz 1 06 1 2 60<br />
This circuit is used to select either the oscillator clock, CGMXCLK, or the VCO clock, CGMVCLK, as the<br />
source of the base clock, CGMOUT. The CGMXCLK clock is divided by two while the CGMVCLK is<br />
divided by three to correct the duty cycle. The two divided clocks go through a transition control circuit<br />
that to change from one clock source to the other. During this time, CGMOUT is held in stasis. Therefore,<br />
the bus clock frequency, which is one-half of the base clock frequency, is either one-fourth the frequency<br />
of the selected clock (CGMXCLK) or one-sixth the frequency of the selected CGMVCLK clock.<br />
The BCS bit in the PLL control register (PCTL) selects which clock drives CGMOUT. The divided VCO<br />
clock cannot be selected as the base clock source if the PLL is not turned on. The PLL cannot be turned<br />
off if the divided VCO clock is selected. The PLL cannot be turned on or off simultaneously with the<br />
selection or deselection of the divided VCO clock. The divided VCO clock also cannot be selected as the<br />
base clock source if the factor L is programmed to a 0. This value would set up a condition inconsistent<br />
with the operation of the PLL, so that the PLL would be disabled and the oscillator clock would be forced<br />
as the source of the base clock.<br />
<strong>MC68HC908JW32</strong> <strong>Data</strong> <strong>Sheet</strong>, Rev. 6<br />
64 <strong>Freescale</strong> Semiconductor
5.3.9 CGM External Connections<br />
<strong>MC68HC908JW32</strong> <strong>Data</strong> <strong>Sheet</strong>, Rev. 6<br />
Functional Description<br />
In its typical configuration, the CGMC requires up to nine external components. Five of these are for the<br />
crystal oscillator and two or four are for the PLL.<br />
The crystal oscillator is normally connected in a Pierce oscillator configuration, as shown in Figure 5-3.<br />
Figure 5-3 shows only the logical representation of the internal components and may not represent actual<br />
circuitry. The oscillator configuration uses five components:<br />
• Crystal, X1 • Fixed capacitor, C1 • Tuning capacitor, C2 (can also be a fixed capacitor)<br />
• Feedback resistor, RB • Series resistor, RS The series resistor (RS ) is included in the diagram to follow strict Pierce oscillator guidelines. Refer to the<br />
crystal manufacturer’s data for more information regarding values for C1 and C2.<br />
Figure 5-3 also shows the external components for the PLL:<br />
• Bypass capacitor, CBYP • Filter network<br />
Care should be taken with PCB routing in order to minimize signal cross talk and noise. (See 5.8<br />
Acquisition/Lock Time Specifications for routing information, filter network and its effects on PLL<br />
performance.)<br />
MCU<br />
SIMOSCEN FROM SIM<br />
OSC_XCLKEN<br />
(FROM CONFIG)<br />
RB<br />
X1<br />
RS<br />
C1 C2<br />
CGMXCLK<br />
OSC1 OSC2 CGMXFC VSSPLL VDDPLL (4-MHZ)<br />
Note: Filter network in box can be replaced with a 0.47µF capacitor, but will degrade stability.<br />
2kΩ<br />
2n2 F<br />
Figure 5-3. CGM External Connections<br />
CBYP<br />
0.1 µF<br />
<strong>Freescale</strong> Semiconductor 65<br />
100 pF
Clock Generator Module (CGM)<br />
5.4 I/O Signals<br />
The following paragraphs describe the CGM I/O signals.<br />
5.4.1 Crystal Amplifier Input Pin (OSC1)<br />
The OSC1 pin is an input to the crystal oscillator amplifier.<br />
5.4.2 Crystal Amplifier Output Pin (OSC2)<br />
The OSC2 pin is the output of the crystal oscillator inverting amplifier.<br />
5.4.3 External Filter Capacitor Pin (CGMXFC)<br />
The CGMXFC pin is required by the loop filter to filter out phase corrections. An external filter network is<br />
connected to this pin. (See Figure 5-3.)<br />
NOTE<br />
To prevent noise problems, the filter network should be placed as close to<br />
the CGMXFC pin as possible, with minimum routing distances and no<br />
routing of other signals across the network.<br />
5.4.4 Oscillator Output Frequency Signal (CGMXCLK)<br />
CGMXCLK is the oscillator output signal. It runs at the full speed of the oscillator, and is generated directly<br />
from the crystal oscillator circuit, the RC oscillator circuit, or the internal oscillator circuit.<br />
5.4.5 CGM Reference Clock (CGMRCLK)<br />
CGMRCLK is a buffered version of CGMXCLK, this clock is the reference clock for the phase-locked-loop<br />
circuit.<br />
5.4.6 CGM VCO Clock Output (CGMVCLK)<br />
CGMVCLK is the clock output from the VCO.<br />
5.4.7 CGM Base Clock Output (CGMOUT)<br />
CGMOUT is the clock output of the CGM. This signal goes to the SIM, which generates the MCU clocks.<br />
CGMOUT is a 50 percent duty cycle clock running at twice the bus frequency. CGMOUT is software<br />
programmable to be either the oscillator output, CGMXCLK, divided by two or the VCO clock, CGMVCLK,<br />
divided by three.<br />
5.4.8 CGM CPU Interrupt (CGMINT)<br />
CGMINT is the interrupt signal generated by the PLL lock detector.<br />
<strong>MC68HC908JW32</strong> <strong>Data</strong> <strong>Sheet</strong>, Rev. 6<br />
66 <strong>Freescale</strong> Semiconductor
5.5 CGM Registers<br />
<strong>MC68HC908JW32</strong> <strong>Data</strong> <strong>Sheet</strong>, Rev. 6<br />
CGM Registers<br />
The following registers control and monitor operation of the CGM:<br />
• PLL control register (PCTL) — (See 5.5.1 PLL Control Register.)<br />
• PLL bandwidth control register (PBWC) — (See 5.5.2 PLL Bandwidth Control Register.)<br />
• PLL multiplier select registers (PMSH and PMSL) — (See 5.5.3 PLL Multiplier Select Registers.)<br />
• PLL VCO range select register (PMRS) — (See 5.5.4 PLL VCO Range Select Register.)<br />
• PLL reference divider select register (PMDS) — (See 5.5.5 PLL Reference Divider Select<br />
Register.)<br />
5.5.1 PLL Control Register<br />
The PLL control register (PCTL) contains the interrupt enable and flag bits, the on/off switch, the base<br />
clock selector bit, the prescaler bits, and the VCO power-of-two range selector bits.<br />
Address: $1090<br />
Bit 7 6 5 4 3 2 1 Bit 0<br />
Read:<br />
Write:<br />
PLLIE<br />
PLLF<br />
PLLON BCS PRE1 PRE0 VPR1 VPR0<br />
Reset: 0 0 1 0 0 0 0 0<br />
= Unimplemented<br />
Figure 5-4. PLL Control Register (PCTL)<br />
PLLIE — PLL Interrupt Enable Bit<br />
This read/write bit enables the PLL to generate an interrupt request when the LOCK bit toggles, setting<br />
the PLL flag, PLLF. When the AUTO bit in the PLL bandwidth control register (PBWC) is clear, PLLIE<br />
cannot be written and reads as logic 0. Reset clears the PLLIE bit.<br />
1 = PLL interrupts enabled<br />
0 = PLL interrupts disabled<br />
PLLF — PLL Interrupt Flag Bit<br />
This read-only bit is set whenever the LOCK bit toggles. PLLF generates an interrupt request if the<br />
PLLIE bit also is set. PLLF always reads as logic 0 when the AUTO bit in the PLL bandwidth control<br />
register (PBWC) is clear. Clear the PLLF bit by reading the PLL control register. Reset clears the PLLF<br />
bit.<br />
1 = Change in lock condition<br />
0 = No change in lock condition<br />
NOTE<br />
Do not inadvertently clear the PLLF bit. Any read or read-modify-write<br />
operation on the PLL control register clears the PLLF bit.<br />
PLLON — PLL On Bit<br />
This read/write bit activates the PLL and enables the VCO clock, CGMVCLK. PLLON cannot be<br />
cleared if the VCO clock is driving the base clock, CGMOUT (BCS = 1). (See 5.3.8 Base Clock<br />
Selector Circuit.) Reset sets this bit so that the loop can stabilize as the MCU is powering up.<br />
1 = PLL on<br />
0 = PLL off<br />
<strong>Freescale</strong> Semiconductor 67
Clock Generator Module (CGM)<br />
BCS — Base Clock Select Bit<br />
This read/write bit selects either the oscillator output, CGMXCLK, or the VCO clock, CGMVCLK, as<br />
the source of the CGM output, CGMOUT. CGMOUT frequency is one-half the frequency of the<br />
selected clock. BCS cannot be set while the PLLON bit is clear. After toggling BCS, it may take up to<br />
three CGMXCLK and three CGMVCLK cycles to complete the transition from one source clock to the<br />
other. During the transition, CGMOUT is held in stasis. (See 5.3.8 Base Clock Selector Circuit.) Reset<br />
clears the BCS bit.<br />
1 = CGMVCLK divided by three drives CGMOUT<br />
0 = CGMXCLK divided by two drives CGMOUT<br />
NOTE<br />
PLLON and BCS have built-in protection that prevents the base clock<br />
selector circuit from selecting the VCO clock as the source of the base clock<br />
if the PLL is off. Therefore, PLLON cannot be cleared when BCS is set, and<br />
BCS cannot be set when PLLON is clear. If the PLL is off (PLLON = 0),<br />
selecting CGMVCLK requires two writes to the PLL control register. (See<br />
5.3.8 Base Clock Selector Circuit.)<br />
PRE1 and PRE0 — Prescaler Program Bits<br />
These read/write bits control a prescaler that selects the prescaler power-of-two multiplier, P. (See<br />
5.3.3 PLL Circuits and 5.3.6 Programming the PLL.) PRE1 and PRE0 cannot be written when the<br />
PLLON bit is set. Reset clears these bits.<br />
These prescaler bits affects the relationship between the VCO clock and the final system bus clock.<br />
Table 5-2. PRE1 and PRE0 Programming<br />
PRE1 and PRE0 P Prescaler Multiplier<br />
00 0 1<br />
01 1 2<br />
10 2 4<br />
11 3 8<br />
VPR1 and VPR0 — VCO Power-of-Two Range Select Bits<br />
These read/write bits control the VCO’s hardware power-of-two range multiplier E that, in conjunction<br />
with L (See 5.3.3 PLL Circuits, 5.3.6 Programming the PLL, and 5.5.4 PLL VCO Range Select<br />
Register.) controls the hardware center-of-range frequency, f VRS. VPR1:VPR0 cannot be written when<br />
the PLLON bit is set. Reset clears these bits.<br />
Table 5-3. VPR1 and VPR0 Programming<br />
VPR1 and VPR0 E<br />
<strong>MC68HC908JW32</strong> <strong>Data</strong> <strong>Sheet</strong>, Rev. 6<br />
VCO Power-of-Two<br />
Range Multiplier<br />
00 0 1<br />
01 1 2<br />
10 2 4<br />
NOTE: Do not program E to a value of 3.<br />
68 <strong>Freescale</strong> Semiconductor
5.5.2 PLL Bandwidth Control Register<br />
<strong>MC68HC908JW32</strong> <strong>Data</strong> <strong>Sheet</strong>, Rev. 6<br />
CGM Registers<br />
The PLL bandwidth control register (PBWC):<br />
• Selects automatic or manual (software-controlled) bandwidth control mode<br />
• Indicates when the PLL is locked<br />
• In automatic bandwidth control mode, indicates when the PLL is in acquisition or tracking mode<br />
• In manual operation, forces the PLL into acquisition or tracking mode<br />
Address: $1091<br />
Bit 7 6 5 4 3 2 1 Bit 0<br />
Read:<br />
Write:<br />
AUTO<br />
LOCK<br />
ACQ<br />
0 0 0 0<br />
R<br />
Reset: 0 0 0 0 0 0 0<br />
= Unimplemented R = Reserved<br />
Figure 5-5. PLL Bandwidth Control Register (PBWCR)<br />
AUTO — Automatic Bandwidth Control Bit<br />
This read/write bit selects automatic or manual bandwidth control. When initializing the PLL for manual<br />
operation (AUTO = 0), clear the ACQ bit before turning on the PLL. Reset clears the AUTO bit.<br />
1 = Automatic bandwidth control<br />
0 = Manual bandwidth control<br />
LOCK — Lock Indicator Bit<br />
When the AUTO bit is set, LOCK is a read-only bit that becomes set when the VCO clock, CGMVCLK,<br />
is locked (running at the programmed frequency). When the AUTO bit is clear, LOCK reads as logic 0<br />
and has no meaning. The write one function of this bit is reserved for test, so this bit must always be<br />
written a 0. Reset clears the LOCK bit.<br />
1 = VCO frequency correct or locked<br />
0 = VCO frequency incorrect or unlocked<br />
ACQ — Acquisition Mode Bit<br />
When the AUTO bit is set, ACQ is a read-only bit that indicates whether the PLL is in acquisition mode<br />
or tracking mode. When the AUTO bit is clear, ACQ is a read/write bit that controls whether the PLL is<br />
in acquisition or tracking mode.<br />
In automatic bandwidth control mode (AUTO = 1), the last-written value from manual operation is<br />
stored in a temporary location and is recovered when manual operation resumes. Reset clears this bit,<br />
enabling acquisition mode.<br />
1 = Tracking mode<br />
0 = Acquisition mode<br />
<strong>Freescale</strong> Semiconductor 69
Clock Generator Module (CGM)<br />
5.5.3 PLL Multiplier Select Registers<br />
The PLL multiplier select registers (PMSH and PMSL) contain the programming information for the<br />
modulo feedback divider.<br />
Address: $1092<br />
Bit 7 6 5 4 3 2 1 Bit 0<br />
Read:<br />
Write:<br />
0 0 0 0<br />
MUL11 MUL10 MUL9 MUL8<br />
Reset: 0 0 0 0 0 0 0 0<br />
= Unimplemented<br />
MUL[11:0] — Multiplier Select Bits<br />
These read/write bits control the modulo feedback divider that selects the VCO frequency multiplier N.<br />
(See 5.3.3 PLL Circuits and 5.3.6 Programming the PLL.) A value of $0000 in the multiplier select<br />
registers configure the modulo feedback divider the same as a value of $0001. Reset initializes the<br />
registers to $0040 for a default multiply value of 64.<br />
NOTE<br />
The multiplier select bits have built-in protection such that they cannot be<br />
written when the PLL is on (PLLON = 1).<br />
5.5.4 PLL VCO Range Select Register<br />
Figure 5-6. PLL Multiplier Select Register High (PMSH)<br />
Address: $1093<br />
Bit 7 6 5 4 3 2 1 Bit 0<br />
Read:<br />
Write:<br />
MUL7 MUL6 MUL5 MUL4 MUL3 MUL2 MUL1 MUL0<br />
Reset: 0 1 0 0 0 0 0 0<br />
Figure 5-7. PLL Multiplier Select Register Low (PMSL)<br />
The PLL VCO range select register (PMRS) contains the programming information required for the<br />
hardware configuration of the VCO.<br />
Address: $1094<br />
Bit 7 6 5 4 3 2 1 Bit 0<br />
Read:<br />
Write:<br />
VRS7 VRS6 VRS5 VRS4 VRS3 VRS2 VRS1 VRS0<br />
Reset: 0 1 0 0 0 0 0 0<br />
Figure 5-8. PLL VCO Range Select Register (PMRS)<br />
VRS[7:0] — VCO Range Select Bits<br />
These read/write bits control the hardware center-of-range linear multiplier L which, in conjunction with<br />
E(See5.3.3 PLL Circuits, 5.3.6 Programming the PLL, and 5.5.1 PLL Control Register.), controls the<br />
hardware center-of-range frequency, f VRS . VRS[7:0] cannot be written when the PLLON bit in the<br />
PCTL is set. (See 5.3.7 Special Programming Exceptions.) A value of $00 in the VCO range select<br />
<strong>MC68HC908JW32</strong> <strong>Data</strong> <strong>Sheet</strong>, Rev. 6<br />
70 <strong>Freescale</strong> Semiconductor
<strong>MC68HC908JW32</strong> <strong>Data</strong> <strong>Sheet</strong>, Rev. 6<br />
Interrupts<br />
register disables the PLL and clears the BCS bit in the PLL control register (PCTL). (See 5.3.8 Base<br />
Clock Selector Circuit and 5.3.7 Special Programming Exceptions.). Reset initializes the register to<br />
$40 for a default range multiply value of 64.<br />
NOTE<br />
The VCO range select bits have built-in protection such that they cannot be<br />
written when the PLL is on (PLLON = 1) and such that the VCO clock<br />
cannot be selected as the source of the base clock (BCS = 1) if the VCO<br />
range select bits are all clear.<br />
The PLL VCO range select register must be programmed correctly.<br />
Incorrect programming can result in failure of the PLL to achieve lock.<br />
5.5.5 PLL Reference Divider Select Register<br />
The PLL reference divider select register (PMDS) contains the programming information for the modulo<br />
reference divider.<br />
RDS[3:0] — Reference Divider Select Bits<br />
These read/write bits control the modulo reference divider that selects the reference division factor, R.<br />
(See 5.3.3 PLL Circuits and 5.3.6 Programming the PLL.) RDS[3:0] cannot be written when the PLLON<br />
bit in the PCTL is set. A value of $00 in the reference divider select register configures the reference<br />
divider the same as a value of $01. (See 5.3.7 Special Programming Exceptions.) Reset initializes the<br />
register to $01 for a default divide value of 1.<br />
NOTE<br />
The reference divider select bits have built-in protection such that they<br />
cannot be written when the PLL is on (PLLON = 1).<br />
5.6 Interrupts<br />
Address: $1095<br />
Bit 7 6 5 4 3 2 1 Bit 0<br />
Read:<br />
Write:<br />
0 0 0 0<br />
RDS3 RDS2 RDS1 RDS0<br />
Reset: 0 0 0 0 0 0 0 1<br />
= Unimplemented<br />
Figure 5-9. PLL Reference Divider Select Register (PMDS)<br />
NOTE<br />
The default divide value of 1 is recommended for all applications.<br />
When the AUTO bit is set in the PLL bandwidth control register (PBWC), the PLL can generate a CPU<br />
interrupt request every time the LOCK bit changes state. The PLLIE bit in the PLL control register (PCTL)<br />
enables CPU interrupts from the PLL. PLLF, the interrupt flag in the PCTL, becomes set whether<br />
interrupts are enabled or not. When the AUTO bit is clear, CPU interrupts from the PLL are disabled and<br />
PLLF reads as logic 0.<br />
Software should read the LOCK bit after a PLL interrupt request to see if the request was due to an entry<br />
into lock or an exit from lock. When the PLL enters lock, the divided VCO clock, CGMVCLK, divided by<br />
three can be selected as the CGMOUT source by setting BCS in the PCTL. When the PLL exits lock, the<br />
<strong>Freescale</strong> Semiconductor 71
Clock Generator Module (CGM)<br />
VCO clock frequency is corrupt, and appropriate precautions should be taken. If the application is not<br />
frequency sensitive, interrupts should be disabled to prevent PLL interrupt service routines from impeding<br />
software performance or from exceeding stack limitations.<br />
NOTE<br />
Software can select the CGMVCLK divided by three as the CGMOUT<br />
source even if the PLL is not locked (LOCK = 0). Therefore, software should<br />
make sure the PLL is locked before setting the BCS bit.<br />
5.7 Special Modes<br />
The WAIT instruction puts the MCU in low power-consumption standby modes.<br />
5.7.1 Wait Mode<br />
The WAIT instruction does not affect the CGM. Before entering wait mode, software can disengage and<br />
turn off the PLL by clearing the BCS and PLLON bits in the PLL control register (PCTL) to save power.<br />
Less power-sensitive applications can disengage the PLL without turning it off, so that the PLL clock is<br />
immediately available at WAIT exit. This would be the case also when the PLL is to wake the MCU from<br />
wait mode, such as when the PLL is first enabled and waiting for LOCK or LOCK is lost.<br />
5.7.2 Stop Mode<br />
If the oscillator stop mode enable bit (STOP_XCLKEN in CONFIG2 register) for the selected oscillator is<br />
configured to disabled the oscillator in stop mode, then the STOP instruction disables the CGM (oscillator<br />
and phase locked loop) and holds low all CGM outputs (CGMOUT, CGMVCLK, and CGMINT).<br />
If the STOP instruction is executed with the VCO clock, CGMVCLK, divided by three driving CGMOUT,<br />
the PLL automatically clears the BCS bit in the PLL control register (PCTL), thereby selecting the<br />
oscillator clock, CGMXCLK, divided by two as the source of CGMOUT. When the MCU recovers from<br />
STOP, the crystal clock divided by two drives CGMOUT and BCS remains clear.<br />
If the oscillator stop mode enable bit is configured for continuous oscillator operation in stop mode, then<br />
the phase locked loop is shut off but the CGMXCLK will continue to drive the SIM and other MCU<br />
sub-systems.<br />
5.7.3 CGM During Break Interrupts<br />
The system integration module (SIM) controls whether status bits in other modules can be cleared during<br />
the break state. The BCFE bit in the SIM break flag control register (SBFCR) enables software to clear<br />
status bits during the break state. (See 6.7.3 SIM Break Flag Control Register.)<br />
To allow software to clear status bits during a break interrupt, write a logic 1 to the BCFE bit. If a status<br />
bit is cleared during the break state, it remains cleared when the MCU exits the break state.<br />
To protect the PLLF bit during the break state, write a logic 0 to the BCFE bit. With BCFE at logic 0 (its<br />
default state), software can read and write the PLL control register during the break state without affecting<br />
the PLLF bit.<br />
<strong>MC68HC908JW32</strong> <strong>Data</strong> <strong>Sheet</strong>, Rev. 6<br />
72 <strong>Freescale</strong> Semiconductor
5.8 Acquisition/Lock Time Specifications<br />
<strong>MC68HC908JW32</strong> <strong>Data</strong> <strong>Sheet</strong>, Rev. 6<br />
Acquisition/Lock Time Specifications<br />
The acquisition and lock times of the PLL are, in many applications, the most critical PLL design<br />
parameters. Proper design and use of the PLL ensures the highest stability and lowest acquisition/lock<br />
times.<br />
5.8.1 Acquisition/Lock Time Definitions<br />
Typical control systems refer to the acquisition time or lock time as the reaction time, within specified<br />
tolerances, of the system to a step input. In a PLL, the step input occurs when the PLL is turned on or<br />
when it suffers a noise hit. The tolerance is usually specified as a percent of the step input or when the<br />
output settles to the desired value plus or minus a percent of the frequency change. Therefore, the<br />
reaction time is constant in this definition, regardless of the size of the step input. For example, consider<br />
a system with a 5 percent acquisition time tolerance. If a command instructs the system to change from<br />
0Hz to 1MHz, the acquisition time is the time taken for the frequency to reach 1MHz ±50kHz. 50kHz =<br />
5% of the 1MHz step input. If the system is operating at 1MHz and suffers a –100kHz noise hit, the<br />
acquisition time is the time taken to return from 900kHz to 1MHz ±5kHz. 5kHz = 5% of the 100kHz step<br />
input.<br />
Other systems refer to acquisition and lock times as the time the system takes to reduce the error<br />
between the actual output and the desired output to within specified tolerances. Therefore, the acquisition<br />
or lock time varies according to the original error in the output. Minor errors may not even be registered.<br />
Typical PLL applications prefer to use this definition because the system requires the output frequency to<br />
be within a certain tolerance of the desired frequency regardless of the size of the initial error.<br />
5.8.2 Parametric Influences on Reaction Time<br />
Acquisition and lock times are designed to be as short as possible while still providing the highest possible<br />
stability. These reaction times are not constant, however. Many factors directly and indirectly affect the<br />
acquisition time.<br />
The most critical parameter which affects the reaction times of the PLL is the reference frequency, fRDV .<br />
This frequency is the input to the phase detector and controls how often the PLL makes corrections. For<br />
stability, the corrections must be small compared to the desired frequency, so several corrections are<br />
required to reduce the frequency error. Therefore, the slower the reference the longer it takes to make<br />
these corrections. This parameter is under user control via the choice of crystal frequency fXCLK and the<br />
R value programmed in the reference divider. (See 5.3.3 PLL Circuits, 5.3.6 Programming the PLL, and<br />
5.5.5 PLL Reference Divider Select Register.)<br />
Another critical parameter is the external filter network. The PLL modifies the voltage on the VCO by<br />
adding or subtracting charge from capacitors in this network. Therefore, the rate at which the voltage<br />
changes for a given frequency error (thus change in charge) is proportional to the capacitance. The size<br />
of the capacitor also is related to the stability of the PLL. If the capacitor is too small, the PLL cannot make<br />
small enough adjustments to the voltage and the system cannot lock. If the capacitor is too large, the PLL<br />
may not be able to adjust the voltage in a reasonable time. (See 5.8.3 Choosing a Filter.)<br />
Temperature and processing also can affect acquisition time because the electrical characteristics of the<br />
PLL change. The part operates as specified as long as these influences stay within the specified limits.<br />
External factors, however, can cause drastic changes in the operation of the PLL. These factors include<br />
noise injected into the PLL through the filter capacitor, filter capacitor leakage, stray impedances on the<br />
circuit board, and even humidity or circuit board contamination.<br />
<strong>Freescale</strong> Semiconductor 73
Clock Generator Module (CGM)<br />
5.8.3 Choosing a Filter<br />
As described in 5.8.2 Parametric Influences on Reaction Time, the external filter network is critical to the<br />
stability and reaction time of the PLL. The PLL is also dependent on reference frequency and supply<br />
voltage.<br />
Either of the filter networks in Figure 5-10 is recommended when using a 4MHz reference clock<br />
(CGMRCLK). Figure 5-10 (a) is used for applications requiring better stability. Figure 5-10 (b) is used in<br />
low-cost applications where stability is not critical.<br />
2 kΩ<br />
2n2 nF<br />
CGMXFC CGMXFC<br />
100 pF<br />
VSS VSS (a) (b)<br />
Figure 5-10. PLL Filter<br />
<strong>MC68HC908JW32</strong> <strong>Data</strong> <strong>Sheet</strong>, Rev. 6<br />
0.22 µF<br />
74 <strong>Freescale</strong> Semiconductor
Chapter 6<br />
System Integration Module (SIM)<br />
6.1 Introduction<br />
This section describes the system integration module (SIM). Together with the CPU, the SIM controls all<br />
MCU activities. A block diagram of the SIM is shown in Figure 6-1. Figure 6-2 is a summary of the SIM<br />
input/output (I/O) registers. The SIM is a system state controller that coordinates CPU and exception<br />
timing. The SIM is responsible for:<br />
• Bus clock generation and control for CPU and peripherals:<br />
– Stop/wait/reset/break entry and recovery<br />
– Internal clock control<br />
• Master reset control, including power-on reset (POR) and COP timeout<br />
• Interrupt control:<br />
– Acknowledge timing<br />
– Arbitration control timing<br />
– Vector address generation<br />
• CPU enable/disable timing<br />
Table 6-1 shows the internal signal names used in this section.<br />
Table 6-1. Signal Name Conventions<br />
Signal Name Description<br />
ICLK Internal RC oscillator clock<br />
CGMXCLK Selected oscillator clock from oscillator module<br />
CGMVCLK PLL VCO output and the divided PLL output<br />
CGMOUT<br />
CGMVCLK-based or oscillator-based clock output from CGM module<br />
(Bus clock = CGMOUT ÷ 2)<br />
IAB Internal address bus<br />
IDB Internal data bus<br />
PORRST Signal from the power-on reset module to the SIM<br />
IRST Internal reset signal<br />
R/W Read/write signal<br />
<strong>MC68HC908JW32</strong> <strong>Data</strong> <strong>Sheet</strong>, Rev. 6<br />
<strong>Freescale</strong> Semiconductor 75
System Integration Module (SIM)<br />
RESET<br />
PIN LOGIC<br />
Figure 6-1. SIM Block Diagram<br />
Addr. Register Name Bit 7 6 5 4 3 2 1 Bit 0<br />
$FE00<br />
$FE01<br />
$FE03<br />
V DD<br />
INTERNAL<br />
PULLUP<br />
DEVICE<br />
SIM Break Status Register<br />
(SBSR)<br />
Note: Writing a logic 0 clears SBSW.<br />
SIM Reset Status Register<br />
(SRSR)<br />
SIM Break Flag Control<br />
Register (SBFCR)<br />
Read:<br />
SBSW<br />
R R R R R R<br />
Write: NOTE<br />
Reset: 0 0 0 0 0 0 0 0<br />
Read: POR PIN COP ILOP ILAD USB LVI 0<br />
Write:<br />
POR: 1 0 0 0 0 0 0 0<br />
Read:<br />
Write:<br />
STOP/WAIT<br />
CONTROL<br />
CLOCK<br />
CONTROL<br />
POR CONTROL<br />
RESET PIN CONTROL<br />
SIM RESET STATUS REGISTER<br />
INTERRUPT CONTROL<br />
AND PRIORITY DECODE<br />
Reset: 0<br />
SIM<br />
COUNTER<br />
CLOCK GENERATORS<br />
RESET<br />
MASTER<br />
RESET<br />
CONTROL<br />
BCFE R R R R R R R<br />
= Unimplemented R = Reserved<br />
Figure 6-2. SIM I/O Register Summary<br />
<strong>MC68HC908JW32</strong> <strong>Data</strong> <strong>Sheet</strong>, Rev. 6<br />
MODULE STOP<br />
MODULE WAIT<br />
CPU STOP (FROM CPU)<br />
CPU WAIT (FROM CPU)<br />
SIMOSCEN (TO CGM, OSC)<br />
COP CLOCK<br />
CGMXCLK (FROM CGM)<br />
CGMOUT (FROM CGM)<br />
INTERNAL CLOCKS<br />
LVI (FROM LVI MODULE)<br />
ILLEGAL OPCODE (FROM CPU)<br />
ILLEGAL ADDRESS (FROM ADDRESS<br />
MAP DECODERS)<br />
COP (FROM COP MODULE)<br />
INTERRUPT SOURCES<br />
CPU INTERFACE<br />
76 <strong>Freescale</strong> Semiconductor<br />
÷ 2<br />
R
$FE04<br />
$FE05<br />
$FE06<br />
Interrupt Status Register 1<br />
(INT1)<br />
Interrupt Status Register 2<br />
(INT2)<br />
Interrupt Status Register 3<br />
(INT3)<br />
6.2 SIM Bus Clock Control and Generation<br />
<strong>MC68HC908JW32</strong> <strong>Data</strong> <strong>Sheet</strong>, Rev. 6<br />
SIM Bus Clock Control and Generation<br />
The bus clock generator provides system clock signals for the CPU and peripherals on the MCU. The<br />
system clocks are generated from an incoming clock, CGMOUT, as shown in Figure 6-3. This clock can<br />
come from either an external oscillator or from the on-chip PLL. (See Chapter 5 Clock Generator Module<br />
(CGM).)<br />
OSC2<br />
OSC1<br />
STOP MODE CLOCK<br />
ENABLE SIGNALS<br />
FROM CONFIG2<br />
6.2.1 Bus Timing<br />
Read: IF6 IF5 IF4 IF3 IF2 IF1 0 0<br />
Write: R R R R R R R R<br />
Reset: 0 0 0 0 0 0 0 0<br />
Read: IF14 IF13 IF12 IF11 IF10 IF9 IF8 IF7<br />
Write: R R R R R R R R<br />
Reset: 0 0 0 0 0 0 0 0<br />
Read: 0 0 0 0 0 0 0 IF15<br />
Write: R R R R R R R R<br />
Reset: 0 0 0 0 0 0 0 0<br />
= Unimplemented R = Reserved<br />
Figure 6-2. SIM I/O Register Summary<br />
OSCILLATOR (OSC) MODULE<br />
CGMRCLK<br />
PHASE-LOCKED LOOP (PLL)<br />
CGMXCLK<br />
CGMXCLK<br />
CGMOUT<br />
SIMDIV2<br />
Figure 6-3. CGM Clock Signals<br />
TO TBM<br />
SIM COUNTER<br />
SYSTEM INTEGRATION MODULE<br />
In user mode, the internal bus frequency is either the oscillator output (CGMXCLK) divided by four or the<br />
PLL output (CGMVCLK) divided by six.<br />
<strong>Freescale</strong> Semiconductor 77<br />
÷ 2<br />
BUS CLOCK<br />
GENERATORS<br />
MONITOR MODE<br />
USER MODE<br />
SIMOSCEN<br />
IT12<br />
TO REST<br />
OF MCU<br />
IT23<br />
TO REST<br />
OF MCU<br />
PTC1
System Integration Module (SIM)<br />
6.2.2 Clock Start-up from POR or LVI Reset<br />
When the power-on reset module or the low-voltage inhibit module generates a reset, the clocks to the<br />
CPU and peripherals are inactive and held in an inactive phase until after the 4096 CGMXCLK cycle POR<br />
timeout has completed. The RST pin is driven low by the SIM during this entire period. The IBUS clocks<br />
start upon completion of the timeout.<br />
6.2.3 Clocks in Stop Mode and Wait Mode<br />
Upon exit from stop mode by an interrupt, break, or reset, the SIM allows CGMXCLK to clock the SIM<br />
counter. The CPU and peripheral clocks do not become active until after the stop delay timeout. This<br />
timeout is selectable as 4096 or 32 CGMXCLK cycles. (See 6.6.2 Stop Mode.)<br />
In wait mode, the CPU clocks are inactive. The SIM also produces two sets of clocks for other modules.<br />
Refer to the wait mode subsection of each module to see if the module is active or inactive in wait mode.<br />
Some modules can be programmed to be active in wait mode.<br />
6.3 Reset and System Initialization<br />
The MCU has these reset sources:<br />
• Power-on reset module (POR)<br />
• External reset pin (RST)<br />
• Computer operating properly module (COP)<br />
• Low-voltage inhibit module (LVI)<br />
• Illegal opcode<br />
• Illegal address<br />
• Universal serial bus module (USB)<br />
All of these resets produce the vector $FFFE:$FFFF ($FEFE:$FEFF in monitor mode) and assert the<br />
internal reset signal (IRST). IRST causes all registers to be returned to their default values and all<br />
modules to be returned to their reset states.<br />
An internal reset clears the SIM counter (see 6.4 SIM Counter), but an external reset does not. Each of<br />
the resets sets a corresponding bit in the SIM reset status register (SRSR). (See 6.7 SIM Registers.)<br />
6.3.1 External Pin Reset<br />
The RST pin circuit includes an internal pull-up device. Pulling the asynchronous RST pin low halts all<br />
processing. The PIN bit of the SIM reset status register (SRSR) is set as long as RST is held low for at<br />
least the minimum tRL time and no other reset sources are present. See Table 6-2 for details. Figure 6-4<br />
shows the relative timing.<br />
Table 6-2. Reset Recovery<br />
Reset Recovery Type Actual Number of Cycles<br />
POR/LVI 4163 (4096 + 64 + 3)<br />
All others 67 (64 + 3)<br />
<strong>MC68HC908JW32</strong> <strong>Data</strong> <strong>Sheet</strong>, Rev. 6<br />
78 <strong>Freescale</strong> Semiconductor
CGMXCLK<br />
RST<br />
IAB PC VECT H VECT L<br />
6.3.2 Active Resets from Internal Sources<br />
Figure 6-4. External Reset Timing<br />
<strong>MC68HC908JW32</strong> <strong>Data</strong> <strong>Sheet</strong>, Rev. 6<br />
Reset and System Initialization<br />
All internal reset sources actively pull the RST pin low for 32 CGMXCLK cycles to allow resetting of<br />
external peripherals. The internal reset signal IRST continues to be asserted for an additional 32 cycles<br />
(see Figure 6-5). An internal reset can be caused by an illegal address, illegal opcode, COP timeout, LVI,<br />
or POR (see Figure 6-6).<br />
NOTE<br />
For LVI or POR resets, the SIM cycles through 4096 + 32 CGMXCLK<br />
cycles during which the SIM forces the RST pin low. The internal reset<br />
signal then follows the sequence from the falling edge of RST shown in<br />
Figure 6-5.<br />
IRST<br />
RST<br />
CGMXCLK<br />
IAB<br />
RST PULLED LOW BY MCU<br />
The COP reset is asynchronous to the bus clock.<br />
Figure 6-5. Internal Reset Timing<br />
ILLEGAL ADDRESS RST<br />
ILLEGAL OPCODE RST<br />
COPRST<br />
POR<br />
LVI<br />
USB<br />
32 CYCLES 32 CYCLES<br />
INTERNAL RESET<br />
Figure 6-6. Sources of Internal Reset<br />
VECTOR HIGH<br />
The active reset feature allows the part to issue a reset to peripherals and other chips within a system<br />
built around the MCU.<br />
6.3.2.1 Power-On Reset<br />
When power is first applied to the MCU, the power-on reset module (POR) generates a pulse to indicate<br />
that power-on has occurred. The external reset pin (RST) is held low while the SIM counter counts out<br />
4096 + 32 CGMXCLK cycles. Thirty-two CGMXCLK cycles later, the CPU and memories are released<br />
from reset to allow the reset vector sequence to occur.<br />
<strong>Freescale</strong> Semiconductor 79
System Integration Module (SIM)<br />
At power-on, these events occur:<br />
• A POR pulse is generated.<br />
• The internal reset signal is asserted.<br />
• The SIM enables CGMOUT.<br />
• Internal clocks to the CPU and modules are held inactive for 4096 CGMXCLK cycles to allow<br />
stabilization of the oscillator.<br />
• The pin is driven low during the oscillator stabilization time.<br />
• The POR bit of the SIM reset status register (SRSR) is set and all other bits in the register are<br />
cleared.<br />
OSC1<br />
PORRST<br />
CGMXCLK<br />
CGMOUT<br />
RST<br />
IRST<br />
IAB<br />
4096<br />
CYCLES<br />
32<br />
CYCLES<br />
32<br />
CYCLES<br />
Figure 6-7. POR Recovery<br />
6.3.2.2 Computer Operating Properly (COP) Reset<br />
An input to the SIM is reserved for the COP reset signal. The overflow of the COP counter causes an<br />
internal reset and sets the COP bit in the SIM reset status register (SRSR). The SIM actively pulls down<br />
the RST pin for all internal reset sources.<br />
To prevent a COP module timeout, write any value to location $FFFF. Writing to location $FFFF clears<br />
the COP counter and bits 12 through 5 of the SIM counter. The SIM counter output, which occurs at least<br />
every 8176 CGMXCLK cycles, drives the COP counter. The COP should be serviced as soon as possible<br />
out of reset to guarantee the maximum amount of time before the first timeout.<br />
The COP module is disabled if the RST pin or the IRQ1 pin is held at VTST while the MCU is in monitor<br />
mode. The COP module can be disabled only through combinational logic conditioned with the high<br />
voltage signal on the RST or the IRQ1 pin. This prevents the COP from becoming disabled as a result of<br />
external noise. During a break state, VTST on the RST pin disables the COP module.<br />
6.3.2.3 Illegal Opcode Reset<br />
The SIM decodes signals from the CPU to detect illegal instructions. An illegal instruction sets the ILOP<br />
bit in the SIM reset status register (SRSR) and causes a reset.<br />
<strong>MC68HC908JW32</strong> <strong>Data</strong> <strong>Sheet</strong>, Rev. 6<br />
$FFFE $FFFF<br />
80 <strong>Freescale</strong> Semiconductor
<strong>MC68HC908JW32</strong> <strong>Data</strong> <strong>Sheet</strong>, Rev. 6<br />
SIM Counter<br />
If the stop enable bit, STOP, in the mask option register is logic 0, the SIM treats the STOP instruction as<br />
an illegal opcode and causes an illegal opcode reset. The SIM actively pulls down the RST pin for all<br />
internal reset sources.<br />
6.3.2.4 Illegal Address Reset<br />
An opcode fetch from an unmapped address generates an illegal address reset. The SIM verifies that the<br />
CPU is fetching an opcode prior to asserting the ILAD bit in the SIM reset status register (SRSR) and<br />
resetting the MCU. A data fetch from an unmapped address does not generate a reset. The SIM actively<br />
pulls down the RST pin for all internal reset sources.<br />
6.3.2.5 Low-Voltage Inhibit (LVI) Reset<br />
The low-voltage inhibit module (LVI) asserts its output to the SIM when the VDD voltage falls to the<br />
LVITRIPF voltage. The LVI bit in the SIM reset status register (SRSR) is set, and the external reset pin<br />
(RST) is held low while the SIM counter counts out 4096 + 32 CGMXCLK cycles. Thirty-two CGMXCLK<br />
cycles later, the CPU is released from reset to allow the reset vector sequence to occur. The SIM actively<br />
pulls down the RST pin for all internal reset sources.<br />
6.3.2.6 Universal Serial Bus (USB) Reset<br />
The USB module will detect a reset signaled on the bus by the presence of an extended SE0 at the USB<br />
data pins of a device. The MCU seeing a single-ended 0 on its USB data inputs for more than 2.5µs treats<br />
that signal as a reset. After the reset is removed, the device will be in the attached, but not yet addressed<br />
or configured, state (refer to Section 9.1 USB Devices of the Universal Serial Bus Specification Rev. 2.0).<br />
The device must be able to accept the device address via a SET_ADDRESS command (refer to Section<br />
9.4 of the Universal Serial Bus Specification Rev. 2.0) no later than 10ms after the reset is removed.<br />
USB reset can be disabled to generate an internal reset. It can be configured to generate IRQ interrupt.<br />
(See Chapter 3 Configuration Registers (CONFIG).)<br />
NOTE<br />
USB reset is disabled when the USB module is disabled by clearing the<br />
USBEN bit of the USB address register (UADDR).<br />
6.4 SIM Counter<br />
The SIM counter is used by the power-on reset module (POR) and in stop mode recovery to allow the<br />
oscillator time to stabilize before enabling the internal bus (IBUS) clocks. The SIM counter also serves as<br />
a prescaler for the computer operating properly module (COP). The SIM counter overflow supplies the<br />
clock for the COP module. The SIM counter is 12 bits long.<br />
6.4.1 SIM Counter During Power-On Reset<br />
The power-on reset module (POR) detects power applied to the MCU. At power-on, the POR circuit<br />
asserts the signal PORRST. Once the SIM is initialized, it enables the clock generation module (CGM) to<br />
drive the bus clock state machine.<br />
6.4.2 SIM Counter During Stop Mode Recovery<br />
The SIM counter also is used for stop mode recovery. The STOP instruction clears the SIM counter. After<br />
an interrupt, break, or reset, the SIM senses the state of the short stop recovery bit, SSREC, in the mask<br />
<strong>Freescale</strong> Semiconductor 81
System Integration Module (SIM)<br />
option register. If the SSREC bit is a logic 1, then the stop recovery is reduced from the normal delay of<br />
4096 CGMXCLK cycles down to 32 CGMXCLK cycles. This is ideal for applications using canned<br />
oscillators that do not require long start-up times from stop mode. External crystal applications should use<br />
the full stop recovery time, that is, with SSREC cleared.<br />
6.4.3 SIM Counter and Reset States<br />
External reset has no effect on the SIM counter. (See 6.6.2 Stop Mode for details.) The SIM counter is<br />
free-running after all reset states. (See 6.3.2 Active Resets from Internal Sources for counter control and<br />
internal reset recovery sequences.)<br />
6.5 Exception Control<br />
Normal, sequential program execution can be changed in three different ways:<br />
• Interrupts:<br />
– Maskable hardware CPU interrupts<br />
– Non-maskable software interrupt instruction (SWI)<br />
• Reset<br />
• Break interrupts<br />
6.5.1 Interrupts<br />
At the beginning of an interrupt, the CPU saves the CPU register contents on the stack and sets the<br />
interrupt mask (I bit) to prevent additional interrupts. At the end of an interrupt, the RTI instruction recovers<br />
the CPU register contents from the stack so that normal processing can resume. Figure 6-8 shows<br />
interrupt entry timing, and Figure 6-9 shows interrupt recovery timing.<br />
MODULE<br />
INTERRUPT<br />
I-BIT<br />
IAB<br />
IDB<br />
R/W<br />
MODULE<br />
INTERRUPT<br />
I-BIT<br />
IAB<br />
IDB<br />
R/W<br />
DUMMY SP SP – 1 SP – 2 SP – 3 SP – 4 VECT H VECT L START ADDR<br />
DUMMY PC – 1[7:0] PC – 1[15:8] X A CCR V DATA H V DATA L OPCODE<br />
Figure 6-8. Interrupt Entry Timing<br />
SP – 4 SP – 3 SP – 2 SP – 1 SP PC PC + 1<br />
CCR A X PC – 1[15:8] PC – 1[7:0] OPCODE OPERAND<br />
Figure 6-9. Interrupt Recovery Timing<br />
Interrupts are latched, and arbitration is performed in the SIM at the start of interrupt processing. The<br />
arbitration result is a constant that the CPU uses to determine which vector to fetch. Once an interrupt is<br />
<strong>MC68HC908JW32</strong> <strong>Data</strong> <strong>Sheet</strong>, Rev. 6<br />
82 <strong>Freescale</strong> Semiconductor
<strong>MC68HC908JW32</strong> <strong>Data</strong> <strong>Sheet</strong>, Rev. 6<br />
Exception Control<br />
latched by the SIM, no other interrupt can take precedence, regardless of priority, until the latched<br />
interrupt is serviced (or the I bit is cleared). (See Figure 6-10.)<br />
YES<br />
AS MANY INTERRUPTS<br />
AS EXIST ON CHIP<br />
FROM RESET<br />
I BIT BREAK SET?<br />
INTERRUPT?<br />
NO<br />
I-BIT SET?<br />
NO<br />
IRQ1<br />
INTERRUPT?<br />
NO<br />
FETCH NEXT<br />
INSTRUCTION<br />
SWI<br />
INSTRUCTION?<br />
NO<br />
RTI<br />
INSTRUCTION?<br />
NO<br />
YES<br />
YES<br />
STACK CPU REGISTERS<br />
SET I-BIT<br />
LOAD PC WITH INTERRUPT VECTOR<br />
YES<br />
YES<br />
UNSTACK CPU REGISTERS<br />
EXECUTE INSTRUCTION<br />
Figure 6-10. Interrupt Processing<br />
6.5.1.1 Hardware Interrupts<br />
A hardware interrupt does not stop the current instruction. Processing of a hardware interrupt begins after<br />
completion of the current instruction. When the current instruction is complete, the SIM checks all pending<br />
hardware interrupts. If interrupts are not masked (I bit clear in the condition code register) and if the<br />
corresponding interrupt enable bit is set, the SIM proceeds with interrupt processing; otherwise, the next<br />
instruction is fetched and executed.<br />
<strong>Freescale</strong> Semiconductor 83
System Integration Module (SIM)<br />
If more than one interrupt is pending at the end of an instruction execution, the highest priority interrupt<br />
is serviced first. Figure 6-11 demonstrates what happens when two interrupts are pending. If an interrupt<br />
is pending upon exit from the original interrupt service routine, the pending interrupt is serviced before the<br />
LDA instruction is executed.<br />
INT1<br />
INT2<br />
Figure 6-11. Interrupt Recognition Example<br />
The LDA opcode is prefetched by both the INT1 and INT2 RTI instructions. However, in the case of the<br />
INT1 RTI prefetch, this is a redundant operation.<br />
NOTE<br />
To maintain compatibility with the M6805 Family, the H register is not<br />
pushed on the stack during interrupt entry. If the interrupt service routine<br />
modifies the H register or uses the indexed addressing mode, software<br />
should save the H register and then restore it prior to exiting the routine.<br />
6.5.1.2 SWI Instruction<br />
The SWI instruction is a non-maskable instruction that causes an interrupt regardless of the state of the<br />
interrupt mask (I bit) in the condition code register.<br />
NOTE<br />
A software interrupt pushes PC onto the stack. A software interrupt does<br />
not push PC – 1, as a hardware interrupt does.<br />
6.5.2 Interrupt Status Registers<br />
CLI<br />
LDA #$FF<br />
PSHH<br />
PULH<br />
RTI<br />
PSHH<br />
PULH<br />
RTI<br />
The flags in the interrupt status registers identify maskable interrupt sources. Table 6-3 summarizes the<br />
interrupt sources and the interrupt status register flags that they set. The interrupt status registers can be<br />
useful for debugging.<br />
<strong>MC68HC908JW32</strong> <strong>Data</strong> <strong>Sheet</strong>, Rev. 6<br />
BACKGROUND<br />
ROUTINE<br />
INT1 INTERRUPT SERVICE ROUTINE<br />
INT2 INTERRUPT SERVICE ROUTINE<br />
84 <strong>Freescale</strong> Semiconductor
6.5.2.1 Interrupt Status Register 1<br />
Address: $FE04<br />
Bit 7 6 5 4 3 2 1 Bit 0<br />
Read: IF6 IF5 IF4 IF3 IF2 IF1 0 0<br />
Write: R R R R R R R R<br />
Reset: 0 0 0 0 0 0 0 0<br />
R = Reserved<br />
<strong>MC68HC908JW32</strong> <strong>Data</strong> <strong>Sheet</strong>, Rev. 6<br />
Exception Control<br />
IF6–IF1 — Interrupt Flags 6–1<br />
These flags indicate the presence of interrupt requests from the sources shown in Table 6-3.<br />
1 = Interrupt request present<br />
0 = No interrupt request present<br />
Bit 0 and Bit 1 — Always read 0<br />
6.5.2.2 Interrupt Status Register 2<br />
IF14–IF7 — Interrupt Flags 14–7<br />
These flags indicate the presence of interrupt requests from the sources shown in Table 6-3.<br />
1 = Interrupt request present<br />
0 = No interrupt request present<br />
6.5.2.3 Interrupt Status Register 3<br />
Figure 6-12. Interrupt Status Register 1 (INT1)<br />
Address: $FE05<br />
Bit 7 6 5 4 3 2 1 Bit 0<br />
Read: IF14 IF13 IF12 IF11 IF10 IF9 IF8 IF7<br />
Write: R R R R R R R R<br />
Reset: 0 0 0 0 0 0 0 0<br />
R = Reserved<br />
Figure 6-13. Interrupt Status Register 2 (INT2)<br />
Address: $FE06<br />
Bit 7 6 5 4 3 2 1 Bit 0<br />
Read: 0 0 0 0 0 0 0 IF15<br />
Write: R R R R R R R R<br />
Reset: 0 0 0 0 0 0 0 0<br />
R = Reserved<br />
Figure 6-14. Interrupt Status Register 3 (INT3)<br />
IF15 — Interrupt Flag 15<br />
This flag indicates the presence of an interrupt request from the source shown in Table 6-3.<br />
1 = Interrupt request present<br />
0 = No interrupt request present<br />
<strong>Freescale</strong> Semiconductor 85
System Integration Module (SIM)<br />
Priority<br />
Lowest<br />
INT<br />
Flag<br />
IF15<br />
IF14<br />
IF13<br />
IF12<br />
IF11<br />
IF10<br />
IF9<br />
IF8<br />
IF7<br />
IF6<br />
IF5<br />
IF4<br />
IF3<br />
IF2<br />
IF1<br />
—<br />
Table 6-3. Interrupt Sources<br />
Vector<br />
Address<br />
$FFDE<br />
$FFDF<br />
$FFE0<br />
$FFE1<br />
$FFE2<br />
$FFE3<br />
$FFE4<br />
$FFE5<br />
$FFE6<br />
$FFE7<br />
$FFE8<br />
$FFE9<br />
$FFEA<br />
$FFEB<br />
$FFEC<br />
$FFED<br />
$FFEE<br />
$FFEF<br />
$FFF0<br />
$FFF1<br />
$FFF2<br />
$FFF3<br />
$FFF4<br />
$FFF5<br />
$FFF6<br />
$FFF7<br />
$FFF8<br />
$FFF9<br />
$FFFA<br />
$FFFB<br />
$FFFC<br />
$FFFD<br />
$FFFE<br />
—<br />
Highest $FFFF<br />
Timebase<br />
Keyboard<br />
SPI Transmit<br />
SPI Receive<br />
Reserved<br />
Reserved<br />
Reserved<br />
PS2 Interrupt<br />
TIM1 Overflow<br />
TIM1 Channel 1<br />
TIM1 Channel 0<br />
PLL<br />
IRQ<br />
USB Endpoint<br />
USB System<br />
SWI<br />
Reset<br />
<strong>MC68HC908JW32</strong> <strong>Data</strong> <strong>Sheet</strong>, Rev. 6<br />
Interrupt Source<br />
86 <strong>Freescale</strong> Semiconductor
6.5.3 Reset<br />
All reset sources always have equal and highest priority and cannot be arbitrated.<br />
6.5.4 Break Interrupts<br />
<strong>MC68HC908JW32</strong> <strong>Data</strong> <strong>Sheet</strong>, Rev. 6<br />
Low-Power Modes<br />
The break module can stop normal program flow at a software-programmable break point by asserting<br />
its break interrupt output. (See Chapter 18 Break Module (BRK).) The SIM puts the CPU into the break<br />
state by forcing it to the SWI vector location. Refer to the break interrupt subsection of each module to<br />
see how each module is affected by the break state.<br />
6.5.5 Status Flag Protection in Break Mode<br />
The SIM controls whether status flags contained in other modules can be cleared during break mode. The<br />
user can select whether flags are protected from being cleared by properly initializing the break clear flag<br />
enable bit (BCFE) in the SIM break flag control register (SBFCR).<br />
Protecting flags in break mode ensures that set flags will not be cleared while in break mode. This<br />
protection allows registers to be freely read and written during break mode without losing status flag<br />
information.<br />
Setting the BCFE bit enables the clearing mechanisms. Once cleared in break mode, a flag remains<br />
cleared even when break mode is exited. Status flags with a 2-step clearing mechanism — for example,<br />
a read of one register followed by the read or write of another — are protected, even when the first step<br />
is accomplished prior to entering break mode. Upon leaving break mode, execution of the second step<br />
will clear the flag as normal.<br />
6.6 Low-Power Modes<br />
Executing the WAIT or STOP instruction puts the MCU in a low power-consumption mode for standby<br />
situations. The SIM holds the CPU in a non-clocked state. The operation of each of these modes is<br />
described in the following subsections. Both STOP and WAIT clear the interrupt mask (I) in the condition<br />
code register, allowing interrupts to occur.<br />
6.6.1 Wait Mode<br />
In wait mode, the CPU clocks are inactive while the peripheral clocks continue to run. Figure 6-15 shows<br />
the timing for wait mode entry.<br />
A module that is active during wait mode can wake up the CPU with an interrupt if the interrupt is enabled.<br />
Stacking for the interrupt begins one cycle after the WAIT instruction during which the interrupt occurred.<br />
In wait mode, the CPU clocks are inactive. Refer to the wait mode subsection of each module to see if<br />
the module is active or inactive in wait mode. Some modules can be programmed to be active in wait<br />
mode.<br />
Wait mode also can be exited by a reset or break. A break interrupt during wait mode sets the SIM break<br />
stop/wait bit, SBSW, in the SIM break status register (SBSR). If the COP disable bit, COPD, in the mask<br />
option register is logic 0, then the computer operating properly module (COP) is enabled and remains<br />
active in wait mode.<br />
<strong>Freescale</strong> Semiconductor 87
System Integration Module (SIM)<br />
IAB<br />
WAIT ADDR + 1 SAME SAME<br />
IDB PREVIOUS DATA NEXT OPCODE SAME<br />
R/W<br />
WAIT ADDR<br />
Figure 6-15. Wait Mode Entry Timing<br />
Figure 6-16 and Figure 6-17 show the timing for WAIT recovery.<br />
Figure 6-16. Wait Recovery from Interrupt or Break<br />
Figure 6-17. Wait Recovery from Internal Reset<br />
<strong>MC68HC908JW32</strong> <strong>Data</strong> <strong>Sheet</strong>, Rev. 6<br />
88 <strong>Freescale</strong> Semiconductor<br />
SAME<br />
NOTE: Previous data can be operand data or the WAIT opcode, depending on the<br />
last instruction.<br />
IAB<br />
IDB<br />
EXITSTOPWAIT<br />
$A6<br />
$6E0B $6E0C $00FF $00FE $00FD $00FC<br />
$A6 $A6 $01 $0B $6E<br />
NOTE: EXITSTOPWAIT = RST pin OR CPU interrupt OR break interrupt<br />
IAB<br />
IDB<br />
RST<br />
CGMXCLK<br />
$A6<br />
$6E0B RST VCT H RST VCT L<br />
$A6 $A6<br />
32<br />
CYCLES<br />
32<br />
CYCLES
6.6.2 Stop Mode<br />
<strong>MC68HC908JW32</strong> <strong>Data</strong> <strong>Sheet</strong>, Rev. 6<br />
Low-Power Modes<br />
In stop mode, the SIM counter is reset and the system clocks are disabled. An interrupt request from a<br />
module can cause an exit from stop mode. Stacking for interrupts begins after the selected stop recovery<br />
time has elapsed. Reset or break also causes an exit from stop mode.<br />
The SIM disables the clock generator module output (CGMOUT) in stop mode, stopping the CPU and<br />
peripherals. Stop recovery time is selectable using the SSREC bit in the configuration register 1<br />
(CONFIG1). If SSREC is set, stop recovery is reduced from the normal delay of 4096 CGMXCLK cycles<br />
down to 32. This is ideal for applications using canned oscillators that do not require long start-up times<br />
from stop mode.<br />
NOTE<br />
External crystal applications should use the full stop recovery time by<br />
clearing the SSREC bit.<br />
The SIM counter is held in reset from the execution of the STOP instruction until the beginning of stop<br />
recovery. It is then used to time the recovery period. Figure 6-18 shows stop mode entry timing.<br />
NOTE<br />
To minimize stop current, all pins configured as inputs should be driven to<br />
a logic 1 or logic 0.<br />
CGMXCLK<br />
INT/BREAK<br />
CPUSTOP<br />
IAB<br />
STOP ADDR<br />
STOP ADDR + 1 SAME SAME<br />
IDB PREVIOUS DATA NEXT OPCODE SAME<br />
R/W<br />
NOTE: Previous data can be operand data or the STOP opcode, depending on the last<br />
instruction.<br />
Figure 6-18. Stop Mode Entry Timing<br />
STOP RECOVERY PERIOD<br />
Figure 6-19. Stop Mode Recovery from Interrupt<br />
<strong>Freescale</strong> Semiconductor 89<br />
SAME<br />
IAB STOP +1<br />
STOP + 2 STOP + 2 SP SP – 1 SP – 2 SP – 3
System Integration Module (SIM)<br />
6.7 SIM Registers<br />
The SIM has three memory-mapped registers:<br />
• SIM Break Status Register (SBSR) — $FE00<br />
• SIM Reset Status Register (SRSR) — $FE01<br />
• SIM Break Flag Control Register (SBFCR) — $FE03<br />
6.7.1 SIM Break Status Register<br />
The SIM break status register (SBSR) contains a flag to indicate that a break caused an exit from stop<br />
mode or wait mode. This register is used only in emulation mode.<br />
Address: $FE00<br />
Bit 7 6 5 4 3 2 1 Bit 0<br />
Read:<br />
Write:<br />
R R R R R R<br />
SBSW<br />
Note<br />
R<br />
Reset: 0<br />
Note: Writing a logic 0 clears SBSW. R = Reserved<br />
SBSW — Break Wait Bit<br />
SBSW can be read within the break interrupt routine. The user can modify the return address on the<br />
stack by subtracting 1 from it.<br />
1 = Wait mode was exited by break interrupt<br />
0 = Wait mode was not exited by break interrupt<br />
6.7.2 SIM Reset Status Register<br />
This register contains six flags that show the source of the last reset provided all previous reset status<br />
bits have been cleared. Clear the SIM reset status register by reading it. A power-on reset sets the POR<br />
bit and clears all other bits in the register.<br />
The register is initialized on power up with the POR bit set and all other bits cleared. During a POR or any<br />
other internal reset, the RST pin is pulled low. After the pin is released, it will be sampled 32 CGMXCLK<br />
cycles later. If the pin is not above VIH at this time, then the PIN bit may be set, in addition to whatever<br />
other bits are set.<br />
POR — Power-On Reset Bit<br />
1 = Last reset caused by POR circuit<br />
0 = Read of SRSR<br />
Figure 6-20. SIM Break Status Register (SBSR)<br />
Address: $FE01<br />
Bit 7 6 5 4 3 2 1 Bit 0<br />
Read:<br />
Write:<br />
POR PIN COP ILOP ILAD USB LVI 0<br />
Reset: 1 0 0 0 0 0 0 0<br />
= Unimplemented<br />
Figure 6-21. SIM Reset Status Register (SRSR)<br />
<strong>MC68HC908JW32</strong> <strong>Data</strong> <strong>Sheet</strong>, Rev. 6<br />
90 <strong>Freescale</strong> Semiconductor
PIN — External Reset Bit<br />
1 = Last reset caused by external reset pin (RST)<br />
0 = POR or read of SRSR<br />
COP — Computer Operating Properly Reset Bit<br />
1 = Last reset caused by COP counter<br />
0 = POR or read of SRSR<br />
ILOP — Illegal Opcode Reset Bit<br />
1 = Last reset caused by an illegal opcode<br />
0 = POR or read of SRSR<br />
ILAD — Illegal Address Reset Bit (opcode fetches only)<br />
1 = Last reset caused by an opcode fetch from an illegal address<br />
0 = POR or read of SRSR<br />
USB — USB Reset Bit<br />
1 = Last reset caused by USB reset.<br />
0 = POR or read of SRSR<br />
LVI — Low-Voltage Inhibit Reset Bit<br />
1 = Last reset caused by the LVI circuit<br />
0 = POR or read of SRSR<br />
6.7.3 SIM Break Flag Control Register<br />
<strong>MC68HC908JW32</strong> <strong>Data</strong> <strong>Sheet</strong>, Rev. 6<br />
SIM Registers<br />
The SIM break control register contains a bit that enables software to clear status bits while the MCU is<br />
in a break state.<br />
Address: $FE03<br />
Bit 7 6 5 4 3 2 1 Bit 0<br />
Read:<br />
Write:<br />
BCFE R R R R R R R<br />
Reset: 0<br />
R = Reserved<br />
Figure 6-22. SIM Break Flag Control Register (SBFCR)<br />
BCFE — Break Clear Flag Enable Bit<br />
This read/write bit enables software to clear status bits by accessing status registers while the MCU is<br />
in a break state. To clear status bits during the break state, the BCFE bit must be set.<br />
1 = Status bits clearable during break<br />
0 = Status bits not clearable during break<br />
<strong>Freescale</strong> Semiconductor 91
System Integration Module (SIM)<br />
<strong>MC68HC908JW32</strong> <strong>Data</strong> <strong>Sheet</strong>, Rev. 6<br />
92 <strong>Freescale</strong> Semiconductor
Chapter 7<br />
Monitor Mode (MON)<br />
7.1 Introduction<br />
This section describes the monitor mode (MON). The monitor mode allows complete testing of the MCU<br />
through a single-wire interface with a host computer.<br />
7.2 Features<br />
Features of the monitor mode include:<br />
• Normal user-mode pin functionality<br />
• One pin dedicated to serial communication between monitor ROM and host computer<br />
• Standard mark/space non-return-to-zero (NRZ) communication with host computer<br />
• Execution of code in RAM or ROM<br />
• ROM memory security feature (1)<br />
• 960 bytes monitor ROM code size ($FC00–$FDFF and $FE10–$FFCE)<br />
• Standard monitor mode entry if high voltage, VTST , is applied to IRQ<br />
7.3 Functional Description<br />
The monitor module receives and executes commands from a host computer. Figure 7-1 shows an<br />
example circuit used to enter monitor mode and communicate with a host computer via a standard<br />
RS-232 interface.<br />
Simple monitor commands can access any memory address. In monitor mode, the MCU can execute<br />
code downloaded into RAM by a host computer while most MCU pins retain normal operating mode<br />
functions. All communication between the host computer and the MCU is through the PTA0 pin. A<br />
level-shifting and multiplexing interface is required between PTA0 and the host computer. PTA0 is used<br />
in a wired-OR configuration and requires a pullup resistor.<br />
The monitor code allows enabling the PLL to generate the internal clock, provided the reset vector is<br />
blank, when the device is being clocked by a low-frequency crystal. This entry method, which is enabled<br />
when IRQ is held low out of reset, is intended to support serial communication/ programming at 9600<br />
baud in monitor mode.<br />
1. No security feature is absolutely secure. However, <strong>Freescale</strong>’s strategy is to make reading or copying the ROM difficult for<br />
unauthorized users.<br />
<strong>MC68HC908JW32</strong> <strong>Data</strong> <strong>Sheet</strong>, Rev. 6<br />
<strong>Freescale</strong> Semiconductor 93
Monitor Mode (MON)<br />
1 µF<br />
1 µF<br />
DB9<br />
2<br />
3<br />
5<br />
MAX232<br />
V+<br />
V–<br />
NOTES:<br />
1. Affects high voltage entry to monitor mode only (SW2 at position C):<br />
SW1: Position A — Bus clock = OSC1 4<br />
SW1: Position B — Bus clock = OSC1 2<br />
2<br />
6<br />
V DD<br />
+<br />
1<br />
C1+<br />
VCC 16<br />
+<br />
1 µF<br />
3<br />
C1–<br />
GND<br />
15<br />
+<br />
4 C2+<br />
5<br />
7<br />
8<br />
C2–<br />
10<br />
9<br />
1<br />
1 µF<br />
+<br />
V TST<br />
+<br />
1 µF<br />
74HC125<br />
6 5<br />
2<br />
74HC125<br />
3 4<br />
Figure 7-1. Monitor Mode Circuit<br />
<strong>MC68HC908JW32</strong> <strong>Data</strong> <strong>Sheet</strong>, Rev. 6<br />
HC908JW32<br />
94 <strong>Freescale</strong> Semiconductor<br />
V REG<br />
XTAL CIRCUIT<br />
V DD<br />
10 k<br />
1k<br />
(SEE NOTE)<br />
0.1 µF<br />
10k<br />
A<br />
B<br />
V DD<br />
4.9152MHz/9.8304MHz<br />
(50% DUTY)<br />
8.5 V<br />
10 k<br />
V DD<br />
0.1 µF<br />
2 k<br />
2.2 nF<br />
SW1<br />
0.1 µF<br />
10 k<br />
10k<br />
100 pF<br />
V DD<br />
RST<br />
V DD<br />
V DDPLL<br />
V SSPLL<br />
V SS<br />
CGMXFC<br />
OSC1<br />
IRQ<br />
PTA0<br />
PTA1<br />
PTC1<br />
PTA2
7.3.1 Entering Monitor Mode<br />
<strong>MC68HC908JW32</strong> <strong>Data</strong> <strong>Sheet</strong>, Rev. 6<br />
Functional Description<br />
Table 7-1 shows the pin conditions for entering monitor mode. As specified in the table, monitor mode<br />
may be entered after a POR and will allow communication at 9600 baud provided one of the following<br />
sets of conditions is met:<br />
1. IRQ = V TST (PLL off):<br />
– The external clock is 4.9152 MHz with PTC1 low<br />
2. IRQ = V TST (PLL off):<br />
– The external clock is 9.8304 MHz with PTC1 high<br />
If V TST is applied to IRQ and PTC1 is low upon monitor mode entry (above condition set 1), the bus<br />
frequency is a divide-by-two of the input clock. If PTC1 is high with V TST applied to IRQ upon monitor<br />
mode entry, the bus frequency will be a divide-by-four of the input clock. Holding the PTC1 pin low when<br />
entering monitor mode causes a bypass of a divide-by-two stage at the oscillator only if V TST is applied<br />
to IRQ. In this event, the CGMOUT frequency is equal to the CGMXCLK frequency, and the OSC1 input<br />
directly generates internal bus clocks. In this case, the OSC1 signal must have a 50% duty cycle at<br />
maximum bus frequency.<br />
Table 7-1. Monitor Mode Signal Requirements and Options<br />
IRQ RST PTA2 PTA1 PTA0 PTC1<br />
External<br />
Clock (1)<br />
Bus<br />
Freq.<br />
PLL COP<br />
X GND X X X X X 0 X Disabled 0<br />
V TST (2)<br />
V TST<br />
(2)<br />
V DD<br />
or<br />
GND<br />
V DD<br />
or<br />
V TST<br />
V DD<br />
or<br />
V TST<br />
V DD<br />
or<br />
V TST<br />
0 1 1 0<br />
0 1 1 1<br />
4.9152<br />
MHz<br />
9.8304<br />
MHz<br />
2.4576<br />
MHz<br />
2.4576<br />
MHz<br />
1. External clock is derived by a 4.9152/9.8304 MHz off-chip oscillator<br />
2. Monitor mode entry by IRQ = VTST , a 4.9152/9.8304 MHz off-chip oscillator must be used. The MCU internal crystal oscillator<br />
circuit is bypassed.<br />
The COP module is disabled in monitor mode as long as V TST is applied to either IRQ or RST.<br />
This condition states that as long as V TST is maintained on the IRQ pin after entering monitor mode, or if<br />
V TST is applied to RST after the initial reset to get into monitor mode (when V TST was applied to IRQ),<br />
then the COP will be disabled. In the latter situation, after V TST is applied to the RST pin, V TST can be<br />
removed from the IRQ pin in the interest of freeing the IRQ for normal functionality in monitor mode.<br />
<strong>Freescale</strong> Semiconductor 95<br />
Baud<br />
Rate<br />
OFF Disabled 9600<br />
OFF Disabled 9600<br />
Comment<br />
No operation until<br />
reset goes high<br />
PTA1 and PTA2<br />
voltages only<br />
required if<br />
IRQ = V TST ;<br />
PTC1 determines<br />
frequency divider<br />
PTA1 and PTA2<br />
voltages only<br />
required if<br />
IRQ = V TST ;<br />
PTC1 determines<br />
frequency divider<br />
X X X X X — OFF Enabled — Enters user mode
Monitor Mode (MON)<br />
Enter monitor mode with pin configuration shown in Figure 7-1 by pulling RST low and then high. The<br />
rising edge of RST latches monitor mode. Once monitor mode is latched, the values on the specified pins<br />
can change (except for PTA1, where it should be held until after security, see 7.4 Security).<br />
Once out of reset, the MCU waits for the host to send eight security bytes. (See 7.4 Security.) After the<br />
security bytes, the MCU sends a break signal (10 consecutive logic 0s) to the host, indicating that it is<br />
ready to receive a command.<br />
In monitor mode, the MCU uses different vectors for reset, SWI (software interrupt), and break interrupt<br />
than those for user mode. The alternate vectors are in the $FE page instead of the $FF page and allow<br />
code execution from the internal monitor firmware instead of user code.<br />
NOTE<br />
Exiting monitor mode after it has been initiated by having a blank reset<br />
vector requires a power-on reset (POR). Pulling RST low will not exit<br />
monitor mode in this situation.<br />
Table 7-2 summarizes the differences between user mode and monitor mode vectors.<br />
7.3.2 <strong>Data</strong> Format<br />
Modes<br />
Communication with the monitor ROM is in standard non-return-to-zero (NRZ) mark/space data format.<br />
Transmit and receive baud rates must be identical.<br />
7.3.3 Break Signal<br />
Table 7-2. Mode Differences (Vectors)<br />
Reset<br />
Vector<br />
High<br />
Reset<br />
Vector<br />
Low<br />
Break<br />
Vector<br />
High<br />
Functions<br />
Break<br />
Vector<br />
Low<br />
Figure 7-2. Monitor <strong>Data</strong> Format<br />
A start bit (logic 0) followed by nine logic 0 bits is a break signal. When the monitor receives a break signal,<br />
it drives the PTA0 pin high for the duration of two bits and then echoes back the break signal.<br />
Figure 7-3. Break Transaction<br />
<strong>MC68HC908JW32</strong> <strong>Data</strong> <strong>Sheet</strong>, Rev. 6<br />
SWI<br />
Vector<br />
High<br />
SWI<br />
Vector<br />
Low<br />
User $FFFE $FFFF $FFFC $FFFD $FFFC $FFFD<br />
Monitor $FEFE $FEFF $FEFC $FEFD $FEFC $FEFD<br />
START<br />
BIT BIT 0 BIT 1<br />
BIT 2 BIT 3 BIT 4 BIT 5 BIT 6 BIT 7<br />
MISSING STOP BIT<br />
NEXT<br />
START<br />
BIT<br />
96 <strong>Freescale</strong> Semiconductor<br />
STOP<br />
BIT<br />
2-STOP BIT DELAY BEFORE ZERO ECHO<br />
0 1 2 3 4 5 6 7 0 1 2 3 4 5 6 7
7.3.4 Baud Rate<br />
<strong>MC68HC908JW32</strong> <strong>Data</strong> <strong>Sheet</strong>, Rev. 6<br />
Functional Description<br />
The communication baud rate is controlled by the crystal frequency and the state of the PTB0 pin (when<br />
IRQ1 is set to VTST) upon entry into monitor mode. When PTB0 is high, the divide by ratio is 1024. If the<br />
PTB0 pin is at logic 0 upon entry into monitor mode, the divide by ratio is 512.<br />
If monitor mode was entered with VDD on IRQ1, then the divide by ratio is set at 1024, regardless of PTB0.<br />
This condition for monitor mode entry requires that the reset vector is blank.<br />
Table 7-3 lists external frequencies required to achieve a standard baud rate of 9600 BPS. Other<br />
standard baud rates can be accomplished using proportionally higher or lower frequency generators. If<br />
using a crystal as the clock source, be aware of the upper frequency limit that the internal clock module<br />
can handle.<br />
7.3.5 Commands<br />
External<br />
Frequency<br />
The monitor ROM firmware uses these commands:<br />
• READ (read memory)<br />
• WRITE (write memory)<br />
• IREAD (indexed read)<br />
• IWRITE (indexed write)<br />
• READSP (read stack pointer)<br />
• RUN (run user program)<br />
Table 7-3. Monitor Baud Rate Selection<br />
IRQ1 PTB0<br />
Internal<br />
Frequency<br />
Baud Rate<br />
(BPS)<br />
4.9152 MHz V TST 0 2.4576 MHz 9600<br />
9.8304 MHz V TST 1 2.4576 MHz 9600<br />
9.8304 MHz V DD X 2.4576 MHz 9600<br />
The monitor ROM firmware echoes each received byte back to the PTA0 pin for error checking. An 11-bit<br />
delay at the end of each command allows the host to send a break character to cancel the command. A<br />
delay of two bit times occurs before each echo and before READ, IREAD, or READSP data is returned.<br />
The data returned by a read command appears after the echo of the last byte of the command.<br />
NOTE<br />
Wait one bit time after each echo before sending the next byte.<br />
<strong>Freescale</strong> Semiconductor 97
Monitor Mode (MON)<br />
FROM HOST<br />
ECHO<br />
READ<br />
Figure 7-4. Read Transaction<br />
Figure 7-5. Write Transaction<br />
A brief description of each monitor mode command is given in Table 7-4 through Table 7-9.<br />
Table 7-4. READ (Read Memory) Command<br />
Description Read byte from memory<br />
Operand 2-byte address in high-byte:low-byte order<br />
<strong>Data</strong><br />
Returned<br />
READ<br />
Opcode $4A<br />
ADDRESS<br />
HIGH<br />
ADDRESS<br />
HIGH<br />
ADDRESS<br />
LOW<br />
Returns contents of specified address<br />
Command Sequence<br />
ADDRESS<br />
LOW<br />
4 1 4 1 4 1<br />
3, 2<br />
4<br />
Notes:<br />
1 = Echo delay, approximately 2 bit times<br />
2 = <strong>Data</strong> return delay, approximately 2 bit times<br />
3 = Cancel command delay, 11 bit times<br />
4 = Wait 1 bit time before sending next byte.<br />
FROM HOST<br />
WRITE<br />
ECHO<br />
WRITE<br />
ADDRESS<br />
HIGH<br />
ADDRESS<br />
HIGH<br />
Notes:<br />
1 = Echo delay, approximately 2 bit times<br />
2 = Cancel command delay, 11 bit times<br />
3 = Wait 1 bit time before sending next byte.<br />
ADDRESS<br />
LOW<br />
ADDRESS<br />
LOW<br />
3<br />
<strong>MC68HC908JW32</strong> <strong>Data</strong> <strong>Sheet</strong>, Rev. 6<br />
DATA DATA<br />
3 1 3 1 3 1<br />
1<br />
2, 3<br />
SENT TO<br />
MONITOR<br />
ECHO<br />
READ<br />
READ<br />
ADDRESS<br />
HIGH<br />
ADDRESS<br />
HIGH<br />
ADDRESS<br />
LOW<br />
ADDRESS<br />
LOW<br />
98 <strong>Freescale</strong> Semiconductor<br />
DATA<br />
DATA<br />
RETURN<br />
RETURN
Table 7-5. WRITE (Write Memory) Command<br />
Description Write byte to memory<br />
Operand<br />
2-byte address in high-byte:low-byte order;<br />
low byte followed by data byte<br />
<strong>Data</strong><br />
Returned None<br />
Opcode $49<br />
Command Sequence<br />
FROM<br />
HOST<br />
WRITE<br />
ECHO<br />
WRITE<br />
Table 7-6. IREAD (Indexed Read) Command<br />
Description Read next 2 bytes in memory from last address accessed<br />
Operand None<br />
<strong>Data</strong><br />
Returned<br />
Returns contents of next two addresses<br />
Opcode $1A<br />
Command Sequence<br />
ECHO<br />
ADDRESS<br />
HIGH<br />
FROM<br />
HOST<br />
IREAD<br />
ADDRESS<br />
HIGH<br />
IREAD<br />
ADDRESS<br />
LOW<br />
ADDRESS<br />
LOW<br />
<strong>MC68HC908JW32</strong> <strong>Data</strong> <strong>Sheet</strong>, Rev. 6<br />
DATA DATA<br />
Functional Description<br />
<strong>Freescale</strong> Semiconductor 99<br />
DATA<br />
DATA<br />
RETURN
Monitor Mode (MON)<br />
Table 7-7. IWRITE (Indexed Write) Command<br />
Description Write to last address accessed + 1<br />
Operand Single data byte<br />
<strong>Data</strong><br />
Returned None<br />
Opcode $19<br />
Command Sequence<br />
FROM<br />
HOST<br />
IWRITE<br />
ECHO<br />
IWRITE<br />
DATA DATA<br />
A sequence of IREAD or IWRITE commands can access a block of memory sequentially over the full<br />
64-Kbyte memory map.<br />
Table 7-8. READSP (Read Stack Pointer) Command<br />
Description Reads stack pointer<br />
Operand None<br />
<strong>Data</strong> Returns incremented stack pointer value (SP + 1) in<br />
Returned high-byte:low-byte order<br />
Opcode $0C<br />
Command Sequence<br />
ECHO<br />
FROM<br />
HOST<br />
READSP<br />
READSP<br />
SP<br />
SP<br />
HIGH LOW<br />
<strong>MC68HC908JW32</strong> <strong>Data</strong> <strong>Sheet</strong>, Rev. 6<br />
RETURN<br />
100 <strong>Freescale</strong> Semiconductor
<strong>MC68HC908JW32</strong> <strong>Data</strong> <strong>Sheet</strong>, Rev. 6<br />
Security<br />
The MCU executes the SWI and PSHH instructions when it enters monitor mode. The RUN command<br />
tells the MCU to execute the PULH and RTI instructions. Before sending the RUN command, the host can<br />
modify the stacked CPU registers to prepare to run the host program. The READSP command returns<br />
the incremented stack pointer value, SP + 1. The high and low bytes of the program counter are at<br />
addresses SP + 5 and SP + 6.<br />
7.4 Security<br />
Table 7-9. RUN (Run User Program) Command<br />
Description Executes PULH and RTI instructions<br />
Operand None<br />
<strong>Data</strong><br />
Returned None<br />
Opcode $28<br />
Command Sequence<br />
ECHO<br />
FROM<br />
HOST<br />
RUN<br />
RUN<br />
HIGH BYTE OF INDEX REGISTER<br />
CONDITION CODE REGISTER<br />
ACCUMULATOR<br />
LOW BYTE OF INDEX REGISTER<br />
HIGH BYTE OF PROGRAM COUNTER<br />
LOW BYTE OF PROGRAM COUNTER<br />
SP + 1<br />
SP + 2<br />
SP + 3<br />
SP + 4<br />
SP + 5<br />
Figure 7-6. Stack Pointer at Monitor Mode Entry<br />
A security feature discourages unauthorized reading of ROM locations while in monitor mode. The host<br />
can bypass the security feature at monitor mode entry by sending eight security bytes that match the<br />
bytes at locations $FFF6–$FFFD. Locations $FFF6–$FFFD contain user-defined data.<br />
NOTE<br />
Do not leave locations $FFF6–$FFFD blank. For security reasons, program<br />
locations $FFF6–$FFFD even if they are not used for vectors.<br />
<strong>Freescale</strong> Semiconductor 101<br />
SP<br />
SP + 6<br />
SP + 7
Monitor Mode (MON)<br />
During monitor mode entry, the MCU waits after the power-on reset for the host to send the eight security<br />
bytes on pin PTA0. If the received bytes match those at locations $FFF6–$FFFD, the host bypasses the<br />
security feature and can read all ROM locations and execute code from ROM. Security remains bypassed<br />
until a power-on reset occurs. If the reset was not a power-on reset, security remains bypassed and<br />
security code entry is not required. (See Figure 7-7.)<br />
V DD<br />
RST<br />
PTA0<br />
4096 + 32 CGMXCLK CYCLES<br />
FROM HOST<br />
FROM MCU<br />
BYTE 1<br />
BYTE 1 ECHO<br />
NOTES:<br />
1 = Echo delay, approximately 2 bit times.<br />
2 = <strong>Data</strong> return delay, approximately 2 bit times.<br />
4 = Wait 1 bit time before sending next byte.<br />
256 BUS CYCLES (MINIMUM)<br />
Figure 7-7. Monitor Mode Entry Timing<br />
Upon power-on reset, if the received bytes of the security code do not match the data at locations<br />
$FFF6–$FFFD, the host fails to bypass the security feature. The MCU remains in monitor mode, but<br />
reading a ROM location returns an invalid value and trying to execute code from ROM causes an illegal<br />
address reset. After receiving the eight security bytes from the host, the MCU transmits a break character,<br />
signifying that it is ready to receive a command.<br />
NOTE<br />
The MCU does not transmit a break character until after the host sends the<br />
eight security bits.<br />
To determine whether the security code entered is correct, check to see if bit 6 of RAM address $60 is<br />
set. If it is, then the correct security code has been entered and ROM can be accessed.<br />
<strong>MC68HC908JW32</strong> <strong>Data</strong> <strong>Sheet</strong>, Rev. 6<br />
102 <strong>Freescale</strong> Semiconductor<br />
BYTE 2<br />
BYTE 2 ECHO<br />
BYTE 8<br />
BYTE 8 ECHO<br />
COMMAND<br />
1 4 1 1 2 4 1<br />
BREAK<br />
COMMAND ECHO
7.5 ROM-Resident Routines<br />
<strong>MC68HC908JW32</strong> <strong>Data</strong> <strong>Sheet</strong>, Rev. 6<br />
ROM-Resident Routines<br />
Five routines stored in the monitor ROM area (thus ROM-resident) are provided for FLASH memory<br />
manipulation. They are intended to simplify FLASH program, erase and load operations. Table 7-10<br />
shows a summary of the ROM-resident routines.<br />
Table 7-10. Summary of ROM-Resident Routines<br />
Routine Name Routine Description<br />
Call<br />
Address<br />
The routines are designed to be called as stand-alone subroutines in the user program or monitor mode.<br />
The parameters that are passed to a routine are in the form of a contiguous data block, stored in RAM.<br />
The index register (H:X) is loaded with the address of the first byte of the data block (acting as a pointer),<br />
and the subroutine is called (JSR). Using the start address as a pointer, multiple data blocks can be used,<br />
any area of RAM be used. A data block has the control and data bytes in a defined order, as shown in<br />
Figure 7-8.<br />
Figure 7-8. <strong>Data</strong> Block Format for ROM-Resident Routines<br />
Stack Used<br />
(bytes)<br />
PRGRNGE Program a range of locations $FE10 16<br />
ERARNGE Erase a page or the entire array $FE13 10<br />
LDRNGE Loads data from a range of locations $FA31 10<br />
MON_PRGRNGE<br />
MON_ERARNGE<br />
FILE_PTR<br />
Program a range of locations in monitor<br />
mode<br />
Erase a page or the entire array in monitor<br />
mode<br />
$XXXX<br />
ADDRESS AS POINTER<br />
DATA<br />
ARRAY<br />
R A M<br />
BUS SPEED (BUS_SPD)<br />
DATA SIZE (DATASIZE)<br />
START ADDRESS HIGH (ADDRH)<br />
START ADDRESS LOW (ADDRL)<br />
DATA 0<br />
DATA 1<br />
DATA N<br />
$FF24 18<br />
$FF28 12<br />
DATA<br />
BLOCK<br />
During the software execution, it does not consume any dedicated RAM location, the run-time heap will<br />
extend the system stack, all other RAM location will not be affected.<br />
<strong>Freescale</strong> Semiconductor 103
Monitor Mode (MON)<br />
The control and data bytes are described below.<br />
• Bus speed — This one byte indicates the operating bus speed of the MCU. The value of this byte<br />
should be equal to 4 times the bus speed. E.g. for a 4MHz bus, the value is 16 ($10). This control<br />
byte is useful where the MCU clock source is switched between the PLL clock and the crystal clock.<br />
• <strong>Data</strong> size — This one byte indicates the number of bytes in the data array that are to be<br />
manipulated. The maximum data array size is 255. Routines ERARNGE and MON_ERARNGE do<br />
not manipulate a data array, thus, this data size byte has no meaning.<br />
• Start address — These two bytes, high byte followed by low byte, indicate the start address of the<br />
FLASH memory to be manipulated.<br />
• <strong>Data</strong> array — This data array contains data that are to be manipulated. <strong>Data</strong> in this array are<br />
programmed to FLASH memory by the programming routines: PRGRNGE, MON_PRGRNGE. For<br />
the read routines: LDRNGE and data is read from FLASH and stored in this array.<br />
7.5.1 PRGRNGE<br />
PRGRNGE is used to program a range of FLASH locations with data loaded into the data array.<br />
Routine Name PRGRNGE<br />
Table 7-11. PRGRNGE Routine<br />
Routine Description Program a range of locations<br />
Calling Address $FE10<br />
Stack Used 16 bytes<br />
<strong>Data</strong> Block Format<br />
Bus speed (BUS_SPD)<br />
<strong>Data</strong> size (DATASIZE)<br />
Start address high (ADDRH)<br />
Start address (ADDRL)<br />
<strong>Data</strong> 1 (DATA1)<br />
:<br />
<strong>Data</strong> N (DATAN)<br />
The start location of the FLASH to be programmed is specified by the address ADDRH:ADDRL and the<br />
number of bytes from this location is specified by DATASIZE. The maximum number of bytes that can be<br />
programmed in one routine call is 255 bytes (max. DATASIZE is 255).<br />
ADDRH:ADDRL do not need to be at a page boundary, the routine handles any boundary misalignment<br />
during programming. A check to see that all bytes in the specified range are erased is not performed by<br />
this routine prior programming. Nor does this routine do a verification after programming, so there is no<br />
return confirmation that programming was successful. User must assure that the range specified is first<br />
erased.<br />
The coding example below is to program 64 bytes of data starting at FLASH location $EE00, with a bus<br />
speed of 4.9152 MHz. The coding assumes the data block is already loaded in RAM, with the address<br />
pointer, FILE_PTR, pointing to the first byte of the data block.<br />
<strong>MC68HC908JW32</strong> <strong>Data</strong> <strong>Sheet</strong>, Rev. 6<br />
104 <strong>Freescale</strong> Semiconductor
ORG RAM<br />
:<br />
FILE_PTR:<br />
BUS_SPD DS.B 1 ; Indicates 4x bus frequency<br />
DATASIZE DS.B 1 ; <strong>Data</strong> size to be programmed<br />
START_ADDR DS.W 1 ; FLASH start address<br />
DATAARRAY DS.B 64 ; Reserved data array<br />
PRGRNGE EQU $FE10<br />
FLASH_START EQU $EE00<br />
ORG FLASH<br />
INITIALISATION:<br />
MOV #20, BUS_SPD<br />
MOV #64, DATASIZE<br />
LDHX #FLASH_START<br />
STHX START_ADDR<br />
RTS<br />
MAIN:<br />
BSR INITIALISATION<br />
:<br />
:<br />
LDHX #FILE_PTR<br />
JSR PRGRNGE<br />
7.5.2 ERARNGE<br />
ERARNGE is used to erase a range of locations in FLASH.<br />
Routine Name ERARNGE<br />
Table 7-12. ERARNGE Routine<br />
Routine Description Erase a page or the entire array<br />
Calling Address $FE13<br />
Stack Used 10 bytes<br />
<strong>Data</strong> Block Format<br />
Bus speed (BUS_SPD)<br />
<strong>Data</strong> size (DATASIZE)<br />
Starting address (ADDRH)<br />
Starting address (ADDRL)<br />
<strong>MC68HC908JW32</strong> <strong>Data</strong> <strong>Sheet</strong>, Rev. 6<br />
ROM-Resident Routines<br />
There are two sizes of erase ranges: a page or the entire array. The ERARNGE will erase the page (512<br />
consecutive bytes) in FLASH specified by the address ADDRH:ADDRL. This address can be any address<br />
within the page. Calling ERARNGE with ADDRH:ADDRL equal to $FFFF will erase the entire FLASH<br />
array (mass erase). Therefore, care must be taken when calling this routine to prevent an accidental mass<br />
erase.<br />
The ERARNGE routine do not use a data array. The DATASIZE byte is a dummy byte that is also not<br />
used.<br />
<strong>Freescale</strong> Semiconductor 105
Monitor Mode (MON)<br />
The coding example below is to perform a page erase, from $EE00–$EFFF. The Initialization subroutine<br />
is the same as the coding example for PRGRNGE (see 7.5.1 PRGRNGE).<br />
ERARNGE EQU $FE13<br />
MAIN:<br />
BSR INITIALISATION<br />
:<br />
:<br />
LDHX #FILE_PTR<br />
JSR ERARNGE<br />
:<br />
7.5.3 LDRNGE<br />
LDRNGE is used to load the data array in RAM with data from a range of FLASH locations.<br />
Routine Name LDRNGE<br />
Table 7-13. LDRNGE Routine<br />
Routine Description Loads data from a range of locations<br />
Calling Address $FA31<br />
Stack Used 10 bytes<br />
<strong>Data</strong> Block Format<br />
Bus speed (BUS_SPD)<br />
<strong>Data</strong> size (DATASIZE)<br />
Starting address (ADDRH)<br />
Starting address (ADDRL)<br />
<strong>Data</strong> 1<br />
:<br />
<strong>Data</strong> N<br />
The start location of FLASH from where data is retrieved is specified by the address ADDRH:ADDRL and<br />
the number of bytes from this location is specified by DATASIZE. The maximum number of bytes that can<br />
be retrieved in one routine call is 255 bytes. The data retrieved from FLASH is loaded into the data array<br />
in RAM. Previous data in the data array will be overwritten. User can use this routine to retrieve data from<br />
FLASH that was previously programmed.<br />
The coding example below is to retrieve 64 bytes of data starting from $EE00 in FLASH. The Initialization<br />
subroutine is the same as the coding example for PRGRNGE (see 7.5.1 PRGRNGE).<br />
LDRNGE<br />
MAIN:<br />
EQU $FA31<br />
BSR<br />
:<br />
:<br />
INITIALIZATION<br />
LDHX #FILE_PTR<br />
JSR<br />
:<br />
LDRNGE<br />
<strong>MC68HC908JW32</strong> <strong>Data</strong> <strong>Sheet</strong>, Rev. 6<br />
106 <strong>Freescale</strong> Semiconductor
Chapter 8<br />
Timer Interface Module (TIM)<br />
8.1 Introduction<br />
This section describes the timer interface (TIM) module. The TIM is a two-channel timer that provides a<br />
timing reference with input capture, output compare, and pulse-width-modulation functions. Figure 8-1 is<br />
a block diagram of the TIM.<br />
This particular MCU has a single timer interface modules which are denoted as TIM1.<br />
8.2 Features<br />
Features of the TIM include:<br />
• Two input capture/output compare channels:<br />
– Rising-edge, falling-edge, or any-edge input capture trigger<br />
– Set, clear, or toggle output compare action<br />
• Buffered and unbuffered pulse-width-modulation (PWM) signal generation<br />
• Programmable TIM clock input<br />
– with 7-frequency internal bus clock prescaler selection<br />
– External TIM clock input (bus frequency / 2 maximum)<br />
• Free-running or modulo up-count operation<br />
• Toggle channel pin on overflow<br />
• TIM counter stop and reset bits<br />
8.3 Pin Name Conventions<br />
The text that follows describes the timer, TIM1. The TIM input/output (I/O) pin names are T1CH01 (timer<br />
channel 01). The TIMER shares three I/O pins with three port C I/O port pins. The timer clock input is used<br />
by TIM1 modules. The full names of the TIM I/O pins are listed in<br />
Table 8-1. The generic pin names appear in the text that follows.<br />
TIM Generic Pin<br />
Names:<br />
Full TIM<br />
Pin Names:<br />
Table 8-1. Pin Name Conventions<br />
T1CH0 T1CH1 TCLK1<br />
PTC0/T1CH0 PTC2/T1CH1 PTC1/TCLK1<br />
NOTE<br />
References to timer 1 may be made in the following text by omitting the<br />
timer number. For example, TCH01 may refer generically to T1CH01.<br />
<strong>MC68HC908JW32</strong> <strong>Data</strong> <strong>Sheet</strong>, Rev. 6<br />
<strong>Freescale</strong> Semiconductor 107
Timer Interface Module (TIM)<br />
8.4 Functional Description<br />
Figure 8-1 shows the structure of the TIM. The central component of the TIM is the 16-bit TIM counter<br />
that can operate as a free-running counter or a modulo up-counter. The TIM counter provides the timing<br />
reference for the input capture and output compare functions. The TIM counter modulo registers,<br />
TMODH:TMODL, control the modulo value of the TIM counter. Software can read the TIM counter value<br />
at any time without affecting the counting sequence.<br />
The TIM channel (per timer) is programmable independently as input capture or output compare channel.<br />
If a channel is configured as input capture, then an internal pullup device may be enabled for that channel.<br />
(See Chapter 13 Input/Output (I/O) Ports.)<br />
INTERNAL BUS<br />
TCLK1<br />
INTERNAL<br />
BUS CLOCK<br />
TSTOP<br />
TRST<br />
16-BIT COUNTER<br />
PRESCALER<br />
16-BIT COMPARATOR<br />
TMODH:TMODL<br />
CHANNEL 0<br />
16-BIT COMPARATOR<br />
TCH0H:TCH0L<br />
16-BIT LATCH<br />
CHANNEL 1<br />
16-BIT COMPARATOR<br />
TCH1H:TCH1L<br />
16-BIT LATCH<br />
ELS0B ELS0A<br />
MS0A<br />
ELS0B ELS0A<br />
MS0A<br />
PRESCALER SELECT<br />
PS2 PS1 PS0<br />
Figure 8-1. TIM Block Diagram<br />
Figure 8-2 summarizes the timer registers.<br />
NOTE<br />
References to timer 1 may be made in the following text by omitting the<br />
timer number. For example, TSC may generically refer to both T1SC.<br />
<strong>MC68HC908JW32</strong> <strong>Data</strong> <strong>Sheet</strong>, Rev. 6<br />
108 <strong>Freescale</strong> Semiconductor<br />
CH0F<br />
MS0B<br />
CH1F<br />
TOF<br />
TOIE<br />
TOV0<br />
CH0MAX<br />
CH0IE<br />
TOV1<br />
CH1MAX<br />
CH01IE<br />
CH1IE<br />
INTERRUPT<br />
LOGIC<br />
PORT<br />
LOGIC<br />
INTERRUPT<br />
LOGIC<br />
PORT<br />
LOGIC<br />
INTERRUPT<br />
LOGIC<br />
T1CH0<br />
T1CH1
8.4.1 TIM Counter Prescaler<br />
<strong>MC68HC908JW32</strong> <strong>Data</strong> <strong>Sheet</strong>, Rev. 6<br />
Functional Description<br />
Addr. Register Name Bit 7 6 5 4 3 2 1 Bit 0<br />
$000A<br />
Timer 1 Status and Control<br />
Register<br />
Read:<br />
Write:<br />
TOF<br />
0<br />
TOIE TSTOP<br />
0<br />
TRST<br />
0<br />
PS2 PS1 PS0<br />
(T1SC) Reset: 0 0 1 0 0 0 0 0<br />
$000C<br />
$000D<br />
$000E<br />
$000F<br />
$0010<br />
$0011<br />
$0012<br />
$0013<br />
$0014<br />
$0015<br />
Timer 1 Counter<br />
Register High<br />
(T1CNTH)<br />
Timer 1 Counter<br />
Register Low<br />
(T1CNTL)<br />
Timer 1 Counter Modulo<br />
Register High<br />
(T1MODH)<br />
Timer 1 Counter Modulo<br />
Register Low<br />
(T1MODL)<br />
Timer 1 Channel 0 Status and<br />
Control Register (T1SC0)<br />
Timer 1 Channel 0<br />
Register High<br />
(T1CH0H)<br />
Timer 1 Channel 0<br />
Register Low<br />
(T1CH0L)<br />
Timer 1 Channel 1 Status and<br />
Control Register (T1SC1)<br />
Timer 1 Channel 1<br />
Register High<br />
(T1CH1H)<br />
Timer 1 Channel 1<br />
Register Low<br />
(T1CH1L)<br />
The TIM clock source can be one of the seven prescaler outputs or the TIM clock pin, TCLK. The<br />
prescaler generates seven clock rates from the internal bus clock. The prescaler select bits, PS[2:0], in<br />
the TIM status and control register select the TIM clock source.<br />
8.4.2 Input Capture<br />
Read:<br />
Write:<br />
Bit 15 14 13 12 11 10 9 Bit 8<br />
Reset: 0 0 0 0 0 0 0 0<br />
Read:<br />
Write:<br />
Bit 7 6 5 4 3 2 1 Bit 0<br />
Reset: 0 0 0 0 0 0 0 0<br />
Read:<br />
Write:<br />
Bit 15 14 13 12 11 10 9 Bit 8<br />
Reset: 1 1 1 1 1 1 1 1<br />
Read:<br />
Write:<br />
Bit 7 6 5 4 3 2 1 Bit 0<br />
Reset: 1 1 1 1 1 1 1 1<br />
Read:<br />
Write:<br />
CH0F<br />
0<br />
CH0IE MS0B MS0A ELS0B ELS0A TOV0 CH0MAX<br />
Reset: 0 0 0 0 0 0 0 0<br />
Read:<br />
Write:<br />
Bit 15 14 13 12 11 10 9 Bit 8<br />
Reset: Indeterminate after reset<br />
Read:<br />
Write:<br />
Bit 7 6 5 4 3 2 1 Bit 0<br />
Reset: Indeterminate after reset<br />
Read:<br />
Write:<br />
CH1F<br />
0<br />
CH1IE<br />
0<br />
MS1A ELS1B ELS1A TOV1 CH1MAX<br />
Reset: 0 0 0 0 0 0 0 0<br />
Read:<br />
Write:<br />
Bit 15 14 13 12 11 10 9 Bit 8<br />
Reset:<br />
Read:<br />
Indeterminate after reset<br />
Bit 7 6 5 4 3 2 1 Bit 0<br />
Write:<br />
Reset: Indeterminate after reset<br />
= Unimplemented<br />
Figure 8-2. TIM I/O Register Summary<br />
With the input capture function, the TIM can capture the time at which an external event occurs. When an<br />
active edge occurs on the pin of an input capture channel, the TIM latches the contents of the TIM counter<br />
into the TIM channel registers, TCHxH:TCHxL. The polarity of the active edge is programmable. Input<br />
captures can generate TIM CPU interrupt requests.<br />
<strong>Freescale</strong> Semiconductor 109
Timer Interface Module (TIM)<br />
8.4.3 Output Compare<br />
With the output compare function, the TIM can generate a periodic pulse with a programmable polarity,<br />
duration, and frequency. When the counter reaches the value in the registers of an output compare<br />
channel, the TIM can set, clear, or toggle the channel pin. Output compares can generate TIM CPU<br />
interrupt requests.<br />
8.4.3.1 Unbuffered Output Compare<br />
Any output compare channel can generate unbuffered output compare pulses as described in 8.4.3<br />
Output Compare. The pulses are unbuffered because changing the output compare value requires writing<br />
the new value over the old value currently in the TIM channel registers.<br />
An unsynchronized write to the TIM channel registers to change an output compare value could cause<br />
incorrect operation for up to two counter overflow periods. For example, writing a new value before the<br />
counter reaches the old value but after the counter reaches the new value prevents any compare during<br />
that counter overflow period. Also, using a TIM overflow interrupt routine to write a new, smaller output<br />
compare value may cause the compare to be missed. The TIM may pass the new value before it is written.<br />
Use the following methods to synchronize unbuffered changes in the output compare value on channel x:<br />
• When changing to a smaller value, enable channel x output compare interrupts and write the new<br />
value in the output compare interrupt routine. The output compare interrupt occurs at the end of<br />
the current output compare pulse. The interrupt routine has until the end of the counter overflow<br />
period to write the new value.<br />
• When changing to a larger output compare value, enable TIM overflow interrupts and write the new<br />
value in the TIM overflow interrupt routine. The TIM overflow interrupt occurs at the end of the<br />
current counter overflow period. Writing a larger value in an output compare interrupt routine (at<br />
the end of the current pulse) could cause two output compares to occur in the same counter<br />
overflow period.<br />
8.4.3.2 Buffered Output Compare<br />
Channels 0 and 1 can be linked to form a buffered output compare channel whose output appears on the<br />
TCH0 pin. The TIM channel registers of the linked pair alternately control the output.<br />
Setting the MS0B bit in TIM channel 0 status and control register (TSC0) links channel 0 and channel 1.<br />
The output compare value in the TIM channel 0 registers initially controls the output on the TCH0 pin.<br />
Writing to the TIM channel 1 registers enables the TIM channel 1 registers to synchronously control the<br />
output after the TIM overflows. At each subsequent overflow, the TIM channel registers (0 or 1) that<br />
control the output are the ones written to last. TSC0 controls and monitors the buffered output compare<br />
function, and TIM channel 1 status and control register (TSC1) is unused. While the MS0B bit is set, the<br />
channel 1 pin, TCH1, is available as a general-purpose I/O pin.<br />
NOTE<br />
In buffered output compare operation, do not write new output compare<br />
values to the currently active channel registers. User software should track<br />
the currently active channel to prevent writing a new value to the active<br />
channel. Writing to the active channel registers is the same as generating<br />
unbuffered output compares.<br />
<strong>MC68HC908JW32</strong> <strong>Data</strong> <strong>Sheet</strong>, Rev. 6<br />
110 <strong>Freescale</strong> Semiconductor
8.4.4 Pulse Width Modulation (PWM)<br />
<strong>MC68HC908JW32</strong> <strong>Data</strong> <strong>Sheet</strong>, Rev. 6<br />
Functional Description<br />
By using the toggle-on-overflow feature with an output compare channel, the TIM can generate a PWM<br />
signal. The value in the TIM counter modulo registers determines the period of the PWM signal. The<br />
channel pin toggles when the counter reaches the value in the TIM counter modulo registers. The time<br />
between overflows is the period of the PWM signal.<br />
As Figure 8-3 shows, the output compare value in the TIM channel registers determines the pulse width<br />
of the PWM signal. The time between overflow and output compare is the pulse width. Program the TIM<br />
to clear the channel pin on output compare if the polarity of the PWM pulse is 1. Program the TIM to set<br />
the pin if the polarity of the PWM pulse is 0.<br />
The value in the TIM counter modulo registers and the selected prescaler output determines the<br />
frequency of the PWM output. The frequency of an 8-bit PWM signal is variable in 256 increments. Writing<br />
$00FF (255) to the TIM counter modulo registers produces a PWM period of 256 times the internal bus<br />
clock period if the prescaler select value is $000. See 8.9.1 TIM Status and Control Register.<br />
TCHx<br />
OVERFLOW OVERFLOW OVERFLOW<br />
PULSE<br />
WIDTH<br />
PERIOD<br />
OUTPUT<br />
COMPARE<br />
OUTPUT<br />
COMPARE<br />
Figure 8-3. PWM Period and Pulse Width<br />
OUTPUT<br />
COMPARE<br />
The value in the TIM channel registers determines the pulse width of the PWM output. The pulse width<br />
of an 8-bit PWM signal is variable in 256 increments. Writing $0080 (128) to the TIM channel registers<br />
produces a duty cycle of 128/256 or 50%.<br />
8.4.4.1 Unbuffered PWM Signal Generation<br />
Any output compare channel can generate unbuffered PWM pulses as described in 8.4.4 Pulse Width<br />
Modulation (PWM). The pulses are unbuffered because changing the pulse width requires writing the new<br />
pulse width value over the old value currently in the TIM channel registers.<br />
An unsynchronized write to the TIM channel registers to change a pulse width value could cause incorrect<br />
operation for up to two PWM periods. For example, writing a new value before the counter reaches the<br />
old value but after the counter reaches the new value prevents any compare during that PWM period.<br />
Also, using a TIM overflow interrupt routine to write a new, smaller pulse width value may cause the<br />
compare to be missed. The TIM may pass the new value before it is written.<br />
<strong>Freescale</strong> Semiconductor 111
Timer Interface Module (TIM)<br />
Use the following methods to synchronize unbuffered changes in the PWM pulse width on channel x:<br />
• When changing to a shorter pulse width, enable channel x output compare interrupts and write the<br />
new value in the output compare interrupt routine. The output compare interrupt occurs at the end<br />
of the current pulse. The interrupt routine has until the end of the PWM period to write the new<br />
value.<br />
• When changing to a longer pulse width, enable TIM overflow interrupts and write the new value in<br />
the TIM overflow interrupt routine. The TIM overflow interrupt occurs at the end of the current PWM<br />
period. Writing a larger value in an output compare interrupt routine (at the end of the current pulse)<br />
could cause two output compares to occur in the same PWM period.<br />
NOTE<br />
In PWM signal generation, do not program the PWM channel to toggle on<br />
output compare. Toggling on output compare prevents reliable 0% duty<br />
cycle generation and removes the ability of the channel to self-correct in the<br />
event of software error or noise. Toggling on output compare also can<br />
cause incorrect PWM signal generation when changing the PWM pulse<br />
width to a new, much larger value.<br />
8.4.4.2 Buffered PWM Signal Generation<br />
Channels 0 and 1 can be linked to form a buffered PWM channel whose output appears on the TCH0 pin.<br />
The TIM channel registers of the linked pair alternately control the pulse width of the output.<br />
Setting the MS0B bit in TIM channel 0 status and control register (TSC0) links channel 0 and channel 1.<br />
The TIM channel 0 registers initially control the pulse width on the TCH0 pin. Writing to the TIM channel<br />
1 registers enables the TIM channel 1 registers to synchronously control the pulse width at the beginning<br />
of the next PWM period. At each subsequent overflow, the TIM channel registers (0 or 1) that control the<br />
pulse width are the ones written to last. TSC0 controls and monitors the buffered PWM function, and TIM<br />
channel 1 status and control register (TSC1) is unused. While the MS0B bit is set, the channel 1 pin,<br />
TCH1, is available as a general-purpose I/O pin.<br />
NOTE<br />
In buffered PWM signal generation, do not write new pulse width values to<br />
the currently active channel registers. User software should track the<br />
currently active channel to prevent writing a new value to the active<br />
channel. Writing to the active channel registers is the same as generating<br />
unbuffered PWM signals.<br />
8.4.4.3 PWM Initialization<br />
To ensure correct operation when generating unbuffered or buffered PWM signals, use the following<br />
initialization procedure:<br />
1. In the TIM status and control register (TSC):<br />
a. Stop the TIM counter by setting the TIM stop bit, TSTOP.<br />
b. Reset the TIM counter and prescaler by setting the TIM reset bit, TRST.<br />
2. In the TIM counter modulo registers (TMODH:TMODL), write the value for the required PWM<br />
period.<br />
3. In the TIM channel x registers (TCHxH:TCHxL), write the value for the required pulse width.<br />
<strong>MC68HC908JW32</strong> <strong>Data</strong> <strong>Sheet</strong>, Rev. 6<br />
112 <strong>Freescale</strong> Semiconductor
<strong>MC68HC908JW32</strong> <strong>Data</strong> <strong>Sheet</strong>, Rev. 6<br />
Interrupts<br />
4. In TIM channel x status and control register (TSCx):<br />
a. Write 0:1 (for unbuffered output compare or PWM signals) or 1:0 (for buffered output compare<br />
or PWM signals) to the mode select bits, MSxB:MSxA. (See Table 8-3.)<br />
b. Write 1 to the toggle-on-overflow bit, TOVx.<br />
c. Write 1:0 (to clear output on compare) or 1:1 (to set output on compare) to the edge/level<br />
select bits, ELSxB:ELSxA. The output action on compare must force the output to the<br />
complement of the pulse width level. (See Table 8-3.)<br />
NOTE<br />
In PWM signal generation, do not program the PWM channel to toggle on<br />
output compare. Toggling on output compare prevents reliable 0% duty<br />
cycle generation and removes the ability of the channel to self-correct in the<br />
event of software error or noise. Toggling on output compare can also<br />
cause incorrect PWM signal generation when changing the PWM pulse<br />
width to a new, much larger value.<br />
5. In the TIM status control register (TSC), clear the TIM stop bit, TSTOP.<br />
Setting MS0B links channels 0 and 1 and configures them for buffered PWM operation. The TIM channel<br />
0 registers (TCH0H:TCH0L) initially control the buffered PWM output. TIM status control register 0<br />
(TSCR0) controls and monitors the PWM signal from the linked channels.<br />
Clearing the toggle-on-overflow bit, TOVx, inhibits output toggles on TIM overflows. Subsequent output<br />
compares try to force the output to a state it is already in and have no effect. The result is a 0% duty cycle<br />
output.<br />
Setting the channel x maximum duty cycle bit (CHxMAX) and setting the TOVx bit generates a 100% duty<br />
cycle output. (See 8.9.4 TIM Channel Status and Control Registers.)<br />
8.5 Interrupts<br />
The following TIM sources can generate interrupt requests:<br />
• TIM overflow flag (TOF) — The TOF bit is set when the TIM counter reaches the modulo value<br />
programmed in the TIM counter modulo registers. The TIM overflow interrupt enable bit, TOIE,<br />
enables TIM overflow CPU interrupt requests. TOF and TOIE are in the TIM status and control<br />
register.<br />
• TIM channel flags (CH1F:CH0F) — The CHxF bit is set when an input capture or output compare<br />
occurs on channel x. Channel x TIM CPU interrupt requests are controlled by the channel x<br />
interrupt enable bit, CHxIE. Channel x TIM CPU interrupt requests are enabled when CHxIE = 1.<br />
CHxF and CHxIE are in the TIM channel x status and control register.<br />
8.6 Low-Power Modes<br />
The WAIT and STOP instructions put the MCU in low power- consumption standby modes.<br />
8.6.1 Wait Mode<br />
The TIM remains active after the execution of a WAIT instruction. In wait mode, the TIM registers are not<br />
accessible by the CPU. Any enabled CPU interrupt request from the TIM can bring the MCU out of wait<br />
mode.<br />
<strong>Freescale</strong> Semiconductor 113
Timer Interface Module (TIM)<br />
If TIM functions are not required during wait mode, reduce power consumption by stopping the TIM before<br />
executing the WAIT instruction.<br />
8.6.2 Stop Mode<br />
The TIM is inactive after the execution of a STOP instruction. The STOP instruction does not affect<br />
register conditions or the state of the TIM counter. TIM operation resumes when the MCU exits stop mode<br />
after an external interrupt.<br />
8.7 TIM During Break Interrupts<br />
A break interrupt stops the TIM counter and inhibits input captures.<br />
The system integration module (SIM) controls whether status bits in other modules can be cleared during<br />
the break state. The BCFE bit in the break flag control register (BFCR) enables software to clear status<br />
bits during the break state. (See 6.7.3 SIM Break Flag Control Register.)<br />
To allow software to clear status bits during a break interrupt, write a logic 1 to the BCFE bit. If a status<br />
bit is cleared during the break state, it remains cleared when the MCU exits the break state.<br />
To protect status bits during the break state, write a logic 0 to the BCFE bit. With BCFE at logic 0 (its<br />
default state), software can read and write I/O registers during the break state without affecting status bits.<br />
Some status bits have a 2-step read/write clearing procedure. If software does the first step on such a bit<br />
before the break, the bit cannot change during the break state as long as BCFE is at logic 0. After the<br />
break, doing the second step clears the status bit.<br />
8.8 I/O Signals<br />
Port C shares three of its pins with the TIM. The two TIM channel I/O pins are PTC0/T1CH0 and<br />
PTC2/T1CH1; and the external clock input is PTC1/TCLK1.<br />
Each channel I/O pin is programmable independently as an input capture pin or an output compare pin.<br />
T1CH0 can be configured as buffered output compare or buffered PWM pins.<br />
8.8.1 TIM Clock Pin (PTC1/TCLK1)<br />
PTC1/TCLK1 is an external clock input that can be the clock source for the TIM counter instead of the<br />
prescaled internal bus clock. Select the PTC1/TCLK1 input by writing logic 1’s to the three prescaler<br />
select bits, PS[2:0]. (See 8.9.1 TIM Status and Control Register.) The minimum T2CLK pulse width,<br />
TCLK1 LMIN or TCLK1 HMIN, is:<br />
The maximum TCLK1 frequency is: bus frequency ÷ 2<br />
8.9 I/O Registers<br />
1<br />
------------------------------------ +<br />
t SU<br />
bus frequency<br />
NOTE<br />
References to either timer 1 or timer 2 may be made in the following text by<br />
omitting the timer number. For example, TSC may generically refer to both<br />
T1SC AND T2SC.<br />
<strong>MC68HC908JW32</strong> <strong>Data</strong> <strong>Sheet</strong>, Rev. 6<br />
114 <strong>Freescale</strong> Semiconductor
These I/O registers control and monitor operation of the TIM:<br />
• TIM status and control register (TSC)<br />
• TIM counter registers (TCNTH:TCNTL)<br />
• TIM counter modulo registers (TMODH:TMODL)<br />
• TIM channel status and control registers (TSC0, TSC1)<br />
• TIM channel registers (TCH0H:TCH0L, TCH1H:TCH1L)<br />
8.9.1 TIM Status and Control Register<br />
The TIM status and control register (TSC):<br />
• Enables TIM overflow interrupts<br />
• Flags TIM overflows<br />
• Stops the TIM counter<br />
• Resets the TIM counter<br />
• Prescales the TIM counter clock<br />
Address: $000A<br />
Bit 7 6 5 4 3 2 1 Bit 0<br />
Read:<br />
Write:<br />
TOF<br />
0<br />
TOIE TSTOP<br />
0<br />
TRST<br />
0<br />
PS2 PS1 PS0<br />
Reset: 0 0 1 0 0 0 0 0<br />
= Unimplemented<br />
Figure 8-4. TIM Status and Control Register (TSC)<br />
<strong>MC68HC908JW32</strong> <strong>Data</strong> <strong>Sheet</strong>, Rev. 6<br />
I/O Registers<br />
TOF — TIM Overflow Flag Bit<br />
This read/write flag is set when the TIM counter reaches the modulo value programmed in the TIM<br />
counter modulo registers. Clear TOF by reading the TIM status and control register when TOF is set<br />
and then writing a logic 0 to TOF. If another TIM overflow occurs before the clearing sequence is<br />
complete, then writing logic 0 to TOF has no effect. Therefore, a TOF interrupt request cannot be lost<br />
due to inadvertent clearing of TOF. Reset clears the TOF bit. Writing a logic 1 to TOF has no effect.<br />
1 = TIM counter has reached modulo value<br />
0 = TIM counter has not reached modulo value<br />
TOIE — TIM Overflow Interrupt Enable Bit<br />
This read/write bit enables TIM overflow interrupts when the TOF bit becomes set. Reset clears the<br />
TOIE bit.<br />
1 = TIM overflow interrupts enabled<br />
0 = TIM overflow interrupts disabled<br />
TSTOP — TIM Stop Bit<br />
This read/write bit stops the TIM counter. Counting resumes when TSTOP is cleared. Reset sets the<br />
TSTOP bit, stopping the TIM counter until software clears the TSTOP bit.<br />
1 = TIM counter stopped<br />
0 = TIM counter active<br />
NOTE<br />
Do not set the TSTOP bit before entering wait mode if the TIM is required<br />
to exit wait mode. Also, when the TSTOP bit is set and the timer is<br />
configured for input capture operation, input captures are inhibited until the<br />
TSTOP bit is cleared.<br />
<strong>Freescale</strong> Semiconductor 115
Timer Interface Module (TIM)<br />
TRST — TIM Reset Bit<br />
Setting this write-only bit resets the TIM counter and the TIM prescaler. Setting TRST has no effect on<br />
any other registers. Counting resumes from $0000. TRST is cleared automatically after the TIM<br />
counter is reset and always reads as logic 0. Reset clears the TRST bit.<br />
1 = Prescaler and TIM counter cleared<br />
0 = No effect<br />
NOTE<br />
Setting the TSTOP and TRST bits simultaneously stops the TIM counter at<br />
a value of $0000.<br />
PS[2:0] — Prescaler Select Bits<br />
These read/write bits select one of the seven prescaler outputs as the input to the TIM counter as<br />
Table 8-2 shows. Reset clears the PS[2:0] bits.<br />
8.9.2 TIM Counter Registers<br />
Table 8-2. Prescaler Selection<br />
PS2 PS1 PS0 TIM Clock Source<br />
0 0 0 Internal bus clock ÷ 1<br />
0 0 1 Internal bus clock ÷ 2<br />
0 1 0 Internal bus clock ÷ 4<br />
0 1 1 Internal bus clock ÷ 8<br />
1 0 0 Internal bus clock ÷ 16<br />
1 0 1 Internal bus clock ÷ 32<br />
1 1 0 Internal bus clock ÷ 64<br />
1 1 1 TCLK1<br />
The two read-only TIM counter registers contain the high and low bytes of the value in the TIM counter.<br />
Reading the high byte (TCNTH) latches the contents of the low byte (TCNTL) into a buffer. Subsequent<br />
reads of TCNTH do not affect the latched TCNTL value until TCNTL is read. Reset clears the TIM counter<br />
registers. Setting the TIM reset bit (TRST) also clears the TIM counter registers.<br />
NOTE<br />
If you read TCNTH during a break interrupt, be sure to unlatch TCNTL by<br />
reading TCNTL before exiting the break interrupt. Otherwise, TCNTL<br />
retains the value latched during the break.<br />
Address: $000C<br />
Bit 7 6 5 4 3 2 1 Bit 0<br />
Read:<br />
Write:<br />
Bit 15 14 13 12 11 10 9 Bit 8<br />
Reset: 0 0 0 0 0 0 0 0<br />
= Unimplemented<br />
Figure 8-5. TIM Counter Registers High (TCNTH)<br />
<strong>MC68HC908JW32</strong> <strong>Data</strong> <strong>Sheet</strong>, Rev. 6<br />
116 <strong>Freescale</strong> Semiconductor
Address: $000D<br />
Bit 7 6 5 4 3 2 1 Bit 0<br />
Read:<br />
Write:<br />
Bit 7 6 5 4 3 2 1 Bit 0<br />
Reset: 0 0 0 0 0 0 0 0<br />
= Unimplemented<br />
Figure 8-6. TIM Counter Registers Low (TCNTL)<br />
8.9.3 TIM Counter Modulo Registers<br />
<strong>MC68HC908JW32</strong> <strong>Data</strong> <strong>Sheet</strong>, Rev. 6<br />
I/O Registers<br />
The read/write TIM modulo registers contain the modulo value for the TIM counter. When the TIM counter<br />
reaches the modulo value, the overflow flag (TOF) becomes set, and the TIM counter resumes counting<br />
from $0000 at the next timer clock. Writing to the high byte (TMODH) inhibits the TOF bit and overflow<br />
interrupts until the low byte (TMODL) is written. Reset sets the TIM counter modulo registers.<br />
Address: $000E<br />
Bit 7 6 5 4 3 2 1 Bit 0<br />
Read:<br />
Write:<br />
Bit 15 14 13 12 11 10 9 Bit 8<br />
Reset: 1 1 1 1 1 1 1 1<br />
Figure 8-7. TIM Counter Modulo Register High (TMODH)<br />
Address: $000F<br />
Bit 7 6 5 4 3 2 1 Bit 0<br />
Read:<br />
Write:<br />
Bit 7 6 5 4 3 2 1 Bit 0<br />
Reset: 1 1 1 1 1 1 1 1<br />
Figure 8-8. TIM Counter Modulo Register Low (TMODL)<br />
NOTE<br />
Reset the TIM counter before writing to the TIM counter modulo registers.<br />
8.9.4 TIM Channel Status and Control Registers<br />
Each of the TIM channel status and control registers:<br />
• Flags input captures and output compares<br />
• Enables input capture and output compare interrupts<br />
• Selects input capture, output compare, or PWM operation<br />
• Selects high, low, or toggling output on output compare<br />
• Selects rising edge, falling edge, or any edge as the active input capture trigger<br />
• Selects output toggling on TIM overflow<br />
• Selects 0% and 100% PWM duty cycle<br />
• Selects buffered or unbuffered output compare/PWM operation<br />
<strong>Freescale</strong> Semiconductor 117
Timer Interface Module (TIM)<br />
Address: $0010<br />
Bit 7 6 5 4 3 2 1 Bit 0<br />
Read:<br />
Write:<br />
CH0F<br />
0<br />
CH0IE MS0B MS0A ELS0B ELS0A TOV0 CH0MAX<br />
Reset: 0 0 0 0 0 0 0 0<br />
Figure 8-9. TIM Channel 0 Status and Control Register (TSC0)<br />
Address: $0013<br />
Bit 7 6 5 4 3 2 1 Bit 0<br />
Read:<br />
Write:<br />
CH1F<br />
0<br />
CH1IE<br />
0<br />
MS1A ELS1B ELS1A TOV1 CH1MAX<br />
Reset: 0 0 0 0 0 0 0 0<br />
= Unimplemented<br />
Figure 8-10. TIM Channel 1 Status and Control Register (TSC1)<br />
CHxF — Channel x Flag Bit<br />
When channel x is an input capture channel, this read/write bit is set when an active edge occurs on<br />
the channel x pin. When channel x is an output compare channel, CHxF is set when the value in the<br />
TIM counter registers matches the value in the TIM channel x registers.<br />
When TIM CPU interrupt requests are enabled (CHxIE = 1), clear CHxF by reading TIM channel x<br />
status and control register with CHxF set and then writing a logic 0 to CHxF. If another interrupt request<br />
occurs before the clearing sequence is complete, then writing logic 0 to CHxF has no effect. Therefore,<br />
an interrupt request cannot be lost due to inadvertent clearing of CHxF.<br />
Reset clears the CHxF bit. Writing a logic 1 to CHxF has no effect.<br />
1 = Input capture or output compare on channel x<br />
0 = No input capture or output compare on channel x<br />
CHxIE — Channel x Interrupt Enable Bit<br />
This read/write bit enables TIM CPU interrupt service requests on channel x.<br />
Reset clears the CHxIE bit.<br />
1 = Channel x CPU interrupt requests enabled<br />
0 = Channel x CPU interrupt requests disabled<br />
MSxB — Mode Select Bit B<br />
This read/write bit selects buffered output compare/PWM operation. MSxB exists only in the TIM1<br />
channel 0 and TIM2 channel 0 status and control registers.<br />
Setting MS0B disables the channel 1 status and control register and reverts TCH1 to general-purpose<br />
I/O.<br />
Reset clears the MSxB bit.<br />
1 = Buffered output compare/PWM operation enabled<br />
0 = Buffered output compare/PWM operation disabled<br />
MSxA — Mode Select Bit A<br />
When ELSxB:ELSxA ≠ 0:0, this read/write bit selects either input capture operation or unbuffered<br />
output compare/PWM operation.<br />
See Table 8-3.<br />
1 = Unbuffered output compare/PWM operation<br />
0 = Input capture operation<br />
<strong>MC68HC908JW32</strong> <strong>Data</strong> <strong>Sheet</strong>, Rev. 6<br />
118 <strong>Freescale</strong> Semiconductor
<strong>MC68HC908JW32</strong> <strong>Data</strong> <strong>Sheet</strong>, Rev. 6<br />
I/O Registers<br />
When ELSxB:ELSxA = 0:0, this read/write bit selects the initial output level of the TCHx pin. See<br />
Table 8-3. Reset clears the MSxA bit.<br />
1 = Initial output level low<br />
0 = Initial output level high<br />
NOTE<br />
Before changing a channel function by writing to the MSxB or MSxA bit, set<br />
the TSTOP and TRST bits in the TIM status and control register (TSC).<br />
ELSxB and ELSxA — Edge/Level Select Bits<br />
When channel x is an input capture channel, these read/write bits control the active edge-sensing logic<br />
on channel x.<br />
When channel x is an output compare channel, ELSxB and ELSxA control the channel x output<br />
behavior when an output compare occurs.<br />
When ELSxB and ELSxA are both clear, channel x is not connected to an I/O port, and pin TCHx is<br />
available as a general-purpose I/O pin. Table 8-3 shows how ELSxB and ELSxA work. Reset clears<br />
the ELSxB and ELSxA bits.<br />
Table 8-3. Mode, Edge, and Level Selection<br />
MSxB:MSxA ELSxB:ELSxA Mode Configuration<br />
X0<br />
X1<br />
00<br />
00<br />
Output preset<br />
Pin under port control;<br />
initial output level high<br />
Pin under port control;<br />
initial output level low<br />
00 01<br />
Capture on rising edge only<br />
00 10<br />
Input capture<br />
Capture on falling edge only<br />
00 11<br />
Capture on rising or<br />
falling edge<br />
01 00<br />
Software compare only<br />
01 01 Output compare Toggle output on compare<br />
01 10 or PWM<br />
Clear output on compare<br />
01 11 Set output on compare<br />
1X 01<br />
Buffered output<br />
Toggle output on compare<br />
1X 10 compare or Clear output on compare<br />
1X 11<br />
buffered PWM<br />
Set output on compare<br />
NOTE<br />
After iniitially enabling a TIM channel register for input capture operation,<br />
and selecting the edge sensitivity, clear CHxF to ignore any erroneous<br />
edge detection flags.<br />
TOVx — Toggle On Overflow Bit<br />
When channel x is an output compare channel, this read/write bit controls the behavior of the channel<br />
x output when the TIM counter overflows. When channel x is an input capture channel, TOVx has no<br />
effect. Reset clears the TOVx bit.<br />
1 = Channel x pin toggles on TIM counter overflow<br />
0 = Channel x pin does not toggle on TIM counter overflow<br />
<strong>Freescale</strong> Semiconductor 119
Timer Interface Module (TIM)<br />
NOTE<br />
When TOVx is set, a TIM counter overflow takes precedence over a<br />
channel x output compare if both occur at the same time.<br />
CHxMAX — Channel x Maximum Duty Cycle Bit<br />
When the TOVx bit is at logic 1, setting the CHxMAX bit forces the duty cycle of buffered and<br />
unbuffered PWM signals to 100%. As Figure 8-11 shows, the CHxMAX bit takes effect in the cycle<br />
after it is set or cleared. The output stays at the 100% duty cycle level until the cycle after CHxMAX is<br />
cleared.<br />
TCHx<br />
CHxMAX<br />
OVERFLOW<br />
PERIOD<br />
OUTPUT<br />
COMPARE<br />
8.9.5 TIM Channel Registers<br />
OVERFLOW OVERFLOW OVERFLOW OVERFLOW<br />
OUTPUT<br />
COMPARE<br />
OUTPUT<br />
COMPARE<br />
Figure 8-11. CHxMAX Latency<br />
These read/write registers contain the captured TIM counter value of the input capture function or the<br />
output compare value of the output compare function. The state of the TIM channel registers after reset<br />
is unknown.<br />
In input capture mode (MSxB:MSxA = 0:0), reading the high byte of the TIM channel x registers (TCHxH)<br />
inhibits input captures until the low byte (TCHxL) is read.<br />
In output compare mode (MSxB:MSxA ≠ 0:0), writing to the high byte of the TIM channel x registers<br />
(TCHxH) inhibits output compares until the low byte (TCHxL) is written.<br />
Address: $0011<br />
Bit 7 6 5 4 3 2 1 Bit 0<br />
Read:<br />
Write:<br />
Bit 15 14 13 12 11 10 9 Bit 8<br />
Reset: Indeterminate after reset<br />
Figure 8-12. TIM Channel 0 Register High (TCH0H)<br />
Address: $0012<br />
Bit 7 6 5 4 3 2 1 Bit 0<br />
Read:<br />
Write:<br />
Bit 7 6 5 4 3 2 1 Bit 0<br />
Reset: Indeterminate after reset<br />
Figure 8-13. TIM Channel 0 Register Low (TCH0L)<br />
<strong>MC68HC908JW32</strong> <strong>Data</strong> <strong>Sheet</strong>, Rev. 6<br />
OUTPUT<br />
COMPARE<br />
120 <strong>Freescale</strong> Semiconductor
Address: $0014<br />
Read:<br />
Write:<br />
Bit 7 6 5 4 3 2 1 Bit 0<br />
Bit 15 14 13 12 11 10 9 Bit 8<br />
Reset: Indeterminate after reset<br />
Address: $0015<br />
Read:<br />
Write:<br />
Figure 8-14. TIM Channel 1 Register High (TCH1H)<br />
Bit 7 6 5 4 3 2 1 Bit 0<br />
Bit 7 6 5 4 3 2 1 Bit 0<br />
Reset: Indeterminate after reset<br />
Figure 8-15. TIM Channel 1 Register Low (TCH1L)<br />
<strong>MC68HC908JW32</strong> <strong>Data</strong> <strong>Sheet</strong>, Rev. 6<br />
I/O Registers<br />
<strong>Freescale</strong> Semiconductor 121
Timer Interface Module (TIM)<br />
<strong>MC68HC908JW32</strong> <strong>Data</strong> <strong>Sheet</strong>, Rev. 6<br />
122 <strong>Freescale</strong> Semiconductor
Chapter 9<br />
Timebase Module (TBM)<br />
9.1 Introduction<br />
This section describes the timebase module (TBM). The TBM will generate periodic interrupts at user<br />
selectable rates using a counter clocked by the selected OSCCLK clock from the oscillator module. This<br />
TBM version uses 18 divider stages, eight of which are user selectable.<br />
9.2 Features<br />
Features of the TBM module include:<br />
• 88-kHz build-in RC clock.<br />
• Software programmable ~3s, ~1.5s, ~745ms, ~372ms, ~186ms, ~93ms, ~47ms, and ~23ms<br />
periodic interrupt<br />
• User selectable oscillator clock source enable during stop mode to allow periodic wake-up from<br />
stop<br />
9.3 Functional Description<br />
This module can generate a periodic interrupt by dividing the oscillator clock frequency, OSCCLK. The<br />
counter is initialized to all 0s when TBON bit is cleared. The counter, shown in Figure 9-1, starts counting<br />
when the TBON bit is set. When the counter overflows at the tap selected by TBR2:TBR0, the TBIF bit<br />
gets set. If the TBIE bit is set, an interrupt request is sent to the CPU. The TBIF flag is cleared by writing<br />
a 1 to the TACK bit. The first time the TBIF flag is set after enabling the timebase module, the interrupt is<br />
generated at approximately half of the overflow period. Subsequent events occur at the exact period.<br />
<strong>MC68HC908JW32</strong> <strong>Data</strong> <strong>Sheet</strong>, Rev. 6<br />
<strong>Freescale</strong> Semiconductor 123
Timebase Module (TBM)<br />
÷ 2<br />
÷ 2<br />
88-kHz<br />
Internal<br />
RC OSC<br />
÷ 2<br />
÷ 2<br />
÷ 2<br />
÷ 2<br />
÷ 2<br />
÷ 2<br />
9.4 Timebase Register Description<br />
÷ 2048 ÷ 4096 ÷ 8192 ÷ 16384 ÷ 32768<br />
Figure 9-1. Timebase Block Diagram<br />
The timebase has one register, the TBCR, which is used to enable the timebase interrupts and set the<br />
rate.<br />
Address: $0018<br />
Bit 7 6 5 4 3 2 1 Bit 0<br />
Read:<br />
Write:<br />
TBIF<br />
TBR2 TBR1 TBR0<br />
0<br />
TACK<br />
TBIE TBON R<br />
Reset: 0 0 0 0 0 0 0 0<br />
= Unimplemented R = Reserved<br />
Figure 9-2. Timebase Control Register (TBCR)<br />
TBIF — Timebase Interrupt Flag<br />
This read-only flag bit is set when the timebase counter has rolled over.<br />
1 = Timebase interrupt pending<br />
0 = Timebase interrupt not pending<br />
÷ 2<br />
÷ 2<br />
÷ 2<br />
÷ 2 ÷ 2 ÷ 2<br />
<strong>MC68HC908JW32</strong> <strong>Data</strong> <strong>Sheet</strong>, Rev. 6<br />
124 <strong>Freescale</strong> Semiconductor<br />
÷ 2<br />
÷ 65536 ÷ 131072 ÷ 262144<br />
÷ 2<br />
TBR2<br />
000<br />
001<br />
010<br />
011<br />
100<br />
101<br />
110<br />
111<br />
TBR1<br />
÷ 2 ÷ 2<br />
SEL<br />
TBR0<br />
TACK<br />
R<br />
TBMINT<br />
TBIF<br />
TBON<br />
TBIE
TBR2–TBR0 — Timebase Rate Selection<br />
These read/write bits are used to select the rate of timebase interrupts as shown in Table 9-1.<br />
NOTE<br />
Do not change TBR2–TBR0 bits while the timebase is enabled (TBON = 1).<br />
<strong>MC68HC908JW32</strong> <strong>Data</strong> <strong>Sheet</strong>, Rev. 6<br />
Interrupts<br />
TACK — Timebase ACKnowledge<br />
The TACK bit is a write-only bit and always reads as 0. Writing a logic 1 to this bit clears TBIF, the<br />
timebase interrupt flag bit. Writing a logic 0 to this bit has no effect.<br />
1 = Clear timebase interrupt flag<br />
0 = No effect<br />
TBIE — Timebase Interrupt Enabled<br />
This read/write bit enables the timebase interrupt when the TBIF bit becomes set. Reset clears the<br />
TBIE bit.<br />
1 = Timebase interrupt enabled<br />
0 = Timebase interrupt disabled<br />
TBON — Timebase Enabled<br />
This read/write bit enables the timebase. Timebase may be turned off to reduce power consumption<br />
when its function is not necessary. The counter can be initialized by clearing and then setting this bit.<br />
Reset clears the TBON bit.<br />
1 = Timebase enabled<br />
0 = Timebase disabled and the counter initialized to 0s<br />
9.5 Interrupts<br />
Table 9-1. Timebase Rate Selection (88-kHz Reference)<br />
TBR2 TBR1 TBR0 Divider<br />
The timebase module can interrupt the CPU on a regular basis with a rate defined by TBR2–TBR0. When<br />
the timebase counter chain rolls over, the TBIF flag is set. If the TBIE bit is set, enabling the timebase<br />
interrupt, the counter chain overflow will generate a CPU interrupt request. The interrupt vector is defined<br />
in Table 6-3. Interrupt Sources.<br />
Interrupts must be acknowledged by writing a logic 1 to the TACK bit.<br />
Timebase Interrupt Rate<br />
Hz ms<br />
0 0 0 262144 ~0.33 ~2979<br />
0 0 1 131072 ~0.67 ~1489<br />
0 1 0 65536 ~1.3 ~745<br />
0 1 1 32768 ~2.7 ~372<br />
1 0 0 16384 ~5.4 ~186<br />
1 0 1 8192 ~10.7 ~93<br />
1 1 0 4096 ~21.5 ~47<br />
1 1 1 2048 ~43.0 ~23<br />
<strong>Freescale</strong> Semiconductor 125
Timebase Module (TBM)<br />
9.6 Low-Power Modes<br />
The WAIT and STOP instructions put the MCU in low power- consumption standby modes.<br />
9.6.1 Wait Mode<br />
The timebase module remains active after execution of the WAIT instruction. In wait mode, the timebase<br />
register is not accessible by the CPU.<br />
If the timebase functions are not required during wait mode, reduce the power consumption by stopping<br />
the timebase before enabling the WAIT instruction.<br />
9.6.2 Stop Mode<br />
The timebase module may remain active after execution of the STOP instruction if the oscillator has been<br />
enabled to operate during stop mode through the stop mode oscillator enable bit (STOP_RCLKEN) for<br />
the selected oscillator in the CONFIG2 register. The timebase module can be used in this mode to<br />
generate a periodic walk-up from stop mode.<br />
If the oscillator has not been enabled to operate in stop mode, the timebase module will not be active<br />
during STOP mode. In stop mode the timebase register is not accessible by the CPU.<br />
If the timebase functions are not required during stop mode, reduce the power consumption by stopping<br />
the timebase before enabling the STOP instruction.<br />
<strong>MC68HC908JW32</strong> <strong>Data</strong> <strong>Sheet</strong>, Rev. 6<br />
126 <strong>Freescale</strong> Semiconductor
Chapter 10<br />
Serial Peripheral Interface Module (SPI)<br />
10.1 Introduction<br />
This section describes the serial peripheral interface (SPI) module, which allows full-duplex,<br />
synchronous, serial communications with peripheral devices.<br />
10.2 Features<br />
Features of the SPI module include the following:<br />
• Full-duplex operation<br />
• Master and slave modes<br />
• Double-buffered operation with separate transmit and receive registers<br />
• Four master mode frequencies (maximum = bus frequency ÷ 2)<br />
• Maximum slave mode frequency = bus frequency<br />
• Serial clock with programmable polarity and phase<br />
• Two separately enabled interrupts:<br />
– SPRF (SPI receiver full)<br />
– SPTE (SPI transmitter empty)<br />
• Mode fault error flag with CPU interrupt capability<br />
• Overflow error flag with CPU interrupt capability<br />
• Programmable wired-OR mode<br />
10.3 Pin Name Conventions and I/O Register Addresses<br />
The text that follows describes the SPI. The SPI I/O pin names are SS (slave select), SPSCK (SPI serial<br />
clock), CGND (clock ground), MOSI (master out slave in), and MISO (master in/slave out). The SPI<br />
shares four I/O pins with four parallel I/O ports.<br />
The full names of the SPI I/O pins are shown in Table 10-1. The generic pin names appear in the text that<br />
follows.<br />
SPI Generic<br />
Pin Names:<br />
Full SPI<br />
Pin Names:<br />
Figure 10-1 summarizes the SPI I/O registers.<br />
Table 10-1. Pin Name Conventions<br />
MISO MOSI SS SPSCK CGND<br />
SPI PTE6/MISO PTE5/MOSI PTE7/SS PTE4/SPSCK V SS<br />
<strong>MC68HC908JW32</strong> <strong>Data</strong> <strong>Sheet</strong>, Rev. 6<br />
<strong>Freescale</strong> Semiconductor 127
Serial Peripheral Interface Module (SPI)<br />
Addr. Register Name Bit 7 6 5 4 3 2 1 Bit 0<br />
$004C SPI Control Register (SPCR)<br />
Read:<br />
Write:<br />
SPRIE R SPMSTR CPOL CPHA SPWOM SPE SPTIE<br />
Reset: 0 0 1 0 1 0 0 0<br />
$004D<br />
SPI Status and Control<br />
Register<br />
Read:<br />
Write:<br />
SPRF<br />
ERRIE<br />
OVRF MODF SPTE<br />
MODFEN SPR1 SPR0<br />
(SPSCR)<br />
Reset: 0 0 0 0 1 0 0 0<br />
Read: R7 R6 R5 R4 R3 R2 R1 R0<br />
$004E<br />
SPI <strong>Data</strong> Register<br />
(SPDR)<br />
Write: T7 T6 T5 T4 T3 T2 T1 T0<br />
Reset: Unaffected by reset<br />
= Unimplemented R = Reserved<br />
10.4 Functional Description<br />
Figure 10-1. SPI I/O Register Summary<br />
Figure 10-2 shows the structure of the SPI module.<br />
The SPI module allows full-duplex, synchronous, serial communication between the MCU and peripheral<br />
devices, including other MCUs. Software can poll the SPI status flags or SPI operation can be<br />
interrupt-driven.<br />
The following paragraphs describe the operation of the SPI module.<br />
10.4.1 Master Mode<br />
The SPI operates in master mode when the SPI master bit, SPMSTR, is set.<br />
NOTE<br />
Configure the SPI modules as master or slave before enabling them.<br />
Enable the master SPI before enabling the slave SPI. Disable the slave SPI<br />
before disabling the master SPI. (See 10.13.1 SPI Control Register.)<br />
Only a master SPI module can initiate transmissions. Software begins the transmission from a master SPI<br />
module by writing to the transmit data register. If the shift register is empty, the byte immediately transfers<br />
to the shift register, setting the SPI transmitter empty bit, SPTE. The byte begins shifting out on the MOSI<br />
pin under the control of the serial clock. (See Figure 10-3.)<br />
The SPR1 and SPR0 bits control the baud rate generator and determine the speed of the shift register.<br />
(See 10.13.2 SPI Status and Control Register.) Through the SPSCK pin, the baud rate generator of the<br />
master also controls the shift register of the slave peripheral.<br />
As the byte shifts out on the MOSI pin of the master, another byte shifts in from the slave on the master’s<br />
MISO pin. The transmission ends when the receiver full bit, SPRF, becomes set. At the same time that<br />
SPRF becomes set, the byte from the slave transfers to the receive data register. In normal operation,<br />
SPRF signals the end of a transmission. Software clears SPRF by reading the SPI status and control<br />
register with SPRF set and then reading the SPI data register. Writing to the SPI data register clears the<br />
SPTE bit.<br />
<strong>MC68HC908JW32</strong> <strong>Data</strong> <strong>Sheet</strong>, Rev. 6<br />
128 <strong>Freescale</strong> Semiconductor
CGMOUT ÷ 2<br />
FROM SIM<br />
CLOCK<br />
DIVIDER<br />
SPMSTR<br />
÷ 2<br />
÷ 8<br />
÷ 32<br />
÷ 128<br />
SPE<br />
SPR1<br />
CLOCK<br />
SELECT<br />
SPR0<br />
RESERVED<br />
TRANSMITTER CPU INTERRUPT REQUEST<br />
RESERVED<br />
RECEIVER/ERROR CPU INTERRUPT REQUEST<br />
TRANSMIT DATA REGISTER<br />
SHIFT REGISTER<br />
7 6 5 4 3 2 1 0<br />
SPI<br />
CONTROL<br />
INTERNAL BUS<br />
RECEIVE DATA REGISTER<br />
SPMSTR<br />
Figure 10-2. SPI Module Block Diagram<br />
Figure 10-3. Full-Duplex Master-Slave Connections<br />
<strong>MC68HC908JW32</strong> <strong>Data</strong> <strong>Sheet</strong>, Rev. 6<br />
CLOCK<br />
LOGIC<br />
CPHA CPOL<br />
Functional Description<br />
<strong>Freescale</strong> Semiconductor 129<br />
SPRF<br />
SPTE<br />
OVRF<br />
MODF<br />
MODFEN<br />
ERRIE<br />
SPTIE<br />
SPRIE<br />
R<br />
SPE<br />
SPWOM<br />
MASTER MCU SLAVE MCU<br />
SHIFT REGISTER<br />
BAUD RATE<br />
GENERATOR<br />
MISO MISO<br />
MOSI MOSI<br />
SPSCK SPSCK<br />
SS SS<br />
VDD PIN<br />
CONTROL<br />
LOGIC<br />
M<br />
S<br />
SHIFT REGISTER<br />
MISO<br />
MOSI<br />
SPSCK<br />
SS
Serial Peripheral Interface Module (SPI)<br />
10.4.2 Slave Mode<br />
The SPI operates in slave mode when the SPMSTR bit is clear. In slave mode, the SPSCK pin is the input<br />
for the serial clock from the master MCU. Before a data transmission occurs, the SS pin of the slave SPI<br />
must be at logic 0. SS must remain low until the transmission is complete. (See 10.7.2 Mode Fault Error.)<br />
In a slave SPI module, data enters the shift register under the control of the serial clock from the master<br />
SPI module. After a byte enters the shift register of a slave SPI, it transfers to the receive data register,<br />
and the SPRF bit is set. To prevent an overflow condition, slave software then must read the receive data<br />
register before another full byte enters the shift register.<br />
The maximum frequency of the SPSCK for an SPI configured as a slave is the bus clock speed (which is<br />
twice as fast as the fastest master SPSCK clock that can be generated). The frequency of the SPSCK for<br />
an SPI configured as a slave does not have to correspond to any SPI baud rate. The baud rate only<br />
controls the speed of the SPSCK generated by an SPI configured as a master. Therefore, the frequency<br />
of the SPSCK for an SPI configured as a slave can be any frequency less than or equal to the bus speed.<br />
When the master SPI starts a transmission, the data in the slave shift register begins shifting out on the<br />
MISO pin. The slave can load its shift register with a new byte for the next transmission by writing to its<br />
transmit data register. The slave must write to its transmit data register at least one bus cycle before the<br />
master starts the next transmission. Otherwise, the byte already in the slave shift register shifts out on the<br />
MISO pin. <strong>Data</strong> written to the slave shift register during a transmission remains in a buffer until the end of<br />
the transmission.<br />
When the clock phase bit (CPHA) is set, the first edge of SPSCK starts a transmission. When CPHA is<br />
clear, the falling edge of SS starts a transmission. (See 10.5 Transmission Formats.)<br />
NOTE<br />
SPSCK must be in the proper idle state before the slave is enabled to<br />
prevent SPSCK from appearing as a clock edge.<br />
10.5 Transmission Formats<br />
During an SPI transmission, data is simultaneously transmitted (shifted out serially) and received (shifted<br />
in serially). A serial clock synchronizes shifting and sampling on the two serial data lines. A slave select<br />
line allows selection of an individual slave SPI device; slave devices that are not selected do not interfere<br />
with SPI bus activities. On a master SPI device, the slave select line can optionally be used to indicate<br />
multiple-master bus contention.<br />
10.5.1 Clock Phase and Polarity Controls<br />
Software can select any of four combinations of serial clock (SPSCK) phase and polarity using two bits<br />
in the SPI control register (SPCR). The clock polarity is specified by the CPOL control bit, which selects<br />
an active high or low clock and has no significant effect on the transmission format.<br />
The clock phase (CPHA) control bit selects one of two fundamentally different transmission formats. The<br />
clock phase and polarity should be identical for the master SPI device and the communicating slave<br />
device. In some cases, the phase and polarity are changed between transmissions to allow a master<br />
device to communicate with peripheral slaves having different requirements.<br />
NOTE<br />
Before writing to the CPOL bit or the CPHA bit, disable the SPI by clearing<br />
the SPI enable bit (SPE).<br />
<strong>MC68HC908JW32</strong> <strong>Data</strong> <strong>Sheet</strong>, Rev. 6<br />
130 <strong>Freescale</strong> Semiconductor
10.5.2 Transmission Format When CPHA = 0<br />
<strong>MC68HC908JW32</strong> <strong>Data</strong> <strong>Sheet</strong>, Rev. 6<br />
Transmission Formats<br />
Figure 10-4 shows an SPI transmission in which CPHA is logic 0. The figure should not be used as a<br />
replacement for data sheet parametric information.<br />
Two waveforms are shown for SPSCK: one for CPOL = 0 and another for CPOL = 1. The diagram may<br />
be interpreted as a master or slave timing diagram since the serial clock (SPSCK), master in/slave out<br />
(MISO), and master out/slave in (MOSI) pins are directly connected between the master and the slave.<br />
The MISO signal is the output from the slave, and the MOSI signal is the output from the master. The SS<br />
line is the slave select input to the slave. The slave SPI drives its MISO output only when its slave select<br />
input (SS) is at logic 0, so that only the selected slave drives to the master. The SS pin of the master is<br />
not shown but is assumed to be inactive. The SS pin of the master must be high or must be reconfigured<br />
as general-purpose I/O not affecting the SPI. (See 10.7.2 Mode Fault Error.) When CPHA = 0, the first<br />
SPSCK edge is the MSB capture strobe. Therefore, the slave must begin driving its data before the first<br />
SPSCK edge, and a falling edge on the SS pin is used to start the slave data transmission. The slave’s<br />
SS pin must be toggled back to high and then low again between each byte transmitted as shown in<br />
Figure 10-5.<br />
SPSCK CYCLE #<br />
FOR REFERENCE<br />
SPSCK; CPOL = 0<br />
SPSCK; CPOL =1<br />
MOSI<br />
FROM MASTER<br />
MISO<br />
FROM SLAVE<br />
SS; TO SLAVE<br />
CAPTURE STROBE<br />
MSB<br />
1 2 3 4 5 6 7 8<br />
MSB<br />
BIT 6 BIT 5 BIT 4 BIT 3 BIT 2 BIT 1 LSB<br />
BIT 6 BIT 5 BIT 4 BIT 3 BIT 2 BIT 1 LSB<br />
Figure 10-4. Transmission Format (CPHA = 0)<br />
MISO/MOSI BYTE 1 BYTE 2<br />
BYTE 3<br />
MASTER SS<br />
SLAVE SS<br />
CPHA = 0<br />
SLAVE SS<br />
CPHA = 1<br />
Figure 10-5. CPHA/SS Timing<br />
When CPHA = 0 for a slave, the falling edge of SS indicates the beginning of the transmission. This<br />
causes the SPI to leave its idle state and begin driving the MISO pin with the MSB of its data. Once the<br />
transmission begins, no new data is allowed into the shift register from the transmit data register.<br />
Therefore, the SPI data register of the slave must be loaded with transmit data before the falling edge of<br />
SS. Any data written after the falling edge is stored in the transmit data register and transferred to the shift<br />
register after the current transmission.<br />
<strong>Freescale</strong> Semiconductor 131
Serial Peripheral Interface Module (SPI)<br />
10.5.3 Transmission Format When CPHA = 1<br />
Figure 10-6 shows an SPI transmission in which CPHA is logic 1. The figure should not be used as a<br />
replacement for data sheet parametric information. Two waveforms are shown for SPSCK: one for<br />
CPOL = 0 and another for CPOL = 1. The diagram may be interpreted as a master or slave timing<br />
diagram since the serial clock (SPSCK), master in/slave out (MISO), and master out/slave in (MOSI) pins<br />
are directly connected between the master and the slave. The MISO signal is the output from the slave,<br />
and the MOSI signal is the output from the master. The SS line is the slave select input to the slave. The<br />
slave SPI drives its MISO output only when its slave select input (SS) is at logic 0, so that only the selected<br />
slave drives to the master. The SS pin of the master is not shown but is assumed to be inactive. The SS<br />
pin of the master must be high or must be reconfigured as general-purpose I/O not affecting the SPI. (See<br />
10.7.2 Mode Fault Error.) When CPHA = 1, the master begins driving its MOSI pin on the first SPSCK<br />
edge. Therefore, the slave uses the first SPSCK edge as a start transmission signal. The SS pin can<br />
remain low between transmissions. This format may be preferable in systems having only one master and<br />
only one slave driving the MISO data line.<br />
SPSCK CYCLE #<br />
FOR REFERENCE<br />
SPSCK; CPOL = 0<br />
SPSCK; CPOL =1<br />
MOSI<br />
FROM MASTER<br />
MISO<br />
FROM SLAVE<br />
SS; TO SLAVE<br />
CAPTURE STROBE<br />
MSB<br />
MSB<br />
Figure 10-6. Transmission Format (CPHA = 1)<br />
When CPHA = 1 for a slave, the first edge of the SPSCK indicates the beginning of the transmission. This<br />
causes the SPI to leave its idle state and begin driving the MISO pin with the MSB of its data. Once the<br />
transmission begins, no new data is allowed into the shift register from the transmit data register.<br />
Therefore, the SPI data register of the slave must be loaded with transmit data before the first edge of<br />
SPSCK. Any data written after the first edge is stored in the transmit data register and transferred to the<br />
shift register after the current transmission.<br />
10.5.4 Transmission Initiation Latency<br />
1 2 3 4 5 6 7 8<br />
BIT 6 BIT 5 BIT 4 BIT 3 BIT 2 BIT 1 LSB<br />
BIT 6 BIT 5 BIT 4 BIT 3 BIT 2 BIT 1 LSB<br />
When the SPI is configured as a master (SPMSTR = 1), writing to the SPDR starts a transmission. CPHA<br />
has no effect on the delay to the start of the transmission, but it does affect the initial state of the SPSCK<br />
signal. When CPHA = 0, the SPSCK signal remains inactive for the first half of the first SPSCK cycle.<br />
When CPHA = 1, the first SPSCK cycle begins with an edge on the SPSCK line from its inactive to its<br />
active level. The SPI clock rate (selected by SPR1:SPR0) affects the delay from the write to SPDR and<br />
the start of the SPI transmission. (See Figure 10-7.) The internal SPI clock in the master is a free-running<br />
derivative of the internal MCU clock. To conserve power, it is enabled only when both the SPE and<br />
SPMSTR bits are set. SPSCK edges occur halfway through the low time of the internal MCU clock. Since<br />
the SPI clock is free-running, it is uncertain where the write to the SPDR occurs relative to the slower<br />
SPSCK. This uncertainty causes the variation in the initiation delay shown in Figure 10-7. This delay is<br />
no longer than a single SPI bit time. That is, the maximum delay is two MCU bus cycles for DIV2, eight<br />
MCU bus cycles for DIV8, 32 MCU bus cycles for DIV32, and 128 MCU bus cycles for DIV128.<br />
<strong>MC68HC908JW32</strong> <strong>Data</strong> <strong>Sheet</strong>, Rev. 6<br />
132 <strong>Freescale</strong> Semiconductor
BUS<br />
CLOCK<br />
MOSI<br />
SPSCK<br />
CPHA = 1<br />
SPSCK<br />
CPHA = 0<br />
SPSCK CYCLE<br />
NUMBER<br />
BUS<br />
CLOCK<br />
BUS<br />
CLOCK<br />
BUS<br />
CLOCK<br />
BUS<br />
CLOCK<br />
WRITE<br />
TO SPDR<br />
WRITE<br />
TO SPDR<br />
10.6 Queuing Transmission <strong>Data</strong><br />
INITIATION DELAY<br />
MSB BIT 6<br />
1 2<br />
SPSCK = INTERNAL CLOCK ÷ 2;<br />
EARLIEST<br />
2 POSSIBLE START POINTS<br />
WRITE LATEST<br />
TO SPDR<br />
EARLIEST SPSCK = INTERNAL CLOCK ÷ 8; LATEST<br />
WRITE<br />
TO SPDR<br />
8 POSSIBLE START POINTS<br />
EARLIEST SPSCK = INTERNAL CLOCK ÷ 32; LATEST<br />
WRITE<br />
TO SPDR<br />
32 POSSIBLE START POINTS<br />
EARLIEST SPSCK = INTERNAL CLOCK ÷ 128;<br />
128 POSSIBLE START POINTS<br />
LATEST<br />
Figure 10-7. Transmission Start Delay (Master)<br />
<strong>MC68HC908JW32</strong> <strong>Data</strong> <strong>Sheet</strong>, Rev. 6<br />
Queuing Transmission <strong>Data</strong><br />
The double-buffered transmit data register allows a data byte to be queued and transmitted. For an SPI<br />
configured as a master, a queued data byte is transmitted immediately after the previous transmission<br />
has completed. The SPI transmitter empty flag (SPTE) indicates when the transmit data buffer is ready<br />
to accept new data. Write to the transmit data register only when the SPTE bit is high. Figure 10-8 shows<br />
the timing associated with doing back-to-back transmissions with the SPI (SPSCK has CPHA: CPOL =<br />
1:0).<br />
<strong>Freescale</strong> Semiconductor 133<br />
BIT 5<br />
INITIATION DELAY FROM WRITE SPDR TO TRANSFER BEGIN<br />
3
Serial Peripheral Interface Module (SPI)<br />
WRITE TO SPDR 1<br />
SPTE<br />
SPSCK<br />
CPHA:CPOL = 1:0<br />
MOSI<br />
SPRF<br />
READ SPSCR<br />
READ SPDR<br />
1 CPU WRITES BYTE 1 TO SPDR, CLEARING SPTE BIT.<br />
2 BYTE 1 TRANSFERS FROM TRANSMIT DATA<br />
REGISTER TO SHIFT REGISTER, SETTING SPTE BIT.<br />
3 CPU WRITES BYTE 2 TO SPDR, QUEUEING BYTE 2<br />
AND CLEARING SPTE BIT.<br />
4 FIRST INCOMING BYTE TRANSFERS FROM SHIFT<br />
REGISTER TO RECEIVE DATA REGISTER, SETTING<br />
SPRF BIT.<br />
5 BYTE 2 TRANSFERS FROM TRANSMIT DATA<br />
REGISTER TO SHIFT REGISTER, SETTING SPTE BIT.<br />
6 CPU READS SPSCR WITH SPRF BIT SET.<br />
Figure 10-8. SPRF/SPTE CPU Interrupt Timing<br />
The transmit data buffer allows back-to-back transmissions without the slave precisely timing its writes<br />
between transmissions as in a system with a single data buffer. Also, if no new data is written to the data<br />
buffer, the last value contained in the shift register is the next data word to be transmitted.<br />
For an idle master or idle slave that has no data loaded into its transmit buffer, the SPTE is set again no<br />
more than two bus cycles after the transmit buffer empties into the shift register. This allows the user to<br />
queue up a 16-bit value to send. For an already active slave, the load of the shift register cannot occur<br />
until the transmission is completed. This implies that a back-to-back write to the transmit data register is<br />
not possible. The SPTE indicates when the next write can occur.<br />
10.7 Error Conditions<br />
2<br />
3<br />
MSB BIT BIT BIT BIT BIT BIT LSB MSB BIT BIT BIT BIT BIT BIT LSB MSB BIT<br />
6 5 4 3 2 1 6 5 4 3 2 1 6<br />
BYTE 1 BYTE 2 BYTE 3<br />
The following flags signal SPI error conditions:<br />
• Overflow (OVRF) — Failing to read the SPI data register before the next full byte enters the shift<br />
register sets the OVRF bit. The new byte does not transfer to the receive data register, and the<br />
unread byte still can be read. OVRF is in the SPI status and control register.<br />
• Mode fault error (MODF) — The MODF bit indicates that the voltage on the slave select pin (SS)<br />
is inconsistent with the mode of the SPI. MODF is in the SPI status and control register.<br />
<strong>MC68HC908JW32</strong> <strong>Data</strong> <strong>Sheet</strong>, Rev. 6<br />
134 <strong>Freescale</strong> Semiconductor<br />
5<br />
4<br />
6<br />
8<br />
7 CPU READS SPDR, CLEARING SPRF BIT.<br />
8 CPU WRITES BYTE 3 TO SPDR, QUEUEING BYTE<br />
3 AND CLEARING SPTE BIT.<br />
9 SECOND INCOMING BYTE TRANSFERS FROM SHIFT<br />
REGISTER TO RECEIVE DATA REGISTER, SETTING<br />
SPRF BIT.<br />
10 BYTE 3 TRANSFERS FROM TRANSMIT DATA<br />
REGISTER TO SHIFT REGISTER, SETTING SPTE BIT.<br />
11 CPU READS SPSCR WITH SPRF BIT SET.<br />
12 CPU READS SPDR, CLEARING SPRF BIT.<br />
10<br />
9<br />
11<br />
7 12<br />
BIT BIT<br />
5 4
10.7.1 Overflow Error<br />
<strong>MC68HC908JW32</strong> <strong>Data</strong> <strong>Sheet</strong>, Rev. 6<br />
Error Conditions<br />
The overflow flag (OVRF) becomes set if the receive data register still has unread data from a previous<br />
transmission when the capture strobe of bit 1 of the next transmission occurs. The bit 1 capture strobe<br />
occurs in the middle of SPSCK cycle 7. (See Figure 10-4 and Figure 10-6.) If an overflow occurs, all data<br />
received after the overflow and before the OVRF bit is cleared does not transfer to the receive data<br />
register and does not set the SPI receiver full bit (SPRF). The unread data that transferred to the receive<br />
data register before the overflow occurred can still be read. Therefore, an overflow error always indicates<br />
the loss of data. Clear the overflow flag by reading the SPI status and control register and then reading<br />
the SPI data register.<br />
OVRF generates a receiver/error CPU interrupt request if the error interrupt enable bit (ERRIE) is also<br />
set. The SPRF, MODF, and OVRF interrupts share the same CPU interrupt vector. (See Figure 10-11.)<br />
It is not possible to enable MODF or OVRF individually to generate a receiver/error CPU interrupt request.<br />
However, leaving MODFEN low prevents MODF from being set.<br />
If the CPU SPRF interrupt is enabled and the OVRF interrupt is not, watch for an overflow condition.<br />
Figure 10-9 shows how it is possible to miss an overflow. The first part of Figure 10-9 shows how it is<br />
possible to read the SPSCR and SPDR to clear the SPRF without problems. However, as illustrated by<br />
the second transmission example, the OVRF bit can be set in between the time that SPSCR and SPDR<br />
are read.<br />
SPRF<br />
OVRF<br />
READ<br />
SPSCR<br />
READ<br />
SPDR<br />
BYTE 1 BYTE 2 BYTE 3 BYTE 4<br />
1<br />
4<br />
6<br />
8<br />
1<br />
2<br />
3<br />
4<br />
2<br />
3<br />
BYTE 1 SETS SPRF BIT.<br />
CPU READS SPSCR WITH SPRF BIT SET<br />
AND OVRF BIT CLEAR.<br />
CPU READS BYTE 1 IN SPDR,<br />
CLEARING SPRF BIT.<br />
BYTE 2 SETS SPRF BIT.<br />
CPU READS SPSCR WITH SPRF BIT SET<br />
AND OVRF BIT CLEAR.<br />
BYTE 3 SETS OVRF BIT. BYTE 3 IS LOST.<br />
CPU READS BYTE 2 IN SPDR, CLEARING SPRF BIT,<br />
BUT NOT OVRF BIT.<br />
BYTE 4 FAILS TO SET SPRF BIT BECAUSE<br />
OVRF BIT IS NOT CLEARED. BYTE 4 IS LOST.<br />
Figure 10-9. Missed Read of Overflow Condition<br />
In this case, an overflow can be missed easily. Since no more SPRF interrupts can be generated until this<br />
OVRF is serviced, it is not obvious that bytes are being lost as more transmissions are completed. To<br />
prevent this, either enable the OVRF interrupt or do another read of the SPSCR following the read of the<br />
SPDR. This ensures that the OVRF was not set before the SPRF was cleared and that future<br />
transmissions can set the SPRF bit. Figure 10-10 illustrates this process. Generally, to avoid this second<br />
SPSCR read, enable the OVRF to the CPU by setting the ERRIE bit.<br />
<strong>Freescale</strong> Semiconductor 135<br />
5<br />
5<br />
6<br />
7<br />
8<br />
7
Serial Peripheral Interface Module (SPI)<br />
SPI RECEIVE<br />
COMPLETE<br />
SPRF<br />
OVRF<br />
READ<br />
SPSCR<br />
READ<br />
SPDR<br />
10.7.2 Mode Fault Error<br />
BYTE 1 BYTE 2 BYTE 3 BYTE 4<br />
1<br />
5<br />
7<br />
11<br />
1<br />
2<br />
3<br />
4<br />
5<br />
6<br />
7<br />
2<br />
3<br />
BYTE 1 SETS SPRF BIT.<br />
CPU READS SPSCR WITH SPRF BIT SET<br />
AND OVRF BIT CLEAR.<br />
CPU READS BYTE 1 IN SPDR,<br />
CLEARING SPRF BIT.<br />
CPU READS SPSCR AGAIN<br />
TO CHECK OVRF BIT.<br />
BYTE 2 SETS SPRF BIT.<br />
CPU READS SPSCR WITH SPRF BIT SET<br />
AND OVRF BIT CLEAR.<br />
BYTE 3 SETS OVRF BIT. BYTE 3 IS LOST.<br />
4<br />
Figure 10-10. Clearing SPRF When OVRF Interrupt Is Not Enabled<br />
Setting the SPMSTR bit selects master mode and configures the SPSCK and MOSI pins as outputs and<br />
the MISO pin as an input. Clearing SPMSTR selects slave mode and configures the SPSCK and MOSI<br />
pins as inputs and the MISO pin as an output. The mode fault bit, MODF, becomes set any time the state<br />
of the slave select pin, SS, is inconsistent with the mode selected by SPMSTR.<br />
To prevent SPI pin contention and damage to the MCU, a mode fault error occurs if:<br />
• The SS pin of a slave SPI goes high during a transmission<br />
• The SS pin of a master SPI goes low at any time<br />
For the MODF flag to be set, the mode fault error enable bit (MODFEN) must be set. Clearing the<br />
MODFEN bit does not clear the MODF flag but does prevent MODF from being set again after MODF is<br />
cleared.<br />
MODF generates a receiver/error CPU interrupt request if the error interrupt enable bit (ERRIE) is also<br />
set. The SPRF, MODF, and OVRF interrupts share the same CPU interrupt vector. (See Figure 10-11.)<br />
It is not possible to enable MODF or OVRF individually to generate a receiver/error CPU interrupt request.<br />
However, leaving MODFEN low prevents MODF from being set.<br />
In a master SPI with the mode fault enable bit (MODFEN) set, the mode fault flag (MODF) is set if SS<br />
goes to logic 0. A mode fault in a master SPI causes the following events to occur:<br />
• If ERRIE = 1, the SPI generates an SPI receiver/error CPU interrupt request.<br />
• The SPE bit is cleared.<br />
• The SPTE bit is set.<br />
• The SPI state counter is cleared.<br />
• The data direction register of the shared I/O port regains control of port drivers.<br />
<strong>MC68HC908JW32</strong> <strong>Data</strong> <strong>Sheet</strong>, Rev. 6<br />
CPU READS BYTE 2 IN SPDR,<br />
CLEARING SPRF BIT.<br />
CPU READS SPSCR AGAIN<br />
TO CHECK OVRF BIT.<br />
CPU READS BYTE 2 SPDR,<br />
CLEARING OVRF BIT.<br />
BYTE 4 SETS SPRF BIT.<br />
CPU READS SPSCR.<br />
CPU READS BYTE 4 IN SPDR,<br />
CLEARING SPRF BIT.<br />
CPU READS SPSCR AGAIN<br />
TO CHECK OVRF BIT.<br />
136 <strong>Freescale</strong> Semiconductor<br />
6<br />
8<br />
8<br />
9<br />
10<br />
11<br />
12<br />
13<br />
14<br />
9<br />
10<br />
12<br />
13<br />
14
NOTE<br />
To prevent bus contention with another master SPI after a mode fault error,<br />
clear all SPI bits of the data direction register of the shared I/O port before<br />
enabling the SPI.<br />
<strong>MC68HC908JW32</strong> <strong>Data</strong> <strong>Sheet</strong>, Rev. 6<br />
Interrupts<br />
When configured as a slave (SPMSTR = 0), the MODF flag is set if SS goes high during a transmission.<br />
When CPHA = 0, a transmission begins when SS goes low and ends once the incoming SPSCK goes<br />
back to its idle level following the shift of the eighth data bit. When CPHA = 1, the transmission begins<br />
when the SPSCK leaves its idle level and SS is already low. The transmission continues until the SPSCK<br />
returns to its idle level following the shift of the last data bit. (See 10.5 Transmission Formats.)<br />
NOTE<br />
Setting the MODF flag does not clear the SPMSTR bit. The SPMSTR bit<br />
has no function when SPE = 0. Reading SPMSTR when MODF = 1 shows<br />
the difference between a MODF occurring when the SPI is a master and<br />
when it is a slave.<br />
When CPHA = 0, a MODF occurs if a slave is selected (SS is at logic 0) and<br />
later unselected (SS is at logic 1) even if no SPSCK is sent to that slave.<br />
This happens because SS at logic 0 indicates the start of the transmission<br />
(MISO driven out with the value of MSB) for CPHA = 0. When CPHA = 1, a<br />
slave can be selected and then later unselected with no transmission<br />
occurring. Therefore, MODF does not occur since a transmission was<br />
never begun.<br />
In a slave SPI (MSTR = 0), the MODF bit generates an SPI receiver/error CPU interrupt request if the<br />
ERRIE bit is set. The MODF bit does not clear the SPE bit or reset the SPI in any way. Software can abort<br />
the SPI transmission by clearing the SPE bit of the slave.<br />
NOTE<br />
A logic 1 voltage on the SS pin of a slave SPI puts the MISO pin in a high<br />
impedance state. Also, the slave SPI ignores all incoming SPSCK clocks,<br />
even if it was already in the middle of a transmission.<br />
To clear the MODF flag, read the SPSCR with the MODF bit set and then write to the SPCR register. This<br />
entire clearing mechanism must occur with no MODF condition existing or else the flag is not cleared.<br />
10.8 Interrupts<br />
Four SPI status flags can be enabled to generate CPU interrupt requests.<br />
SPTE<br />
Transmitter empty<br />
SPRF<br />
Receiver full<br />
OVRF<br />
Overflow<br />
MODF<br />
Mode fault<br />
Table 10-2. SPI Interrupts<br />
Flag Request<br />
SPI transmitter CPU interrupt request<br />
(SPTIE = 1, SPE = 1)<br />
SPI receiver CPU interrupt request<br />
(SPRIE = 1)<br />
SPI receiver/error interrupt request (ERRIE = 1)<br />
SPI receiver/error interrupt request (ERRIE = 1)<br />
<strong>Freescale</strong> Semiconductor 137
Serial Peripheral Interface Module (SPI)<br />
Reading the SPI status and control register with SPRF set and then reading the receive data register<br />
clears SPRF. The clearing mechanism for the SPTE flag is always just a write to the transmit data<br />
register.<br />
The SPI transmitter interrupt enable bit (SPTIE) enables the SPTE flag to generate transmitter CPU<br />
interrupt requests, provided that the SPI is enabled (SPE = 1).<br />
The SPI receiver interrupt enable bit (SPRIE) enables the SPRF bit to generate receiver CPU interrupt<br />
requests, regardless of the state of the SPE bit. (See Figure 10-11.)<br />
The error interrupt enable bit (ERRIE) enables both the MODF and OVRF bits to generate a receiver/error<br />
CPU interrupt request.<br />
The mode fault enable bit (MODFEN) can prevent the MODF flag from being set so that only the OVRF<br />
bit is enabled by the ERRIE bit to generate receiver/error CPU interrupt requests.<br />
R<br />
ERRIE<br />
MODF<br />
OVRF<br />
SPTE SPTIE<br />
SPRIE<br />
SPRF<br />
Figure 10-11. SPI Interrupt Request Generation<br />
The following sources in the SPI status and control register can generate CPU interrupt requests:<br />
• SPI receiver full bit (SPRF) — The SPRF bit becomes set every time a byte transfers from the shift<br />
register to the receive data register. If the SPI receiver interrupt enable bit, SPRIE, is also set,<br />
SPRF generates an SPI receiver/error CPU interrupt request.<br />
• SPI transmitter empty (SPTE) — The SPTE bit becomes set every time a byte transfers from the<br />
transmit data register to the shift register. If the SPI transmit interrupt enable bit, SPTIE, is also set,<br />
SPTE generates an SPTE CPU interrupt request.<br />
<strong>MC68HC908JW32</strong> <strong>Data</strong> <strong>Sheet</strong>, Rev. 6<br />
138 <strong>Freescale</strong> Semiconductor<br />
SPE<br />
NOT AVAILABLE<br />
SPI TRANSMITTER<br />
CPU INTERRUPT REQUEST<br />
NOT AVAILABLE<br />
SPI RECEIVER/ERROR<br />
CPU INTERRUPT REQUEST
10.9 Resetting the SPI<br />
<strong>MC68HC908JW32</strong> <strong>Data</strong> <strong>Sheet</strong>, Rev. 6<br />
Resetting the SPI<br />
Any system reset completely resets the SPI. Partial resets occur whenever the SPI enable bit (SPE) is<br />
low. Whenever SPE is low, the following occurs:<br />
• The SPTE flag is set.<br />
• Any transmission currently in progress is aborted.<br />
• The shift register is cleared.<br />
• The SPI state counter is cleared, making it ready for a new complete transmission.<br />
• All the SPI port logic is defaulted back to being general-purpose I/O.<br />
These items are reset only by a system reset:<br />
• All control bits in the SPCR register<br />
• All control bits in the SPSCR register (MODFEN, ERRIE, SPR1, and SPR0)<br />
• The status flags SPRF, OVRF, and MODF<br />
By not resetting the control bits when SPE is low, the user can clear SPE between transmissions without<br />
having to set all control bits again when SPE is set back high for the next transmission.<br />
By not resetting the SPRF, OVRF, and MODF flags, the user can still service these interrupts after the<br />
SPI has been disabled. The user can disable the SPI by writing 0 to the SPE bit. The SPI can also be<br />
disabled by a mode fault occurring in an SPI that was configured as a master with the MODFEN bit set.<br />
10.10 Low-Power Modes<br />
The WAIT and STOP instructions put the MCU in low power-consumption standby modes.<br />
10.10.1 Wait Mode<br />
The SPI module remains active after the execution of a WAIT instruction. In wait mode the SPI module<br />
registers are not accessible by the CPU. Any enabled CPU interrupt request from the SPI module can<br />
bring the MCU out of wait mode.<br />
If SPI module functions are not required during wait mode, reduce power consumption by disabling the<br />
SPI module before executing the WAIT instruction.<br />
To exit wait mode when an overflow condition occurs, enable the OVRF bit to generate CPU interrupt<br />
requests by setting the error interrupt enable bit (ERRIE). (See 10.8 Interrupts.)<br />
10.10.2 Stop Mode<br />
The SPI module is inactive after the execution of a STOP instruction. The STOP instruction does not<br />
affect register conditions. SPI operation resumes after an external interrupt. If stop mode is exited by<br />
reset, any transfer in progress is aborted, and the SPI is reset.<br />
10.11 SPI During Break Interrupts<br />
The system integration module (SIM) controls whether status bits in other modules can be cleared during<br />
the break state. The BCFE bit in the SIM break flag control register (SBFCR) enables software to clear<br />
status bits during the break state. (See Chapter 6 System Integration Module (SIM).)<br />
To allow software to clear status bits during a break interrupt, write a logic 1 to the BCFE bit. If a status<br />
bit is cleared during the break state, it remains cleared when the MCU exits the break state.<br />
<strong>Freescale</strong> Semiconductor 139
Serial Peripheral Interface Module (SPI)<br />
To protect status bits during the break state, write a logic 0 to the BCFE bit. With BCFE at logic 0 (its<br />
default state), software can read and write I/O registers during the break state without affecting status bits.<br />
Some status bits have a 2-step read/write clearing procedure. If software does the first step on such a bit<br />
before the break, the bit cannot change during the break state as long as BCFE is at logic 0. After the<br />
break, doing the second step clears the status bit.<br />
Since the SPTE bit cannot be cleared during a break with the BCFE bit cleared, a write to the transmit<br />
data register in break mode does not initiate a transmission nor is this data transferred into the shift<br />
register. Therefore, a write to the SPDR in break mode with the BCFE bit cleared has no effect.<br />
10.12 I/O Signals<br />
The SPI module has five I/O pins and shares four of them with a parallel I/O port. They are:<br />
• MISO — <strong>Data</strong> received<br />
• MOSI — <strong>Data</strong> transmitted<br />
• SPSCK — Serial clock<br />
• SS — Slave select<br />
• CGND — Clock ground (internally connected to V SS )<br />
The SPI has limited inter-integrated circuit (I 2 C) capability (requiring software support) as a master in a<br />
single-master environment. To communicate with I 2 C peripherals, MOSI becomes an open-drain output<br />
when the SPWOM bit in the SPI control register is set. In I 2 C communication, the MOSI and MISO pins<br />
are connected to a bidirectional pin from the I 2 C peripheral and through a pullup resistor to V DD .<br />
10.12.1 MISO (Master In/Slave Out)<br />
MISO is one of the two SPI module pins that transmits serial data. In full duplex operation, the MISO pin<br />
of the master SPI module is connected to the MISO pin of the slave SPI module. The master SPI<br />
simultaneously receives data on its MISO pin and transmits data from its MOSI pin.<br />
Slave output data on the MISO pin is enabled only when the SPI is configured as a slave. The SPI is<br />
configured as a slave when its SPMSTR bit is logic 0 and its SS pin is at logic 0. To support a<br />
multiple-slave system, a logic 1 on the SS pin puts the MISO pin in a high-impedance state.<br />
When enabled, the SPI controls data direction of the MISO pin regardless of the state of the data direction<br />
register of the shared I/O port.<br />
10.12.2 MOSI (Master Out/Slave In)<br />
MOSI is one of the two SPI module pins that transmits serial data. In full-duplex operation, the MOSI pin<br />
of the master SPI module is connected to the MOSI pin of the slave SPI module. The master SPI<br />
simultaneously transmits data from its MOSI pin and receives data on its MISO pin.<br />
When enabled, the SPI controls data direction of the MOSI pin regardless of the state of the data direction<br />
register of the shared I/O port.<br />
10.12.3 SPSCK (Serial Clock)<br />
The serial clock synchronizes data transmission between master and slave devices. In a master MCU,<br />
the SPSCK pin is the clock output. In a slave MCU, the SPSCK pin is the clock input. In full-duplex<br />
operation, the master and slave MCUs exchange a byte of data in eight serial clock cycles.<br />
<strong>MC68HC908JW32</strong> <strong>Data</strong> <strong>Sheet</strong>, Rev. 6<br />
140 <strong>Freescale</strong> Semiconductor
<strong>MC68HC908JW32</strong> <strong>Data</strong> <strong>Sheet</strong>, Rev. 6<br />
I/O Signals<br />
When enabled, the SPI controls data direction of the SPSCK pin regardless of the state of the data<br />
direction register of the shared I/O port.<br />
10.12.4 SS (Slave Select)<br />
The SS pin has various functions depending on the current state of the SPI. For an SPI configured as a<br />
slave, the SS is used to select a slave. For CPHA = 0, the SS is used to define the start of a transmission.<br />
(See 10.5 Transmission Formats.) Since it is used to indicate the start of a transmission, the SS must be<br />
toggled high and low between each byte transmitted for the CPHA = 0 format. However, it can remain low<br />
between transmissions for the CPHA = 1 format. See Figure 10-12.<br />
MISO/MOSI BYTE 1 BYTE 2<br />
BYTE 3<br />
MASTER SS<br />
SLAVE SS<br />
CPHA = 0<br />
SLAVE SS<br />
CPHA = 1<br />
Figure 10-12. CPHA/SS Timing<br />
When an SPI is configured as a slave, the SS pin is always configured as an input. It cannot be used as<br />
a general-purpose I/O regardless of the state of the MODFEN control bit. However, the MODFEN bit can<br />
still prevent the state of the SS from creating a MODF error. (See 10.13.2 SPI Status and Control<br />
Register.)<br />
NOTE<br />
A logic 1 voltage on the SS pin of a slave SPI puts the MISO pin in a<br />
high-impedance state. The slave SPI ignores all incoming SPSCK clocks,<br />
even if it was already in the middle of a transmission.<br />
When an SPI is configured as a master, the SS input can be used in conjunction with the MODF flag to<br />
prevent multiple masters from driving MOSI and SPSCK. (See 10.7.2 Mode Fault Error.) For the state of<br />
the SS pin to set the MODF flag, the MODFEN bit in the SPSCK register must be set. If the MODFEN bit<br />
is low for an SPI master, the SS pin can be used as a general-purpose I/O under the control of the data<br />
direction register of the shared I/O port. With MODFEN high, it is an input-only pin to the SPI regardless<br />
of the state of the data direction register of the shared I/O port.<br />
The CPU can always read the state of the SS pin by configuring the appropriate pin as an input and<br />
reading the port data register. (See Table 10-3.)<br />
Table 10-3. SPI Configuration<br />
SPE SPMSTR MODFEN SPI Configuration State of SS Logic<br />
0 X (1) X Not enabled<br />
General-purpose I/O;<br />
SS ignored by SPI<br />
1 0 X Slave Input-only to SPI<br />
1 1 0 Master without MODF<br />
General-purpose I/O;<br />
SS ignored by SPI<br />
1 1 1 Master with MODF Input-only to SPI<br />
Note 1. X = Don’t care<br />
<strong>Freescale</strong> Semiconductor 141
Serial Peripheral Interface Module (SPI)<br />
10.12.5 CGND (Clock Ground)<br />
CGND is the ground return for the serial clock pin, SPSCK, and the ground for the port output buffers. It<br />
is internally connected to V SS as shown in Table 10-1.<br />
10.13 I/O Registers<br />
Three registers control and monitor SPI operation:<br />
• SPI control register (SPCR)<br />
• SPI status and control register (SPSCR)<br />
• SPI data register (SPDR)<br />
10.13.1 SPI Control Register<br />
The SPI control register:<br />
• Enables SPI module interrupt requests<br />
• Configures the SPI module as master or slave<br />
• Selects serial clock polarity and phase<br />
• Configures the SPSCK, MOSI, and MISO pins as open-drain outputs<br />
• Enables the SPI module<br />
Address: $004C<br />
Bit 7 6 5 4 3 2 1 Bit 0<br />
Read:<br />
Write:<br />
SPRIE R SPMSTR CPOL CPHA SPWOM SPE SPTIE<br />
Reset: 0 0 1 0 1 0 0 0<br />
R = Reserved<br />
Figure 10-13. SPI Control Register (SPCR)<br />
SPRIE — SPI Receiver Interrupt Enable Bit<br />
This read/write bit enables CPU interrupt requests generated by the SPRF bit. The SPRF bit is set<br />
when a byte transfers from the shift register to the receive data register. Reset clears the SPRIE bit.<br />
1 = SPRF CPU interrupt requests enabled<br />
0 = SPRF CPU interrupt requests disabled<br />
SPMSTR — SPI Master Bit<br />
This read/write bit selects master mode operation or slave mode operation. Reset sets the SPMSTR bit.<br />
1 = Master mode<br />
0 = Slave mode<br />
CPOL — Clock Polarity Bit<br />
This read/write bit determines the logic state of the SPSCK pin between transmissions. (See<br />
Figure 10-4 and Figure 10-6.) To transmit data between SPI modules, the SPI modules must have<br />
identical CPOL values. Reset clears the CPOL bit.<br />
CPHA — Clock Phase Bit<br />
This read/write bit controls the timing relationship between the serial clock and SPI data. (See<br />
Figure 10-4 and Figure 10-6.) To transmit data between SPI modules, the SPI modules must have<br />
identical CPHA values. When CPHA = 0, the SS pin of the slave SPI module must be set to logic 1<br />
between bytes. (See Figure 10-12.) Reset sets the CPHA bit.<br />
<strong>MC68HC908JW32</strong> <strong>Data</strong> <strong>Sheet</strong>, Rev. 6<br />
142 <strong>Freescale</strong> Semiconductor
<strong>MC68HC908JW32</strong> <strong>Data</strong> <strong>Sheet</strong>, Rev. 6<br />
I/O Registers<br />
SPWOM — SPI Wired-OR Mode Bit<br />
This read/write bit disables the pullup devices on pins SPSCK, MOSI, and MISO so that those pins<br />
become open-drain outputs.<br />
1 = Wired-OR SPSCK, MOSI, and MISO pins<br />
0 = Normal push-pull SPSCK, MOSI, and MISO pins<br />
SPE — SPI Enable<br />
This read/write bit enables the SPI module. Clearing SPE causes a partial reset of the SPI. (See 10.9<br />
Resetting the SPI.) Reset clears the SPE bit.<br />
1 = SPI module enabled<br />
0 = SPI module disabled<br />
SPTIE— SPI Transmit Interrupt Enable<br />
This read/write bit enables CPU interrupt requests generated by the SPTE bit. SPTE is set when a byte<br />
transfers from the transmit data register to the shift register. Reset clears the SPTIE bit.<br />
1 = SPTE CPU interrupt requests enabled<br />
0 = SPTE CPU interrupt requests disabled<br />
10.13.2 SPI Status and Control Register<br />
The SPI status and control register contains flags to signal these conditions:<br />
• Receive data register full<br />
• Failure to clear SPRF bit before next byte is received (overflow error)<br />
• Inconsistent logic level on SS pin (mode fault error)<br />
• Transmit data register empty<br />
The SPI status and control register also contains bits that perform these functions:<br />
• Enable error interrupts<br />
• Enable mode fault error detection<br />
• Select master SPI baud rate<br />
Address $004D<br />
Bit 7 6 5 4 3 2 1 Bit 0<br />
Read:<br />
Write:<br />
SPRF<br />
ERRIE<br />
OVRF MODF SPTE<br />
MODFEN SPR1 SPR0<br />
Reset: 0 0 0 0 1 0 0 0<br />
= Unimplemented<br />
Figure 10-14. SPI Status and Control Register (SPSCR)<br />
SPRF — SPI Receiver Full Bit<br />
This clearable, read-only flag is set each time a byte transfers from the shift register to the receive data<br />
register. SPRF generates a CPU interrupt request if the SPRIE bit in the SPI control register is set also.<br />
During an SPRF CPU interrupt, the CPU clears SPRF by reading the SPI status and control register<br />
with SPRF set and then reading the SPI data register. Reset clears the SPRF bit.<br />
1 = Receive data register full<br />
0 = Receive data register not full<br />
<strong>Freescale</strong> Semiconductor 143
Serial Peripheral Interface Module (SPI)<br />
ERRIE — Error Interrupt Enable Bit<br />
This read/write bit enables the MODF and OVRF bits to generate CPU interrupt requests. Reset clears<br />
the ERRIE bit.<br />
1 = MODF and OVRF can generate CPU interrupt requests<br />
0 = MODF and OVRF cannot generate CPU interrupt requests<br />
OVRF — Overflow Bit<br />
This clearable, read-only flag is set if software does not read the byte in the receive data register before<br />
the next full byte enters the shift register. In an overflow condition, the byte already in the receive data<br />
register is unaffected, and the byte that shifted in last is lost. Clear the OVRF bit by reading the SPI<br />
status and control register with OVRF set and then reading the receive data register. Reset clears the<br />
OVRF bit.<br />
1 = Overflow<br />
0 = No overflow<br />
MODF — Mode Fault Bit<br />
This clearable, read-only flag is set in a slave SPI if the SS pin goes high during a transmission with<br />
the MODFEN bit set. In a master SPI, the MODF flag is set if the SS pin goes low at any time with the<br />
MODFEN bit set. Clear the MODF bit by reading the SPI status and control register (SPSCR) with<br />
MODF set and then writing to the SPI control register (SPCR). Reset clears the MODF bit.<br />
1 = SS pin at inappropriate logic level<br />
0 = SS pin at appropriate logic level<br />
SPTE — SPI Transmitter Empty Bit<br />
This clearable, read-only flag is set each time the transmit data register transfers a byte into the shift<br />
register. SPTE generates an SPTE CPU interrupt request if the SPTIE bit in the SPI control register is<br />
set also.<br />
NOTE<br />
Do not write to the SPI data register unless the SPTE bit is high.<br />
During an SPTE CPU interrupt, the CPU clears the SPTE bit by writing to the transmit data register.<br />
Reset sets the SPTE bit.<br />
1 = Transmit data register empty<br />
0 = Transmit data register not empty<br />
MODFEN — Mode Fault Enable Bit<br />
This read/write bit, when set to 1, allows the MODF flag to be set. If the MODF flag is set, clearing the<br />
MODFEN does not clear the MODF flag. If the SPI is enabled as a master and the MODFEN bit is low,<br />
then the SS pin is available as a general-purpose I/O.<br />
If the MODFEN bit is set, then this pin is not available as a general-purpose I/O. When the SPI is<br />
enabled as a slave, the SS pin is not available as a general-purpose I/O regardless of the value of<br />
MODFEN. (See 10.12.4 SS (Slave Select).)<br />
If the MODFEN bit is low, the level of the SS pin does not affect the operation of an enabled SPI<br />
configured as a master. For an enabled SPI configured as a slave, having MODFEN low only prevents<br />
the MODF flag from being set. It does not affect any other part of SPI operation. (See 10.7.2 Mode<br />
Fault Error.)<br />
<strong>MC68HC908JW32</strong> <strong>Data</strong> <strong>Sheet</strong>, Rev. 6<br />
144 <strong>Freescale</strong> Semiconductor
<strong>MC68HC908JW32</strong> <strong>Data</strong> <strong>Sheet</strong>, Rev. 6<br />
I/O Registers<br />
SPR1 and SPR0 — SPI Baud Rate Select Bits<br />
In master mode, these read/write bits select one of four baud rates as shown in Table 10-4. SPR1 and<br />
SPR0 have no effect in slave mode. Reset clears SPR1 and SPR0.<br />
Use this formula to calculate the SPI baud rate:<br />
where:<br />
CGMOUT = base clock output of the clock generator module (CGM)<br />
BD = baud rate divisor<br />
10.13.3 SPI <strong>Data</strong> Register<br />
Table 10-4. SPI Master Baud Rate Selection<br />
SPR1 and SPR0 Baud Rate Divisor (BD)<br />
00 2<br />
01 8<br />
10 32<br />
11 128<br />
CGMOUT<br />
Baud rate =<br />
-------------------------<br />
2 × BD<br />
The SPI data register consists of the read-only receive data register and the write-only transmit data<br />
register. Writing to the SPI data register writes data into the transmit data register. Reading the SPI data<br />
register reads data from the receive data register. The transmit data and receive data registers are<br />
separate registers that can contain different values. (See Figure 10-2.)<br />
Address: $004E<br />
Bit 7 6 5 4 3 2 1 Bit 0<br />
Read: R7 R6 R5 R4 R3 R2 R1 R0<br />
Write: T7 T6 T5 T4 T3 T2 T1 T0<br />
Reset: Unaffected by reset<br />
Figure 10-15. SPI <strong>Data</strong> Register (SPDR)<br />
R7–R0/T7–T0 — Receive/Transmit <strong>Data</strong> Bits<br />
NOTE<br />
Do not use read-modify-write instructions on the SPI data register since the<br />
register read is not the same as the register written.<br />
<strong>Freescale</strong> Semiconductor 145
Serial Peripheral Interface Module (SPI)<br />
<strong>MC68HC908JW32</strong> <strong>Data</strong> <strong>Sheet</strong>, Rev. 6<br />
146 <strong>Freescale</strong> Semiconductor
Chapter 11<br />
USB 2.0 FS Module<br />
11.1 Introduction<br />
This section describes the universal serial bus (USB) module. The USB module is designed to serve as<br />
a full speed (FS) USB device per the Universal Serial Bus Specification Rev 2.0. Control and interrupt<br />
data transfers are supported. Endpoint 0 functions as a transmit/receive control endpoint; endpoint 1, 2,<br />
3 and 4 functions are configurable as interrupt or bulk endpoints and support transmit or receive<br />
communication.<br />
11.2 Features<br />
Features of the USB module include:<br />
• Full Universal Serial Bus Specification 2.0 full-speed functions<br />
• 12Mbps data rate<br />
• On-chip 3.3V regulator<br />
• Endpoint 0 with 8-byte transmit buffer and 8-byte receive buffer<br />
• 64 bytes programmable buffer to share with 4 data endpoint<br />
• 4 data endpoints supports<br />
• USB device controller with protocol control supports single configuration, 2 interfaces and no<br />
alternate settings for each interface<br />
• Programmable endpoint type for four independent endpoints — interrupt or bulk<br />
• USB data control logic:<br />
– Packet identification and decoding/generation<br />
– CRC generation and checking<br />
– NRZI (Non-Return-to Zero Inserted) encoding/decoding<br />
– Bit-stuffing<br />
– Sync detection<br />
– End-of-packet detection<br />
• USB reset options:<br />
– Internal MCU reset generation<br />
– CPU interrupt request generation<br />
• Suspend and resume operations, with remote wakeup support<br />
<strong>MC68HC908JW32</strong> <strong>Data</strong> <strong>Sheet</strong>, Rev. 6<br />
<strong>Freescale</strong> Semiconductor 147
USB 2.0 FS Module<br />
11.3 USB Module Architecture<br />
3.3V<br />
D+<br />
D–<br />
3.3V<br />
Regulator<br />
USB<br />
Transceiver<br />
Figure 11-1. USB Module Block Diagram<br />
The USB module block diagram is shown in Figure 11-1. The module involves six major blocks - USB<br />
transceiver, USB control logic, USB request processor, USB endpoint controller and USB Endpoint<br />
buffer.<br />
11.3.1 USB Transceiver<br />
Endpoint<br />
Buffer<br />
System Bus<br />
USB<br />
Control<br />
Logic<br />
USB<br />
Endpoint<br />
Controller<br />
The USB transceiver is electrically compliant to the Universal Serial Bus Specification 2.0. The on-chip<br />
3.3V regulator provides a stable power source for the termination pull-up resistor. Full speed devices are<br />
terminated with the pull-up resistor on the D+ line.<br />
<strong>MC68HC908JW32</strong> <strong>Data</strong> <strong>Sheet</strong>, Rev. 6<br />
USB<br />
Request<br />
Processor<br />
148 <strong>Freescale</strong> Semiconductor
11.3.2 USB Control Logic<br />
The USB control logic handle the following functions:<br />
• For transmit data<br />
– Packet creation<br />
– CRC generation<br />
– NRZI encoding<br />
– Bit stuffing<br />
• For receive data<br />
– Sync detection<br />
– Packet Identification<br />
– End-of-packet (EOP) detection<br />
– CRC validation<br />
– NRZI decoding<br />
– Bit unstuffing<br />
• For error detection<br />
– Bad CRC<br />
– Timeout detection for EOP<br />
– Bit stuffing violation<br />
11.3.3 USB Endpoint Configuration<br />
<strong>MC68HC908JW32</strong> <strong>Data</strong> <strong>Sheet</strong>, Rev. 6<br />
USB Module Architecture<br />
A single configuration and 2 interfaces are supported by the module. Endpoint 0 is always used as control<br />
endpoint. The interface number for endpoint 1 to 4 are programmable through USB interface control<br />
register (UINTFCR). The endpoint type and direction of all endpoint 1 to 4 is software programmable to<br />
either BULK or INTERRUPT and either IN or OUT respectively. The endpoint configuration is<br />
summarized in Table 11-1<br />
Endpoint<br />
Number<br />
Table 11-1. Endpoint Summary<br />
Configuration<br />
Number<br />
Interface<br />
Number<br />
Direction Type<br />
0 — — IN/OUT Control<br />
1 1 EP1INT IN/OUT<br />
2 1 EP2INT IN/OUT<br />
3 1 EP3INT IN/OUT<br />
4 1 EP4INT IN/OUT<br />
Bulk/<br />
Interrupt<br />
Bulk/<br />
Interrupt<br />
Bulk/<br />
Interrupt<br />
Bulk/<br />
Interrupt<br />
<strong>Freescale</strong> Semiconductor 149
USB 2.0 FS Module<br />
11.3.4 USB Requestor Processor<br />
The USB requestor processor automatically process some standard USB requests as listed in<br />
Table 11-2.<br />
Table 11-2. USB Requests Handling<br />
Request Handling<br />
CLEAR_FEATURE<br />
GET_CONFIGURATION<br />
GET_DESCRIPTOR<br />
GET_INTERFACE<br />
GET_STATUS<br />
SET_ADDRESS<br />
SET_CONFIGURATION<br />
Requestor processor clears the feature specified by the feature selector. For<br />
USB specification 2.0, only two features are specified -<br />
DEVICE_REMOTE_WAKEUP and ENDPOINT_HALT. The module stores<br />
the HALT status and remote wakeup status internally. No user attention is<br />
required.<br />
Return the configuration number specified in CONFIG. No user notification<br />
is provided.<br />
This requests is not handled automatically by the request processor. User is<br />
notified by the SETUP flag and the TFRC_OUT flag being set. The request<br />
command can be decoded through the 8-byte endpoint 0 OUT data buffer.<br />
User must fill up the Endpoint 0 data IN buffer 8 bytes at a time manually<br />
with the corresponding descriptor requested by the host. When DVALID_IN<br />
bit is set and TFRC_IN flag is cleared, the requestor processor responses to<br />
the next IN packet with the data stored. Before the DVALID_IN bit is set,<br />
NAK is returned to all IN packet.<br />
No alternate setting is support by the module, Alternative interface number<br />
zero is always return. No user notification is provided.<br />
Returns the current status of the specified device, endpoint or interface. No<br />
user notification is provided.<br />
Internal address register is modified. The control logic begins responding to<br />
the new address once the status stage of the request completes<br />
successfully. No user notification is provided.<br />
If the configuration value is zero, the USB module is placed into the<br />
unconfigured state. If the device is successfully configured by the host, the<br />
new configuration value is specified by CONFIG bit.<br />
NOTE: User is notified if the request completes successfully. CONFIG_CHG<br />
flag of USB Status Register (USBSR) will be set upon a successful<br />
completion of the request where the configuration number is changed from<br />
zero to one. User can read the CONFIG flag for the corresponding changes.<br />
SET_DESCRIPTOR Not supported. STALL packet is returned to the host.<br />
SET_FEATURE<br />
SET_INTERFACE<br />
SYNC_FRAME<br />
Corresponding feature specified by the packet is enabled accordingly. No<br />
user attention is required.<br />
No alternative setting is supported. If the alternative setting number is zero,<br />
ACK is returned to the host. No user notification is provided.<br />
Passed to the user as a vendor specific request.<br />
NOTE: SETUP flag, TFRC_OUT flag and DVALID_OUT flag will be set.<br />
User should decode the request via reading the endpoint 0 data registers<br />
(UE0D0-UE0D7).<br />
<strong>MC68HC908JW32</strong> <strong>Data</strong> <strong>Sheet</strong>, Rev. 6<br />
150 <strong>Freescale</strong> Semiconductor
<strong>MC68HC908JW32</strong> <strong>Data</strong> <strong>Sheet</strong>, Rev. 6<br />
USB Module Architecture<br />
11.3.4.1 Configuration Process<br />
All USB devices must be configured before used. The host will configure the device according to the<br />
configuration process defined by the USB specification 2.0 Chapter 9. During the process most of the<br />
USB commands issued by the host are responded automatically except GET_DESCRIPTOR,<br />
SYNC_FRAME, vendor specific and class specific commands where user interaction is required. These<br />
are known as the user commands. The number of configurations and interfaces supported is limited by<br />
the module. This module can support a single configuration and maximum of two interfaces. No alternate<br />
setting is allowed.<br />
Upon the reception of the user commands, no module level decoding is done instead user is notified by<br />
the SETUP flag and TFRC_OUT flag. User can then decode the command through the dedicated 8-byte<br />
endpoint 0 buffer. For instance, when a valid GET_DESCRIPTOR command is detected, user is notified<br />
by the SETUP, TFRC_OUT flag and DVALID_OUT flag. User should decode the command via the 8-byte<br />
endpoint 0 OUT buffer. Corresponding return descriptor is written to the endpoint 0 IN buffer 8 bytes at a<br />
time. By setting the DVALID_IN bit, the data is sent to the host in the next IN packet. Otherwise, the<br />
module will return NAK to all IN packet. If ACK is not returned from the host, the data is re-sent<br />
automatically in the next IN packet until ACK is returned from the host, then transfer complete flag<br />
TFRC_IN is set, the next 8 bytes of data can be written to the endpoint 0 IN buffer. The process continues<br />
until the requested descriptor is sent completely.<br />
NOTE<br />
Please note the module will return ACK to all valid SETUP packet. No<br />
software attention is required.<br />
Endpoint 0 buffer and endpoint 0 data size register (DSIZE) will be updated<br />
on every incoming SETUP packet. However, SETUP or TFRC_OUT will<br />
not be set unless the SETUP packet is a valid GET_DESCRIPTOR,<br />
SYNC_FRAME or class/vendor specific SETUP command.<br />
11.3.4.2 Control Endpoint 0<br />
Endpoint 0 is always treated as control endpoint. It has eight bytes dedicated buffer for device transmit<br />
(IN packet) and eight bytes dedicated buffer for device receive (OUT packet). Most of the host requests<br />
is handled by the requestor processor excepts the class/vendor specified request, GET_DESCRIPTOR<br />
request and the SYNC_FRAME request. If the user is notified by the module about the arrival of such<br />
requests, user can decode the request command by reading the endpoint 0 data register.<br />
The SETUP flag will be set if the 8-byte setup packet is received without CRC/Token/EOP error for<br />
Vendor/Class/SetDescriptor/SynchFrame commands only.<br />
NOTE<br />
For any OUT data received in the 8-byte endpoint OUT buffer, they are only<br />
valid until the start of any SETUP packet addressed to the device, even if<br />
the packet is corrupted the 8-byte OUT buffer may still be overwritten by<br />
this new SETUP packet. There is no indication of the corruption built into<br />
this module.<br />
11.3.5 Endpoint Controller<br />
The module has four independent endpoint controllers that managed the data transfer between CPU and<br />
the USB host. Each of these endpoint can be configured to either one of the two modes - bulk or interrupt.<br />
<strong>Freescale</strong> Semiconductor 151
USB 2.0 FS Module<br />
There are 64-byte RAM buffer to share between the four data endpoints. User is required to specify the<br />
buffer base address and the buffer size for each endpoint used. The buffer is separated in 8 bytes page,<br />
therefore, there are 8 pages in total. For example, if 16 bytes of buffer is required for endpoint 1 and 16<br />
bytes is required for endpoint 2, the buffer base address for endpoint 1 can be specified as %000, while<br />
the buffer base address for endpoint 2 can be specified %010 and the buffer size SIZE[1:0] register<br />
should be defined as %01 and %01 respectively.<br />
11.3.5.1 OUT endpoint <strong>Data</strong> Transfer<br />
The buffer size assigned to the endpoint is required to match with the endpoint definition specified in the<br />
endpoint descriptor. On every packet of data transfer, data loaded to the endpoint buffers are started with<br />
the buffer base address. If the data is valid, the complete packet is downloaded to the buffer RAM and<br />
ACK is sent automatically. The packet size is reported to DSIZE register and the transfer complete flag<br />
(TFRC) is set. User should wait until the data valid bit (DVALID) to be set before reading the data from<br />
the buffers. Otherwise, if CRC error encountered, the data packet is ignored and no handshake is<br />
returned.<br />
11.3.5.2 IN endpoint <strong>Data</strong> Transfer<br />
When IN packet is received by the module and DVALID bit is cleared, NAK is returned. If the IN packet<br />
is corresponding to endpoint 0, user is required to write data to the dedicate 8 bytes registers, then DSIZE<br />
should be updated before setting DVALID bit to send data via the next IN packet.<br />
If the IN packet is corresponding to other endpoint 1 to 4, user is required to write data to corresponding<br />
endpoint buffer indicated by the BASE pointer.<br />
When the packet is transmitted successfully that ACK is returned from the host, DVALID bit is returned<br />
to zero. Transfer complete flag (TFRC) is set to notify user for the next transfer.<br />
11.4 Interrupt Source<br />
There are two interrupt source reserved for the USB module.<br />
Table 11-3. Interrupt Source Table<br />
Flag Interrupt Source<br />
TFRC0_IN USB Endpoint Interrupt<br />
TFRC0_OUT USB Endpoint Interrupt<br />
TFRC1 USB Endpoint Interrupt<br />
TFRC2 USB Endpoint Interrupt<br />
TFRC3 USB Endpoint Interrupt<br />
TFRC4 USB Endpoint Interrupt<br />
SETUP USB System Interrupt<br />
SOF USB System Interrupt<br />
CONFIG_CHG USB System Interrupt<br />
USBRST USB System Interrupt<br />
RESUMEF USB System Interrupt<br />
SUSPND USB System Interrupt<br />
<strong>MC68HC908JW32</strong> <strong>Data</strong> <strong>Sheet</strong>, Rev. 6<br />
152 <strong>Freescale</strong> Semiconductor
11.5 USB Module Registers<br />
<strong>MC68HC908JW32</strong> <strong>Data</strong> <strong>Sheet</strong>, Rev. 6<br />
USB Module Registers<br />
Addr. Register Name Bit 7 6 5 4 3 2 1 Bit 0<br />
$0051<br />
$0052<br />
$0053<br />
$0054<br />
$0055<br />
$0056<br />
$0057<br />
$0058<br />
$0059<br />
$005A<br />
$005B<br />
$005C<br />
USB Control Register<br />
(USBCR)<br />
USB Status Register<br />
(USBSR)<br />
USB Status Interrupt<br />
Mask Register<br />
(USIMR)<br />
USB EPO<br />
Control/Status<br />
Register (UEP0CSR)<br />
USB EP1<br />
Control/Status<br />
Register (UEP1CSR)<br />
USB EP2<br />
Control/Status<br />
Register (UEP2CSR)<br />
USB EP3<br />
Control/Status<br />
Register (UEP3CSR)<br />
USB EP4<br />
Control/Status<br />
Register (UEP4CSR)<br />
USB EP1 <strong>Data</strong> Size<br />
Register<br />
(UEP1DSR)<br />
USB EP2 <strong>Data</strong> Size<br />
Register<br />
(UEP2DSR)<br />
USB EP3 <strong>Data</strong> Size<br />
Register<br />
(UEP3DSR)<br />
USB EP4 <strong>Data</strong> Size<br />
Register<br />
(UEP4DSR)<br />
Read:<br />
0<br />
USBEN USBCLKEN TFC4IE TFC3IE TFC2IE TFC1IE TFC0IE<br />
Write: RESUME<br />
Reset: 0 0 0 0 0 0 0 0<br />
Read: CONFIG<br />
Write:<br />
SETUP SOF<br />
CONFIG_<br />
CHG<br />
USBRST RESUMEF SUSPND<br />
Reset: 0 0 0 0 0 0 0 0<br />
Read:<br />
0<br />
R<br />
Write: EP0_STALL<br />
SETUPIE SOFIE<br />
CONFIG_<br />
CHGIE<br />
USBRE-<br />
SETIE<br />
RESUME-<br />
FIE<br />
SUSPNDIE<br />
Reset: 0 0 0 0 0 0 0 0<br />
Read: DSIZE3_<br />
OUT<br />
DSIZE2_<br />
OUT<br />
DSIZE1_<br />
OUT<br />
Write: DSIZE3_IN DSIZE2_IN DSIZE1_IN DSIZE0_IN<br />
DSIZE0_<br />
OUT DVALID_IN TFRC_IN<br />
DVALID_<br />
OUT<br />
TFRC_OUT<br />
Reset: 0 0 0 0 0 0 0 0<br />
Read: 0<br />
MODE1 MODE0<br />
Write: STALL<br />
DIR SIZE1 SIZE0 DVALID TFRC<br />
Reset: 0 0 0 0 0 0 0 0<br />
Read: 0<br />
MODE1 MODE0<br />
Write: STALL<br />
DIR SIZE1 SIZE0 DVALID TFRC<br />
Reset: 0 0 0 0 0 0 0 0<br />
Read: 0<br />
MODE1 MODE0<br />
Write: STALL<br />
DIR SIZE1 SIZE0 DVALID TFRC<br />
Reset: 0 0 0 0 0 0 0 0<br />
Read: 0<br />
MODE1 MODE0<br />
Write: STALL<br />
DIR SIZE1 SIZE0 DVALID TFRC<br />
Reset: 0 0 0 0 0 0 0 0<br />
Read:<br />
Write:<br />
DSIZE6 DSIZE5 DSIZE4 DSIZE3 DSIZE2 DSIZE1 DSIZE0<br />
Reset: 0 0 0 0 0 0 0 0<br />
Read:<br />
Write:<br />
DSIZE6 DSIZE5 DSIZE4 DSIZE3 DSIZE2 DSIZE1 DSIZE0<br />
Reset: 0 0 0 0 0 0 0 0<br />
Read:<br />
Write:<br />
DSIZE6 DSIZE5 DSIZE4 DSIZE3 DSIZE2 DSIZE1 DSIZE0<br />
Reset: 0 0 0 0 0 0 0 0<br />
Read:<br />
Write:<br />
DSIZE6 DSIZE5 DSIZE4 DSIZE3 DSIZE2 DSIZE1 DSIZE0<br />
Reset: 0 0 0 0 0 0 0 0<br />
U = Unaffected by reset R = Reserved<br />
Figure 11-2. USB Registers<br />
<strong>Freescale</strong> Semiconductor 153
USB 2.0 FS Module<br />
Addr. Register Name Bit 7 6 5 4 3 2 1 Bit 0<br />
$005D<br />
$005E<br />
$005F<br />
$0040<br />
$0041<br />
$0042<br />
$0043<br />
$0043<br />
$0044<br />
$0045<br />
$0046<br />
USB EP 1/2 Base<br />
Pointer Register<br />
(UEP12BPR)<br />
USB EP 3/4 Base<br />
Pointer Register<br />
(UEP34BPR)<br />
USB Interface Control<br />
Register<br />
(UINTFCR)<br />
USB Endpoint 0 <strong>Data</strong><br />
Register 0<br />
(UE0D0)<br />
USB Endpoint 0 <strong>Data</strong><br />
Register 1<br />
(UE0D1)<br />
USB Endpoint 0 <strong>Data</strong><br />
Register 2<br />
(UE0D2)<br />
USB Endpoint 0 <strong>Data</strong><br />
Register 3<br />
(UE0D3)<br />
USB Endpoint 0 <strong>Data</strong><br />
Register 4<br />
(UE0D4)<br />
USB Endpoint 0 <strong>Data</strong><br />
Register 5<br />
(UE0D5)<br />
USB Endpoint 0 <strong>Data</strong><br />
Register 6<br />
(UE0D6)<br />
USB Endpoint 0 <strong>Data</strong><br />
Register 7<br />
(UE0D7)<br />
Read:<br />
Write:<br />
BASE22 BASE21 BASE20 BASE12 BASE11 BASE10<br />
Reset: 0 0 0 0 0 0 0 0<br />
Read:<br />
Write:<br />
BASE42 BASE41 BASE40 BASE32 BASE31 BASE30<br />
Reset: 0 0 0 0 0 0 0 0<br />
Read:<br />
Write:<br />
EP4INT EP3INT EP2INT EP1INT<br />
Reset: 0 0 0 0 0 0 0 0<br />
Read: UE0D07_<br />
OUT<br />
UE0D06_<br />
OUT<br />
UE0D05_<br />
OUT<br />
UE0D04_<br />
OUT<br />
<strong>MC68HC908JW32</strong> <strong>Data</strong> <strong>Sheet</strong>, Rev. 6<br />
UE0D03_<br />
OUT<br />
UE0D02_<br />
OUT<br />
UE0D01_<br />
OUT<br />
UE0D00_<br />
OUT<br />
Write: UE0D07_IN UE0D06_IN UE0D05_IN UE0D04_IN UE0D03_IN UE0D02_IN UE0D01_IN UE0D00_IN<br />
Reset: Unaffected by reset<br />
Read: UE0D17_<br />
OUT<br />
UE0D16_<br />
OUT<br />
UE0D15_<br />
OUT<br />
UE0D14_<br />
OUT<br />
UE0D13_<br />
OUT<br />
UE0D12_<br />
OUT<br />
UE0D11_<br />
OUT<br />
UE0D10_<br />
OUT<br />
Write: UE0D17_IN UE0D16_IN UE0D15_IN UE0D14_IN UE0D13_IN UE0D12_IN UE0D11_IN UE0D10_IN<br />
Reset: Unaffected by reset<br />
Read: UE0D27_<br />
OUT<br />
UE0D26_<br />
OUT<br />
UE0D25_<br />
OUT<br />
UE0D24_<br />
OUT<br />
UE0D23_<br />
OUT<br />
UE0D22_<br />
OUT<br />
UE0D21_<br />
OUT<br />
UE0D20_<br />
OUT<br />
Write: UE0D27_IN UE0D26_IN UE0D25_IN UE0D24_IN UE0D23_IN UE0D22_IN UE0D21_IN UE0D20_IN<br />
Reset: Unaffected by reset<br />
Read: UE0D37_<br />
OUT<br />
UE0D36_<br />
OUT<br />
UE0D35_<br />
OUT<br />
UE0D34_<br />
OUT<br />
UE0D33_<br />
OUT<br />
UE0D32_<br />
OUT<br />
UE0D31_<br />
OUT<br />
UE0D30_<br />
OUT<br />
Write: UE0D37_IN UE0D36_IN UE0D35_IN UE0D34_IN UE0D33_IN UE0D32_IN UE0D31_IN UE0D30_IN<br />
Reset: Unaffected by reset<br />
Read: UE0D47_<br />
OUT<br />
UE0D46_<br />
OUT<br />
UE0D45_<br />
OUT<br />
UE0D44_<br />
OUT<br />
UE0D43_<br />
OUT<br />
UE0D42_<br />
OUT<br />
UE0D41_<br />
OUT<br />
UE0D40_<br />
OUT<br />
Write: UE0D47_IN UE0D46_IN UE0D45_IN UE0D44_IN UE0D43_IN UE0D42_IN UE0D41_IN UE0D40_IN<br />
Reset: Unaffected by reset<br />
Read: UE0D57_<br />
OUT<br />
UE0D56_<br />
OUT<br />
UE0D55_<br />
OUT<br />
UE0D54_<br />
OUT<br />
UE0D53_<br />
OUT<br />
UE0D52_<br />
OUT<br />
UE0D51_<br />
OUT<br />
UE0D50_<br />
OUT<br />
Write: UE0D57_IN UE0D56_IN UE0D55_IN UE0D54_IN UE0D53_IN UE0D52_IN UE0D51_IN UE0D50_IN<br />
Reset: Unaffected by reset<br />
Read: UE0D67_<br />
OUT<br />
UE0D66_<br />
OUT<br />
UE0D65_<br />
OUT<br />
UE0D64_<br />
OUT<br />
UE0D63_<br />
OUT<br />
UE0D62_<br />
OUT<br />
UE0D61_<br />
OUT<br />
UE0D60_<br />
OUT<br />
Write: UE0D67_IN UE0D66_IN UE0D65_IN UE0D64_IN UE0D63_IN UE0D62_IN UE0D61_IN UE0D60_IN<br />
Reset: Unaffected by reset<br />
Read: UE0D77_<br />
OUT<br />
UE0D76_<br />
OUT<br />
UE0D75_<br />
OUT<br />
UE0D74_<br />
OUT<br />
UE0D73_<br />
OUT<br />
UE0D72_<br />
OUT<br />
UE0D71_<br />
OUT<br />
UE0D70_<br />
OUT<br />
Write: UE0D77_IN UE0D76_IN UE0D75_IN UE0D74_IN UE0D73_IN UE0D72_IN UE0D71_IN UE0D70_IN<br />
Reset: Unaffected by reset<br />
U = Unaffected by reset R = Reserved<br />
Figure 11-2. USB Registers (Continued)<br />
154 <strong>Freescale</strong> Semiconductor
11.5.1 USB Control Register (USBCR)<br />
Address: $0051<br />
Bit 7 6 5 4 3 2 1 Bit 0<br />
Read:<br />
Write:<br />
USBEN<br />
USBCLK-<br />
EN<br />
TC4IE TC3IE TC2IE TFC1IE TC0IE<br />
0<br />
RESUME<br />
Reset: 0 0 0 0 0 0 0 0<br />
Figure 11-3. USB Control Register<br />
<strong>MC68HC908JW32</strong> <strong>Data</strong> <strong>Sheet</strong>, Rev. 6<br />
USB Module Registers<br />
USBEN — USB Module Enable<br />
This read/write bit enables the USB module. Setting this bit updates the endpoint configuration<br />
according to the definition defined in UEPxCSR, UINTFCR, UEP12BPR and UEP34BPR registers.<br />
User must ensure the 48MHz clock source is ready before the module is enabled. When the USBEN<br />
bit is returned to zero, the module is reset and the device is returned to power state. User is<br />
recommended to reset all the status flags by software before enabling USBEN again. Reset clears this<br />
bit.<br />
1 = USB module enabled<br />
0 = USB module disabled<br />
USBCLKEN — USB Clock Enable<br />
This read/write bit enables the 48MHz clock source to the USB module. User must ensure this bit is<br />
set before setting USBEN bit. In USB suspend mode it is recommended to clear this bit for power<br />
saving. Reset clears this bit.<br />
1 = USB clock enabled<br />
0 = USB clock disabled<br />
TCxIE — Transfer complete interrupt enable for endpoint x<br />
The read/write bit enables CPU interrupt when transfer complete flag (TFRC) of corresponding<br />
endpoint is set. TC0IE is controlling both TFRC0_IN and TFRC0_OUT at the same time. Reset clears<br />
this bit.<br />
1 = Transfer complete interrupt enabled<br />
0 = Transfer complete interrupt disabled<br />
RESUME — Force RESUME condition<br />
This write-only bit forces a resume state (K or non-idle state) onto the USB bus data lines to initiate a<br />
remote wakeup. This bit generates RESUME only if the device is in SUSPEND mode and the remote<br />
wake up feature is enabled by the SET_FEATURE command. The USB control logic ensures the<br />
forced resume duration is greater than 3ms. Reading this bit always returns zero. Writing zero to the<br />
bit has no effect.<br />
1 = Generates forced RESUME condition on the USB data lines<br />
0 = Default value<br />
<strong>Freescale</strong> Semiconductor 155
USB 2.0 FS Module<br />
11.5.2 USB Status Register (USBSR)<br />
Address: $0052<br />
Bit 7 6 5 4 3 2 1 Bit 0<br />
Read:<br />
Write:<br />
CONFIG<br />
SETUP SOF<br />
CONFIG_<br />
CHG<br />
USBRST RESUMEF SUSPND<br />
Reset: 0 0 0 0 0 0 0 0<br />
= Unimplemented<br />
Figure 11-4. USB Status Register<br />
CONFIG — Configuration Number<br />
This read-only bit specify the configuration number returned from the USB host. The module only<br />
supports a single configuration setting.<br />
1 = Device configure to configuration number 1<br />
0 = Device is unconfigured<br />
SETUP — SETUP Request Received<br />
This read/write bit indicates a valid GET_DESCRIPTOR command, SYNC_FRAME command or<br />
class/vendor specific request is detected. This bit only set when the packet is received without<br />
CRC/Token/EOP error. When this is set, user must read and decode the request from the endpoint 0<br />
data registers (UE0D7-0). Writing zero to clear the bit. Writing one to the bit has no effect. Reset clears<br />
this bit.<br />
1 = GET_DESCRIPTOR, SYNC_FRAME or Class/vendor specific requests received<br />
0 = No vendor specific request received<br />
SOF — Start of Frame Detection Flag<br />
This read/write bit indicates a start-of-frame signal is detected from the USB data line. Writing zero to<br />
clear the bit. Writing one to the bit has no effect. Reset clears this bit.<br />
1 = Start-of-frame is detected<br />
0 = No start-of-frame is detected<br />
CONFIG_CHG — Change of Configuration Detection Flag<br />
This read/write bit indicates a change of device configuration request is received from the host. This<br />
bit will be set when new configuration is requested and accepted by the host. Writing zero to clear the<br />
bit. Writing one to the bit has no effect. Reset clears this bit.<br />
1 = A change of configuration request is received<br />
0 = No change of configuration request is received<br />
USBRST — USB Reset Detection Flag<br />
This read/write bit is set when a valid reset signal state is detected on the D+ and D- lines. If URSTD<br />
bit of the configuration register (CONFIG) is clear, this reset detection flag will generate a MCU internal<br />
reset signal to reset the CPU and its peripheral. Otherwise, if URSTD is set, a interrupt request will be<br />
generated instead. Writing zero to clear the bit. Writing one to the bit has no effect. Reset clears this bit.<br />
1 = USB reset signal is detected<br />
0 = No USB reset signal is detected<br />
RESUMEF — RESUME Detection Flag<br />
This read/write bit is set when bus activity is detected while the device is in SUSPEND mode. Writing<br />
zero to clear the bit. Writing one to the bit has no effect. Reset clears this bit.<br />
1 = USB bus activity is detected while the device is in SUSPEND mode<br />
0 = No USB bus activity is detected<br />
<strong>MC68HC908JW32</strong> <strong>Data</strong> <strong>Sheet</strong>, Rev. 6<br />
156 <strong>Freescale</strong> Semiconductor
<strong>MC68HC908JW32</strong> <strong>Data</strong> <strong>Sheet</strong>, Rev. 6<br />
USB Module Registers<br />
SUSPND — SUSPEND Detection Flag<br />
This read/write bit is set when the module detects a suspend state on the USB bus or the bus is idle<br />
for 3ms. The module will enter suspend mode when this bit is set. In order to reduce the power<br />
consumption, user is recommended to stop the USB module clock by clearing the USBCLKEN bit in<br />
USBCR register before putting the MCU in STOP mode. Writing zero to clear the bit. Writing one to<br />
the bit has no effect. Reset clears this bit.<br />
1 = SUSPEND state is detected<br />
0 = No suspend state is detected<br />
11.5.3 USB Status Interrupt Mask Register (USIMR)<br />
Address: $0053<br />
Bit 7 6 5 4 3 2 1 Bit 0<br />
Read:<br />
Write:<br />
R<br />
0<br />
EP0_STALL<br />
SETUPIE SOFIE<br />
CONFIG_<br />
CHGIE<br />
USBRE-<br />
SETIE<br />
RESUME-<br />
FIE<br />
SUSP-<br />
NDIE<br />
Reset: 0 0 0 0 0 0 0 0<br />
R = Reserved<br />
Figure 11-5. USB Status Interrupt Mask Register<br />
EP0_STALL — Forced EP0 STALL Handshake Enable<br />
This write only bit is used to provide protocol STALL to the control endpoint. Writing one to the bit<br />
causes endpoint 0 to return STALL in response to any IN or OUT token issue by the USB host until<br />
the next SETUP transaction. The bit can only be erased by module hardware, writing zero to the bit<br />
has no effect. Reset also clears this bit.<br />
1 = Send STALL handshake<br />
0 = Do not response STALL handshaking<br />
SETUPIE — SETUP Request Interrupt Mask<br />
This read/write bit enables a CPU interrupt request when GET_DESCRIPTOR, SYNC_FRAME or<br />
class/vendor specific request is received or SETUP flag of USB status register (USBSR) is set. Reset<br />
clears this bit.<br />
1 = CPU interrupt is enabled when SETUP flag in USBSR is set<br />
0 = CPU interrupt is disabled when SETUP flag in USBSR is set<br />
SOFIE — Start-of-frame Interrupt Mask<br />
This read/write bit enables a CPU interrupt request when a start-of-frame signal is detected on the<br />
USB bus or SOF flag of USB status register (USBSR) is set. Reset clears this bit.<br />
1 = SOF interrupt is enabled<br />
0 = SOF interrupt is disabled<br />
CONFIG_CHGIE — Configuration Change Interrupt Mask<br />
This read/write bit enables a CPU interrupt request when a configuration change from zero to one is<br />
detected or CONFIG_CHG flag of USB status register (USBSR) is set. Reset clears this bit.<br />
1 = CPU interrupt is enabled when CONFIG_CHG flag in USBSR is set<br />
0 = CPU interrupt is disabled when CONFIG_CHG flag in USBSR is set<br />
<strong>Freescale</strong> Semiconductor 157
USB 2.0 FS Module<br />
USBRSTIE — USB RESET Interrupt Mask<br />
This read/write bit enables a CPU interrupt request when USBRST flag of USB status register<br />
(USBSR) and URSTD bit of configuration register (CONFIG) is set. Reset clears this bit.<br />
1 = CPU interrupt request is enabled when USB reset signal is detected<br />
0 = CPU interrupt request is disabled when USB reset signal is detected<br />
RESUMEFIE — Resume Interrupt Mask<br />
This read/write bit enables a CPU interrupt request when the USB bus activity is resumed or<br />
RESUMEF of USB status register (USBSR) is set. Reset clears this bit.<br />
1 = CPU interrupt request is enabled when USB bus activity is resumed<br />
0 = CPU interrupt request is disabled when USB bus activity is resumed<br />
SUSPNDIE — Suspend Mode Interrupt Mask<br />
This read/write bit enables a CPU interrupt request when the module entered suspend mode or<br />
SUSPND flag of USB status register (USBSR) is set. Reset clears this bit.<br />
1 = CPU interrupt request is enabled when the module enters suspend mode<br />
0 = CPU interrupt request is disabled when the module enters suspend mode<br />
11.5.4 USB Endpoint 0 Control/Status Register (UEP0CSR)<br />
Address: $0054<br />
Bit 7 6 5 4 3 2 1 Bit 0<br />
Read: DSIZE3_OUT DSIZE2_OUT DSIZE1_OUT DSIZE0_OUT DVALID_IN TFRC_IN DVALID_OUT TFRC_OUT<br />
Write: DSIZE3_IN DSIZE2_IN DSIZE1_IN DSIZE0_IN<br />
Reset: 0 0 0 0 0 0 0 0<br />
Figure 11-6. USB Endpoint 0 Control/Status Register<br />
DSIZE[3:0]_OUT — Endpoint 0 <strong>Data</strong> Size for OUT packet<br />
These bits specify the packet size received for the previous valid OUT packet. The bits are read only.<br />
DSIZE[3:0]_IN — Endpoint 0 <strong>Data</strong> Size for IN packet<br />
These bits indicates the packet size to be transmitted in response to the next IN packet. The bits are<br />
write only.<br />
DVALID_IN — <strong>Data</strong> valid enable bit for IN packet<br />
This read/write bit indicates the data in the endpoint buffer is valid and ready to send. Setting this bit<br />
triggers the data transmission. The bit will be cleared automatically by hardware when a successful IN<br />
packet transaction occurred or a valid SETUP packet is received. The bit can also be cleared by writing<br />
zero. When the bit is zero, all IN packets to endpoint zero will be responded by NAK. Reset also clears<br />
this bit.<br />
1 = <strong>Data</strong> in the EP0 buffer is valid and ready to transmit<br />
0 = <strong>Data</strong> in the EP0 buffer is not valid<br />
TFRC_IN — Transfer Complete Flag for IN packet<br />
This read/write bit indicates the data in the EP0 buffer is completely transferred to the host. When the<br />
bit is set, all successive IN packet is responded by NAK. Writing zero to clear this bit. Writing one to<br />
the bit has no effect.<br />
1 = Endpoint data transfer completed<br />
0 = Default status<br />
<strong>MC68HC908JW32</strong> <strong>Data</strong> <strong>Sheet</strong>, Rev. 6<br />
158 <strong>Freescale</strong> Semiconductor
<strong>MC68HC908JW32</strong> <strong>Data</strong> <strong>Sheet</strong>, Rev. 6<br />
USB Module Registers<br />
DVALID_OUT — <strong>Data</strong> valid enable bit for OUT packet<br />
This bit indicates valid data is stored in the endpoint buffer, CPU attention is required. User must clear<br />
this bit in order to receive the next OUT packet by writing zero to the bit, otherwise all successive OUT<br />
packet is NAK by the module. Writing one to the bit has no effect. Reset clears this bit.<br />
1 = <strong>Data</strong> in the EP0 buffer is valid<br />
0 = <strong>Data</strong> in the EP0 buffer is not valid<br />
TFRC_OUT — Transfer Complete Flag for OUT packet<br />
This read/write bit indicates the a valid OUT or SETUP packet is completely transferred to the EP0<br />
data buffer. When the bit is set, all successive OUT packet will be responded by NAK. Writing zero to<br />
clear this bit. Writing one to the bit has no effect.<br />
1 = Endpoint data transfer completed<br />
0 = Default status<br />
11.5.5 USB Endpoint 1–4 Control Status Register (UEP1CSR–UEP4CSR)<br />
Address: $0055 to $0058<br />
Bit 7 6 5 4 3 2 1 Bit 0<br />
Read:<br />
Write:<br />
MODE1 MODE0<br />
0<br />
STALL<br />
DIR SIZE1 SIZE0 DVALID TFRC<br />
Reset: 0 0 0 0 0 0 0 0<br />
Figure 11-7. USB Endpoint 1–4 Control Status Register<br />
TFRC — Transfer Complete Flag<br />
This read/write bit indicates the data transfer associated with the endpoint is completed. When the bit<br />
is set, all successive IN/OUT packet will be responded by NAK. Writing zero to clear this bit. Writing<br />
one to the bit has no effect.<br />
1 = Endpoint data transfer completed<br />
0 = Default status<br />
DVALID — <strong>Data</strong> valid bit<br />
When the endpoint is configured as IN endpoint, this bit indicates the data in the endpoint buffer is valid<br />
and ready to be sent. Setting this bit arms the data transmission otherwise all IN packets are returned<br />
by NAK. The bit will be cleared automatically by hardware when a successful IN packet transaction<br />
occurred.<br />
When the endpoint is configured as OUT endpoint, this bit indicates valid received data is stored in the<br />
endpoint buffer, CPU attention is required. User must clear this bit in order to receive the next OUT<br />
packet, otherwise all successive OUT packet is responded NAK by the module. Reset clears this bit.<br />
1 = <strong>Data</strong> in the endpoint buffer is valid<br />
0 = <strong>Data</strong> in the endpoint buffer is not valid<br />
<strong>Freescale</strong> Semiconductor 159
USB 2.0 FS Module<br />
SIZE[1:0] — Buffer size Selection bits<br />
This read/write bits select the buffer size for the corresponding endpoint. When USBEN is set, these<br />
bits has no effect.<br />
Table 11-4. Buffer Size Selection Table<br />
SIZE[1:0] Buffer Size<br />
00 8 Bytes<br />
01 16 Bytes<br />
10 32 Bytes<br />
11 64 Bytes<br />
TFRCIE — Transfer Complete Interrupt Enable<br />
This read/write bit enables the CPU interrupt associated with the TFRC flag.<br />
1 = TFRC flag interrupt is enabled<br />
0 = TFRC flag interrupt is disabled<br />
DIR — Endpoint Direction Bit<br />
Setting this bit enables the endpoint to become IN endpoint. Clearing this bit enables the endpoint to<br />
become OUT endpoint. Writing to this bit will have no effect when USBEN is set.<br />
1 = IN endpoint is enabled<br />
0 = OUT endpoint is enabled<br />
STALL — Forced STALL Handshake Enable<br />
This read/write bit causes endpoint 0 to return a STALL handshake when polled by either an IN or OUT<br />
token by the USB host. If the bit is set by software, when a data packet addressed to that endpoint is<br />
detected, this STALL status will be latched to the module, the bit is cleared automatically and the<br />
packet will be responded by STALL. Once the STALL status is latched, it can only be cleared by<br />
CLEAR_FEATURE command from the host. Software cannot clear this status. If there is no packet<br />
addressed to the endpoint after the bit is set, it can still be cleared by writing zero. Reset clears this bit.<br />
1 = Send STALL handshake<br />
0 = Do not response STALL handshaking<br />
NOTE<br />
When USB RESET is detected, explicitly writing zero to the STALL bit is<br />
recommended to ensure all unlatched STALL status is cleared.<br />
MODE[1:0] — Endpoint Type selection<br />
This bit selects the type of the endpoint. When USBEN is set, this bit has no effect.<br />
Table 11-5. Mode selection for Endpoint type<br />
MODE[1:0] Endpoint Type<br />
00 Endpoint Disable<br />
01 —<br />
10 Bulk<br />
11 Interrupt<br />
<strong>MC68HC908JW32</strong> <strong>Data</strong> <strong>Sheet</strong>, Rev. 6<br />
160 <strong>Freescale</strong> Semiconductor
11.5.6 USB Endpoint 1–4 <strong>Data</strong> Size Register (UEP1DSR–UEP4DSR)<br />
Address: $0059 to $005C<br />
Bit 7 6 5 4 3 2 1 Bit 0<br />
Read:<br />
Write:<br />
DSIZE6 DSIZE5 DSIZE4 DSIZE3 DSIZE2 DSIZE1 DSIZE0<br />
Reset: 0 0 0 0 0 0 0 0<br />
= Unimplemented<br />
Figure 11-8. USB Endpoint 1–4 <strong>Data</strong> Size Register<br />
<strong>MC68HC908JW32</strong> <strong>Data</strong> <strong>Sheet</strong>, Rev. 6<br />
USB Module Registers<br />
DSIZE[6:0] — Packet <strong>Data</strong> Size<br />
When the corresponding endpoint is configured as IN endpoint, these bits indicates the packet size to<br />
be transmitted. When the corresponding endpoint is configured as OUT endpoint, these bits indicates<br />
the packet size received.<br />
11.5.7 USB Endpoint 1/2 and 3/4 Base Pointer Register (UEP12BPR–UEP34BPR)<br />
Address: $005D to $005E<br />
Bit 7 6 5 4 3 2 1 Bit 0<br />
Read:<br />
Write:<br />
BASE22 BASE21 BASE20 BASE12 BASE11 BASE10<br />
Reset: 0 0 0 0 0 0 0 0<br />
Read:<br />
Write:<br />
BASE42 BASE41 BASE40 BASE32 BASE31 BASE30<br />
Reset: 0 0 0 0 0 0 0 0<br />
= Unimplemented<br />
Figure 11-9. USB Endpoint 1-4 <strong>Data</strong> Pointer Register<br />
BASEx[2:0] — Base Location Pointer<br />
There are total 64 bytes of dedicated RAM space assigned to the module, the addressable space is from<br />
address $1000 to $103F. User must allocated appropriate buffer area to the endpoint which matches with<br />
the packet size reported to the host. This register indicates the base address pointer for the endpoint<br />
buffer area. The pointer location must align to the 8 bytes boundary. BASEx[2:0] specifies only the 3<br />
address bits A5-A3. When USBEN is set, these bit have no effect.<br />
Table 11-6. BASEx[2:0] Address Definition<br />
%0001 0000 0 0 BASEx[2:0] 0 0 0<br />
A15–A8 A7 A6 A5 A4 A3 A2 A1 A0<br />
<strong>Freescale</strong> Semiconductor 161
USB 2.0 FS Module<br />
11.5.8 USB Interface Control Register (UINTFCR)<br />
Address: $005F<br />
Bit 7 6 5 4 3 2 1 Bit 0<br />
Read:<br />
Write:<br />
EP4INT EP3INT EP2INT EP1INT<br />
Reset: 0 0<br />
= Unimplemented<br />
0 0 0 0 0 0<br />
Figure 11-10. USB Interface Control Register<br />
EP1INT — Endpoint 1 Interface number<br />
This bit specifies the interface number for physical endpoint 1. The interface number is loaded to the<br />
USB module at the time when the USB module is enabled. When USBEN is set, this bit has no effect.<br />
Reset clears this bit.<br />
1 = The interface number for endpoint 1 is one<br />
0 = The interface number for endpoint 1 is zero<br />
EP2INT — Endpoint 2 Interface number<br />
This bit specifies the interface number for physical endpoint 2. The interface number is loaded to the<br />
USB module at the time when the USB module is enabled. When USBEN is set, this bit has no effect.<br />
Reset clears this bit.<br />
1 = The interface number for endpoint 2 is one<br />
0 = The interface number for endpoint 2 is zero<br />
EP3INT — Endpoint 3 Interface number<br />
This bit specifies the interface number for physical endpoint 3. The interface number is loaded to the<br />
USB module at the time when the USB module is enabled. When USBEN is set, this bit has no effect.<br />
Reset clears this bit.<br />
1 = The interface number for endpoint 3 is one7<br />
0 = The interface number for endpoint 3 is zero<br />
EP4INT — Endpoint 4 Interface number<br />
This bit specifies the interface number for physical endpoint 4. The interface number is loaded to the<br />
USB module at the time when the USB module is enabled. When USBEN is set, this bit has no effect.<br />
Reset clears this bit.<br />
1 = The interface number for endpoint 4 is one<br />
0 = The interface number for endpoint 4 is zero<br />
11.5.9 USB Endpoint 0 <strong>Data</strong> Register 7–0 (UE0D7–UE0D0)<br />
Address: $0040 to $0047<br />
Read: UE0Dx7_<br />
OUT<br />
Write: UE0Dx7_<br />
IN<br />
UE0Dx6_<br />
OUT<br />
UE0Dx6_<br />
IN<br />
UE0Dx5_<br />
OUT<br />
UE0Dx5_<br />
IN<br />
UE0Dx4_<br />
OUT<br />
UE0Dx4_<br />
IN<br />
UE0Dx3_<br />
OUT<br />
UE0Dx3_<br />
IN<br />
Reset: Unaffected by reset<br />
These are the IN/OUT data buffer endpoint 0. The OUT buffer can be accessed by reading to the<br />
registers. The IN buffer can be accessed by writing to the registers.<br />
<strong>MC68HC908JW32</strong> <strong>Data</strong> <strong>Sheet</strong>, Rev. 6<br />
UE0Dx2_<br />
OUT<br />
UE0Dx2_<br />
IN<br />
Figure 11-11. USB Endpoint 0 <strong>Data</strong> Register 7–0<br />
UE0Dx1_<br />
OUT<br />
UE0Dx1_<br />
IN<br />
UE0D0x_<br />
OUT<br />
UE0Dx0_<br />
IN<br />
162 <strong>Freescale</strong> Semiconductor
Chapter 12<br />
PS2 Clock Generator (PS2CLK)<br />
12.1 Introduction<br />
This module provides the capability to generate PS2 clock.<br />
12.2 Functional Description<br />
Figure 12-1 shows the block diagram for the PS2 clock generator. The module is enabled by setting<br />
PS2EN bit. When the module is enabled, the output port becomes an open-drain output. A two phase<br />
clock is created by the prescaler block, one is driving the clock generator unit and the other is driving the<br />
interrupt generator. The clock generator drives the output port directly if CLKEN bit is set, while the<br />
interrupt generator enables CPU interrupt at the different clock phase. The CPU interrupt can be masked<br />
by clearing the PS2IEN bit. The waveform diagram is shown in Figure 12-2.<br />
When the module is enabled, the output port status is continuous monitored and stored in PSTATUS flag.<br />
PTE2/PS2CLK/D+<br />
PSTATUS<br />
CLOCK<br />
GENERATOR<br />
PS2EN<br />
PRE<br />
CLKEN<br />
CSEL[1:0]<br />
PS2IEN<br />
Figure 12-1. PS2 Clock Generator Block Diagram<br />
<strong>MC68HC908JW32</strong> <strong>Data</strong> <strong>Sheet</strong>, Rev. 6<br />
INTERRUPT<br />
GENERATOR<br />
PRESCALER Bus Clock<br />
CPU<br />
Interrupt<br />
<strong>Freescale</strong> Semiconductor 163<br />
PS2IF
PS2 Clock Generator (PS2CLK)<br />
CLK<br />
Output<br />
Interrupt<br />
Generator<br />
CLKEN = 1 CLKEN = 0<br />
CPU<br />
Interrupt<br />
Trigger<br />
Figure 12-2. Clock Generator Output Waveform.<br />
12.3 PS2 Clock Generator Control and Status Registers<br />
Address: $0019<br />
Bit 7 6 5 4 3 2 1 Bit 0<br />
Read:<br />
Write:<br />
PSTATUS<br />
PS2IF PRE CSEL1 CSEL0 PS2IEN CLKEN PS2EN<br />
Reset: 0 0 0 0 0 0 0 0<br />
= Unimplemented R = Reserved<br />
Figure 12-3. PS2 Clock Generator Control and Status Registers (PS2CSR)<br />
PSTATUS — Port Status Flag<br />
This read only bit reflects the port status when the module is enabled. Reset clears this bit.<br />
1 = Port status is logic high<br />
0 = Port status is logic low<br />
PS2IF — PS2 Interrupt Flag.<br />
This flag is set when PS2 interrupt is trigger by the interrupt generator. Writing one to this bit clears the<br />
flag. Reset clears this flag.<br />
1 = CPU interrupt is pending<br />
0 = CPU interrupt is not pending<br />
<strong>MC68HC908JW32</strong> <strong>Data</strong> <strong>Sheet</strong>, Rev. 6<br />
164 <strong>Freescale</strong> Semiconductor
<strong>MC68HC908JW32</strong> <strong>Data</strong> <strong>Sheet</strong>, Rev. 6<br />
PS2 Clock Generator Control and Status Registers<br />
PRE — Prescaler Selection<br />
These bits select prescaler divider ratio. Reset clears this bit.<br />
1 = Divide by 480 is selected<br />
0 = Divide by 160 is selected<br />
CSEL[1:0] — Clock Frequency Selection bits.<br />
These bits selects the clock divider ratio to cater for different clock source frequency. Reset clears<br />
these bits.<br />
BUS<br />
Frequency<br />
Table 12-1. CSEL[1:0] Divider Ratio<br />
CSEL[1:0] Divider Ratio<br />
00 1<br />
01 2<br />
10 4<br />
11 Not used<br />
Table 12-2. Clock Selection Summary<br />
PRE<br />
(Divider Raito)<br />
CSEL[1:0]<br />
(Divider Ratio)<br />
Port Output<br />
Frequency<br />
8-MHz 160 4 12.5 kHz<br />
6-MHz 480 1 12.5 kHz<br />
4-MHz 160 2 12.5 kHz<br />
NOTE<br />
Glitches may occur when CSEL[1:0] and PRE value can be altered while<br />
PS2EN is set.<br />
PS2IEN — PS2 Interrupt Mask<br />
This read/write bit enables the periodic PS2 interrupt. Reset clears this bit.<br />
1 = PS2 interrupt is enabled<br />
0 = PS2 interrupt is disabled<br />
CLKEN — Clock Output Enable bit<br />
This read/write bit enables the open drain clock output. Reset clears this bit.<br />
1 = Open drain clock output is enabled<br />
0 = Open drain clock output is disabled<br />
PS2EN — PS2 Clock Generator Module Enable<br />
This read/write bit enables the module clock source. Reset clears this bit.<br />
1 = Module enabled<br />
0 = Module disabled<br />
<strong>Freescale</strong> Semiconductor 165
PS2 Clock Generator (PS2CLK)<br />
<strong>MC68HC908JW32</strong> <strong>Data</strong> <strong>Sheet</strong>, Rev. 6<br />
166 <strong>Freescale</strong> Semiconductor
Chapter 13<br />
Input/Output (I/O) Ports<br />
13.1 Introduction<br />
Twenty-nine (34) bidirectional input-output (I/O) pins form five parallel ports. All I/O pins are<br />
programmable as inputs or outputs.<br />
Input pins and I/O port pins that are not used in the application must be terminated. This prevents excess<br />
current caused by floating inputs, and enhances immunity during noise or transient events. Termination<br />
methods include:<br />
1. Configuring unused pins as outputs and driving high or low;<br />
2. Configuring unused pins as inputs and enabling internal pull-ups;<br />
3. Configuring unused pins as inputs and using external pull-up or pull-down resistors.<br />
Never connect unused pins directly to V DD or V SS .<br />
Since some general-purpose I/O pins are not available on all packages, these pins must be terminated<br />
as well. Either method 1 or 2 above are appropriate.<br />
Addr. Register Name Bit 7 6 5 4 3 2 1 Bit 0<br />
$0000<br />
Port A <strong>Data</strong> Register<br />
(PTA)<br />
Read:<br />
Write:<br />
PTA7 PTA6 PTA5 PTA4 PTA3 PTA2 PTA1 PTA0<br />
Reset: Unaffected by reset<br />
$0001<br />
Port B <strong>Data</strong> Register<br />
(PTB)<br />
Read:<br />
Write:<br />
PTB7 PTB6 PTB5 PTB4 PTB3 PTB2 PTB1 PTB0<br />
Reset: Unaffected by reset<br />
$0002<br />
Port C <strong>Data</strong> Register<br />
(PTC)<br />
Read:<br />
Write:<br />
PTC3 PTC2 PTC1 PTC0<br />
Reset: Unaffected by reset<br />
$0003<br />
Port D <strong>Data</strong> Register<br />
(PTD)<br />
Read:<br />
Write:<br />
PTD7 PTD6 PTD5 PTD4 PTD3 PTD2 PTD1 PTD0<br />
Reset: Unaffected by reset<br />
$0008<br />
Port E <strong>Data</strong> Register<br />
(PTE)<br />
Read:<br />
Write:<br />
PTE7 PTE6 PTE5 PTE4 PTE3 PTE2<br />
Reset: Unaffected by reset<br />
$0004<br />
<strong>Data</strong> Direction Register A<br />
(DDRA)<br />
Read:<br />
Write:<br />
DDRA7 DDRA6 DDRA5 DDRA4 DDRA3 DDRA2 DDRA1 DDRA0<br />
Reset: 0 0 0 0 0 0 0 0<br />
= Unimplemented<br />
Figure 13-1. I/O Port Register Summary<br />
<strong>MC68HC908JW32</strong> <strong>Data</strong> <strong>Sheet</strong>, Rev. 6<br />
<strong>Freescale</strong> Semiconductor 167
Input/Output (I/O) Ports<br />
Addr. Register Name Bit 7 6 5 4 3 2 1 Bit 0<br />
$0005<br />
$0006<br />
$0007<br />
$0009<br />
$001A<br />
<strong>Data</strong> Direction Register B<br />
(DDRB)<br />
<strong>Data</strong> Direction Register C<br />
(DDRC)<br />
<strong>Data</strong> Direction Register D<br />
(DDRD)<br />
<strong>Data</strong> Direction Register E<br />
(DDRE)<br />
Port Option Control<br />
Register 1<br />
(POCR1)<br />
Read:<br />
Write:<br />
DDRB7 DDRB6 DDRB5 DDRB4 DDRB3 DDRB2 DDRB1 DDRB0<br />
Reset: 0 0 0 0 0 0 0 0<br />
Read:<br />
Write:<br />
<strong>MC68HC908JW32</strong> <strong>Data</strong> <strong>Sheet</strong>, Rev. 6<br />
DDRC3 DDRC2 DDRC1 DDRC0<br />
Reset: 0 0 0 0 0 0 0 0<br />
Read:<br />
Write:<br />
DDRD7 DDRD6 DDRD5 DDRD4 DDRD3 DDRD2 DDRD1 DDRD0<br />
Reset: 0 0 0 0 0 0 0 0<br />
Read:<br />
Write:<br />
DDRE7 DDRE6 DDRE5 DDRE4 DDRE3 DDRE2<br />
Reset: 0 0 0 0 0 0 0 0<br />
Read:<br />
Write:<br />
LEDB7 LEDB6 LEDB5 LEDB4 LEDB3 LEDB2 LEDB1 LEDB0<br />
Reset: 0 0 0 0 0 0 0 0<br />
$001B<br />
Port Option Control<br />
Register 2<br />
Read:<br />
Write:<br />
0 0<br />
PTD7PD PTD3PD PTD2PD DPPULLEN PTE3P PTE2P<br />
(POCR2)<br />
Reset: 0 0 0 0 0 0 0 0<br />
$003E<br />
Pullup Control Register<br />
(PULLCR)<br />
Port Bit DDR<br />
A<br />
0 DDRA0<br />
Read: PULL7EN PULL6EN PULL5EN PULL4EN PULL3EN PULL2EN PULL1EN PULL0EN<br />
Write:<br />
Reset: 0 0 0 0 0 0 0 0<br />
= Unimplemented<br />
Figure 13-1. I/O Port Register Summary (Continued)<br />
Table 13-1. Port Control Register Bits Summary<br />
Module Control<br />
Module Register Control Bit<br />
3 DDRA3 KBIE3 PTA3/KBA3<br />
KBI KBIER ($17)<br />
4 DDRA4 KBIE4 PTA4/KBA4<br />
168 <strong>Freescale</strong> Semiconductor<br />
Pin<br />
KBIE0 PTA0/KBA0<br />
1 DDRA1 KBIE1 PTA1/KBA1<br />
2 DDRA2 KBIE2 PTA2/KBA2<br />
5 DDRA5 KBIE5 PTA5/KBA5<br />
6 DDRA6 KBIE6 PTA6/KBA6<br />
7 DDRA7 KBIE7 PTA7/KBA7
Port Bit DDR<br />
B<br />
C<br />
D<br />
Table 13-1. Port Control Register Bits Summary (Continued)<br />
0 DDRB0<br />
1 DDRB1<br />
2 DDRB2<br />
3 DDRB3<br />
4 DDRB4<br />
5 DDRB5<br />
6 DDRB6<br />
7 DDRB7<br />
0 DDRC0<br />
LED POCR1 ($1A) LEDB0<br />
PULLUP PULLCR ($3E) PULL0EN<br />
LED POCR1 ($1A) LEDB1<br />
PULLUP PULLCR ($3E) PULL1EN<br />
LED POCR1 ($1A) LEDB2<br />
PULLUP PULLCR ($3E) PULL2EN<br />
LED POCR1 ($1A) LEDB3<br />
PULLUP PULLCR ($3E) PULL3EN<br />
LED POCR1 ($1A) LEDB4<br />
PULLUP PULLCR ($3E) PULL4EN<br />
LED POCR1 ($1A) LEDB5<br />
PULLUP PULLCR ($3E) PULL5EN<br />
LED POCR1 ($1A) LEDB6<br />
PULLUP PULLCR ($3E) PULL6EN<br />
LED POCR1 ($1A) LEDB7<br />
PULLUP PULLCR ($3E) PULL7EN<br />
<strong>MC68HC908JW32</strong> <strong>Data</strong> <strong>Sheet</strong>, Rev. 6<br />
Introduction<br />
<strong>Freescale</strong> Semiconductor 169<br />
PTB0<br />
PTB1<br />
PTB2<br />
PTB3<br />
PTB4<br />
PTB5<br />
PTB6<br />
PTB7<br />
T1SC0 ($10) ELS0B:ELS0A PTC0/T1CH0<br />
1 DDRC1 TIM1<br />
T1SC ($0A) PS[2:0] PTC1/TCLK1<br />
2 DDRC2 T1SC1 ($13) ELS1B:ELS1A PTC2/T1CH1<br />
3 DDRC3 — — — PTC3<br />
0 DDRD0 — — — PTD0<br />
1 DDRD1 — — — PTD1<br />
2 DDRD2<br />
PTD2PD PTD2<br />
PULLUP POCR2 ($1B)<br />
3 DDRD3 PTD3PD PTD3<br />
4 DDRD4<br />
Module Control<br />
Module Register Control Bit<br />
PTD4<br />
5 DDRD5 — — —<br />
PTD5<br />
6 DDRD6 PTD6<br />
7 DDRD7 PULLUP POCR2 ($1B) PTD7PD PTD7<br />
Pin
Input/Output (I/O) Ports<br />
Port Bit DDR<br />
E<br />
13.2 Port A<br />
2 DDRE2<br />
3 DDRE3<br />
4 DDRE4<br />
Port A is an 8-bit general-purpose bidirectional I/O port with software configurable pullups, and it shares<br />
its pins with the keyboard interrupt module (KBI).<br />
13.2.1 Port A <strong>Data</strong> Register<br />
Table 13-1. Port Control Register Bits Summary (Continued)<br />
Module Control<br />
Module Register Control Bit<br />
USB USBCR ($51) USBEN<br />
PULLUP POCR2 ($1B) PTE2P<br />
PS2CLK PS2CSR ($19) PS2EN<br />
USB USBCR ($51) USBEN<br />
PULLUP POCR2 ($1B) PTE3P<br />
IRQ IOCR ($1C) PTE3IE<br />
The port A data register contains a data latch for each of the eight port A pins.<br />
PTA[7:0] — Port A <strong>Data</strong> Bits<br />
These read/write bits are software programmable. <strong>Data</strong> direction of each port A pin is under the control<br />
of the corresponding bit in data direction register A. Reset has no effect on port A data.<br />
KBA7–KBA0 — Keyboard Interrupts<br />
The keyboard interrupt enable bits, KBA7–KBA0, in the keyboard interrupt enable register (KBIER),<br />
enable the port A pins as external interrupt pins and the internal pullup of the corresponding pin. (See<br />
Chapter 15 Keyboard Interrupt Module (KBI).)<br />
<strong>MC68HC908JW32</strong> <strong>Data</strong> <strong>Sheet</strong>, Rev. 6<br />
PTE2/D+<br />
PTE3/D–<br />
PTE4/SPSCK<br />
5 DDRE5 PTE5/MOSI<br />
SPI SPCR ($4C) SPE<br />
6 DDRE6 PTE6/MISO<br />
7 DDRE7 PTE7/SS<br />
Address: $0000<br />
Bit 7 6 5 4 3 2 1 Bit 0<br />
Read:<br />
Write:<br />
PTA7 PTA6 PTA5 PTA4 PTA3 PTA2 PTA1 PTA0<br />
Reset: Unaffected by reset<br />
Alternative<br />
Function:<br />
KBA7 KBA6 KBA5 KBA4 KBA3 KBA2 KBA1 KBA0<br />
Additional Optional Optional Optional Optional Optional Optional Optional Optional<br />
Function: pullup pullup pullup pullup pullup pullup pullup pullup<br />
Figure 13-2. Port A <strong>Data</strong> Register (PTA)<br />
170 <strong>Freescale</strong> Semiconductor<br />
Pin
13.2.2 <strong>Data</strong> Direction Register A<br />
<strong>MC68HC908JW32</strong> <strong>Data</strong> <strong>Sheet</strong>, Rev. 6<br />
Port A<br />
<strong>Data</strong> direction register A determines whether each port A pin is an input or an output. Writing a logic 1 to<br />
a DDRA bit enables the output buffer for the corresponding port A pin; a logic 0 disables the output buffer.<br />
Address: $0004<br />
Bit 7 6 5 4 3 2 1 Bit 0<br />
Read:<br />
Write:<br />
DDRA7 DDRA6 DDRA5 DDRA4 DDRA3 DDRA2 DDRA1 DDRA0<br />
Reset: 0* 0 0 0 0 0 0 0<br />
* DDRA7 bit is reset by POR or LVI reset only.<br />
DDRA[7:0] — <strong>Data</strong> Direction Register A Bits<br />
These read/write bits control port A data direction. Reset clears DDRA[7:0], configuring all port A pins<br />
as inputs.<br />
1 = Corresponding port A pin configured as output<br />
0 = Corresponding port A pin configured as input<br />
NOTE<br />
Avoid glitches on port A pins by writing to the port A data register before<br />
changing data direction register A bits from 0 to 1.<br />
Figure 13-4 shows the port A I/O logic.<br />
INTERNAL DATA BUS<br />
Figure 13-3. <strong>Data</strong> Direction Register A (DDRA)<br />
READ DDRA ($0004)<br />
WRITE DDRA ($0004)<br />
WRITE PTA ($0000)<br />
READ PTA ($0000)<br />
RESET<br />
DDRAx<br />
PTAx<br />
Figure 13-4. Port A I/O Circuit<br />
When bit DDRAx is a logic 1, reading address $0000 reads the PTAx data latch. When bit DDRAx is a<br />
logic 0, reading address $0000 reads the voltage level on the pin. The data latch can always be written,<br />
regardless of the state of its data direction bit. Table 13-2 summarizes the operation of the port A pins.<br />
<strong>Freescale</strong> Semiconductor 171<br />
PTAx
Input/Output (I/O) Ports<br />
13.3 Port B<br />
DDRA<br />
Bit<br />
0 X (1)<br />
Port B is a 8-bit general-purpose bidirectional I/O port; open-drain when configured as output.<br />
13.3.1 Port B <strong>Data</strong> Register<br />
The port B data register contains a data latch for each of the eight port B pins.<br />
PTB[7:0] — Port B <strong>Data</strong> Bits<br />
These read/write bits are software programmable. <strong>Data</strong> direction of each port B pin is under control of<br />
the corresponding bit in data direction register B. Reset has no effect on port B data.<br />
LED Drive — Direct LED Driver<br />
The LED direct drive bit, LEDB[7:0], in the port option control register (POCR) controls the drive<br />
options for PTB[7:0]. (See 13.7 Port Options.)<br />
Pullup — Programmable Pullup<br />
The Pullup control bit, PULL[7:0]EN, in the pullup control register (PULLCR) controls the optional<br />
pullup for PTB[7:0]. (See 13.7 Port Options.)<br />
13.3.2 <strong>Data</strong> Direction Register B<br />
Table 13-2. Port A Pin Functions<br />
PTA Bit I/O Pin Mode<br />
Input, Hi-Z (2)<br />
Accesses to<br />
DDRA<br />
1. X = don’t care<br />
2. Hi-Z = high impedance<br />
3. Writing affects data register, but does not affect input<br />
<strong>Data</strong> direction register B determines whether each port B pin is an input or an output. Writing a logic 1 to<br />
a DDRB bit enables the output buffer for the corresponding port B pin; a logic 0 disables the output buffer.<br />
<strong>MC68HC908JW32</strong> <strong>Data</strong> <strong>Sheet</strong>, Rev. 6<br />
Accesses to PTA<br />
Read/Write Read Write<br />
DDRA[7:0] Pin PTA[7:0] (3)<br />
1 X Output DDRA[7:0] PTA[7:0] PTA[7:0]<br />
Address: $0001<br />
Bit 7 6 5 4 3 2 1 Bit 0<br />
Read:<br />
Write:<br />
PTB7 PTB6 PTB5 PTB4 PTB3 PTB2 PTB1 PTB0<br />
Reset: Unaffected by reset<br />
Additional<br />
Function:<br />
LED drive LED drive LED drive LED drive LED drive LED drive LED drive LED drive<br />
Additional Optional Optional Optional Optional Optional Optional Optional Optional<br />
Function: pullup pullup pullup pullup pullup pullup pullup pullup<br />
Figure 13-5. Port B <strong>Data</strong> Register (PTB)<br />
172 <strong>Freescale</strong> Semiconductor
Address: $0005<br />
Bit 7 6 5 4 3 2 1 Bit 0<br />
Read:<br />
Write:<br />
DDRB7 DDRB6 DDRB5 DDRB4 DDRB3 DDRB2 DDRB1 DDRB0<br />
Reset: 0 0 0 0 0 0 0 0<br />
<strong>MC68HC908JW32</strong> <strong>Data</strong> <strong>Sheet</strong>, Rev. 6<br />
Port B<br />
DDRB[7:0] — <strong>Data</strong> Direction Register B Bits<br />
These read/write bits control port B data direction. Reset clears DDRB[7:0], configuring all port B pins<br />
as inputs.<br />
1 = Corresponding port B pin configured as output<br />
0 = Corresponding port B pin configured as input<br />
NOTE<br />
Avoid glitches on port B pins by writing to the port B data register before<br />
changing data direction register B bits from 0 to 1.<br />
Figure 13-7 shows the port B I/O circuit logic.<br />
INTERNAL DATA BUS<br />
Figure 13-6. <strong>Data</strong> Direction Register D (DDRD)<br />
Figure 13-7. Port B I/O Circuit<br />
When bit DDRBx is a logic 1, reading address $0001 reads the PTBx data latch. When bit DDRBx is a<br />
logic 0, reading address $0001 reads the voltage level on the pin. The data latch can always be written,<br />
regardless of the state of its data direction bit. Table 13-3 summarizes the operation of the port B pins.<br />
DDRB<br />
Bit<br />
READ DDRD ($0007)<br />
WRITE DDRD ($0007)<br />
WRITE PTD ($0003)<br />
READ PTD ($0003)<br />
RESET<br />
Table 13-3. Port B Pin Functions<br />
PTB Bit I/O Pin Mode<br />
DDRBx<br />
PTBx<br />
1. X = don’t care<br />
2. Hi-Z = high impedance<br />
3. Writing affects data register, but does not affect input.<br />
Accesses<br />
to DDRB<br />
Accesses to PTB<br />
Read/Write Read Write<br />
0 X (1) Input, Hi-Z (2) DDRB[7:0] Pin PTB[7:0] (3)<br />
1 X Output DDRB[7:0] PTB[7:0] PTB[7:0]<br />
<strong>Freescale</strong> Semiconductor 173<br />
PTBx
Input/Output (I/O) Ports<br />
13.4 Port C<br />
Port C is a 4-bit general-purpose bidirectional I/O port. PTC[3:0] are shared with Timer.<br />
13.4.1 Port C <strong>Data</strong> Register<br />
The port C data register contains a data latch for each of the seven port C pins.<br />
Address: $0002<br />
Bit 7 6 5 4 3 2 1 Bit 0<br />
Read:<br />
Write:<br />
PTC3 PTC2 PTC1 PTC0<br />
Reset: Unaffected by reset<br />
Additional<br />
Function:<br />
T1CH1 T1CLK T1CH0<br />
= Unimplemented<br />
Table 13-4 shows the port function priority table.<br />
Figure 13-8. Port C <strong>Data</strong> Register (PTC)<br />
Table 13-4. Port C Priority Table<br />
MSxB:MSxA Feature<br />
01/10/11 Timer function pins<br />
00 Port logic control<br />
PTC[3:0] — Port C <strong>Data</strong> Bits<br />
These read/write bits are software-programmable. <strong>Data</strong> direction of each port C pin is under the control<br />
of the corresponding bit in data direction register C. Reset has no effect on port C data.<br />
T1CH0, T1CH1 — Timer Channels I/O Bits<br />
The PTC0/T1CH0, PTC2/T1CH1 pins are the TIM input capture/output compare pins. The edge/level<br />
select bits, ELSxB and ELSxA, determine whether they are timer channel I/O pins or general-purpose<br />
I/O pins. (see Chapter 8 Timer Interface Module (TIM))<br />
TCLK1 — Timer Clock Input<br />
The PTC1/TCLK1 pin are the external clock input for the TIM. The prescaler select bits, PS[2:0], select<br />
PTC1/TCLK1 as the TIM clock input. When not selected as the TIM clock, they are available for<br />
general purpose I/O. (see Chapter 8 Timer Interface Module (TIM))<br />
NOTE<br />
<strong>Data</strong> direction register C (DDRC) does not affect the data direction of port<br />
C pins that are being used by the TIM. However, the DDRC bits always<br />
determine whether reading port C returns the states of the latches or the<br />
states of the pins.<br />
<strong>MC68HC908JW32</strong> <strong>Data</strong> <strong>Sheet</strong>, Rev. 6<br />
174 <strong>Freescale</strong> Semiconductor
13.4.2 <strong>Data</strong> Direction Register C<br />
<strong>MC68HC908JW32</strong> <strong>Data</strong> <strong>Sheet</strong>, Rev. 6<br />
Port C<br />
<strong>Data</strong> direction register C determines whether each port C pin is an input or an output. Writing a logic 1 to<br />
a DDRC bit enables the output buffer for the corresponding port C pin; a logic 0 disables the output buffer.<br />
Address: $0006<br />
Bit 7 6 5 4 3 2 1 Bit 0<br />
Read:<br />
Write:<br />
DDRC3 DDRC2 DDRC1 DDRC0<br />
Reset: 0 0 0 0 0 0 0 0<br />
= Unimplemented<br />
Figure 13-9. <strong>Data</strong> Direction Register C (DDRC)<br />
DDRC[3:0] — <strong>Data</strong> Direction Register C Bits<br />
These read/write bits control port C data direction. Reset clears DDRC[3:0], configuring all port C pins<br />
as inputs.<br />
1 = Corresponding port C pin configured as output<br />
0 = Corresponding port C pin configured as input<br />
NOTE<br />
Avoid glitches on port C pins by writing to the port C data register before<br />
changing data direction register C bits from 0 to 3.<br />
Figure 13-10 shows the port C I/O logic.<br />
INTERNAL DATA BUS<br />
READ DDRC ($0007)<br />
WRITE DDRC ($0007)<br />
WRITE PTC ($0002)<br />
READ PTC ($0002)<br />
RESET<br />
DDRCx<br />
PTCx<br />
Figure 13-10. Port C I/O Circuit<br />
When bit DDRCx is a logic 1, reading address $0002 reads the PTCx data latch. When bit DDRCx is a<br />
logic 0, reading address $0002 reads the voltage level on the pin. The data latch can always be written,<br />
regardless of the state of its data direction bit. Table 13-5 summarizes the operation of the port C pins.<br />
Table 13-5. Port C Pin Functions<br />
DDRC<br />
Bit<br />
PTC Bit I/O Pin Mode<br />
Accesses to DDRC<br />
Read/Write<br />
Accesses to PTC<br />
Read Write<br />
0 X (1) Input, Hi-Z (2) DDRC[3:0] Pin PTC[3:0] (3)<br />
1 X Output DDRC[3:0] PTC[3:0] PTC[3:0]<br />
1. X = don’t care<br />
2. Hi-Z = high impedance<br />
3. Writing affects data register, but does not affect input.<br />
<strong>Freescale</strong> Semiconductor 175<br />
PTCx
Input/Output (I/O) Ports<br />
13.5 Port D<br />
Port D is a 8-bit general-purpose bidirectional I/O port.<br />
13.5.1 Port D <strong>Data</strong> Register<br />
The port D data register contains a data latch for each of the eight port D pins.<br />
Address: $0003<br />
Bit 7 6 5 4 3 2 1 Bit 0<br />
Read:<br />
Write:<br />
PTD7 PTD6 PTD5 PTD4 PTD3 PTD2 PTD1 PTD0<br />
Reset: Unaffected by reset<br />
Additional Function: Optional<br />
Pullup<br />
Optional<br />
Pullup<br />
Optional<br />
Pullup<br />
PTD[7:0] — Port D <strong>Data</strong> Bits<br />
These read/write bits are software programmable. <strong>Data</strong> direction of each port D pin is under control of<br />
the corresponding bit in data direction register D. Reset has no effect on port D data.<br />
PTD2, PTD3 and PTD7<br />
There is programmable pullup associated with the pins. The pullup are default enabled and can be<br />
controlled via POCR2 register.<br />
13.5.2 <strong>Data</strong> Direction Register D<br />
= Unimplemented<br />
Figure 13-11. Port D <strong>Data</strong> Register (PTD)<br />
<strong>Data</strong> direction register D determines whether each port D pin is an input or an output. Writing a logic 1 to<br />
a DDRD bit enables the output buffer for the corresponding port D pin; a logic 0 disables the output buffer.<br />
Address: $0007<br />
Bit 7 6 5 4 3 2 1 Bit 0<br />
Read:<br />
Write:<br />
DDRD7 DDRD6 DDRD5 DDRD4 DDRD3 DDRD2 DDRD1 DDRD0<br />
Reset: 0 0 0 0 0 0 0 0<br />
Figure 13-12. <strong>Data</strong> Direction Register D (DDRD)<br />
DDRD[7:0] — <strong>Data</strong> Direction Register D Bits<br />
These read/write bits control port D data direction. Reset clears DDRD[7:0], configuring all port D pins<br />
as inputs.<br />
1 = Corresponding port D pin configured as output<br />
0 = Corresponding port D pin configured as input<br />
NOTE<br />
Avoid glitches on port D pins by writing to the port D data register before<br />
changing data direction register D bits from 0 to 1.<br />
<strong>MC68HC908JW32</strong> <strong>Data</strong> <strong>Sheet</strong>, Rev. 6<br />
176 <strong>Freescale</strong> Semiconductor
Figure 13-13 shows the port D I/O circuit logic.<br />
INTERNAL DATA BUS<br />
Figure 13-13. Port D I/O Circuit<br />
<strong>MC68HC908JW32</strong> <strong>Data</strong> <strong>Sheet</strong>, Rev. 6<br />
Port D<br />
When bit DDRDx is a logic 1, reading address $0003 reads the PTDx data latch. When bit DDRDx is a<br />
logic 0, reading address $0003 reads the voltage level on the pin. The data latch can always be written,<br />
regardless of the state of its data direction bit. Table 13-6 summarizes the operation of the port D pins.<br />
DDRD<br />
Bit<br />
READ DDRD ($0008)<br />
WRITE DDRD ($0008)<br />
WRITE PTD ($0003)<br />
READ PTD ($0003)<br />
0 X (1)<br />
RESET<br />
Table 13-6. Port D Pin Functions<br />
PTD Bit I/O Pin Mode<br />
Input, Hi-Z (2)<br />
DDRDx<br />
PTDx<br />
Accesses<br />
to DDRD<br />
1. X = don’t care<br />
2. Hi-Z = high impedance<br />
3. Writing affects data register, but does not affect input.<br />
Accesses to PTD<br />
Read/Write Read Write<br />
DDRD[7:0] Pin PTD[7:0] (3)<br />
1 X Output DDRD[7:0] PTD[7:0] PTD[7:0]<br />
<strong>Freescale</strong> Semiconductor 177<br />
PTDx
Input/Output (I/O) Ports<br />
13.6 Port E<br />
Port E is a 6-bit general-purpose bidirectional I/O port. PTE[3:2] are special-function pins that share with<br />
the USB data pin D+ and D–. Four of the pins PTE[7:4] are shared with serial peripheral interface (SPI)<br />
module.<br />
13.6.1 Port E <strong>Data</strong> Register<br />
The port E data register contains a data latch for each of the six port E pins.<br />
Address: $0008<br />
Bit 7 6 5 4 3 2 1 Bit 0<br />
Read:<br />
Write:<br />
PTE7 PTE6 PTE5 PTE4 PTE3 PTE2<br />
Reset: Unaffected by reset<br />
Alternative Function: D– D+<br />
Additional Function:<br />
Additional Function:<br />
Additional Function:<br />
Additional Function:<br />
high<br />
current<br />
open drain<br />
Optional<br />
5kΩ<br />
pullup to<br />
VDD<br />
External<br />
Interrupt<br />
<strong>MC68HC908JW32</strong> <strong>Data</strong> <strong>Sheet</strong>, Rev. 6<br />
high<br />
current<br />
open drain<br />
Optional<br />
USB<br />
pullup to<br />
VREF33<br />
Optional<br />
5kΩ<br />
pullup to<br />
VDD<br />
Additional Function: PS2CLK<br />
Additional Function: SS MISO MOSI SPSCK<br />
= Unimplemented<br />
Figure 13-14. Port E <strong>Data</strong> Register (PTE)<br />
178 <strong>Freescale</strong> Semiconductor
Table 13-7 shows the priority table for PTE2/D+ pin.<br />
USB Module<br />
Enable<br />
(USBEN)<br />
PS2 Clock<br />
Generator<br />
Enable<br />
(PS2EN)<br />
Table 13-7. PTE2/D+ Priority Table<br />
<strong>Data</strong><br />
Direction<br />
Control<br />
(DDRE2)<br />
5k Pullup<br />
Enable<br />
(PTE2P)<br />
Table 13-8 shows the priority table for PTE3/D– pin.<br />
USB D+<br />
Pullup<br />
Enable<br />
(DPPULPEN)<br />
<strong>MC68HC908JW32</strong> <strong>Data</strong> <strong>Sheet</strong>, Rev. 6<br />
Pin Function<br />
1 X X X 1 D+ with pullup to VREF33.<br />
1 X X X 0 D+ without pullup<br />
0 1 X 1/0 0<br />
0 1 X 0 1/0<br />
0 0 1 X 1<br />
0 0 1 1 0<br />
0 0 0 X 1<br />
Port E<br />
PS2 Clock output (open-drain) with<br />
optional 5k pullup to VDD<br />
PS2 Clock output (open-drain) with<br />
optional 1.2k pullup to VREG33<br />
GPIO output (open-drain) with 1.2K<br />
pullup to REG33V<br />
GPIO output (open-drain) with 5k<br />
pullup to VDD<br />
GPIO input with 1.2K pullup to<br />
REG33V<br />
0 0 0 1 0 GPIO input with 5K pullup to VDD<br />
USB Module<br />
Enable (USBEN)<br />
PTE3 IRQ Enable<br />
(PT3IE)<br />
Table 13-8. PTE3/D– Priority Table<br />
<strong>Data</strong> Direction<br />
Control (DDRE3)<br />
5K Pullup Enable<br />
(PTE3P)<br />
1 X X X USB D– pin<br />
0 1 X 0/1<br />
0 0 0 0/1<br />
0 0 1 0/1<br />
Pin Function<br />
GPIO input with associated interrupt<br />
function and optional 5k pullup to VDD<br />
GPIO input with optional 5k pullup to<br />
VDD<br />
GPIO output (open-drain) with optional<br />
5k pullup to VDD<br />
PTE[7:2] — Port E <strong>Data</strong> Bits<br />
PTE[7:2] are read/write, software-programmable bits. <strong>Data</strong> direction of each port E pin is under the<br />
control of the corresponding bit in data direction register E.<br />
The PTE3 and PTE2 pullup enable bits, PTE3P and PTE2P, in the port option control register 2<br />
(POCR2) enable 5kΩ pullups to VDD on PTE3 and PTE2 if the USB module is disabled. (See 13.7<br />
Port Options.)<br />
The PTE2 USB pullup enable bits, DPPULLEN, in the port option control register 2 (POCR2) enable<br />
USB pullups to VREF33 on PTE2 for USB operation. Either of PTE2P or DPPULLEN bit can be<br />
activated at the one time, DPPULLEN bit has higher priority, it will always override the setting of PTE2P<br />
bit.<br />
<strong>Freescale</strong> Semiconductor 179
Input/Output (I/O) Ports<br />
PTE3 pin functions as an external interrupt when PTE3IE=1 in the IRQ option control register (IOCR)<br />
and USBEN=0 in the USB address register (USB disabled). (See 14.7 IRQ Status and Control<br />
Register.)<br />
PTE2 pin also muxed with PS2 clock generator module. (See Chapter 12 PS2 Clock Generator<br />
(PS2CLK).)<br />
D– and D+ — USB <strong>Data</strong> Pins<br />
D– and D+ are the differential data lines used by the USB module. (See Chapter 11 USB 2.0 FS<br />
Module.)<br />
When the USB module is enabled, PTE2/D+ and PTE3/D– function as USB data pins D– and D+.<br />
When the USB module is disabled, PTE2/D+ and PTE3/D– function as open drain high current pins<br />
for PS/2 clock and data use.<br />
NOTE<br />
PTE2/D+ pin has two programmable pullup resistors. One is used for PTE2<br />
when the USB module is disable and another is used for D+ when the USB<br />
module is enabled.<br />
<strong>Data</strong> direction register E (DDRE) does not affect the data direction of port E<br />
pins that are being used by the SPI module. However, the DDRE bits<br />
always determine whether reading port E returns the states of the latches<br />
or the states of the pins. (See Table 13-5 . Port C Pin Functions.)<br />
SS, MISO, MOSI, and SPSCK — SPI Functional Pins<br />
These are the chip select, master-input-slave-output, master-output-slave-input and clock pins for the<br />
SPI module. The SPI enable bit, SPE, in the SPI control register, SPCR, enables these pins as the SPI<br />
functional pins and overrides any control from port I/O logic. See Chapter 10 Serial Peripheral Interface<br />
Module (SPI).<br />
13.6.2 <strong>Data</strong> Direction Register E<br />
<strong>Data</strong> direction register E determines whether each port E pin is an input or an output. Writing a logic 1 to<br />
a DDRE bit enables the output buffer for the corresponding port E pin; a logic 0 disables the output buffer.<br />
Address: $0009<br />
Bit 7 6 5 4 3 2 1 Bit 0<br />
Read:<br />
Write:<br />
DDRE7 DDRE6 DDRE5 DDRE4 DDRE3 DDRE2<br />
Reset: 0 0 0 0 0 0 0 0<br />
= Unimplemented<br />
Figure 13-15. <strong>Data</strong> Direction Register E (DDRE)<br />
DDRE[7:2] — <strong>Data</strong> Direction Register E Bits<br />
These read/write bits control port E data direction. Reset clears DDRE[7:2], configuring all port E pins<br />
as inputs.<br />
1 = Corresponding port E pin configured as output<br />
0 = Corresponding port E pin configured as input<br />
NOTE<br />
Avoid glitches on port E pins by writing to the port E data register before<br />
changing data direction register E bits from 0 to 1.<br />
<strong>MC68HC908JW32</strong> <strong>Data</strong> <strong>Sheet</strong>, Rev. 6<br />
180 <strong>Freescale</strong> Semiconductor
Figure 13-16 shows the port E I/O circuit logic.<br />
INTERNAL DATA BUS<br />
Figure 13-16. Port E I/O Circuit<br />
<strong>MC68HC908JW32</strong> <strong>Data</strong> <strong>Sheet</strong>, Rev. 6<br />
Port E<br />
When bit DDREx is a logic 1, reading address $0008 reads the PTEx data latch. When bit DDREx is a<br />
logic 0, reading address $0008 reads the voltage level on the pin. The data latch can always be written,<br />
regardless of the state of its data direction bit. Table 13-5 summarizes the operation of the port E pins.<br />
DDRE<br />
Bit<br />
READ DDRE ($0009)<br />
WRITE DDRE ($0009)<br />
WRITE PTE ($0008)<br />
READ PTE ($0008)<br />
PTE<br />
Bit<br />
0 X (1)<br />
RESET<br />
Table 13-9. Port E Pin Functions<br />
I/O Pin Mode<br />
Input, Hi-Z (2)<br />
DDREx<br />
PTEx<br />
Accesses<br />
to DDRE<br />
1. X = don’t care<br />
2. Hi-Z = high impedance<br />
3. Writing affects data register, but does not affect input.<br />
Accesses to PTE<br />
Read/Write Read Write<br />
DDRE[7:2] Pin PTE[7:2] (3)<br />
1 X Output DDRE[7:2] PTE[7:2] PTE[7:2]<br />
<strong>Freescale</strong> Semiconductor 181<br />
PTEx
Input/Output (I/O) Ports<br />
13.7 Port Options<br />
All pins of port B have programmable pullup resistors and LED drive capability. Port pins have<br />
programmable high current drive capability.<br />
13.7.1 Port Option Control Register 1<br />
Address: $001A<br />
Bit 7 6 5 4 3 2 1 Bit 0<br />
Read:<br />
Write:<br />
LEDB7 LEDB6 LEDB5 LEDB4 LEDB3 LEDB2 LEDB1 LEDB0<br />
Reset: 0 0 0 0 0 0 0 0<br />
LEDB[7:0] — Port B LED Drive Enable Bits<br />
These read/write bits are software programmable to enable the direct LED drive on an output port pin.<br />
1 = Corresponding port B pin configured for direct LED drive: high current sinking capability<br />
0 = Corresponding port B pin configured for standard drive<br />
13.7.2 Port Option Control Register 2<br />
Table 13-10. port Option Control Register 1 (POCR1)<br />
The port option control register controls the pullup options for port E.<br />
Address: $001B<br />
Bit 7 6 5 4 3 2 1 Bit 0<br />
Read:<br />
Write:<br />
0 0<br />
PTD7PD PTD3PD PTD2PD DPPULLEN PTE3P PTE2P<br />
Reset: 0 0 0 0 0 0 0 0<br />
= Unimplemented<br />
Table 13-11. Port Option Control Register 2 (POCR2)<br />
PTD7PD — Pin PTD7 Pullup Disable<br />
This read/write bit disables the pullup option for pin PTD7. The pullup resistor is default enabled after<br />
reset.<br />
1 = Pullup option disabled<br />
0 = Pullup option enabled<br />
PTD3PD — Pin PTD3 Pullup Disable<br />
This read/write bit disables the pullup option for pin PTD3. The pullup resistor is default enabled after<br />
reset.<br />
1 = Pullup option disabled<br />
0 = Pullup option enabled<br />
PTD2PD — Pin PTD2 Pullup Disable<br />
This read/write bit disables the pullup option for pin PTD2. The pullup resistor is default enabled after<br />
reset.<br />
1 = Pullup option disabled<br />
0 = Pullup option enabled<br />
<strong>MC68HC908JW32</strong> <strong>Data</strong> <strong>Sheet</strong>, Rev. 6<br />
182 <strong>Freescale</strong> Semiconductor
<strong>MC68HC908JW32</strong> <strong>Data</strong> <strong>Sheet</strong>, Rev. 6<br />
Port Options<br />
DPPULLEN — D+ Pullup Enable<br />
This read/write bit enables the USB D+ pullup option to VREF33 for pin PTE2.<br />
1 = Configure PTE2 to have internal USB pullups to VREF33<br />
0 = Disconnect PTE2 internal pullups<br />
PTE3P — Pin PTE3 Pullup Enable<br />
This read/write bit enables the pullup option for pin PTE3 if it is not configured as an USB D– pin or<br />
USB module is disabled.<br />
1 = Configure PTE3 to have 5k internal pullups<br />
0 = Disconnect PTE3 internal pullups<br />
PTE2P — Pin PTE2 Pullup Enable<br />
This read/write bit enables the pullup option for pin PTE2 if it is not configured as an USB D+ pin or<br />
USB module is disabled.<br />
1 = Configure PTE2 to have 5k internal pullups<br />
0 = Disconnect PTE2 internal pullups<br />
NOTE<br />
When the USB module is enabled, the pullup controlled by PTE2P and<br />
PTE3P are disconnected; PTE2/D+ pin functions as D+ which has a<br />
programmable pull-up resistor by setting the DPPULLEN bit.<br />
13.7.3 Pullup Control Register (PULLCR)<br />
The pullup control register enables the embedded pullup resistor associated with port B [7:0].<br />
Address: $003E<br />
Bit 7 6 5 4 3 2 1 Bit 0<br />
Read:<br />
Write:<br />
PULL7EN PULL6EN PULL5EN PULL4EN PULL3EN PULL2EN PULL1EN PULL0EN<br />
Reset: 0 0 0 0 0 0 0 0<br />
Figure 13-17. Pullup Control Register (PULLCR)<br />
PULL[7:0]EN — Pullup Enable Bit<br />
These read/write bits enables the embedded pullup resistor associated with the corresponding port<br />
pin. Reset clears this bit.<br />
1 = Pullup resistor is enabled<br />
0 = Pullup resistor is disabled<br />
<strong>Freescale</strong> Semiconductor 183
Input/Output (I/O) Ports<br />
<strong>MC68HC908JW32</strong> <strong>Data</strong> <strong>Sheet</strong>, Rev. 6<br />
184 <strong>Freescale</strong> Semiconductor
Chapter 14<br />
External Interrupt (IRQ)<br />
14.1 Introduction<br />
The IRQ module provides two external interrupt inputs: one dedicated IRQ pin and one shared port pin,<br />
PTE3/D–.<br />
14.2 Features<br />
Features of the IRQ module include:<br />
• Two external interrupt pins, IRQ and PTE3/D–<br />
• IRQ interrupt control bits<br />
• Programmable edge-only or edge and level interrupt sensitivity<br />
• Automatic interrupt acknowledge<br />
• Low leakage IRQ pin for external RC wake up input<br />
• Selectable internal pullup resistor<br />
14.3 Functional Description<br />
A logic 0 applied to the external interrupt pin can latch a CPU interrupt request. Figure 14-1 shows the<br />
structure of the IRQ module.<br />
Interrupt signals on the IRQ pin are latched into the IRQ latch. An interrupt latch remains set until one of<br />
the following actions occurs:<br />
• Vector fetch — A vector fetch automatically generates an interrupt acknowledge signal that clears<br />
the IRQ latch.<br />
• Software clear — Software can clear the interrupt latch by writing to the acknowledge bit in the<br />
interrupt status and control register (ISCR). Writing a logic 1 to the ACK bit clears the IRQ latch.<br />
• Reset — A reset automatically clears the interrupt latch.<br />
The external interrupt pin is falling-edge-triggered and is software-configurable to be either falling-edge<br />
or low-level-triggered. The MODE bit in the ISCR controls the triggering sensitivity of the IRQ pin.<br />
When the interrupt pin is edge-triggered only, the CPU interrupt request remains set until a vector fetch,<br />
software clear, or reset occurs.<br />
When the interrupt pin is both falling-edge and low-level-triggered, the CPU interrupt request remains set<br />
until both of the following occur:<br />
• Vector fetch or software clear<br />
• Return of the interrupt pin to logic one<br />
The vector fetch or software clear may occur before or after the interrupt pin returns to logic 1. As long as<br />
the pin is low, the interrupt request remains pending. A reset will clear the latch and the MODE control<br />
bit, thereby clearing the interrupt even if the pin stays low.<br />
<strong>MC68HC908JW32</strong> <strong>Data</strong> <strong>Sheet</strong>, Rev. 6<br />
<strong>Freescale</strong> Semiconductor 185
External Interrupt (IRQ)<br />
When set, the IMASK bit in the ISCR mask all external interrupt requests. A latched interrupt request is<br />
not presented to the interrupt priority logic unless the IMASK bit is clear.<br />
NOTE<br />
The interrupt mask (I) in the condition code register (CCR) masks all<br />
interrupt requests, including external interrupt requests. (See 6.5 Exception<br />
Control.)<br />
INTERNAL ADDRESS BUS<br />
IRQ<br />
PTE3<br />
IRQPD<br />
INTERNAL<br />
PULLUP<br />
DEVICE<br />
PTE3IE<br />
ACK<br />
RESET<br />
VECTOR<br />
FETCH<br />
DECODER<br />
V DD<br />
TO PTE3 PULLUP<br />
ENABLE CIRCUITRY<br />
"1"<br />
MODE<br />
"1"<br />
CLR<br />
D Q<br />
Figure 14-1. IRQ Module Block Diagram<br />
<strong>MC68HC908JW32</strong> <strong>Data</strong> <strong>Sheet</strong>, Rev. 6<br />
186 <strong>Freescale</strong> Semiconductor<br />
CK<br />
IRQ<br />
FF<br />
CLR<br />
D Q<br />
CK<br />
HIGH<br />
VOLTAGE<br />
DETECT<br />
PTE3IF<br />
IMASK<br />
READ IOCR<br />
SYNCHRO-<br />
NIZER<br />
IRQF<br />
TO MODE<br />
SELECT<br />
LOGIC<br />
TO CPU FOR<br />
BIL/BIH<br />
INSTRUCTIONS<br />
IRQ<br />
INTERRUPT<br />
REQUEST
14.4 IRQ Pin<br />
<strong>MC68HC908JW32</strong> <strong>Data</strong> <strong>Sheet</strong>, Rev. 6<br />
IRQ Pin<br />
Addr. Register Name Bit 7 6 5 4 3 2 1 Bit 0<br />
$001C<br />
IRQ Option Control Register<br />
(IOCR)<br />
Read:<br />
Write:<br />
0 0 0 0 0 PTE3IF<br />
PTE3IE IRQPD<br />
Reset: 0 0 0 0 0 0 0 0<br />
$001E<br />
IRQ Status and Control Register<br />
(ISCR)<br />
Read:<br />
Write:<br />
0 0 0 0 IRQF 0<br />
ACK<br />
IMASK MODE<br />
Reset: 0 0 0 0 0 0 0 0<br />
= Unimplemented<br />
Figure 14-2. IRQ I/O Register Summary<br />
The IRQ pin has a low leakage for input voltages ranging from 0V to VDD ; suitable for applications using<br />
RC discharge circuitry to wake up the MCU.<br />
A logic 0 on the IRQ pin can latch an interrupt request into the IRQ latch. A vector fetch, software clear,<br />
or reset clears the IRQ latch.<br />
If the MODE bit is set, the IRQ pin is both falling-edge-sensitive and low-level-sensitive. With MODE set,<br />
both of the following actions must occur to clear IRQ:<br />
• Vector fetch or software clear — A vector fetch generates an interrupt acknowledge signal to clear<br />
the latch. Software may generate the interrupt acknowledge signal by writing a logic 1 to the ACK<br />
bit in the interrupt status and control register (ISCR). The ACK bit is useful in applications that poll<br />
the IRQ pin and require software to clear the IRQ latch. Writing to the ACK bit prior to leaving an<br />
interrupt service routine can also prevent spurious interrupts due to noise. Setting ACK does not<br />
affect subsequent transitions on the IRQ pin. A falling edge that occurs after writing to the ACK bit<br />
latches another interrupt request. If the IRQ mask bit, IMASK, is clear, the CPU loads the program<br />
counter with the vector address at locations $FFF8 and $FFF9.<br />
• Return of the IRQ pin to logic one — As long as the IRQ pin is at logic zero, IRQ remains active.<br />
The vector fetch or software clear and the return of the IRQ pin to logic one may occur in any order. The<br />
interrupt request remains pending as long as the IRQ pin is at logic zero. A reset will clear the latch and<br />
the MODE control bit, thereby clearing the interrupt even if the pin stays low.<br />
If the MODE bit is clear, the IRQ pin is falling-edge-sensitive only. With MODE clear, a vector fetch or<br />
software clear immediately clears the IRQ latch.<br />
The IRQF bit in the ISCR register can be used to check for pending interrupts. The IRQF bit is not affected<br />
by the IMASK bit, which makes it useful in applications where polling is preferred.<br />
Use the BIH or BIL instruction to read the logic level on the IRQ pin.<br />
NOTE<br />
When using the level-sensitive interrupt trigger, avoid false interrupts by<br />
masking interrupt requests in the interrupt routine.<br />
NOTE<br />
An internal pullup resistor to V DD is connected to IRQ pin; this can be<br />
disabled by setting the IRQPD bit in the IRQ option control register<br />
($001C).<br />
<strong>Freescale</strong> Semiconductor 187
External Interrupt (IRQ)<br />
14.5 PTE3/D– Pin<br />
The PTE3 pin is configured as an interrupt input to trigger the IRQ interrupt when the following conditions<br />
are satisfied:<br />
• The USB module is disabled<br />
• PTE3 pin configured for external interrupt input (PTE3IE = 1)<br />
Setting PTE3IE configures the PTE3 pin to an input pin with an internal pullup device. The PTE3 interrupt<br />
is "ORed" with the IRQ input to trigger the IRQ interrupt Figure 14-1. Therefore, the IRQ status and control<br />
register affects both the IRQ pin and the PTE pin. An interrupt on PTE3 also sets the PTE3 interrupt flag,<br />
PTE3IF, in the IRQ option control register (IOCR).<br />
14.6 IRQ Module During Break Interrupts<br />
The system integration module (SIM) controls whether the IRQ latch can be cleared during the break<br />
state. The BCFE bit in the break flag control register (BFCR) enables software to clear the latches during<br />
the break state. (See Chapter 6 System Integration Module (SIM).)<br />
To allow software to clear the IRQIRQ latch during a break interrupt, write a logic 1 to the BCFE bit. If a<br />
latch is cleared during the break state, it remains cleared when the MCU exits the break state.<br />
To protect the latches during the break state, write a logic 0 to the BCFE bit. With BCFE at logic 0 (its<br />
default state), writing to the ACK bit in the IRQ status and control register during the break state has no<br />
effect on the IRQ latch.<br />
14.7 IRQ Status and Control Register<br />
The IRQ status and control register (ISCR) controls and monitors operation of the IRQ module. The ISCR<br />
has the following functions:<br />
• Shows the state of the IRQ flag<br />
• Clears the IRQ latch<br />
• Masks IRQ interrupt request<br />
• Controls triggering sensitivity of the IRQ pin<br />
Address: $001E<br />
Bit 7 6 5 4 3 2 1 Bit 0<br />
Read:<br />
Write:<br />
0 0 0 0 IRQF 0<br />
ACK<br />
IMASK MODE<br />
Reset: 0 0 0 0 0 0 0 0<br />
= Unimplemented<br />
Figure 14-3. IRQ Status and Control Register (ISCR)<br />
IRQF — IRQ Flag<br />
This read-only status bit is high when the IRQ interrupt is pending.<br />
1 = IRQ interrupt pending<br />
0 = IRQ interrupt not pending<br />
<strong>MC68HC908JW32</strong> <strong>Data</strong> <strong>Sheet</strong>, Rev. 6<br />
188 <strong>Freescale</strong> Semiconductor
<strong>MC68HC908JW32</strong> <strong>Data</strong> <strong>Sheet</strong>, Rev. 6<br />
IRQ Option Control Register<br />
ACK — IRQ Interrupt Request Acknowledge Bit<br />
Writing a logic 1 to this write-only bit clears the IRQ latch. ACK always reads as logic 0. Reset clears<br />
ACK.<br />
IMASK — IRQ Interrupt Mask Bit<br />
Writing a logic 1 to this read/write bit disables IRQ interrupt requests. Reset clears IMASK.<br />
1 = IRQ interrupt requests disabled<br />
0 = IRQ interrupt requests enabled<br />
MODE — IRQ Edge/Level Select Bit<br />
This read/write bit controls the triggering sensitivity of the IRQ pin. Reset clears MODE.<br />
1 = IRQ interrupt requests on falling edges and low levels<br />
0 = IRQ interrupt requests on falling edges only<br />
14.8 IRQ Option Control Register<br />
The IRQ option control register controls and monitors the external interrupt function available on the PTE3<br />
pin. It also disables/enables the pullup resistor on the IRQ pin.<br />
• Controls pullup option on IRQ pin<br />
• Enables PTE3 pin for external interrupts to IRQ<br />
• Shows the state of the PTE3 interrupt flag<br />
Address: $001C<br />
Bit 7 6 5 4 3 2 1 Bit 0<br />
Read:<br />
Write:<br />
0 0 0 0 0 PTE3IF<br />
PTE3IE IRQPD<br />
Reset: 0 0 0 0 0 0 0 0<br />
= Unimplemented<br />
Figure 14-4. IRQ Option Control Register (IOCR)<br />
PTE3IF — PTE3 Interrupt Flag<br />
This read-only status bit is high when a falling edge on PTE3 pin is detected. PTE3IF bit clears when<br />
the IOCR is read.<br />
1 = falling edge on PTE3 is detected and PTE3IE is set<br />
0 = falling edge on PTE3 is not detected or PTE3IE is clear<br />
PTE3IE — PTE3 Interrupt Enable<br />
This read/write bit enables or disables the interrupt function on the PTE3 pin to trigger the IRQ<br />
interrupt. Setting the PTE3IE bit and clearing the USBEN bit in the USB address register configure the<br />
PTE3 pin for interrupt function to the IRQ interrupt. Setting PTE3IE also enables the internal pullup on<br />
PTE3 pin.<br />
1 = PTE3 interrupt enabled; triggers IRQ interrupt<br />
0 = PTE3 interrupt disabled<br />
IRQPD — IRQ Pullup Disable<br />
This read/write bit controls the pullup option for the IRQ pin.<br />
1 = Internal pullup is disconnected<br />
0 = Internal pull-up is connected between IRQ pin and VDD <strong>Freescale</strong> Semiconductor 189
External Interrupt (IRQ)<br />
<strong>MC68HC908JW32</strong> <strong>Data</strong> <strong>Sheet</strong>, Rev. 6<br />
190 <strong>Freescale</strong> Semiconductor
Chapter 15<br />
Keyboard Interrupt Module (KBI)<br />
15.1 Introduction<br />
The keyboard interrupt module (KBI) provides eight independently maskable external interrupts which are<br />
accessible via PTA0–PTA7 pins.<br />
15.2 Features<br />
Features of the keyboard interrupt module include:<br />
• Eight keyboard interrupt pins with separate keyboard interrupt enable bits and one keyboard<br />
interrupt mask<br />
• Hysteresis buffers<br />
• Programmable edge-only or edge- and level-interrupt sensitivity<br />
• Exit from low-power modes<br />
Addr. Register Name Bit 7 6 5 4 3 2 1 Bit 0<br />
$0016<br />
Keyboard Status<br />
and Control Register<br />
Read:<br />
Write:<br />
0 0 0 0 KEYF 0<br />
ACKK<br />
IMASKK MODEK<br />
(KBSCR)<br />
Reset: 0 0 0 0 0 0 0 0<br />
$0017<br />
Keyboard Interrupt Enable<br />
Register<br />
Read:<br />
Write:<br />
KBIE7 KBIE6 KBIE5 KBIE4 KBIE3 KBIE2 KBIE1 KBIE0<br />
(KBIER)<br />
Reset: 0 0 0 0 0 0 0 0<br />
= Unimplemented<br />
15.3 Pin Name Conventions<br />
The eight keyboard interrupt pins are shared with standard port I/O pins. The full name of the KBI pins<br />
are listed in Table 15-1. The generic pin name appear in the text that follows.<br />
KBI<br />
Generic Pin Name<br />
Figure 15-1. KBI I/O Register Summary<br />
Table 15-1. Pin Name Conventions<br />
Full MCU Pin Name<br />
<strong>MC68HC908JW32</strong> <strong>Data</strong> <strong>Sheet</strong>, Rev. 6<br />
Pin Selected for KBI Function<br />
by KBIEx Bit in KBIER<br />
KBA0–KBA7 PTA0/KBA0–PTA7/KBA7 KBIE0–KBIE7<br />
<strong>Freescale</strong> Semiconductor 191
Keyboard Interrupt Module (KBI)<br />
15.4 Functional Description<br />
KBA0<br />
KBIE0<br />
TO PULLUP ENABLE<br />
KBA7<br />
KBIE7<br />
TO PULLUP ENABLE<br />
.<br />
.<br />
.<br />
MODEK<br />
V REG<br />
CLR<br />
D Q<br />
CK<br />
KEYBOARD<br />
INTERRUPT FF<br />
Figure 15-2. Keyboard Module Block Diagram<br />
Writing to the KBIE7–KBIE0 bits in the keyboard interrupt enable register independently enables or<br />
disables each port A pin as a keyboard interrupt pin. Enabling a keyboard interrupt pin also enables its<br />
internal pullup device. A logic 0 applied to an enabled keyboard interrupt pin latches a keyboard interrupt<br />
request.<br />
A keyboard interrupt is latched when one or more keyboard pins goes low after all were high. The MODEK<br />
bit in the keyboard status and control register controls the triggering mode of the keyboard interrupt.<br />
• If the keyboard interrupt is edge-sensitive only, a falling edge on a keyboard pin does not latch an<br />
interrupt request if another keyboard pin is already low.<br />
• If the keyboard interrupt is falling edge- and low level-sensitive, an interrupt request is present as<br />
long as any keyboard pin is low.<br />
NOTE<br />
To prevent losing an interrupt request on one pin because another pin is<br />
still low, software can disable the latter pin while it is low.<br />
If the MODEK bit is set, the keyboard interrupt pins are both falling edge- and low level-sensitive, and both<br />
of the following actions must occur to clear a keyboard interrupt request:<br />
• Vector fetch or software clear — A vector fetch generates an interrupt acknowledge signal to clear<br />
the interrupt request. Software may generate the interrupt acknowledge signal by writing a logic 1<br />
to the ACKK bit in the keyboard status and control register (KBSCR). The ACKK bit is useful in<br />
applications that poll the keyboard interrupt pins and require software to clear the keyboard<br />
interrupt request. Writing to the ACKK bit prior to leaving an interrupt service routine also can<br />
prevent spurious interrupts due to noise. Setting ACKK does not affect subsequent transitions on<br />
the keyboard interrupt pins. A falling edge that occurs after writing to the ACKK bit latches another<br />
interrupt request. If the keyboard interrupt mask bit, IMASKK, is clear, the CPU loads the program<br />
counter with the vector address at locations $FFE0 and $FFE1.<br />
• Return of all enabled keyboard interrupt pins to logic 1 — As long as any enabled keyboard<br />
interrupt pin is at logic 0, the keyboard interrupt remains set.<br />
<strong>MC68HC908JW32</strong> <strong>Data</strong> <strong>Sheet</strong>, Rev. 6<br />
VECTOR FETCH<br />
DECODER<br />
192 <strong>Freescale</strong> Semiconductor<br />
ACKK<br />
RESET<br />
INTERNAL BUS<br />
IMASKK<br />
SYNCHRONIZER<br />
KEYF<br />
Keyboard<br />
Interrupt<br />
Request
<strong>MC68HC908JW32</strong> <strong>Data</strong> <strong>Sheet</strong>, Rev. 6<br />
Functional Description<br />
The vector fetch or software clear and the return of all enabled keyboard interrupt pins to logic 1 may<br />
occur in any order.<br />
If the MODEK bit is clear, the keyboard interrupt pin is falling-edge-sensitive only. With MODEK clear, a<br />
vector fetch or software clear immediately clears the keyboard interrupt request.<br />
Reset clears the keyboard interrupt request and the MODEK bit, clearing the interrupt request even if a<br />
keyboard interrupt pin stays at logic 0.<br />
The keyboard flag bit (KEYF) in the keyboard status and control register can be used to see if a pending<br />
interrupt exists. The KEYF bit is not affected by the keyboard interrupt mask bit (IMASKK) which makes<br />
it useful in applications where polling is preferred.<br />
To determine the logic level on a keyboard interrupt pin, use the data direction register to configure the<br />
pin as an input and read the data register.<br />
NOTE<br />
Setting a keyboard interrupt enable bit (KBIEx) forces the corresponding<br />
keyboard interrupt pin to be an input, overriding the data direction register.<br />
However, the data direction register bit must be a logic 0 for software to<br />
read the pin.<br />
15.4.1 Keyboard Initialization<br />
When a keyboard interrupt pin is enabled, it takes time for the pullup device to reach a logic 1. Therefore,<br />
a false interrupt can occur as soon as the pin is enabled.<br />
To prevent a false interrupt on keyboard initialization:<br />
1. Mask keyboard interrupts by setting the IMASKK bit in the keyboard status and control register.<br />
2. Enable the KBI pins by setting the appropriate KBIEx bits in the keyboard interrupt enable register.<br />
3. Write to the ACKK bit in the keyboard status and control register to clear any false interrupts.<br />
4. Clear the IMASKK bit.<br />
An interrupt signal on an edge-triggered pin can be acknowledged immediately after enabling the pin. An<br />
interrupt signal on an edge- and level-triggered interrupt pin must be acknowledged after a delay that<br />
depends on the external load.<br />
Another way to avoid a false interrupt:<br />
1. Configure the keyboard pins as outputs by setting the appropriate DDRA bits in data direction<br />
register A.<br />
2. Write logic 1s to the appropriate port A data register bits.<br />
3. Enable the KBI pins by setting the appropriate KBIEx bits in the keyboard interrupt enable register.<br />
<strong>Freescale</strong> Semiconductor 193
Keyboard Interrupt Module (KBI)<br />
15.5 I/O Registers<br />
These registers control and monitor operation of the keyboard module:<br />
• Keyboard status and control register (KBSCR)<br />
• Keyboard interrupt enable register (KBIER)<br />
15.5.1 Keyboard Status and Control Register<br />
The keyboard status and control register:<br />
• Flags keyboard interrupt requests<br />
• Acknowledges keyboard interrupt requests<br />
• Masks keyboard interrupt requests<br />
• Controls keyboard interrupt triggering sensitivity<br />
Address: $0016<br />
Bit 7 6 5 4 3 2 1 Bit 0<br />
Read:<br />
Write:<br />
0 0 0 0 KEYF 0<br />
ACKK<br />
IMASKK MODEK<br />
Reset: 0 0 0 0 0 0 0 0<br />
= Unimplemented<br />
Figure 15-3. Keyboard Status and Control Register (KBSCR)<br />
KEYF — Keyboard Flag Bit<br />
This read-only bit is set when a keyboard interrupt is pending. Reset clears the KEYF bit.<br />
1 = Keyboard interrupt pending<br />
0 = No keyboard interrupt pending<br />
ACKK — Keyboard Acknowledge Bit<br />
Writing a logic 1 to this write-only bit clears the keyboard interrupt request. ACKK always reads as<br />
logic 0. Reset clears ACKK.<br />
IMASKK — Keyboard Interrupt Mask Bit<br />
Writing a logic 1 to this read/write bit prevents the output of the keyboard interrupt mask from<br />
generating interrupt requests. Reset clears the IMASKK bit.<br />
1 = Keyboard interrupt requests masked<br />
0 = Keyboard interrupt requests not masked<br />
MODEK — Keyboard Triggering Sensitivity Bit<br />
This read/write bit controls the triggering sensitivity of the keyboard interrupt pins. Reset clears<br />
MODEK.<br />
1 = Keyboard interrupt requests on falling edges and low levels<br />
0 = Keyboard interrupt requests on falling edges only<br />
<strong>MC68HC908JW32</strong> <strong>Data</strong> <strong>Sheet</strong>, Rev. 6<br />
194 <strong>Freescale</strong> Semiconductor
15.5.2 Keyboard Interrupt Enable Register<br />
<strong>MC68HC908JW32</strong> <strong>Data</strong> <strong>Sheet</strong>, Rev. 6<br />
Low-Power Modes<br />
The keyboard interrupt enable register enables or disables each port A pin to operate as a keyboard<br />
interrupt pin.<br />
KBIE7–KBIE0 — Keyboard Interrupt Enable Bits<br />
Each of these read/write bits enables the corresponding keyboard interrupt pin to latch interrupt<br />
requests. Reset clears the keyboard interrupt enable register.<br />
1 = PTAx pin enabled as keyboard interrupt pin<br />
0 = PTAx pin not enabled as keyboard interrupt pin<br />
15.6 Low-Power Modes<br />
The WAIT and STOP instructions put the MCU in low-power consumption standby modes.<br />
15.6.1 Wait Mode<br />
The keyboard module remains active in wait mode. Clearing the IMASKK bit in the keyboard status and<br />
control register enables keyboard interrupt requests to bring the MCU out of wait mode.<br />
15.6.2 Stop Mode<br />
Address: $0017<br />
Bit 7 6 5 4 3 2 1 Bit 0<br />
Read:<br />
Write:<br />
KBIE7 KBIE6 KBIE5 KBIE4 KBIE3 KBIE2 KBIE1 KBIE0<br />
Reset: 0 0 0 0 0 0 0 0<br />
Figure 15-4. Keyboard Interrupt Enable Register (KBIER)<br />
The keyboard module remains active in stop mode. Clearing the IMASKK bit in the keyboard status and<br />
control register enables keyboard interrupt requests to bring the MCU out of stop mode.<br />
15.7 Keyboard Module During Break Interrupts<br />
The system integration module (SIM) controls whether the keyboard interrupt latch can be cleared during<br />
the break state. The BCFE bit in the break flag control register (BFCR) enables software to clear status<br />
bits during the break state.<br />
To allow software to clear the keyboard interrupt latch during a break interrupt, write a logic 1 to the BCFE<br />
bit. If a latch is cleared during the break state, it remains cleared when the MCU exits the break state.<br />
To protect the latch during the break state, write a logic 0 to the BCFE bit. With BCFE at logic 0 (its default<br />
state), writing to the keyboard acknowledge bit (ACKK) in the keyboard status and control register during<br />
the break state has no effect. (See Figure 15-3. Keyboard Status and Control Register (KBSCR).)<br />
<strong>Freescale</strong> Semiconductor 195
Keyboard Interrupt Module (KBI)<br />
<strong>MC68HC908JW32</strong> <strong>Data</strong> <strong>Sheet</strong>, Rev. 6<br />
196 <strong>Freescale</strong> Semiconductor
Chapter 16<br />
Computer Operating Properly (COP)<br />
16.1 Introduction<br />
The computer operating properly (COP) module contains a free-running counter that generates a reset if<br />
allowed to overflow. The COP module helps software recover from runaway code. Prevent a COP reset<br />
by clearing the COP counter periodically. The COP module can be disabled through the COPD bit in the<br />
CONFIG register.<br />
16.2 Functional Description<br />
Figure 16-1 shows the structure of the COP module.<br />
CGMRCLK<br />
INTERNAL RESET SOURCES (1)<br />
RESET VECTOR FETCH<br />
COPCTL WRITE<br />
COPEN (FROM SIM)<br />
COPD (FROM CONFIG)<br />
RESET<br />
COPCTL WRITE<br />
COP RATE SEL<br />
(COPRS FROM CONFIG)<br />
CLEAR ALL STAGES<br />
12-BIT SIM COUNTER<br />
COP CLOCK<br />
CLEAR STAGES 5–12<br />
SIM<br />
COP MODULE<br />
6-BIT COP COUNTER<br />
CLEAR<br />
COP COUNTER<br />
Figure 16-1. COP Block Diagram<br />
<strong>MC68HC908JW32</strong> <strong>Data</strong> <strong>Sheet</strong>, Rev. 6<br />
SIM RESET CIRCUIT<br />
RESET STATUS REGISTER<br />
<strong>Freescale</strong> Semiconductor 197<br />
COP TIMEOUT
Computer Operating Properly (COP)<br />
The COP counter is a free-running 6-bit counter preceded by a 12-bit system integration module (SIM)<br />
counter. If not cleared by software, the COP counter overflows and generates an asynchronous reset<br />
after 262,128 or 8176 CGMRCLK cycles, depending on the state of the COP rate select bit, COPRS in<br />
the configuration register. With a 262,128 CGMRCLK cycle overflow option (COPRS = 0), a 4-MHz<br />
external clock source gives a COP timeout period of 66ms. Writing any value to location $FFFF before<br />
an overflow occurs prevents a COP reset by clearing the COP counter and stages 12 through 5 of the<br />
SIM counter.<br />
NOTE<br />
Service the COP immediately after reset and before entering or after exiting<br />
stop mode to guarantee the maximum time before the first COP counter<br />
overflow.<br />
A COP reset pulls the RST pin low for 32 CGMRCLK cycles and sets the COP bit in the reset status<br />
register (RSR).<br />
In monitor mode, the COP is disabled if the RST pin or the IRQ is held at VTST. During the break state,<br />
VTST on the RST pin disables the COP.<br />
NOTE<br />
Place COP clearing instructions in the main program and not in an interrupt<br />
subroutine. Such an interrupt subroutine could keep the COP from<br />
generating a reset even while the main program is not working properly.<br />
16.3 I/O Signals<br />
The following paragraphs describe the signals shown in Figure 16-1.<br />
16.3.1 CGMRCLK<br />
CGMRCLK is the reference clock output from the OSC module. If a 4-MHz crystal is used, CGMRCLK is<br />
also 4-MHz.<br />
16.3.2 STOP Instruction<br />
The STOP instruction clears the COP prescaler.<br />
16.3.3 COPCTL Write<br />
Writing any value to the COP control register (COPCTL) (see 16.4 COP Control Register) clears the COP<br />
counter and clears bits 12 through 5 of the SIM counter. Reading the COP control register returns the low<br />
byte of the reset vector.<br />
16.3.4 Power-On Reset<br />
The power-on reset (POR) circuit in the SIM clears the COP prescaler 4096 CGMRCLK cycles after<br />
power-up.<br />
16.3.5 Internal Reset<br />
An internal reset clears the SIM counter and the COP counter.<br />
<strong>MC68HC908JW32</strong> <strong>Data</strong> <strong>Sheet</strong>, Rev. 6<br />
198 <strong>Freescale</strong> Semiconductor
16.3.6 Reset Vector Fetch<br />
<strong>MC68HC908JW32</strong> <strong>Data</strong> <strong>Sheet</strong>, Rev. 6<br />
COP Control Register<br />
A reset vector fetch occurs when the vector address appears on the data bus. A reset vector fetch clears<br />
the COP prescaler.<br />
16.3.7 COPD (COP Disable)<br />
The COPD signal reflects the state of the COP disable bit (COPD) in the configuration register (CONFIG).<br />
16.3.8 COPRS (COP Rate Select)<br />
The COPRS signal reflects the state of the COP rate select bit (COPRS) in the configuration register<br />
(CONFIG).<br />
COPRS — COP Rate Select Bit<br />
COPRS selects the COP timeout period. Reset clears COPRS.<br />
1 = COP timeout period is (8176) × CGMRCLK cycles<br />
0 = COP timeout period is (262,128) × CGMRCLK cycles<br />
COPD — COP Disable Bit<br />
COPD disables the COP module.<br />
1 = COP module disabled<br />
0 = COP module enabled<br />
16.4 COP Control Register<br />
The COP control register is located at address $FFFF and overlaps the reset vector. Writing any value to<br />
$FFFF clears the COP counter and starts a new timeout period. Reading location $FFFF returns the low<br />
byte of the reset vector.<br />
16.5 Interrupts<br />
Address: $001F<br />
Bit 7 6 5 4 3 2 1 Bit 0<br />
Read:<br />
Write:<br />
COPRS LVISTOP LVIRSTD LVIPWRD SSREC STOP COPD<br />
Reset: 0 0 0 0 0 0 0 0<br />
= Unimplemented<br />
Figure 16-2. Configuration Register (CONFIG)<br />
Address: $FFFF<br />
Bit 7 6 5 4 3 2 1 Bit 0<br />
Read: Low byte of reset vector<br />
Write: Clear COP counter<br />
Reset: Unaffected by reset<br />
Figure 16-3. COP Control Register (COPCTL)<br />
The COP does not generate CPU interrupt requests.<br />
<strong>Freescale</strong> Semiconductor 199
Computer Operating Properly (COP)<br />
16.6 Monitor Mode<br />
The COP is disabled in monitor mode when V TST is present on the IRQ pin or on the RST pin.<br />
16.7 Low-Power Modes<br />
The WAIT and STOP instructions put the MCU in low-power consumption standby modes.<br />
16.7.1 Wait Mode<br />
The COP remains active during wait mode. To prevent a COP reset during wait mode, periodically clear<br />
the COP counter in a CPU interrupt routine.<br />
16.7.2 Stop Mode<br />
Stop mode turns off the CGMRCLK input to the COP and clears the COP prescaler. Service the COP<br />
immediately before entering or after exiting stop mode to ensure a full COP timeout period after entering<br />
or exiting stop mode.<br />
The STOP bit in the configuration register (CONFIG) enables the STOP instruction. To prevent<br />
inadvertently turning off the COP with a STOP instruction, disable the STOP instruction by clearing the<br />
STOP bit.<br />
16.8 COP Module During Break Mode<br />
The COP is disabled during a break interrupt when V TST is present on the RST pin.<br />
<strong>MC68HC908JW32</strong> <strong>Data</strong> <strong>Sheet</strong>, Rev. 6<br />
200 <strong>Freescale</strong> Semiconductor
Chapter 17<br />
Low-Voltage Inhibit (LVI)<br />
17.1 Introduction<br />
This section describes the low-voltage inhibit (LVI) module. The LVI module monitors the voltage on the<br />
V DD pin, and can force a reset when V DD voltage falls below V TRIPF1 .<br />
17.2 Features<br />
Features of the LVI module include:<br />
• Independent voltage monitoring circuits for V DD<br />
• Independent LVI circuit disable for V DD<br />
• Programmable LVI reset<br />
• Programmable stop mode operation<br />
Addr. Register Name Bit 7 6 5 4 3 2 1 Bit 0<br />
Read: LVIOUT 0 0 0 0 0 0 0<br />
$FE0F<br />
LVI Status Register<br />
(LVISR)<br />
Write:<br />
Reset: 0 0 0 0 0 0 0 0<br />
= Unimplemented<br />
17.3 Functional Description<br />
Figure 17-1. LVI I/O Register Summary<br />
Figure 17-2 shows the structure of the LVI module. The LVI is enabled out of reset. The LVI module<br />
contains independent bandgap reference circuit and comparator for monitoring the VDD voltage. An LVI<br />
reset performs a MCU internal reset and drives the RST pin low to provide low-voltage protection to<br />
external peripheral devices.<br />
LVISTOP, LVIPWRD, LVIRSTD are in the CONFIG1 register. See Chapter 3 Configuration Registers<br />
(CONFIG) for details of the LVI configuration bits. Once an LVI reset occurs, the MCU remains in reset<br />
until VDD rises above VTRIPR1 which causes the MCU to exit reset. The output of the comparator controls<br />
the state of the LVIOUT flag in the LVI status register (LVISR).<br />
An LVI reset also drives the RST pin low to provide low-voltage protection to external peripheral devices.<br />
<strong>MC68HC908JW32</strong> <strong>Data</strong> <strong>Sheet</strong>, Rev. 6<br />
<strong>Freescale</strong> Semiconductor 201
Low-Voltage Inhibit (LVI)<br />
V DD<br />
LOW V DD<br />
DETECTOR<br />
17.3.1 Low V DD Detector<br />
Figure 17-2. LVI Module Block Diagram<br />
The low V DD detector circuit monitors the V DD voltage and forces a LVI reset when the V DD voltage falls<br />
below the trip voltage, V TRIPF1 . The V DD LVI circuit can be disabled by the setting the LVIPWRD bit in<br />
CONFIG1 register.<br />
17.3.2 Polled LVI Operation<br />
LVIPWRD<br />
FROM CONFIG1<br />
V DD > V TRIPR1 = 0<br />
V DD ≤ V TRIPF1 = 1<br />
In applications that can operate at V DD levels below the V TRIPF1 level, software can monitor V DD by polling<br />
the LVIOUT bit. In the CONFIG1 register, the LVIPWRD bit must be at logic 0 to enable the LVI module,<br />
and the LVIRSTD bit must be at logic 1 to disable LVI resets.<br />
17.3.3 Forced Reset Operation<br />
In applications that require V DD to remain above the V TRIPF1 level, enabling LVI resets allows the LVI<br />
module to reset the MCU when V DD falls below the V TRIPF1 level. In the CONFIG1 register, the LVIPWRD<br />
and LVIRSTD bits must be at logic 0 to enable the LVI module and to enable LVI resets.<br />
17.3.4 Voltage Hysteresis Protection<br />
STOP INSTRUCTION<br />
Once the LVI has triggered (by having V DD fall below V TRIPF1 ), the LVI will maintain a reset condition until<br />
V DD rises above the rising trip point voltage, V TRIPR1 . This prevents a condition in which the MCU is<br />
continually entering and exiting reset if V DD is approximately equal to V TRIPF1 . V TRIPR1 is greater than<br />
V TRIPF1 by the hysteresis voltage, V HYS .<br />
<strong>MC68HC908JW32</strong> <strong>Data</strong> <strong>Sheet</strong>, Rev. 6<br />
FROM CONFIG1<br />
FROM CONFIG1<br />
LVIRSTD<br />
LVIOUT<br />
TO LVISR<br />
LVISTOP<br />
LVI RESET<br />
202 <strong>Freescale</strong> Semiconductor
17.4 LVI Status Register<br />
The LVI status register (LVISR) indicates if the V DD voltage was detected below V TRIPF1 .<br />
<strong>MC68HC908JW32</strong> <strong>Data</strong> <strong>Sheet</strong>, Rev. 6<br />
LVI Status Register<br />
LVIOUT — LVI Output Bit<br />
This read-only flag becomes set when the V DD or V REG falls below their respective trip voltages. Reset<br />
clears the LVIOUT bit.<br />
17.5 LVI Interrupts<br />
The LVI module does not generate interrupt requests.<br />
17.6 Low-Power Modes<br />
The STOP and WAIT instructions put the MCU in low power-consumption standby modes.<br />
17.6.1 Wait Mode<br />
If enabled, the LVI module remains active in wait mode. If enabled to generate resets, the LVI module can<br />
generate a reset and bring the MCU out of wait mode.<br />
17.6.2 Stop Mode<br />
Address: $FE0F<br />
Bit 7 6 5 4 3 2 1 Bit 0<br />
Read:<br />
Write:<br />
LVIOUT 0 0 0 0 0 0 0<br />
Reset: 0 0<br />
= Unimplemented<br />
0 0 0 0 0 0<br />
Figure 17-3. LVI Status Register<br />
Table 17-1. LVIOUT Bit Indication<br />
V DD , V REG<br />
V DD > V TRIPR1<br />
V DD < V TRIPF1<br />
V TRIPF1 < V DD < V TRIPR1<br />
LVIOUT<br />
If enabled in stop mode (LVISTOP = 1), the LVI module remains active in stop mode. If enabled to<br />
generate resets (LVIRSTD = 0), the LVI module can generate a reset and bring the MCU out of stop<br />
mode.<br />
<strong>Freescale</strong> Semiconductor 203<br />
0<br />
1<br />
Previous value
Low-Voltage Inhibit (LVI)<br />
<strong>MC68HC908JW32</strong> <strong>Data</strong> <strong>Sheet</strong>, Rev. 6<br />
204 <strong>Freescale</strong> Semiconductor
Chapter 18<br />
Break Module (BRK)<br />
18.1 Introduction<br />
This section describes the break module. The break module can generate a break interrupt that stops<br />
normal program flow at a defined address to enter a background program.<br />
18.2 Features<br />
Features of the break module include:<br />
• Accessible input/output (I/O) registers during the break interrupt<br />
• CPU-generated break interrupts<br />
• Software-generated break interrupts<br />
• COP disabling during break interrupts<br />
Addr. Register Name Bit 7 6 5 4 3 2 1 Bit 0<br />
$FE00<br />
SIM Break Status Register<br />
(SBSR)<br />
Read:<br />
Write:<br />
R R R R R R<br />
SBSW<br />
Note<br />
R<br />
Reset: 0<br />
$FE03<br />
SIM Break Flag Control<br />
Register<br />
Read:<br />
Write:<br />
BCFE R R R R R R R<br />
(SBFCR)<br />
Reset: 0<br />
$FE0C<br />
Break Address<br />
Register High<br />
Read:<br />
Write:<br />
Bit 15 14 13 12 11 10 9 Bit 8<br />
(BRKH)<br />
Reset: 0 0 0 0 0 0 0 0<br />
$FE0D<br />
Break Address<br />
Register Low<br />
Read:<br />
Write:<br />
Bit 7 6 5 4 3 2 1 Bit 0<br />
(BRKL)<br />
Reset: 0 0 0 0 0 0 0 0<br />
$FE0E<br />
Break Status and Control<br />
Register<br />
Read:<br />
Write:<br />
BRKE BRKA<br />
0 0 0 0 0 0<br />
(BRKSCR)<br />
Reset: 0 0 0 0 0 0 0 0<br />
Note: Writing a logic 0 clears BW. = Unimplemented R = Reserved<br />
Figure 18-1. Break Module I/O Register Summary<br />
<strong>MC68HC908JW32</strong> <strong>Data</strong> <strong>Sheet</strong>, Rev. 6<br />
<strong>Freescale</strong> Semiconductor 205
Break Module (BRK)<br />
18.3 Functional Description<br />
When the internal address bus matches the value written in the break address registers, the break module<br />
issues a breakpoint signal to the SIM. The SIM then causes the CPU to load the instruction register with<br />
a software interrupt instruction (SWI) after completion of the current CPU instruction. The program<br />
counter vectors to $FFFC and $FFFD ($FEFC and $FEFD in monitor mode).<br />
The following events can cause a break interrupt to occur:<br />
• A CPU-generated address (the address in the program counter) matches the contents of the break<br />
address registers.<br />
• Software writes a logic 1 to the BRKA bit in the break status and control register.<br />
When a CPU-generated address matches the contents of the break address registers, the break interrupt<br />
is generated. A return-from-interrupt instruction (RTI) in the break routine ends the break interrupt and<br />
returns the MCU to normal operation. Figure 18-2 shows the structure of the break module.<br />
IAB15–IAB0<br />
IAB15–IAB8<br />
IAB7–IAB0<br />
Figure 18-2. Break Module Block Diagram<br />
18.3.1 Flag Protection During Break Interrupts<br />
The BCFE bit in the SIM break flag control register (SBFCR) enables software to clear status bits during<br />
the break state.<br />
18.3.2 CPU During Break Interrupts<br />
BREAK ADDRESS REGISTER HIGH<br />
8-BIT COMPARATOR<br />
8-BIT COMPARATOR<br />
BREAK ADDRESS REGISTER LOW<br />
When the internal address bus matches the value written in the break address registers or when software<br />
writes a 1 to the BRKA bit in the break status and control register, the CPU starts a break interrupt by:<br />
• Loading the instruction register with the SWI instruction<br />
• Loading the program counter with $FFFC and $FFFD ($FEFC and $FEFD in monitor mode)<br />
The break interrupt timing is:<br />
• When a break address is placed at the address of the instruction opcode, the instruction is not<br />
executed until after completion of the break interrupt routine.<br />
• When a break address is placed at an address of an instruction operand, the instruction is<br />
executed before the break interrupt.<br />
• When software writes a 1 to the BRKA bit, the break interrupt occurs just before the next instruction<br />
is executed.<br />
<strong>MC68HC908JW32</strong> <strong>Data</strong> <strong>Sheet</strong>, Rev. 6<br />
CONTROL<br />
BREAK<br />
206 <strong>Freescale</strong> Semiconductor
<strong>MC68HC908JW32</strong> <strong>Data</strong> <strong>Sheet</strong>, Rev. 6<br />
Low-Power Modes<br />
By updating a break address and clearing the BRKA bit in a break interrupt routine, a break interrupt can<br />
be generated continuously.<br />
CAUTION<br />
A break address should be placed at the address of the instruction opcode.<br />
When software does not change the break address and clears the BRKA<br />
bit in the first break interrupt routine, the next break interrupt will not be<br />
generated after exiting the interrupt routine even when the internal address<br />
bus matches the value written in the break address registers.<br />
18.3.3 TIMI and TIM2 During Break Interrupts<br />
A break interrupt stops the timer counters.<br />
18.3.4 COP During Break Interrupts<br />
The COP is disabled during a break interrupt when V TST is present on the RST pin.<br />
18.4 Low-Power Modes<br />
The WAIT and STOP instructions put the MCU in low power-consumption standby modes.<br />
18.4.1 Wait Mode<br />
If enabled, the break module is active in wait mode. In the break routine, the user can subtract one from<br />
the return address on the stack if SBSW is set. (See Chapter 6 System Integration Module (SIM).) Clear<br />
the BW bit by writing logic 0 to it.<br />
18.5 Break Module Registers<br />
These registers control and monitor operation of the break module:<br />
• Break status and control register (BRKSCR)<br />
• Break address register high (BRKH)<br />
• Break address register low (BRKL)<br />
• SIM break status register (SBSR)<br />
• SIM break flag control register (SBFCR)<br />
18.5.1 Break Status and Control Register<br />
The break status and control register (BRKSCR) contains break module enable and status bits.<br />
Address: $FE0E<br />
Bit 7 6 5 4 3 2 1 Bit 0<br />
Read:<br />
Write:<br />
BRKE BRKA<br />
0 0 0 0 0 0<br />
Reset: 0 0 0 0 0 0 0 0<br />
= Unimplemented<br />
Figure 18-3. Break Status and Control Register (BRKSCR)<br />
<strong>Freescale</strong> Semiconductor 207
Break Module (BRK)<br />
BRKE — Break Enable Bit<br />
This read/write bit enables breaks on break address register matches. Clear BRKE by writing a logic<br />
0 to bit 7. Reset clears the BRKE bit.<br />
1 = Breaks enabled on 16-bit address match<br />
0 = Breaks disabled on 16-bit address match<br />
BRKA — Break Active Bit<br />
This read/write status and control bit is set when a break address match occurs. Writing a logic 1 to<br />
BRKA generates a break interrupt. Clear BRKA by writing a logic 0 to it before exiting the break routine.<br />
Reset clears the BRKA bit.<br />
1 = (When read) Break address match<br />
0 = (When read) No break address match<br />
18.5.2 Break Address Registers<br />
The break address registers (BRKH and BRKL) contain the high and low bytes of the desired breakpoint<br />
address. Reset clears the break address registers.<br />
Address: $FE0C<br />
Bit 7 6 5 4 3 2 1 Bit 0<br />
Read:<br />
Write:<br />
Bit 15 14 13 12 11 10 9 Bit 8<br />
Reset: 0 0 0 0 0 0 0 0<br />
18.5.3 SIM Break Status Register<br />
Figure 18-4. Break Address Register High (BRKH)<br />
Address: $FE0D<br />
Bit 7 6 5 4 3 2 1 Bit 0<br />
Read:<br />
Write:<br />
Bit 7 6 5 4 3 2 1 Bit 0<br />
Reset: 0 0 0 0 0 0 0 0<br />
Figure 18-5. Break Address Register Low (BRKL)<br />
The SIM break status register (SBSR) contains a flag to indicate that a break caused an exit from wait<br />
mode. This register is used only in emulation mode.<br />
Address: $FE00<br />
Bit 7 6 5 4 3 2 1 Bit 0<br />
Read:<br />
Write:<br />
R R R R R R<br />
SBSW<br />
Note<br />
R<br />
Reset: 0<br />
Note: Writing a logic 0 clears SBSW. R = Reserved<br />
Figure 18-6. SIM Break Status Register (SBSR)<br />
<strong>MC68HC908JW32</strong> <strong>Data</strong> <strong>Sheet</strong>, Rev. 6<br />
208 <strong>Freescale</strong> Semiconductor
SBSW — Break Wait Bit<br />
<strong>MC68HC908JW32</strong> <strong>Data</strong> <strong>Sheet</strong>, Rev. 6<br />
Break Module Registers<br />
SBSW can be read within the break interrupt routine. The user can modify the return address on the<br />
stack by subtracting 1 from it.<br />
1 = Wait mode was exited by break interrupt<br />
0 = Wait mode was not exited by break interrupt<br />
18.5.4 SIM Break Flag Control Register<br />
The SIM break flag control register (SBFCR) contains a bit that enables software to clear status bits while<br />
the MCU is in a break state.<br />
Address: $FE03<br />
Bit 7 6 5 4 3 2 1 Bit 0<br />
Read:<br />
Write:<br />
BCFE R R R R R R R<br />
Reset: 0<br />
R = Reserved<br />
Figure 18-7. SIM Break Flag Control Register (SBFCR)<br />
BCFE — Break Clear Flag Enable Bit<br />
This read/write bit enables software to clear status bits by accessing status registers while the MCU is<br />
in a break state. To clear status bits during the break state, the BCFE bit must be set.<br />
1 = Status bits clearable during break<br />
0 = Status bits not clearable during break<br />
<strong>Freescale</strong> Semiconductor 209
Break Module (BRK)<br />
<strong>MC68HC908JW32</strong> <strong>Data</strong> <strong>Sheet</strong>, Rev. 6<br />
210 <strong>Freescale</strong> Semiconductor
Chapter 19<br />
Electrical Specifications<br />
19.1 Introduction<br />
This section contains electrical and timing specifications.<br />
19.2 Absolute Maximum Ratings<br />
Maximum ratings are the extreme limits to which the MCU can be exposed without permanently damaging it.<br />
NOTE<br />
This device is not guaranteed to operate properly at the maximum ratings.<br />
Refer to 19.5 DC Electrical Characteristics for guaranteed operating<br />
conditions.<br />
1. Voltages referenced to V SS .<br />
Table 19-1. Absolute Maximum Ratings (1)<br />
Characteristic Symbol Value Unit<br />
Supply voltage V DD –0.3 to +6.0 V<br />
Input voltage<br />
All pins (except IRQ)<br />
IRQ pin<br />
NOTE<br />
This device contains circuitry to protect the inputs against damage due to<br />
high static voltages or electric fields; however, it is advised that normal<br />
precautions be taken to avoid application of any voltage higher than<br />
maximum-rated voltages to this high-impedance circuit. For proper<br />
operation, it is recommended that V IN and V OUT be constrained to the<br />
range V SS ≤ (V IN or V OUT ) ≤ V DD . Reliability of operation is enhanced if<br />
unused inputs are connected to an appropriate logic voltage level (for<br />
example, either V SS or V DD.)<br />
<strong>MC68HC908JW32</strong> <strong>Data</strong> <strong>Sheet</strong>, Rev. 6<br />
<strong>Freescale</strong> Semiconductor 211<br />
V IN<br />
V SS –0.3 to V DD +0.3<br />
V SS –0.3 to 8.5<br />
Maximum current per pin excluding V DD and V SS I ±25 mA<br />
Maximum current out of V SS I MVSS 100 mA<br />
Maximum current into V DD I MVDD 100 mA<br />
Storage temperature T STG –55 to +150 °C<br />
V
Electrical Specifications<br />
19.3 Functional Operating Range<br />
19.4 Thermal Characteristics<br />
Table 19-2. Operating Range<br />
Characteristic Symbol Value Unit<br />
Operating temperature range T A 0 to +70 °C<br />
Operating voltage range V DD 3.5 to 5.5 V<br />
Thermal resistance<br />
48-Pin QFN<br />
48-Pin LQFP<br />
52-Pin LQFP<br />
Table 19-3. Thermal Characteristics<br />
Characteristic Symbol Value Unit<br />
I/O pin power dissipation P I/O User determined W<br />
Power dissipation (1)<br />
Constant (2)<br />
1. Power dissipation is a function of temperature.<br />
2. K constant unique to the device. K can be determined for a known TA and measured PD. With this value of K, PD and TJ can be determined for any value of TA .<br />
<strong>MC68HC908JW32</strong> <strong>Data</strong> <strong>Sheet</strong>, Rev. 6<br />
212 <strong>Freescale</strong> Semiconductor<br />
θ JA<br />
P D<br />
K<br />
84<br />
80<br />
85<br />
P D = (I DD × V DD ) + P I/O =<br />
K/(T J + 273 °C)<br />
PD x(TA + 273 °C)<br />
+ P 2<br />
D ×θJA<br />
Average junction temperature T J T A + (P D × θ JA ) °C<br />
°C/W<br />
W<br />
W/°C
19.5 DC Electrical Characteristics<br />
Table 19-4. DC Electrical Characteristics<br />
<strong>MC68HC908JW32</strong> <strong>Data</strong> <strong>Sheet</strong>, Rev. 6<br />
DC Electrical Characteristics<br />
Characteristic (1) Symbol Min Typ (2) Max Unit<br />
2.5V Regulator Output Voltage V REG25 2.25 2.5 2.75 V<br />
3.3V Regulator Output Voltage<br />
(At V DD from 3.9V–5.5V) (3) V REG33 3.0 3.3 3.6 V<br />
Output high voltage<br />
(I LOAD = –2.0 mA) All ports<br />
Output low voltage<br />
(I LOAD = 1.6mA) All ports<br />
Output Sourcing Capability<br />
PTB0–PTB1 (V OL = 0.4V)<br />
PTB2–PTB7 (V OL = 0.4V)<br />
PTE2–PTE3 (V OL = 0.4V)<br />
Input high voltage<br />
All ports, RST, IRQ<br />
Input low voltage<br />
All ports, RST, IRQ<br />
VDD supply current<br />
Run (4) (0°C-70°C), fOP = 8 MHz<br />
(all modules on including USB)<br />
Wait (5) (0°C-70°C), fOP = 8 MHz<br />
(all modules on including USB)<br />
Stop (0°C-70°C)<br />
with RC on, LVI on and all other modules off<br />
Stop (0°C-70°C)<br />
with RC off, LVI on and all other modules off<br />
Digital I/O ports Hi-Z leakage current<br />
All ports, RST<br />
Input current<br />
IRQ<br />
Capacitance<br />
Ports (as input or output)<br />
V OH V DD –0.8 — — V<br />
V OL — — 0.4 V<br />
<strong>Freescale</strong> Semiconductor 213<br />
I LOAD<br />
18<br />
12<br />
8<br />
26<br />
18<br />
12<br />
34<br />
24<br />
16<br />
mA<br />
mA<br />
mA<br />
V IH 0.7 × V DD — V DD V<br />
V IL V SS — 0.3 × V DD V<br />
I DD<br />
—<br />
—<br />
—<br />
—<br />
—<br />
—<br />
—<br />
—<br />
18<br />
16<br />
350<br />
280<br />
mA<br />
mA<br />
µA<br />
µA<br />
I IL — — ± 10 µA<br />
I IN — — ± 1 µA<br />
POR rise-time ramp rate (6) R POR 0.035 — — V/ms<br />
POR assert voltage (7) V POR_assert 0.90 1.62 2.1 V<br />
Monitor mode entry voltage (at IRQ pin) V TST 1.5 × V DD — 8 V<br />
C OUT<br />
C IN<br />
—<br />
—<br />
—<br />
—<br />
12<br />
8<br />
pF
Electrical Specifications<br />
Pullup resistors (8)<br />
PTA0–PTA7 configured as KBI0–KBI7<br />
RST, IRQ, PTD2, PTD3, PTD7<br />
PTE2–PTE3 with USB disabled<br />
PTE2/D+ with USB enabled (to REG33V) (9)<br />
PTE3/D– with USB enabled (to REG33V) (10)<br />
PTB0–PTB7 with internal pullup enabled<br />
Low-voltage inhibit for external VDD, trip falling voltage<br />
(kick-in)<br />
Low-voltage inhibit for external VDD, trip rising voltage<br />
(recovery)<br />
19.6 Control Timing<br />
19.7 Internal RC Clock Timing<br />
R PU1<br />
R PU2<br />
R PU3<br />
R PU4 (Idle)<br />
R PU4 (Tran)<br />
R PU5<br />
<strong>MC68HC908JW32</strong> <strong>Data</strong> <strong>Sheet</strong>, Rev. 6<br />
214 <strong>Freescale</strong> Semiconductor<br />
21<br />
21<br />
4<br />
900<br />
1425<br />
21<br />
30<br />
30<br />
5<br />
—<br />
—<br />
30<br />
39<br />
39<br />
6<br />
1575<br />
3090<br />
39<br />
V TRIPF1 3.0 3.3 3.5 V<br />
V TRIPR1 3.07 3.4 3.6 V<br />
1. V DD = 3.9 to 5.5 Vdc, V SS = 0 Vdc, T A = T L to T H , unless otherwise noted.<br />
2. Typical values reflect average measurements at midpoint of voltage range, 25 °C only.<br />
3. When V DD drops below 3.9V, the VREF33 regulator output will not be guaranteed within 3.3V +/- 10%.<br />
4. Run (operating) I DD measured using external square wave clock source. All inputs 0.2 V from rail. No dc loads. Less than<br />
100 pF on all outputs. C L = 20 pF on OSC2. All ports configured as inputs. OSC2 capacitance linearly affects run I DD .<br />
5. Wait I DD measured using external square wave clock source. All inputs 0.2 V from rail. No dc loads. Less than 100 pF on<br />
all outputs. C L = 20 pF on OSC2. All ports configured as inputs. OSC2 capacitance linearly affects wait I DD .<br />
6. If minimum V DD is not reached before the internal POR reset is released, RST must be driven low externally until minimum<br />
V DD is reached.<br />
7. The internal 2.5V regulator has embedded a LVI_POR circuitry when the regulator voltage drops below V LVI_POR_assert<br />
voltage it triggers the CPU reset. The reset is released when the regulator voltage returns above V LVI_POR_release voltage.<br />
8. R PU1 and R PU2 are measured at V DD = 5.0V<br />
9. The resistor value is measured at V DD = 3.9 to 5.5 Vdc, V SS = 0 Vdc.<br />
10. The resistor value is measured at V DD = 3.9 to 5.5 Vdc, V SS = 0 Vdc.<br />
Internal operating frequency (2)<br />
RST input pulse width low (3)<br />
Table 19-4. DC Electrical Characteristics (Continued)<br />
Characteristic (1) Symbol Min Typ (2) Max Unit<br />
Characteristic (1)<br />
Table 19-5. Control Timing<br />
Symbol Min Max Unit<br />
f OP — 8 MHz<br />
t RL 100 — ns<br />
1. VSS = 0 Vdc; timing shown with respect to 20% VDD and 70% VDD , unless otherwise noted.<br />
2. Some modules may require a minimum frequency greater than dc for proper operation; see appropriate table for this<br />
information.<br />
3. Minimum pulse width reset is guaranteed to be recognized. It is possible for a smaller pulse width to cause a reset.<br />
Characteristic (1)<br />
Table 19-6. Internal RC Clock Timing<br />
Symbol Min TYP Max Unit<br />
Internal RC Clock frequency f OP 74 88 105 kHz<br />
1. V SS = 0 Vdc; timing shown with respect to 20% V DD and 70% V DD , unless otherwise noted.<br />
kΩ<br />
kΩ<br />
kΩ<br />
Ω<br />
Ω<br />
kΩ
19.8 Crystal Oscillator Characteristics<br />
Crystal frequency (1)<br />
External clock<br />
Reference frequency (1), (2)<br />
Crystal load capacitance (3)<br />
Table 19-7. Oscillator Characteristics<br />
19.9 USB DC Electrical Characteristic<br />
The USB electrical performance is compliant to the USB specification 2.0.<br />
<strong>MC68HC908JW32</strong> <strong>Data</strong> <strong>Sheet</strong>, Rev. 6<br />
Crystal Oscillator Characteristics<br />
Characteristic Symbol Min Typ Max Unit<br />
1. The USB module is designed to function at fXCLK = 4MHz.<br />
2. No more than 10% duty cycle deviation from 50%.<br />
3. Consult crystal vendor data sheet.<br />
4. Not required for high-frequency crystals.<br />
f XCLK 1 4 4 MHz<br />
f XCLK dc — 4 MHz<br />
C L — — — pF<br />
Crystal fixed capacitance (3) C 1 — 2 × C L — pF<br />
Crystal tuning capacitance (3) C 2 — 2 × C L — pF<br />
Feedback bias resistor R B — 1 — MΩ<br />
(3), (4)<br />
Series resistor<br />
Characteristic (1)<br />
R S — — — Ω<br />
Table 19-8. USB DC Electrical Characteristics<br />
1. V DD = 3.9 to 5.5 Vdc, V SS = 0 Vdc, T A = T L to T H , unless otherwise noted.<br />
Symbol Conditions Min Typ Max Unit<br />
Hi-Z state data line leakage I LO 0V
Electrical Specifications<br />
19.10 Timer Interface Module Characteristics<br />
19.11 FLASH Program/Erase Timing<br />
19.12 CGM Electrical Specifications<br />
Table 19-9. Timer Interface Characteristics<br />
Characteristic Symbol Min Max Unit<br />
Input capture pulse width t TIH , t TIL 1 — t CYC<br />
Table 19-10. Flash Program/Erase Timing<br />
Characteristic Symbol Min Max Unit<br />
PROG/ERASE to NVSTR setup time T nvs 5 — µs<br />
NVSTR hold time T nvh 5 — µs<br />
NVSTR hold time (mass erase) T nvhl 100 — µs<br />
NVSTR to program setup time T pgs 10 — µs<br />
Program Time T prog 20 40 µs<br />
Page Erase Time T erase 20 — ms<br />
Mass Erase Time T me 200 — ms<br />
Recovery time T rcv 1 — µs<br />
Accumulative program HV period T hv — 8 ms<br />
Table 19-11. CGM Electrical Specifications<br />
Characteristic Symbol Min Typ Max Unit<br />
Operating Voltage V DD 3.5 — 5.5 V<br />
Reference frequency f RDV — 4 — MHz<br />
VCO center-of-range frequency f VRS — 48M — Hz<br />
VCO multiply factor N 1 — 6<br />
VCO prescale multiplier 2 P 0 — 1<br />
Reference divider factor R 1 1 1<br />
VCO operating frequency f VCLK 24 — 48 MHz<br />
Manual acquisition time t LOCK — — 5 ms<br />
Automatic lock time t LOCK — — 5 ms<br />
<strong>MC68HC908JW32</strong> <strong>Data</strong> <strong>Sheet</strong>, Rev. 6<br />
216 <strong>Freescale</strong> Semiconductor
19.13 5.0V SPI Characteristics<br />
Diagram<br />
Number (1)<br />
1<br />
Operating frequency<br />
Master<br />
Slave<br />
Cycle time<br />
Master<br />
Slave<br />
Characteristic (2)<br />
Table 19-12. SPI Characteristics<br />
1. Numbers refer to dimensions in Figure 19-1 and Figure 19-2.<br />
2. All timing is shown with respect to 20% VDD and 70% VDD , unless noted; 100 pF load on all SPI pins.<br />
3. Time to data active from high-impedance state<br />
4. Hold time to high-impedance state<br />
5. With 100 pF on all SPI pins<br />
<strong>MC68HC908JW32</strong> <strong>Data</strong> <strong>Sheet</strong>, Rev. 6<br />
5.0V SPI Characteristics<br />
Symbol Min Max Unit<br />
f OP(M)<br />
f OP(S)<br />
t CYC(M)<br />
t CYC(S)<br />
f OP /128<br />
dc<br />
2 Enable lead time t Lead(S) 1 — t CYC<br />
3 Enable lag time t Lag(S) 1 — t CYC<br />
4<br />
5<br />
6<br />
7<br />
8<br />
Clock (SPSCK) high time<br />
Master<br />
Slave<br />
Clock (SPSCK) low time<br />
Master<br />
Slave<br />
<strong>Data</strong> setup time (inputs)<br />
Master<br />
Slave<br />
<strong>Data</strong> hold time (inputs)<br />
Master<br />
Slave<br />
Access time, slave (3)<br />
CPHA = 0<br />
CPHA = 1<br />
9 Disable time, slave (4)<br />
10<br />
11<br />
<strong>Data</strong> valid time, after enable edge<br />
Master<br />
Slave (5)<br />
<strong>Data</strong> hold time, outputs, after enable edge<br />
Master<br />
Slave<br />
t SCKH(M)<br />
t SCKH(S)<br />
t SCKL(M)<br />
t SCKL(S)<br />
t SU(M)<br />
t SU(S)<br />
<strong>Freescale</strong> Semiconductor 217<br />
t H(M)<br />
t H(S)<br />
t A(CP0)<br />
t A(CP1)<br />
2<br />
1<br />
t CYC – 25<br />
1/2 t CYC – 25<br />
t CYC – 25<br />
1/2 t CYC – 25<br />
30<br />
30<br />
30<br />
30<br />
0<br />
0<br />
f OP /2<br />
f OP<br />
128<br />
—<br />
64 t CYC<br />
—<br />
64 t CYC<br />
—<br />
—<br />
—<br />
—<br />
—<br />
40<br />
40<br />
MHz<br />
MHz<br />
t CYC<br />
t CYC<br />
ns<br />
ns<br />
ns<br />
ns<br />
ns<br />
ns<br />
ns<br />
ns<br />
ns<br />
ns<br />
t DIS(S) — 40 ns<br />
t V(M)<br />
t V(S)<br />
t HO(M)<br />
t HO(S)<br />
—<br />
—<br />
0<br />
0<br />
50<br />
50<br />
—<br />
—<br />
ns<br />
ns<br />
ns<br />
ns
Electrical Specifications<br />
SS<br />
INPUT<br />
SPSCK OUTPUT<br />
CPOL = 0<br />
SPSCK OUTPUT<br />
CPOL = 1<br />
MISO<br />
INPUT<br />
MOSI<br />
OUTPUT<br />
NOTE<br />
NOTE<br />
SS PIN OF MASTER HELD HIGH<br />
MSB IN<br />
Note: This first clock edge is generated internally, but is not seen at the SPSCK pin.<br />
SS<br />
INPUT<br />
SPSCK OUTPUT<br />
CPOL = 0<br />
SPSCK OUTPUT<br />
CPOL = 1<br />
MISO<br />
INPUT<br />
MOSI<br />
OUTPUT<br />
4<br />
5<br />
1<br />
Figure 19-1. SPI Master Timing<br />
<strong>MC68HC908JW32</strong> <strong>Data</strong> <strong>Sheet</strong>, Rev. 6<br />
218 <strong>Freescale</strong> Semiconductor<br />
5<br />
4<br />
BITS 6–1 LSB IN<br />
11 10 11<br />
MASTER MSB OUT BITS 6–1 MASTER LSB OUT<br />
SS PIN OF MASTER HELD HIGH<br />
4<br />
5<br />
MSB IN<br />
a) SPI Master Timing (CPHA = 0)<br />
1<br />
Note: This last clock edge is generated internally, but is not seen at the SPSCK pin.<br />
5<br />
4<br />
10 11 10<br />
BITS 6–1 LSB IN<br />
MASTER MSB OUT BITS 6–1 MASTER LSB OUT<br />
b) SPI Master Timing (CPHA = 1)<br />
6<br />
6<br />
7<br />
7<br />
NOTE<br />
NOTE
SS<br />
INPUT<br />
SPSCK INPUT<br />
CPOL = 0<br />
SPSCK INPUT<br />
CPOL = 1<br />
MISO<br />
INPUT<br />
MOSI<br />
OUTPUT<br />
8<br />
SLAVE<br />
MSB IN<br />
Note: Not defined but normally MSB of character just received<br />
SS<br />
INPUT<br />
SPSCK INPUT<br />
CPOL = 0<br />
SPSCK INPUT<br />
CPOL = 1<br />
8<br />
MISO<br />
OUTPUT<br />
MOSI<br />
INPUT<br />
2<br />
2<br />
4<br />
5<br />
MSB OUT<br />
1<br />
5<br />
6 7<br />
10<br />
4<br />
BITS 6–1<br />
BITS 6–1<br />
Note: Not defined but normally LSB of character previously transmitted<br />
4<br />
5<br />
10<br />
a) SPI Slave Timing (CPHA = 0)<br />
1<br />
5<br />
4<br />
Figure 19-2. SPI Slave Timing<br />
<strong>MC68HC908JW32</strong> <strong>Data</strong> <strong>Sheet</strong>, Rev. 6<br />
SLAVE LSB OUT<br />
5.0V SPI Characteristics<br />
<strong>Freescale</strong> Semiconductor 219<br />
LSB IN<br />
NOTE SLAVE MSB OUT<br />
BITS 6–1<br />
SLAVE LSB OUT<br />
6 7<br />
10<br />
MSB IN<br />
BITS 6–1<br />
b) SPI Slave Timing (CPHA = 1)<br />
11<br />
11<br />
11<br />
3<br />
LSB IN<br />
9<br />
9<br />
NOTE<br />
3
Electrical Specifications<br />
<strong>MC68HC908JW32</strong> <strong>Data</strong> <strong>Sheet</strong>, Rev. 6<br />
220 <strong>Freescale</strong> Semiconductor
Chapter 20<br />
Ordering Information and Mechanical Specifications<br />
20.1 Introduction<br />
This section contains ordering information for the <strong>MC68HC908JW32</strong>. In addition, this section gives the<br />
package dimensions for the 48-pin quad flat non-leaded package.<br />
20.2 Ordering Information<br />
20.3 Package Dimensions<br />
Table 20-1. MC Order Numbers<br />
MC Order Number Package<br />
Refer to the following pages for detailed package dimensions.<br />
<strong>MC68HC908JW32</strong> <strong>Data</strong> <strong>Sheet</strong>, Rev. 6<br />
Operating<br />
Temperature Range<br />
MCHC908JW32FC 48-pin QFN 0 to +70 °C<br />
MCHC908JW32FAE 48-pin LQFP 0 to +70 °C<br />
MCHC908JW32FHE 52-pin LQFP 0 to +70 °C<br />
<strong>Freescale</strong> Semiconductor 221
How to Reach Us:<br />
Home Page:<br />
www.freescale.com<br />
E-mail:<br />
support@freescale.com<br />
USA/Europe or Locations Not Listed:<br />
<strong>Freescale</strong> Semiconductor<br />
Technical Information Center, CH370<br />
1300 N. Alma School Road<br />
Chandler, Arizona 85224<br />
+1-800-521-6274 or +1-480-768-2130<br />
support@freescale.com<br />
Europe, Middle East, and Africa:<br />
<strong>Freescale</strong> Halbleiter Deutschland GmbH<br />
Technical Information Center<br />
Schatzbogen 7<br />
81829 Muenchen, Germany<br />
+44 1296 380 456 (English)<br />
+46 8 52200080 (English)<br />
+49 89 92103 559 (German)<br />
+33 1 69 35 48 48 (French)<br />
support@freescale.com<br />
Japan:<br />
<strong>Freescale</strong> Semiconductor Japan Ltd.<br />
Headquarters<br />
ARCO Tower 15F<br />
1-8-1, Shimo-Meguro, Meguro-ku,<br />
Tokyo 153-0064<br />
Japan<br />
0120 191014 or +81 3 5437 9125<br />
support.japan@freescale.com<br />
Asia/Pacific:<br />
<strong>Freescale</strong> Semiconductor Hong Kong Ltd.<br />
Technical Information Center<br />
2 Dai King Street<br />
Tai Po Industrial Estate<br />
Tai Po, N.T., Hong Kong<br />
+800 2666 8080<br />
support.asia@freescale.com<br />
For Literature Requests Only:<br />
<strong>Freescale</strong> Semiconductor Literature Distribution Center<br />
P.O. Box 5405<br />
Denver, Colorado 80217<br />
1-800-441-2447 or 303-675-2140<br />
Fax: 303-675-2150<br />
LDCFor<strong>Freescale</strong>Semiconductor@hibbertgroup.com<br />
<strong>MC68HC908JW32</strong><br />
Rev. 6, 3/2009<br />
RoHS-compliant and/or Pb-free versions of <strong>Freescale</strong> products have the functionality<br />
and electrical characteristics of their non-RoHS-compliant and/or non-Pb-free<br />
counterparts. For further information, see http://www.freescale.com or contact your<br />
<strong>Freescale</strong> sales representative.<br />
For information on <strong>Freescale</strong>’s Environmental Products program, go to<br />
http://www.freescale.com/epp.<br />
Information in this document is provided solely to enable system and software<br />
implementers to use <strong>Freescale</strong> Semiconductor products. There are no express or<br />
implied copyright licenses granted hereunder to design or fabricate any integrated<br />
circuits or integrated circuits based on the information in this document.<br />
<strong>Freescale</strong> Semiconductor reserves the right to make changes without further notice to<br />
any products herein. <strong>Freescale</strong> Semiconductor makes no warranty, representation or<br />
guarantee regarding the suitability of its products for any particular purpose, nor does<br />
<strong>Freescale</strong> Semiconductor assume any liability arising out of the application or use of any<br />
product or circuit, and specifically disclaims any and all liability, including without<br />
limitation consequential or incidental damages. “Typical” parameters that may be<br />
provided in <strong>Freescale</strong> Semiconductor data sheets and/or specifications can and do vary<br />
in different applications and actual performance may vary over time. All operating<br />
parameters, including “Typicals”, must be validated for each customer application by<br />
customer’s technical experts. <strong>Freescale</strong> Semiconductor does not convey any license<br />
under its patent rights nor the rights of others. <strong>Freescale</strong> Semiconductor products are<br />
not designed, intended, or authorized for use as components in systems intended for<br />
surgical implant into the body, or other applications intended to support or sustain life,<br />
or for any other application in which the failure of the <strong>Freescale</strong> Semiconductor product<br />
could create a situation where personal injury or death may occur. Should Buyer<br />
purchase or use <strong>Freescale</strong> Semiconductor products for any such unintended or<br />
unauthorized application, Buyer shall indemnify and hold <strong>Freescale</strong> Semiconductor and<br />
its officers, employees, subsidiaries, affiliates, and distributors harmless against all<br />
claims, costs, damages, and expenses, and reasonable attorney fees arising out of,<br />
directly or indirectly, any claim of personal injury or death associated with such<br />
unintended or unauthorized use, even if such claim alleges that <strong>Freescale</strong><br />
Semiconductor was negligent regarding the design or manufacture of the part.<br />
<strong>Freescale</strong> and the <strong>Freescale</strong> logo are trademarks of <strong>Freescale</strong> Semiconductor, Inc.<br />
All other product or service names are the property of their respective owners.<br />
© <strong>Freescale</strong> Semiconductor, Inc. 2009. All rights reserved.