Chapter 1 Introduction to AutoCAD - Goodheart-Willcox
Chapter 1 Introduction to AutoCAD - Goodheart-Willcox
Chapter 1 Introduction to AutoCAD - Goodheart-Willcox

Create successful ePaper yourself
Turn your PDF publications into a flip-book with our unique Google optimized e-Paper software.
This sample chapter is for review purposes only. Copyright © The <strong>Goodheart</strong>-<strong>Willcox</strong> Co., Inc. All rights reserved.<br />
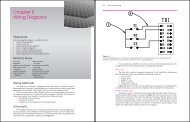
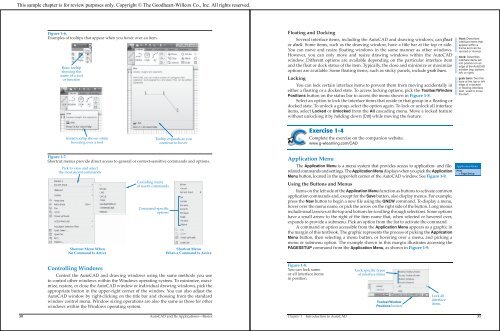
Figure 1-6.<br />
Examples of <strong>to</strong>oltips that appear when you hover over an item.<br />
Basic <strong>to</strong>oltip<br />
showing the<br />
name of a <strong>to</strong>ol<br />
or function<br />
Initial <strong>to</strong>oltip shown while<br />
hovering over a <strong>to</strong>ol<br />
Controlling Windows<br />
Tooltip expands as you<br />
continue <strong>to</strong> hover<br />
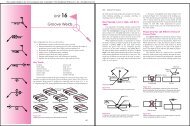
Figure 1-7.<br />
Shortcut menus provide direct access <strong>to</strong> general or context-sensitive commands and options.<br />
Pick <strong>to</strong> view and select<br />
the most recent commands<br />
Shortcut Menu When<br />
No Command Is Active<br />
Cascading menu<br />
of recent commands<br />
Command-specific<br />
options<br />
Shortcut Menu<br />
When a Command Is Active<br />
Control the Au<strong>to</strong>CAD and drawing windows using the same methods you use<br />
<strong>to</strong> control other windows within the Windows operating system. To minimize, maximize,<br />
res<strong>to</strong>re, or close the Au<strong>to</strong>CAD window or individual drawing windows, pick the<br />
appropriate but<strong>to</strong>n in the upper-right corner of the window. You can also adjust the<br />
Au<strong>to</strong>CAD window by right-clicking on the title bar and choosing from the standard<br />
window control menu. Window sizing operations are also the same as those for other<br />
windows within the Windows operating system.<br />
30 Au<strong>to</strong>CAD and Its Applications—Basics<br />
Floating and Docking<br />
Several interface items, including the Au<strong>to</strong>CAD and drawing windows, can fl oat<br />
or dock. Some items, such as the drawing window, have a title bar at the <strong>to</strong>p or side.<br />
You can move and resize fl oating windows in the same manner as other windows.<br />
However, you can only move and resize drawing windows within the Au<strong>to</strong>CAD<br />
window. Different options are available depending on the particular interface item<br />
and the fl oat or dock status of the item. Typically, the close and minimize or maximize<br />
options are available. Some fl oating items, such as sticky panels, include grab bars.<br />
Locking<br />
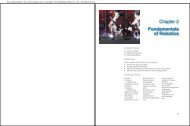
You can lock certain interface items <strong>to</strong> prevent them from moving accidentally in<br />
either a fl oating or a docked state. To access locking options, pick the Toolbar/Window<br />
Positions but<strong>to</strong>n on the status bar <strong>to</strong> access the menu shown in Figure 1-8.<br />
Select an option <strong>to</strong> lock the interface items that reside in that group in a fl oating or<br />
docked state. To unlock a group, select the option again. To lock or unlock all interface<br />
items, select Locked or Unlocked from the All cascading menu. Move a locked feature<br />
without unlocking it by holding down [Ctrl] while moving the feature.<br />
Exercise 1-4<br />
Complete the exercise on the companion website.<br />
www.g-wlearning.com/CAD<br />
Application Menu<br />
The Application Menu is a menu system that provides access <strong>to</strong> application- and fi lerelated<br />
commands and settings. The Application Menu displays when you pick the Application<br />
Menu but<strong>to</strong>n, located in the upper-left corner of the Au<strong>to</strong>CAD window. See Figure 1-9.<br />
Using the But<strong>to</strong>ns and Menus<br />
Items on the left side of the Application Menu function as but<strong>to</strong>ns <strong>to</strong> activate common<br />
application commands and, except for the Save but<strong>to</strong>n, also display menus. For example,<br />
press the New but<strong>to</strong>n <strong>to</strong> begin a new fi le using the QNEW command. To display a menu,<br />
hover over the menu name, or pick the arrow on the right side of the but<strong>to</strong>n. Long menus<br />
include small arrows at the <strong>to</strong>p and bot<strong>to</strong>m for scrolling through selections. Some options<br />
have a small arrow <strong>to</strong> the right of the item name that, when selected or hovered over,<br />
expands <strong>to</strong> provide a submenu. Pick an option from the list <strong>to</strong> activate the command.<br />
A command or option accessible from the Application Menu appears as a graphic in<br />
the margin of this textbook. The graphic represents the process of picking the Application<br />
Menu but<strong>to</strong>n, then selecting a menu but<strong>to</strong>n, or hovering over a menu, and picking a<br />
menu or submenu option. The example shown in this margin illustrates accessing the<br />
PAGESETUP command from the Application Menu, as shown in Figure 1-9.<br />
Figure 1-8.<br />
You can lock some<br />
or all interface items<br />
in position.<br />
Lock specific types<br />
of interface items<br />
Toolbar/Window<br />
Positions but<strong>to</strong>n<br />
Lock all<br />
interface<br />
items<br />
float: Describes<br />
interface items that<br />
appear within a<br />
frame and can be<br />
resized or moved.<br />
dock: Describes<br />
interface items set<br />
in<strong>to</strong> position on an<br />
edge of the Au<strong>to</strong>CAD<br />
window (<strong>to</strong>p, bot<strong>to</strong>m,<br />
left, or right).<br />
grab bars: Two thin<br />
bars at the <strong>to</strong>p or left<br />
edge of a docked<br />
or floating interface<br />
item, used <strong>to</strong> move<br />
the item.<br />
Application Menu<br />
Print<br />
> Page Setup<br />
<strong>Chapter</strong> 1 <strong>Introduction</strong> <strong>to</strong> Au<strong>to</strong>CAD 31