Chapter 1 Introduction to AutoCAD - Goodheart-Willcox
Chapter 1 Introduction to AutoCAD - Goodheart-Willcox
Chapter 1 Introduction to AutoCAD - Goodheart-Willcox

Create successful ePaper yourself
Turn your PDF publications into a flip-book with our unique Google optimized e-Paper software.
This sample chapter is for review purposes only. Copyright © The <strong>Goodheart</strong>-<strong>Willcox</strong> Co., Inc. All rights reserved.<br />
REDO<br />
Quick Access<br />
Redo<br />
tab: A small stub<br />
at the <strong>to</strong>p or side<br />
of a page, window,<br />
dialog box, or<br />
palette that allows<br />
access <strong>to</strong> other<br />
portions of the item.<br />
ribbon panels<br />
(panels): Palette<br />
divisions that group<br />
commands.<br />
and relocating <strong>to</strong>ol but<strong>to</strong>ns. To make basic adjustments, pick the Cus<strong>to</strong>mize Quick<br />
Access Toolbar fl yout on the right side of the <strong>to</strong>olbar. Au<strong>to</strong>CAD and Its Applications—<br />
Cus<strong>to</strong>mization and Programming further explains cus<strong>to</strong>mizing the user interface.<br />
A command or option accessible from the Quick Access <strong>to</strong>olbar appears as a<br />
graphic in the margin of this textbook. The graphic represents the process of picking<br />
a Quick Access <strong>to</strong>olbar but<strong>to</strong>n from the <strong>to</strong>olbar or fl yout. The example shown in this<br />
margin illustrates accessing the REDO command from the Quick Access <strong>to</strong>olbar <strong>to</strong><br />
redo a previously undone operation.<br />
Ribbon<br />
NOTE<br />
Several <strong>to</strong>olbars appear in the Au<strong>to</strong>CAD Classic workspace. These<br />
<strong>to</strong>olbars are usually application- or task-specifi c. The Application<br />
Menu, Quick Access <strong>to</strong>olbar, and ribbon replace classic <strong>to</strong>olbars in<br />
all other workspaces. Refer <strong>to</strong> Au<strong>to</strong>CAD and Its Applications—<br />
Cus<strong>to</strong>mization and Programming for information about displaying<br />
<strong>to</strong>olbars and interface cus<strong>to</strong>mization.<br />
Exercise 1-6<br />
Complete the exercise on the companion website.<br />
www.g-wlearning.com/CAD<br />
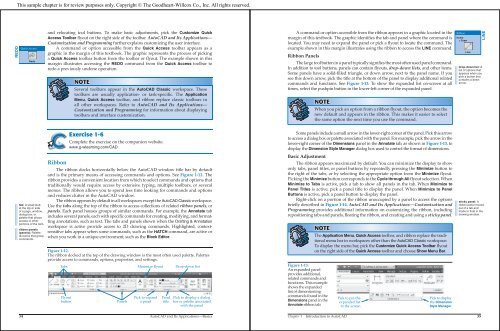
The ribbon docks horizontally below the Au<strong>to</strong>CAD window title bar by default<br />
and is the primary means of accessing commands and options. See Figure 1-12. The<br />
ribbon provides a convenient location from which <strong>to</strong> select commands and options that<br />
traditionally would require access by extensive typing, multiple <strong>to</strong>olbars, or several<br />
menus. The ribbon allows you <strong>to</strong> spend less time looking for commands and options<br />
and reduces clutter in the Au<strong>to</strong>CAD window.<br />
The ribbon appears by default in all workspaces except the Au<strong>to</strong>CAD Classic workspace.<br />
Use the tabs along the <strong>to</strong>p of the ribbon <strong>to</strong> access collections of related ribbon panels, or<br />
panels. Each panel houses groups of similar commands. For example, the Annotate tab<br />
includes several panels, each with specifi c commands for creating, modifying, and formatting<br />
annotations, such as text. The tabs and panels shown when the Drafting & Annotation<br />
workspace is active provide access <strong>to</strong> 2D drawing commands. Highlighted, contextsensitive<br />
tabs appear when some commands, such as the HATCH command, are active or<br />
when you work in a unique environment, such as the Block Edi<strong>to</strong>r.<br />
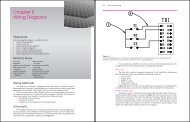
Figure 1-12.<br />
The ribbon docked at the <strong>to</strong>p of the drawing window is the most often used palette. Palettes<br />
provide access <strong>to</strong> commands, options, properties, and settings.<br />
Tabs Minimize flyout Drop-down list<br />
Flyout<br />
but<strong>to</strong>n Panels<br />
Pick <strong>to</strong> expand<br />
a panel<br />
34 Au<strong>to</strong>CAD and Its Applications—Basics<br />
Panel<br />
title<br />
Pick <strong>to</strong> display a dialog<br />
box or palette associated<br />
with the panel<br />
A command or option accessible from the ribbon appears in a graphic located in the<br />
margin of this textbook. The graphic identifies the tab and panel where the command is<br />
located. You may need <strong>to</strong> expand the panel or pick a flyout <strong>to</strong> locate the command. The<br />
example shown in this margin illustrates using the ribbon <strong>to</strong> access the LINE command.<br />
Ribbon Panels<br />
The large <strong>to</strong>ol but<strong>to</strong>n in a panel typically signifies the most often used panel command.<br />
In addition <strong>to</strong> <strong>to</strong>ol but<strong>to</strong>ns, panels can contain flyouts, drop-down lists, and other items.<br />
Some panels have a solid-filled triangle, or down arrow, next <strong>to</strong> the panel name. If you<br />
see this down arrow, pick the title at the bot<strong>to</strong>m of the panel <strong>to</strong> display additional related<br />
commands and functions. See Figure 1-13. To show the expanded list on-screen at all<br />
times, select the pushpin but<strong>to</strong>n in the lower-left corner of the expanded panel.<br />
NOTE<br />
When you pick an option from a ribbon flyout, the option becomes the<br />
new default and appears in the ribbon. This makes it easier <strong>to</strong> select<br />
the same option the next time you use the command.<br />
Some panels include a small arrow in the lower-right corner of the panel. Pick this arrow<br />
<strong>to</strong> access a dialog box or palette associated with the panel. For example, pick the arrow in the<br />
lower-right corner of the Dimensions panel in the Annotate tab, as shown in Figure 1-13, <strong>to</strong><br />
display the Dimension Style Manager dialog box used <strong>to</strong> control the format of dimensions.<br />
Basic Adjustment<br />
The ribbon appears maximized by default. You can minimize the display <strong>to</strong> show<br />
only tabs, panel titles, or panel but<strong>to</strong>ns by repeatedly pressing the Minimize but<strong>to</strong>n <strong>to</strong><br />
the right of the tabs, or by selecting the appropriate option from the Minimize flyout.<br />
Picking the Minimize but<strong>to</strong>n corresponds <strong>to</strong> the Cycle through All flyout selection. When<br />
Minimize <strong>to</strong> Tabs is active, pick a tab <strong>to</strong> show all panels in the tab. When Minimize <strong>to</strong><br />
Panel Titles is active, pick a panel title <strong>to</strong> display the panel. When Minimize <strong>to</strong> Panel<br />
But<strong>to</strong>ns is active, pick a panel but<strong>to</strong>n <strong>to</strong> display the panel.<br />
Right-click on a portion of the ribbon unoccupied by a panel <strong>to</strong> access the options<br />
briefly described in Figure 1-14. Au<strong>to</strong>CAD and Its Applications—Cus<strong>to</strong>mization and<br />
Programming provides additional information on cus<strong>to</strong>mizing the ribbon, including<br />
repositioning tabs and panels, floating the ribbon, and creating and using a sticky panel.<br />
Figure 1-13.<br />
An expanded panel<br />
provides additional,<br />
related commands and<br />
functions. This example<br />
shows the expanded<br />
list of dimensioning<br />
commands found in the<br />
Dimensions panel in the<br />
Annotate ribbon tab.<br />
NOTE<br />
The Application Menu, Quick Access <strong>to</strong>olbar, and ribbon replace the traditional<br />
menu bar in workspaces other than the Au<strong>to</strong>CAD Classic workspace.<br />
To display the menu bar, pick the Cus<strong>to</strong>mize Quick Access Toolbar flyout<br />
on the right side of the Quick Access <strong>to</strong>olbar and choose Show Menu Bar.<br />
Pick <strong>to</strong> pin the<br />
expanded list<br />
<strong>to</strong> the screen<br />
Pick <strong>to</strong> display<br />
the Dimension<br />
Style Manager<br />
<strong>Chapter</strong> 1 <strong>Introduction</strong> <strong>to</strong> Au<strong>to</strong>CAD 35<br />
Ribbon<br />
Home<br />
> Draw<br />
Line<br />
LINE<br />
drop-down list: A<br />
list of options that<br />
appears when you<br />
pick a but<strong>to</strong>n that<br />
contains a down<br />
arrow.<br />
sticky panel: A<br />
ribbon panel moved<br />
out of a tab and<br />
made <strong>to</strong> float in the<br />
drawing window.