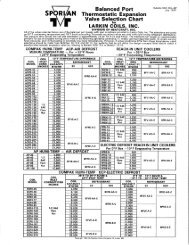
100-50-5.2 - Sporlan Online
100-50-5.2 - Sporlan Online
100-50-5.2 - Sporlan Online

You also want an ePaper? Increase the reach of your titles
YUMPU automatically turns print PDFs into web optimized ePapers that Google loves.
Bulletin <strong>100</strong>-<strong>50</strong>-<strong>5.2</strong> – Page 3<br />
Introduction<br />
The <strong>Sporlan</strong> Subcool<br />
Control is a simple means<br />
of controlling the Electronic<br />
Expansion Valve (EEV) on<br />
most liquid subcooling<br />
systems. The Subcool Control provides liquid<br />
temperature and superheat (pressure-temperature)<br />
control for most common refrigerants. It displays<br />
actual leaving liquid temperature, superheat,<br />
suction pressure, valve position, controller status,<br />
and alarms. It also allows manual control of the<br />
valve position.<br />
Features<br />
• One dial for setting superheat and liquid temperature<br />
• One EEV control (bipolar step motor)<br />
• 4-digit LED display<br />
• Optional controller networking (MODBUS)<br />
• One pressure input (<strong>Sporlan</strong> transducer)<br />
• One digital input (for external switch or relay)<br />
• Three temperature inputs (<strong>Sporlan</strong> surface or air<br />
sensors)<br />
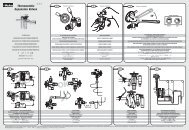
1. Installation<br />
Refer to Appendix I - Wiring Diagram and Appendix J -<br />
Sensor Installation<br />
TOOLS REQUIRED:<br />
• Small flat screwdriver for terminal connections<br />
• Cordless screwdriver<br />
• Phillips and flat screwdrivers<br />
• Needle-nose pliers<br />
• Wire cutters<br />
• Scotch-Brite TM pad<br />
• Two #8 x ½” self-tapping screws to mount DIN rail<br />
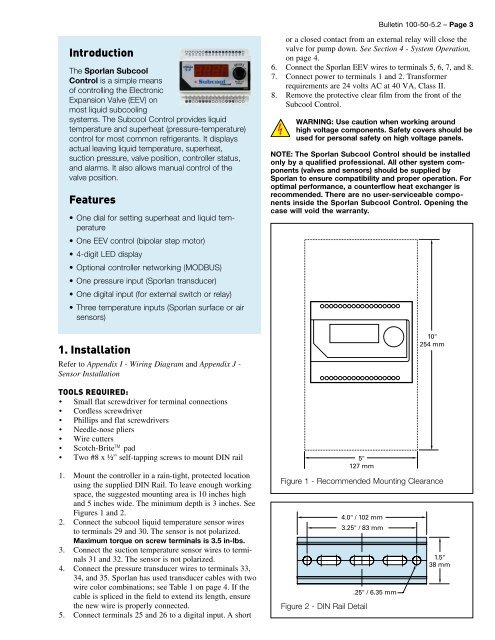
1. Mount the controller in a rain-tight, protected location<br />
using the supplied DIN Rail. To leave enough working<br />
space, the suggested mounting area is 10 inches high<br />
and 5 inches wide. The minimum depth is 3 inches. See<br />
Figures 1 and 2.<br />
2. Connect the subcool liquid temperature sensor wires<br />
to terminals 29 and 30. The sensor is not polarized.<br />
Maximum torque on screw terminals is 3.5 in-lbs.<br />
3. Connect the suction temperature sensor wires to terminals<br />
31 and 32. The sensor is not polarized.<br />
4. Connect the pressure transducer wires to terminals 33,<br />
34, and 35. <strong>Sporlan</strong> has used transducer cables with two<br />
wire color combinations; see Table 1 on page 4. If the<br />
cable is spliced in the field to extend its length, ensure<br />
the new wire is properly connected.<br />
5. Connect terminals 25 and 26 to a digital input. A short<br />
or a closed contact from an external relay will close the<br />
valve for pump down. See Section 4 - System Operation,<br />
on page 4.<br />
6. Connect the <strong>Sporlan</strong> EEV wires to terminals 5, 6, 7, and 8.<br />
7. Connect power to terminals 1 and 2. Transformer<br />
requirements are 24 volts AC at 40 VA, Class II.<br />
8. Remove the protective clear film from the front of the<br />
Subcool Control.<br />
WARNING: Use caution when working around<br />
high voltage components. Safety covers should be<br />
used for personal safety on high voltage panels.<br />
NOTE: The <strong>Sporlan</strong> Subcool Control should be installed<br />
only by a qualified professional. All other system components<br />
(valves and sensors) should be supplied by<br />
<strong>Sporlan</strong> to ensure compatibility and proper operation. For<br />
optimal performance, a counterflow heat exchanger is<br />
recommended. There are no user-serviceable components<br />
inside the <strong>Sporlan</strong> Subcool Control. Opening the<br />
case will void the warranty.<br />
5"<br />
127 mm<br />
10"<br />
254 mm<br />
Figure 1 - Recommended Mounting Clearance<br />
4.0" / 102 mm<br />
3.25" / 83 mm<br />
Figure 2 - DIN Rail Detail<br />
.25" / 6.35 mm<br />
1.5"<br />
38 mm