

307671D ULTRA 400 AIRLESS PAINT SPRAYER - Graco Inc.
307671D ULTRA 400 AIRLESS PAINT SPRAYER - Graco Inc.
307671D ULTRA 400 AIRLESS PAINT SPRAYER - Graco Inc.

You also want an ePaper? Increase the reach of your titles
YUMPU automatically turns print PDFs into web optimized ePapers that Google loves.
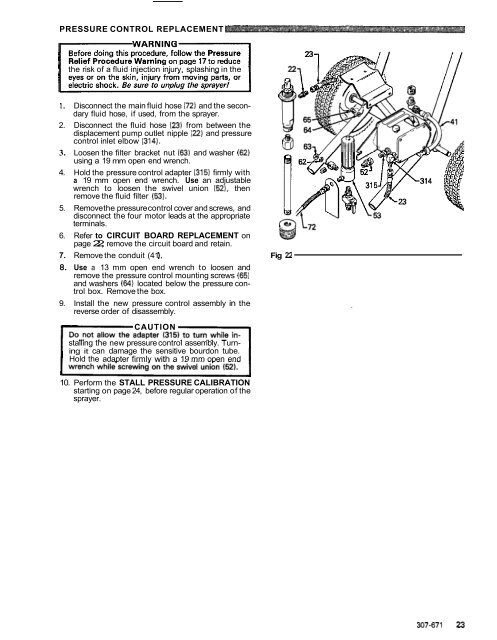
PRESSURE CONTROL REPLACEMENT<br />
the risk of a fluid injection injury, splashing in the<br />
1. Disconnect the main fluid hose (72) and the secondary<br />
fluid hose, if used, from the sprayer.<br />
2. Disconnect the fluid hose (23) from between the<br />
displacement pump outlet nipple (22) and pressure<br />
control inlet elbow (314).<br />
3. Loosen the filter bracket nut (63) and washer (62)<br />
using a 19 mm open end wrench.<br />
4. Hold the pressure control adapter (315) firmly with<br />
a 19 mm open end wrench. Use an adjustable<br />
wrench to loosen the swivel union (52). then<br />
remove the fluid filter (53).<br />
5. Remove the pressure control cover and screws, and<br />
disconnect the four motor leads at the appropriate<br />
terminals.<br />
6. Refer to CIRCUIT BOARD REPLACEMENT on<br />
page 22, remove the circuit board and retain.<br />
7. Remove the conduit (41 1. Fig 22<br />
8. Use a 13 mm open end wrench to loosen and<br />
remove the pressure control mounting screws 165)<br />
and washers (64) located below the pressure control<br />
box. Remove the box.<br />
9. Install the new pressure control assembly in the<br />
reverse order of disassembly.<br />
CAUTION<br />
stalling the new pressure control assembly. Turning<br />
it can damage the sensitive bourdon tube.<br />
Hold the adapter firmly with a 19 mm open end<br />
10. Perform the STALL PRESSURE CALIBRATION<br />
starting on page 24, before regular operation of the<br />
sprayer.<br />
307-671 23


