

307671D ULTRA 400 AIRLESS PAINT SPRAYER - Graco Inc.
307671D ULTRA 400 AIRLESS PAINT SPRAYER - Graco Inc.
307671D ULTRA 400 AIRLESS PAINT SPRAYER - Graco Inc.

Create successful ePaper yourself
Turn your PDF publications into a flip-book with our unique Google optimized e-Paper software.
~~<br />
~ ~~<br />
SETUP<br />
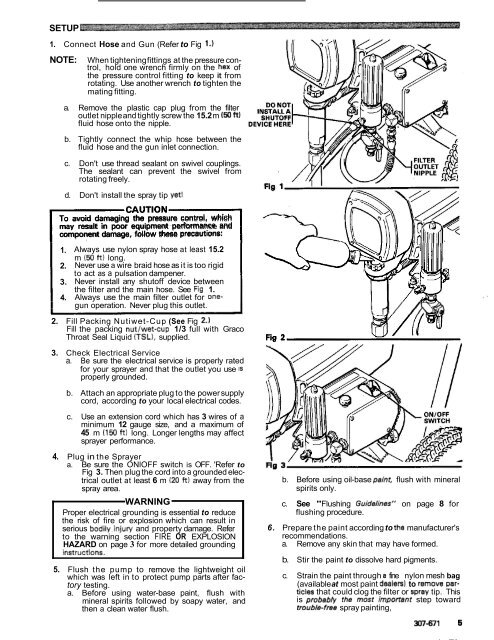
1. Connect Hose and Gun (Refer to Fig 1.)<br />
NOTE:<br />
When tightening fittings at the pressure control,<br />
hold one wrench firmly on the hex of<br />
the pressure control fitting to keep it from<br />
rotating. Use another wrench to tighten the<br />
mating fitting.<br />
a. Remove the plastic cap plug from the filter<br />
outlet nipple and tightly screw the 15.2 m (50 ft)<br />
fluid hose onto the nipple.<br />
b. Tightly connect the whip hose between the<br />
fluid hose and the gun inlet connection.<br />
c. Don't use thread sealant on swivel couplings.<br />
The sealant can prevent the swivel from<br />
rotating freely.<br />
d. Don't install the spray tip yet1<br />
IcA<br />
To avoid damaging the pressure control, which<br />
may result in poor equipment performance and<br />
component damage, follow these precautlons:<br />
1. Always use nylon spray hose at least 15.2<br />
m ( 50 ft) long.<br />
2. Never use a wire braid hose as it is too rigid<br />
to act as a pulsation dampener.<br />
3. Never install any shutoff device between<br />
the filter and the main hose. See Flg 1.<br />
4. Always use the main filter outlet for onegun<br />
operation. Never plug this outlet.<br />
2. Fill Packing Nutiwet-Cup (See Fig 2.)<br />
Fill the packing nut/wet-cup 1/3 full with <strong>Graco</strong><br />
Throat Seal Liquid (TSL), supplied.<br />
3. Check Electrical Service<br />
a. Be sure the electrical service is properly rated<br />
for your sprayer and that the outlet you use Is<br />
properly grounded.<br />
b. Attach an appropriate plug to the power supply<br />
cord, according to your local electrical codes.<br />
c. Use an extension cord which has 3 wires of a<br />
minimum 12 gauge size, and a maximum of<br />
45 m (150 ft) long. Longer lengths may affect<br />
sprayer performance.<br />
4. Plug in the Sprayer<br />
a. Be sure the ONlOFF switch is OFF. 'Refer to<br />
Fig 3. Then plug the cord into a grounded electrical<br />
outlet at least 6 m (20 ft) away from the<br />
spray area.<br />
WARNING<br />
Proper electrical grounding is essential to reduce<br />
the risk of fire or explosion which can result in<br />
serious bodily.injury and property damage. Refer<br />
to the warning section FIRE OR EXPLOSION<br />
HAZARD on page 3 for more detailed grounding<br />
instructlons.<br />
5. Flush the pump to remove the lightweight oil<br />
which was left in to protect pump parts after factory<br />
testing.<br />
a. Before using water-base paint, flush with<br />
mineral spirits followed by soapy water, and<br />
then a clean water flush.<br />
b. Before using oil-base painr, flush with mineral<br />
spirits only.<br />
c. See "Flushing Guidalines" on page 8 for<br />
flushing procedure.<br />
6. Prepare the paint according to the manufacturer's<br />
recommendations.<br />
a. Remove any skin that may have formed.<br />
b. Stir the paint to dissolve hard pigments.<br />
c. Strain the paint through 5 fine nylon mesh bag<br />
(available at most paint dealers) to remove particks<br />
that could clog the filter or spray tip. This<br />
is probably the mosr importanr step toward<br />
trouble-free spray painting,<br />
307-671 6


