

307671D ULTRA 400 AIRLESS PAINT SPRAYER - Graco Inc.
307671D ULTRA 400 AIRLESS PAINT SPRAYER - Graco Inc.
307671D ULTRA 400 AIRLESS PAINT SPRAYER - Graco Inc.

You also want an ePaper? Increase the reach of your titles
YUMPU automatically turns print PDFs into web optimized ePapers that Google loves.
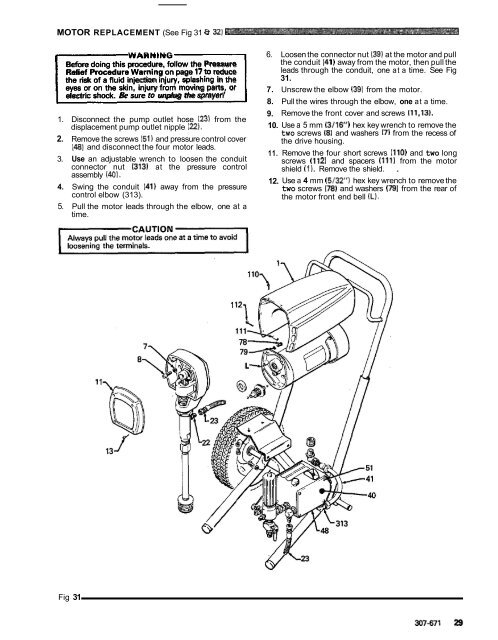
MOTOR REPLACEMENT (See Fig 31 8 32)<br />
1<br />
WARNING<br />
6. Loosen the connector nut (39) at the motor and pull<br />
Before doing this procedure, follow the Pressure<br />
the conduit (41 away from the motor, then pull the<br />
Relief Procedure Warning on page 17to reduce<br />
leads through the conduit, one at a time. See Fig<br />
the risk of a fluid injection injury, splashmg in the<br />
31.<br />
eyes or on the skin, injury from moving parts, or 7. Unscrew the elbow 139) from the motor.<br />
electric shock. Be sure to unplug the sprayer!<br />
8. Pull the wires through the elbow, one at a time.<br />
9. Remove the front cover and screws (11.13).<br />
1. Disconnect the pump outlet hose (23) from the<br />
displacement pump outlet nipple (22).<br />
10. Use a 5 mm (3/16) hex key wrench to remove the<br />
two screws (8) and washers (7) from the recess of<br />
2. Remove the screws (51) and pressure control cover the drive housing.<br />
(48) and disconnect the four motor leads.<br />
3. Use an adjustable wrench to loosen the conduit<br />
connector nut (313) at the pressure control<br />
assembly (401.<br />
4. Swing the conduit (41) away from the pressure<br />
control elbow (313).<br />
5. Pull the motor leads through the elbow, one at a<br />
time.<br />
11.<br />
12.<br />
Remove the four short screws (110) and two long<br />
screws (112) and spacers (111) from the motor<br />
shield (1). Remove the shield. .<br />
Use a 4 mm (5/32”) hex key wrench to remove the<br />
two screws (78) and washers (79) from the rear of<br />
the motor front end bell (L).<br />
Fig 31


