XPM 200HR™ v1 - Hengstler GmbH
XPM 200HR™ v1 - Hengstler GmbH
XPM 200HR™ v1 - Hengstler GmbH

You also want an ePaper? Increase the reach of your titles
YUMPU automatically turns print PDFs into web optimized ePapers that Google loves.
<strong>XPM</strong> 200HR Thermal Printer Family HENGSTLER ®<br />
3.5. Operation of Controls, Sensors and LEDs<br />
3.5.1. Printer Access Control<br />
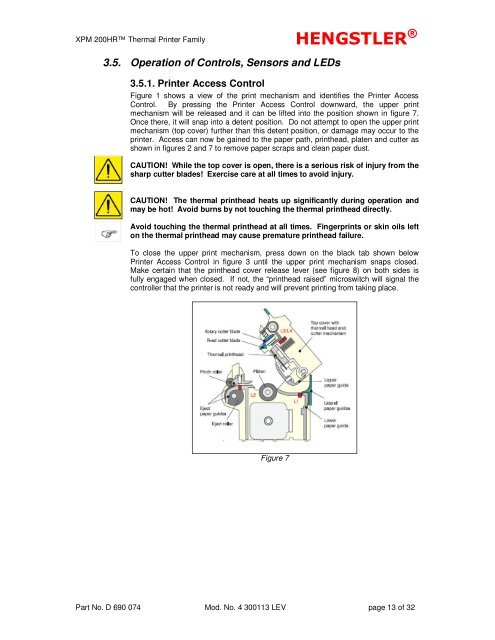
Figure 1 shows a view of the print mechanism and identifies the Printer Access<br />
Control. By pressing the Printer Access Control downward, the upper print<br />
mechanism will be released and it can be lifted into the position shown in figure 7.<br />
Once there, it will snap into a detent position. Do not attempt to open the upper print<br />
mechanism (top cover) further than this detent position, or damage may occur to the<br />
printer. Access can now be gained to the paper path, printhead, platen and cutter as<br />
shown in figures 2 and 7 to remove paper scraps and clean paper dust.<br />
CAUTION! While the top cover is open, there is a serious risk of injury from the<br />
sharp cutter blades! Exercise care at all times to avoid injury.<br />
CAUTION! The thermal printhead heats up significantly during operation and<br />
may be hot! Avoid burns by not touching the thermal printhead directly.<br />
Avoid touching the thermal printhead at all times. Fingerprints or skin oils left<br />
on the thermal printhead may cause premature printhead failure.<br />
To close the upper print mechanism, press down on the black tab shown below<br />
Printer Access Control in figure 3 until the upper print mechanism snaps closed.<br />
Make certain that the printhead cover release lever (see figure 8) on both sides is<br />
fully engaged when closed. If not, the “printhead raised” microswitch will signal the<br />
controller that the printer is not ready and will prevent printing from taking place.<br />
Figure 7<br />
Part No. D 690 074 Mod. No. 4 300113 LEV page 13 of 32