XPM 200HR™ v1 - Hengstler GmbH
XPM 200HR™ v1 - Hengstler GmbH
XPM 200HR™ v1 - Hengstler GmbH

Create successful ePaper yourself
Turn your PDF publications into a flip-book with our unique Google optimized e-Paper software.
<strong>XPM</strong> 200HR Thermal Printer Family HENGSTLER ®<br />
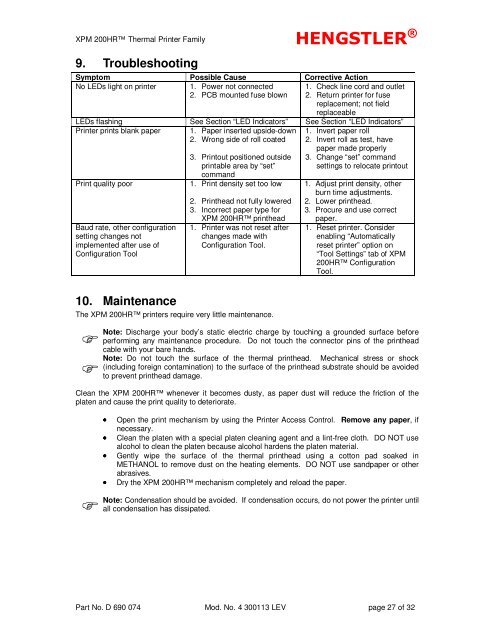
9. Troubleshooting<br />
Symptom Possible Cause Corrective Action<br />
No LEDs light on printer 1. Power not connected<br />
2. PCB mounted fuse blown<br />
1. Check line cord and outlet<br />
2. Return printer for fuse<br />
replacement; not field<br />
replaceable<br />
LEDs flashing See Section “LED Indicators” See Section “LED Indicators”<br />
Printer prints blank paper 1. Paper inserted upside-down<br />
2. Wrong side of roll coated<br />
Print quality poor<br />
Baud rate, other configuration<br />
setting changes not<br />
implemented after use of<br />
Configuration Tool<br />
3. Printout positioned outside<br />
printable area by “set”<br />
command<br />
1. Print density set too low<br />
2. Printhead not fully lowered<br />
3. Incorrect paper type for<br />
<strong>XPM</strong> 200HR printhead<br />
1. Printer was not reset after<br />
changes made with<br />
Configuration Tool.<br />
10. Maintenance<br />
The <strong>XPM</strong> 200HR printers require very little maintenance.<br />
<br />
<br />
1. Invert paper roll<br />
2. Invert roll as test, have<br />
paper made properly<br />
3. Change “set” command<br />
settings to relocate printout<br />
1. Adjust print density, other<br />
burn time adjustments.<br />
2. Lower printhead.<br />
3. Procure and use correct<br />
paper.<br />
1. Reset printer. Consider<br />
enabling “Automatically<br />
reset printer” option on<br />
“Tool Settings” tab of <strong>XPM</strong><br />
200HR Configuration<br />
Tool.<br />
Note: Discharge your body’s static electric charge by touching a grounded surface before<br />
performing any maintenance procedure. Do not touch the connector pins of the printhead<br />
cable with your bare hands.<br />
Note: Do not touch the surface of the thermal printhead. Mechanical stress or shock<br />
(including foreign contamination) to the surface of the printhead substrate should be avoided<br />
to prevent printhead damage.<br />
Clean the <strong>XPM</strong> 200HR whenever it becomes dusty, as paper dust will reduce the friction of the<br />
platen and cause the print quality to deteriorate.<br />
<br />
• Open the print mechanism by using the Printer Access Control. Remove any paper, if<br />
necessary.<br />
• Clean the platen with a special platen cleaning agent and a lint-free cloth. DO NOT use<br />
alcohol to clean the platen because alcohol hardens the platen material.<br />
• Gently wipe the surface of the thermal printhead using a cotton pad soaked in<br />
METHANOL to remove dust on the heating elements. DO NOT use sandpaper or other<br />
abrasives.<br />
• Dry the <strong>XPM</strong> 200HR mechanism completely and reload the paper.<br />
Note: Condensation should be avoided. If condensation occurs, do not power the printer until<br />
all condensation has dissipated.<br />
Part No. D 690 074 Mod. No. 4 300113 LEV page 27 of 32