BIOLOGY IN FOCUS
BIOLOGY IN FOCUS
BIOLOGY IN FOCUS

You also want an ePaper? Increase the reach of your titles
YUMPU automatically turns print PDFs into web optimized ePapers that Google loves.
CELLS AND THE CELL THEORY<br />
examined. When this is done using<br />
diagrams, the features common to both<br />
are labelled down the centre and the<br />
features that are different are labelled<br />
on the outside.<br />
The nucleus is one of the largest<br />
organelles visible with the light<br />
microscope. Chloroplasts and vacuoles<br />
in plant cells are also large enough to<br />
be seen with a light microscope, but all<br />
other organelles are much smaller and<br />
appear as granules of various sizes in<br />
the cytoplasm, if viewed under a light<br />
microscope.<br />
Table 1.4 Comparison<br />
of organelles visable<br />
with light and electron<br />
microscopes<br />
School light microscope (10–200 × )<br />
Top technology light microscope<br />
(800–2 000 × ) Electron microscope (60–2 000 000 × )<br />
■ Cell wall<br />
■ Cell membrane<br />
■ Nucleus and nuclear membrane<br />
■ Chloroplast<br />
■ Vacuole: tonoplast and cell sap<br />
■ Cytoplasm<br />
All structures in previous column as well as:<br />
■ Golgi body<br />
■ mitochondria<br />
■ nucleolus<br />
■ (special staining required for all)<br />
All structures in previous two columns as<br />
well as:<br />
■ endoplasmic reticulum<br />
■ ribosomes<br />
■ lysosomes<br />
■ centrosome<br />
■ cytoskeleton (special staining needed<br />
for this)<br />
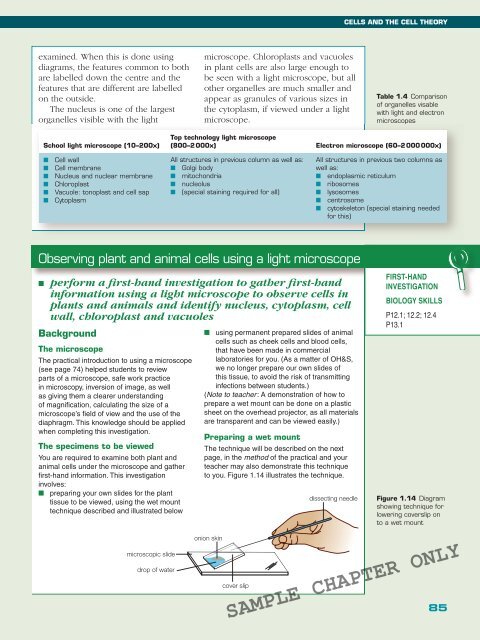
Observing plant and animal cells using a light microscope<br />
■ perform a first-hand investigation to gather first-hand<br />
information using a light microscope to observe cells in<br />
plants and animals and identify nucleus, cytoplasm, cell<br />
wall, chloroplast and vacuoles<br />
Background<br />
The microscope<br />
The practical introduction to using a microscope<br />
(see page 74) helped students to review<br />
parts of a microscope, safe work practice<br />
in microscopy, inversion of image, as well<br />
as giving them a clearer understanding<br />
of magnifi cation, calculating the size of a<br />
microscope’s fi eld of view and the use of the<br />
diaphragm. This knowledge should be applied<br />
when completing this investigation.<br />
The specimens to be viewed<br />
You are required to examine both plant and<br />
animal cells under the microscope and gather<br />
fi rst-hand information. This investigation<br />
involves:<br />
■ preparing your own slides for the plant<br />
tissue to be viewed, using the wet mount<br />
technique described and illustrated below<br />
■ using permanent prepared slides of animal<br />
cells such as cheek cells and blood cells,<br />
that have been made in commercial<br />
laboratories for you. (As a matter of OH&S,<br />
we no longer prepare our own slides of<br />
this tissue, to avoid the risk of transmitting<br />
infections between students.)<br />
(Note to teacher : A demonstration of how to<br />
prepare a wet mount can be done on a plastic<br />
sheet on the overhead projector, as all materials<br />
are transparent and can be viewed easily.)<br />
Preparing a wet mount<br />
The technique will be described on the next<br />
page, in the method of the practical and your<br />
teacher may also demonstrate this technique<br />
to you. Figure 1.14 illustrates the technique.<br />
dissecting needle<br />
FIRST-HAND<br />
<strong>IN</strong>VESTIGATION<br />
<strong>BIOLOGY</strong> SKILLS<br />
P12.1; 12.2; 12.4<br />
P13.1<br />
Figure 1.14 Diagram<br />
showing technique for<br />
lowering coverslip on<br />
to a wet mount<br />
microscopic slide<br />
drop of water<br />
onion skin<br />
cover slip<br />
SAMPLE CHAPTER ONLY<br />
85