OPERATING MANUAL - Bad Request
OPERATING MANUAL - Bad Request
OPERATING MANUAL - Bad Request

You also want an ePaper? Increase the reach of your titles
YUMPU automatically turns print PDFs into web optimized ePapers that Google loves.
Advanced functions<br />
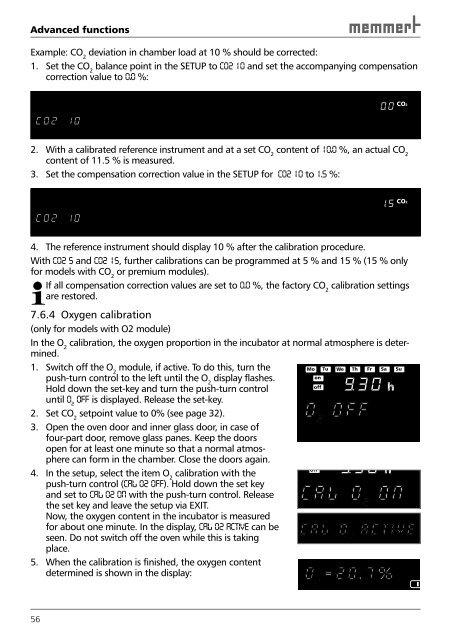
Example: CO 2 deviation in chamber load at 10 % should be corrected:<br />
1. Set the CO 2 balance point in the SETUP to CO2 10 and set the accompanying compensation<br />
correction value to 0.0 %:<br />
56<br />
Mo<br />
on<br />
off<br />
Tu We Th Fr Sa Su<br />
t1<br />
t2<br />
t3<br />
t4<br />
loop<br />
PRINT SETUP<br />
4<br />
3<br />
2<br />
1<br />
STERI DEFRO<br />
°C °C<br />
MIN<br />
AUTO<br />
MAX<br />
IN 1 IN 2 OUT IN 1 IN 2 OUT<br />
% rh<br />
CO2<br />
mb<br />
mb<br />
2. With a calibrated reference instrument and at a set CO 2 content of 10.0 %, an actual CO 2<br />
content of 11.5 % is measured.<br />
3. Set the compensation correction value in the SETUP for CO2 10 to 1.5 %:<br />
Mo<br />
on<br />
off<br />
Tu We Th Fr Sa Su<br />
t1<br />
t2<br />
t3<br />
t4<br />
loop<br />
PRINT SETUP<br />
4<br />
3<br />
2<br />
1<br />
STERI DEFRO<br />
°C °C<br />
MIN<br />
AUTO<br />
MAX<br />
IN 1 IN 2 OUT IN 1 IN 2 OUT<br />
% rh<br />
CO2<br />
mb<br />
mb<br />
4. The reference instrument should display 10 % after the calibration procedure.<br />
With CO2 5 and CO2 15, further calibrations can be programmed at 5 % and 15 % (15 % only<br />
for models with CO 2 or premium modules).<br />
If all compensation correction values are set to 0.0 %, the factory CO 2 calibration settings<br />
are restored.<br />
7.6.4 Oxygen calibration<br />
(only for models with O2 module)<br />
In the O calibration, the oxygen proportion in the incubator at normal atmosphere is deter-<br />
2<br />
mined.<br />
1. Switch off the O module, if active. To do this, turn the<br />
2<br />
push-turn control to the left until the O display flashes.<br />
2<br />
Hold down the set-key and turn the push-turn control<br />
Mo Tu<br />
on<br />
off<br />
We Th Fr Sa Su<br />
until O off is displayed. Release the set-key.<br />
2<br />
2. Set CO setpoint value to 0% (see page 32 ).<br />
2<br />
3. Open the oven door and inner glass door, in case of<br />
four-part door, remove glass panes. Keep the doors<br />
open for at least one minute so that a normal atmosphere<br />
can form in the chamber. Close the doors again.<br />
o off 2<br />
4. In the setup, select the item O calibration with the<br />
2<br />
push-turn control (cal 02 off). Hold down the set key<br />
and set to cal 02 on with the push-turn control. Release<br />
the set key and leave the setup via EXIT.<br />
Now, the oxygen content in the incubator is measured<br />
for about one minute. In the display, cal o2 active can be<br />
seen. Do not switch off the oven while this is taking<br />
place.<br />
5. When the calibration is finished, the oxygen content<br />
determined is shown in the display:<br />
off<br />
CAL o on 2<br />
CAL o 2 active<br />
o 2 =20.7%