MOD User Manual - GPS Central
MOD User Manual - GPS Central
MOD User Manual - GPS Central

Create successful ePaper yourself
Turn your PDF publications into a flip-book with our unique Google optimized e-Paper software.
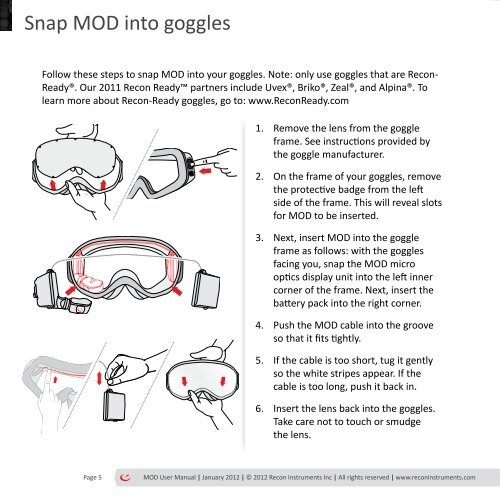
Snap <strong>MOD</strong> into goggles<br />
Follow these steps to snap <strong>MOD</strong> into your goggles. Note: only use goggles that are Recon-<br />
Ready®. Our 2011 Recon Ready partners include Uvex®, Briko®, Zeal®, and Alpina®. To<br />
learn more about Recon-Ready goggles, go to: www.ReconReady.com<br />
1. Remove the lens from the goggle<br />
frame. See instructions provided by<br />
the goggle manufacturer.<br />
2. On the frame of your goggles, remove<br />
the protective badge from the left<br />
side of the frame. This will reveal slots<br />
for <strong>MOD</strong> to be inserted.<br />
3. Next, insert <strong>MOD</strong> into the goggle<br />
frame as follows: with the goggles<br />
facing you, snap the <strong>MOD</strong> micro<br />
optics display unit into the left inner<br />
corner of the frame. Next, insert the<br />
battery pack into the right corner.<br />
4. Push the <strong>MOD</strong> cable into the groove<br />
so that it fits tightly.<br />
5. If the cable is too short, tug it gently<br />
so the white stripes appear. If the<br />
cable is too long, push it back in.<br />
6. Insert the lens back into the goggles.<br />
Take care not to touch or smudge<br />
the lens.<br />
Page 5<br />
<strong>MOD</strong> <strong>User</strong> <strong>Manual</strong> | January 2012 | © 2012 Recon Instruments Inc | All rights reserved | www.reconinstruments.com