Pilatus PC-21 - HT-Modellbau
Pilatus PC-21 - HT-Modellbau
Pilatus PC-21 - HT-Modellbau

Create successful ePaper yourself
Turn your PDF publications into a flip-book with our unique Google optimized e-Paper software.
Building instruction <strong>PC</strong>-<strong>21</strong> Version 0.5e/ 30.10.2008<br />
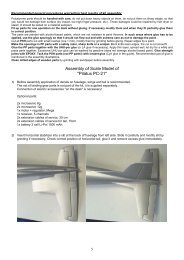
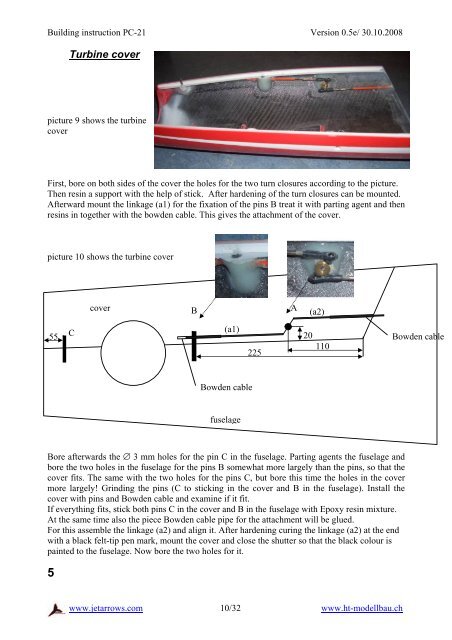
Turbine cover<br />
picture 9 shows the turbine<br />
cover<br />
First, bore on both sides of the cover the holes for the two turn closures according to the picture.<br />
Then resin a support with the help of stick. After hardening of the turn closures can be mounted.<br />
Afterward mount the linkage (a1) for the fixation of the pins B treat it with parting agent and then<br />
resins in together with the bowden cable. This gives the attachment of the cover.<br />
picture 10 shows the turbine cover<br />
cover<br />
B<br />
A<br />
(a2)<br />
55<br />
C<br />
(a1)<br />
20<br />
225<br />
110<br />
Bowden cable<br />
Bowden cable<br />
fuselage<br />
Bore afterwards the ∅ 3 mm holes for the pin C in the fuselage. Parting agents the fuselage and<br />
bore the two holes in the fuselage for the pins B somewhat more largely than the pins, so that the<br />
cover fits. The same with the two holes for the pins C, but bore this time the holes in the cover<br />
more largely! Grinding the pins (C to sticking in the cover and B in the fuselage). Install the<br />
cover with pins and Bowden cable and examine if it fit.<br />
If everything fits, stick both pins C in the cover and B in the fuselage with Epoxy resin mixture.<br />
At the same time also the piece Bowden cable pipe for the attachment will be glued.<br />
For this assemble the linkage (a2) and align it. After hardening curing the linkage (a2) at the end<br />
with a black felt-tip pen mark, mount the cover and close the shutter so that the black colour is<br />
painted to the fuselage. Now bore the two holes for it.<br />
5<br />
www.jetarrows.com<br />
10/32 www.ht-modellbau.ch