

Leybold D65BCS, D40BCS, Instruction Manual - Ideal Vacuum ...
Leybold D65BCS, D40BCS, Instruction Manual - Ideal Vacuum ...
Leybold D65BCS, D40BCS, Instruction Manual - Ideal Vacuum ...

Create successful ePaper yourself
Turn your PDF publications into a flip-book with our unique Google optimized e-Paper software.
Maintenance<br />
6<br />
5<br />
4<br />
3<br />
2<br />
1<br />
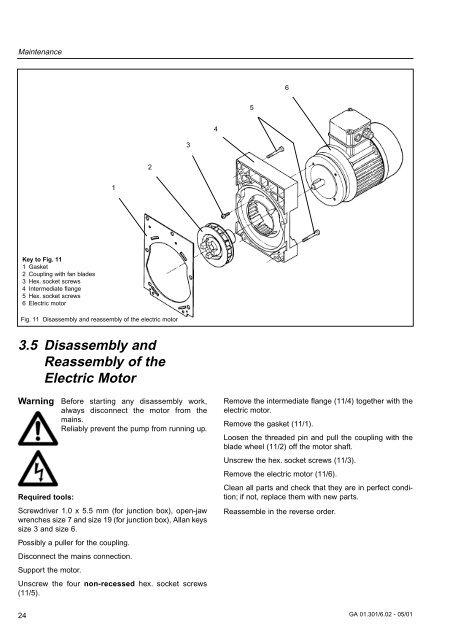
Key to Fig. 11<br />
1 Gasket<br />
2 Coupling with fan blades<br />
3 Hex. socket screws<br />
4 Intermediate flange<br />
5 Hex. socket screws<br />
6 Electric motor<br />
Fig. 11 Disassembly and reassembly of the electric motor<br />
3.5 Disassembly and<br />
Reassembly of the<br />
Electric Motor<br />
Warning<br />
Before starting any disassembly work,<br />
always disconnect the motor from the<br />
mains.<br />
Reliably prevent the pump from running up.<br />
Required tools:<br />
Screwdriver 1.0 x 5.5 mm (for junction box), open-jaw<br />
wrenches size 7 and size 19 (for junction box), Allan keys<br />
size 3 and size 6.<br />
Possibly a puller for the coupling.<br />
Disconnect the mains connection.<br />
Support the motor.<br />
Unscrew the four non-recessed hex. socket screws<br />
(11/5).<br />
Remove the intermediate flange (11/4) together with the<br />
electric motor.<br />
Remove the gasket (11/1).<br />
Loosen the threaded pin and pull the coupling with the<br />
blade wheel (11/2) off the motor shaft.<br />
Unscrew the hex. socket screws (11/3).<br />
Remove the electric motor (11/6).<br />
Clean all parts and check that they are in perfect condition;<br />
if not, replace them with new parts.<br />
Reassemble in the reverse order.<br />
24 GA 01.301/6.02 - 05/01


