

Leybold D65BCS, D40BCS, Instruction Manual - Ideal Vacuum ...
Leybold D65BCS, D40BCS, Instruction Manual - Ideal Vacuum ...
Leybold D65BCS, D40BCS, Instruction Manual - Ideal Vacuum ...

You also want an ePaper? Increase the reach of your titles
YUMPU automatically turns print PDFs into web optimized ePapers that Google loves.
Maintenance<br />
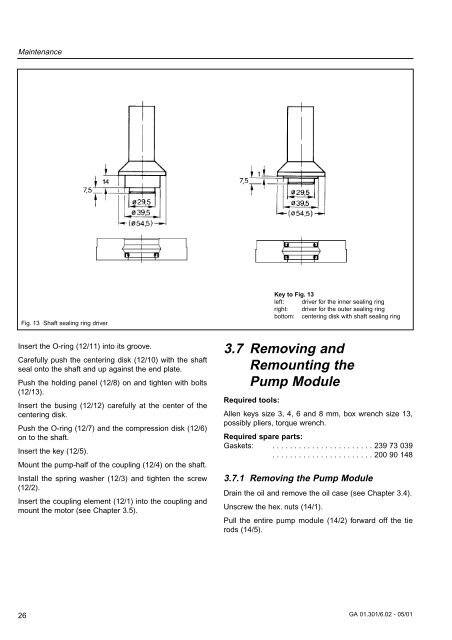
Fig. 13 Shaft sealing ring driver<br />
Insert the O-ring (12/11) into its groove.<br />
Carefully push the centering disk (12/10) with the shaft<br />
seal onto the shaft and up against the end plate.<br />
Push the holding panel (12/8) on and tighten with bolts<br />
(12/13).<br />
Insert the busing (12/12) carefully at the center of the<br />
centering disk.<br />
Push the O-ring (12/7) and the compression disk (12/6)<br />
on to the shaft.<br />
Insert the key (12/5).<br />
Mount the pump-half of the coupling (12/4) on the shaft.<br />
Install the spring washer (12/3) and tighten the screw<br />
(12/2).<br />
Insert the coupling element (12/1) into the coupling and<br />
mount the motor (see Chapter 3.5).<br />
Key to Fig. 13<br />
left: driver for the inner sealing ring<br />
right: driver for the outer sealing ring<br />
bottom: centering disk with shaft sealing ring<br />
3.7 Removing and<br />
Remounting the<br />
Pump Module<br />
Required tools:<br />
Allen keys size 3, 4, 6 and 8 mm, box wrench size 13,<br />
possibly pliers, torque wrench.<br />
Required spare parts:<br />
Gaskets: . . . . . . . . . . . . . . . . . . . . . . . 239 73 039<br />
. . . . . . . . . . . . . . . . . . . . . . . 200 90 148<br />
3.7.1 Removing the Pump Module<br />
Drain the oil and remove the oil case (see Chapter 3.4).<br />
Unscrew the hex. nuts (14/1).<br />
Pull the entire pump module (14/2) forward off the tie<br />
rods (14/5).<br />
26 GA 01.301/6.02 - 05/01


