Layout a webpage step by step 1 Setup project and organize with folders on computer (01-currentsite, 02-archives, 03-working-files, 04-client-provided). 2 Sketch, research, plan (10 minutes or 10 months). 3 <strong>Design</strong> a layout in any program you’re com<strong>for</strong>table with. It’s a visual reference only (Photoshop recommended) . 4 Text representation of ENTIRE page including image descriptions. 5 Open a starter HTML page with required tags in place, save with web safe name. 6 Title page with consideration of bookmarks & SEO. 7 Paste contents of text version of page between body tags - test in browser after each step from here on. 8 Mark paragraphs of text with paragraph tag: p 9 Mark headings that introduce paragraphs and sections with heading tags: h1-h6 10 Add line breaks where you want to <strong>for</strong>ce a new line or soft return: br 11 Put list-type in<strong>for</strong>mation in lists: ul, li 12 Put any other block level content in the appropriate tag: blockquote, pre, hr, address 13 Mark words or phrases that should be emphasized with proper inline tags: em, strong 14 Mark words or phrases by their meaning with inline tags: q, abbr, acronym, cite, code, del, dfn, ins, kbd, samp, var 15 XHTML do not use following inline tags: b, big, center, font, i, s, small, strike, tt, u (small, i, b have been redefined & added back to HTML5). 16 Use HTML Character Entities to put special characters on a page: © is © | non-breaking space is 17 Prepare images in Photoshop or other image editor. 18 Add content related images with the image tag: img 19 Add multimedia & video: object, embed, (swfobject or other custom code) | HTML5 use the video and audio tags, with fallback to Flash. 20 Add tables <strong>for</strong> tabular in<strong>for</strong>mation with the table tag: table, tr, td, th 21 Add <strong>for</strong>ms with the <strong>for</strong>m family of tags: <strong>for</strong>m, button, input, label, legend, fieldset, option, select, textarea (and more). 22 Create links by wrapping anchor tag around any element: a 23 Add notes to yourself or others with comments: 24 In head of HTML page put a style tag to hold CSS: style 25 Add following rule to test CSS: body {background-color:red;} (change background-color to white if test works). 26 In CSS set basic font control on the body rule (color, typeface, size, background color <strong>for</strong> page). 27 In HTML use the div tag to make a box that holds entire body: 28 In CSS make #wrapper rule to give page width and background color: #wrapper {width:800px; background-color:red;} 29 Analyze PS layout and decide how many “boxes” or containers you need <strong>for</strong> the major sections of your page. 30 In CSS make box rules <strong>for</strong> each section and give them a unique name (ID) and temporary background color: #header {background-color:blue;} #nav, #main-content, #aside, #footer 31 In HTML wrap the appropriate content in div tags, matching the names created in step 29. 32 In CSS rough-in shape of page using just divs from prev step. In this site, float to make 2 columns, clear footer. Now actual design can start. 33 Choose one of three methods to control element spacing: 1 - box model math, 2 - inner divs, 3 - content padding/margins 34 In CSS do universal reset to gain complete control of layout: * {margin:0; padding:0;} (only use this reset <strong>for</strong> educational purposes). 35 In CSS make rules <strong>for</strong> basic HTML tags: body, h1-h6, p, ul, ol, li 36 In CSS make rules <strong>for</strong> major sections of page until there are no more changes that work (start with footer in this site). 37 <strong>Design</strong> cycle: 1 - Identify design problem, 2 - find CSS property that fixes that problem, 3 - select appropriate item and apply property change. 38 In CSS make decendant selector rules <strong>for</strong> major sections until those no longer work. 39 In CSS make additional classes and ID’s to make localized changes where decendent selectors don’t work. 40 In HTML apply classes & id’s from previous step to existing tags, new divs or new spans. 41 in CSS use image replacement <strong>for</strong> headings as necessary. 42 CSS rollovers with sprites. 43 Add interactivity with JavaScript. 44 Make CSS and JavaScript external and save out copies of the initial master page <strong>for</strong> the rest of the pages of the site. 2
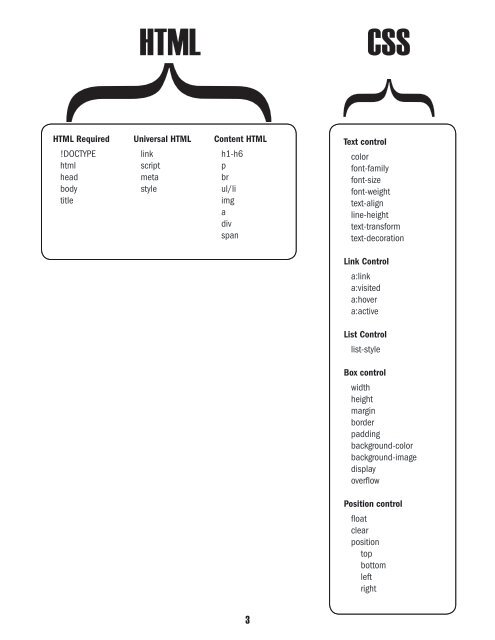
HTML CSS HTML Required !DOCTYPE html head body title Universal HTML link script meta style Content HTML h1-h6 p br ul/li img a div span Text control color font-family font-size font-weight text-align line-height text-trans<strong>for</strong>m text-decoration Link Control a:link a:visited a:hover a:active List Control list-style Box control width height margin border padding background-color background-image display overflow Position control float clear position top bottom left right 3