Build PDF Tool Tips Inside InDesign - InDesign User Group
Build PDF Tool Tips Inside InDesign - InDesign User Group
Build PDF Tool Tips Inside InDesign - InDesign User Group

Create successful ePaper yourself
Turn your PDF publications into a flip-book with our unique Google optimized e-Paper software.
MAGAZINE 21<br />
December 2007 | January 2008<br />
<strong>Build</strong> <strong>PDF</strong> <strong>Tool</strong> <strong>Tips</strong><br />
<strong>Inside</strong> <strong>InDesign</strong>
hover over me<br />
check me out<br />
I have a secret<br />
<strong>Build</strong> <strong>PDF</strong> <strong>Tool</strong> <strong>Tips</strong> <strong>Inside</strong> <strong>InDesign</strong><br />
Adding “tool tips” to your <strong>PDF</strong>s<br />
is an easy way to let your reader<br />
learn more about your subject.<br />
By Keith Gilbert<br />
I love the tool tips that appear when you hover over<br />
icons in most modern applications and Web sites.<br />
These tool tips give you a written explanation of an<br />
icon’s purpose or a text’s meaning, and so are a<br />
user-friendly way to save on screen real estate. Move<br />
over, software developers and Web site engineers—<br />
now you and I can include this type of help in <strong>PDF</strong><br />
files generated from <strong>InDesign</strong>!<br />
Let’s say you’re laying out a document that’s<br />
loaded with technical jargon and acronyms. It will be<br />
distributed as a <strong>PDF</strong> to a wide audience that<br />
may not know all those terms. Rather than bury<br />
the usual acronym glossary in the back of the<br />
document, you can enhance the <strong>PDF</strong> so that when<br />
readers hover over an acronym, the tool tip defines<br />
the mystery word.<br />
You can add these handy tool tips in <strong>InDesign</strong> CS2<br />
or CS3 in just a few steps. I’ll show you how to create<br />
an invisible button in <strong>InDesign</strong> that contains a tool tip;<br />
then export the <strong>InDesign</strong> file to <strong>PDF</strong> with the proper<br />
settings. Along the way, you’ll also pick up tricks<br />
on anchored graphics and Find/Change techniques.<br />
MAGAZINE 21 December 2007 | January 2008<br />
2
Tip<br />
hover over me<br />
check me out<br />
I have a secret<br />
I’m using the CS3 term “panel”; CS2 users, mentally<br />
substitute the word “palette” and you’ll be fine.<br />
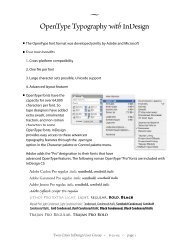
1 Prepare<br />
Start <strong>InDesign</strong>, open your States panel (Window ><br />
Interactive), and position it somewhere handy<br />
on your screen (Figure 1). Make your Frame edges<br />
visible (View > Show Frame Edges).<br />
2 <strong>Build</strong> the Button<br />
Create the pages of your document normally.<br />
I add the tool tip text descriptions as I create<br />
my layout; you can also do so as a final step just<br />
before you finish the document. When you’re<br />
ready to add a tool tip description, select the<br />
Button tool and draw a box around one of the<br />
acronyms in your document. (You’ll find the<br />
Button tool below the Rectangle tools in the<br />
<strong>Tool</strong>s panel (Figure 2), or press “b” to access the<br />
tool from the keyboard.)<br />
Look in the States panel and you’ll see that<br />
<strong>InDesign</strong> has created a button named “Button 1”<br />
(Figure 3).<br />
3 Specify Button Options<br />
In the States panel’s fly-out menu, choose Button<br />
Options or double-click on the button with the Select<br />
(Black arrow) tool. In the Button Options dialog box<br />
(Figure 4), enter a new name for the button if you wish,<br />
but the name of the button isn’t important. Type the<br />
meaning of the acronym—what you want to appear<br />
in the tool tip—in the Description field. Make sure that<br />
the Visibility in <strong>PDF</strong>: field is set to “Visible”, and then<br />
click OK.<br />
Figure 1: The States panel.<br />
Figure 2: I’ve highlighted the<br />
Button tool icon in the <strong>Tool</strong>s panel.<br />
Figure 3: It may not look like it, but the blue box with the X<br />
through it is a button.<br />
Figure 4: The Description field is very important: what you enter<br />
here will show up as a tool tip in the final <strong>PDF</strong>.<br />
MAGAZINE 21 December 2007 | January 2008<br />
3
Tip<br />
Because you can apply Object Styles to buttons,<br />
you could create an Object Style that removes<br />
any fill or stroke from the button with a single click.<br />
Or, with no button selected, click on the button<br />
tool and change the stroke color to None.<br />
This changes the default behavior of the tool,<br />
so all future buttons you create in this document<br />
with the button tool have no stroke.<br />
4 Format the Hover Area<br />
If you don’t want the hover area around the acronym<br />
to be visible, use either the Stroke panel or the Control<br />
panel to remove any stroke from the button. However,<br />
if you want the hover area to be visible to the reader,<br />
you may want to give it a stroke or semi-transparent<br />
fill. Alternately, you could format the text beneath the<br />
button to indicate that it’s a hot spot.<br />
hover over me<br />
5 Test It<br />
That’s all there is to it—you’ve created your first<br />
acronym description “button”. To test it, go to File ><br />
Export and choose Adobe <strong>PDF</strong> for the Format,<br />
then click the Save button. You can tweak the <strong>PDF</strong><br />
export options as you wish (Figure 5), but you<br />
must set Compatibility to Acrobat 5 and check the<br />
Include: Interactive Elements option. Finally, click the<br />
Export button.<br />
Open the <strong>PDF</strong> in Adobe Acrobat or Adobe Reader.<br />
The button you just created should be invisible, but<br />
when you hover over the acronym, the full definition<br />
should be spelled out (Figure 6).<br />
check me out<br />
I have a secret<br />
6 Anchor the Button<br />
The button you created won’t move with the<br />
underlying acronym text if the text reflows in <strong>InDesign</strong>.<br />
To accommodate this, embed the button object as an<br />
anchored object.<br />
Use the Selection (black arrow) tool to select the<br />
button you just created. Choose Edit > Cut. Doubleclick<br />
on the acronym to switch to the Type tool, and<br />
then click in the middle of the acronym. Choose Edit ><br />
Paste (Figure 7).<br />
Figure 7: This looks odd, but you’re not done yet.<br />
Switch to the Selection tool again (in CS3, press<br />
the Esc key to quickly switch from the Type tool to<br />
the Selection tool) and select the button once again.<br />
Choose Object > Anchored Object > Options.<br />
Figure 5: The two most important options here are<br />
Compatibility (Acrobat 5) and Interactive Elements (Include).<br />
Figure 6: That small yellow box is a tool tip.<br />
MAGAZINE 21 December 2007 | January 2008<br />
4
hover over me<br />
check me out<br />
I have a secret<br />
Complete the dialog box exactly as shown in<br />
(Figure 8), then click the OK button. You may need<br />
to adjust the vertical and horizontal position of the<br />
button slightly with the Selection tool. Now the button<br />
is anchored to the acronym and will move where the<br />
acronym moves (Figure 9).<br />
Figure 9: This button will move with the acronym even if<br />
text reflows.<br />
7 <strong>Build</strong> a New <strong>Tool</strong> Tip<br />
Making the first tool tip is the hard part. After you<br />
have one, you can duplicate it or create a new one<br />
pretty easily.<br />
To make a second button for a different acronym,<br />
choose Type > Show Hidden Characters. Use the<br />
Type tool to carefully select the “Yen” symbol that<br />
marks where the first button you created is anchored<br />
to the middle of the first acronym. (You will either<br />
need to zoom way in to see the Yen symbol through<br />
the button, or choose Edit > Edit in Story Editor, and<br />
select the Anchor Symbol [Figure 10] in the middle<br />
of the acronym.) Choose Edit > Copy, click in the<br />
middle of the next acronym you want to define, and<br />
choose Edit > Paste.<br />
www.indesignmag.com<br />
❱❱<br />
Sign up for free weekly tips<br />
❱❱<br />
Download a free trial issue<br />
❱❱ Subscribe for 1 year ($39)*<br />
❱❱ Subscribe for 2 years ($69) and<br />
get all back issues free*<br />
❱❱ Buy individual issues<br />
what are you waiting for?<br />
Figure 8: Replicate the settings in this dialog box.<br />
Figure 10: The anchor symbol (circled) is an important marker.<br />
* Use promotional code “keith” for this discount.<br />
MAGAZINE 21 December 2007 | January 2008<br />
5
hover over me<br />
check me out<br />
I have a secret<br />
Select the new button with the Selection tool.<br />
In the States panel menu, choose Button Options.<br />
In the Button Options dialog box, type the new tool<br />
tip text in the Description field. Make sure that the<br />
Visibility in <strong>PDF</strong>: field is set to “Visible”, and then click<br />
the OK button.<br />
8 <strong>Build</strong> Multiple Instances of the Same <strong>Tool</strong> Tip<br />
If an acronym appears a few times in your document,<br />
you can easily copy and paste the acronym with<br />
the Type tool, and the button that’s attached as an<br />
anchored object will come along for the ride. But what<br />
if an acronym that occurs dozens or hundreds of times,<br />
and you want it tool tip to appear every time? Not<br />
to worry—you can accomplish it quickly with Find/<br />
Change if you have <strong>InDesign</strong> CS3.<br />
With the Type tool, select an acronym (the entire<br />
chunk of text in which the button’s anchored, not just<br />
the Yen symbol). Choose Edit > Copy, then choose<br />
Edit > Find/Change (Figure 11). In the Find What field,<br />
choose the acronym you’re looking for. In the Change<br />
to field, type ^c (which means “Clipboard contents,<br />
formatted”). Next, click the Change All button, and<br />
you’re finished!<br />
Keith Gilbert is an Adobe Certified Instructor and an Adobe Print<br />
Specialist and has taught classes and seminars throughout the US,<br />
as well as Bridgetown, Barbados, and Nairobi, Kenya. Keith is one of<br />
a select group of individuals nationwide to be certified for on-site<br />
training in <strong>InDesign</strong>, InCopy, Illustrator, Photoshop, and Acrobat. He<br />
has been consulting and training for 22 years and still loves his job.<br />
For more information, visit www.gilbertconsulting.com or read his<br />
blog at gilbertconsulting.blogspot.com.<br />
Figure 11: <strong>InDesign</strong> CS3’s Find/Change box is ideal for acronyms<br />
that appear frequently throughout a document.<br />
MAGAZINE 21 December 2007 | January 2008<br />
6
Hungry for more?<br />
Get a new subscription at a special<br />
price. Just go to www.indesignmag.<br />
com/purchase.php and enter the<br />
discount code “keith” to receive<br />
a 1-year subscription for $39, or<br />
a 2-year subscription for $69.