Installing Software and Options for the Polycom ... - Support
Installing Software and Options for the Polycom ... - Support
Installing Software and Options for the Polycom ... - Support

You also want an ePaper? Increase the reach of your titles
YUMPU automatically turns print PDFs into web optimized ePapers that Google loves.
<strong>Installing</strong> <strong>Software</strong> <strong>and</strong> <strong>Options</strong><br />
<strong>Polycom</strong> RealPresence Group Series <strong>and</strong> Accessories<br />
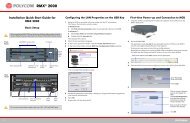
4 In <strong>the</strong> RealPresence Group system web interface, select Admin Settings.<br />
If necessary, enter <strong>the</strong> Admin ID as <strong>the</strong> user name (default is admin), <strong>and</strong><br />
<strong>the</strong>n enter <strong>the</strong> Admin remote access password, if one is set.<br />
The first time you open <strong>the</strong> web interface each day, you might need to<br />
enter a user name <strong>and</strong> password after you select any of <strong>the</strong> interface<br />
options.<br />
5 Go to General Settings > <strong>Software</strong> Updates.<br />
6 Under <strong>Software</strong> Server in <strong>the</strong> Server Address field, enter <strong>the</strong> path <strong>and</strong><br />
address of <strong>the</strong> update site where you posted <strong>the</strong> RealPresence Group<br />
software, <strong>for</strong> example http://10.11.12.100/rpgroup_repo. To use <strong>the</strong><br />
<strong>Polycom</strong> server, enter polycom.<br />
7 Click Check <strong>for</strong> <strong>Software</strong> Updates to have <strong>the</strong> system detect updates.<br />
The system contacts <strong>the</strong> designated server to find available updates.<br />
8 If <strong>the</strong> system indicates an update is available, click Start Update to install<br />
it.<br />
9 When <strong>the</strong> Export Restrictions notice appears, click Accept Agreement.<br />
Follow <strong>the</strong> on-screen instructions to complete <strong>the</strong> update.<br />
To automatically install updates from <strong>the</strong> <strong>Polycom</strong> server or your web server:<br />
1 On a computer, open Internet Explorer 9 on Windows 7 or Apple Safari<br />
on Mac OS X.<br />
2 Configure <strong>the</strong> browser to allow cookies.<br />
3 In <strong>the</strong> browser address line, enter <strong>the</strong> IP address of <strong>the</strong> RealPresence<br />
Group system using <strong>the</strong> <strong>for</strong>mat http://IPaddress (<strong>for</strong> example,<br />
http://10.11.12.13).<br />
4 In <strong>the</strong> RealPresence Group system web interface, select Admin Settings.<br />
If necessary, enter <strong>the</strong> Admin ID as <strong>the</strong> user name (default is admin), <strong>and</strong><br />
<strong>the</strong>n enter <strong>the</strong> Admin remote access password, if one is set.<br />
The first time you open <strong>the</strong> web interface each day, you might need to<br />
enter a user name <strong>and</strong> password after you select any of <strong>the</strong> interface<br />
options.<br />
5 Go to General Settings > <strong>Software</strong> Updates.<br />
Under <strong>Software</strong> Server in <strong>the</strong> Server Address field, enter <strong>the</strong> path <strong>and</strong><br />
address of <strong>the</strong> update site where you posted <strong>the</strong> RealPresence Group<br />
software, <strong>for</strong> example http://10.11.12.100/rpgroup_repo. To use <strong>the</strong><br />
<strong>Polycom</strong> server, enter polycom.<br />
6 Under Automatic <strong>Software</strong> Updates, select Automatically Check <strong>for</strong><br />
<strong>and</strong> Apply <strong>Software</strong> Updates.<br />
7 When <strong>the</strong> Export Restrictions notice appears, click Accept Agreement.<br />
8 Specify <strong>the</strong> automatic update options:<br />
10 <strong>Polycom</strong>, Inc.