You also want an ePaper? Increase the reach of your titles
YUMPU automatically turns print PDFs into web optimized ePapers that Google loves.
28 29<br />
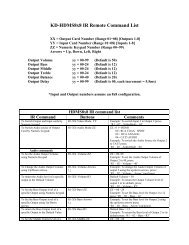
10. IR Remote Command List<br />
Below are listed some of the most common remote commands. A complete list of all IR Remote<br />
commands can be found at the <strong>Key</strong> <strong>Digital</strong> website www.keydigital.com<br />
The following commands assume an 8x8 configuration.<br />
»»<br />
XX = Output Card Number (Range 01~08) [Outputs 1-8]<br />
»»<br />
YY = Input Card Number (Range 01~08) [Inputs 1-8]<br />
»»<br />
ZZ = Numeric <strong>Key</strong>pad Number (Range 00~99)<br />
»»<br />
Arrows = Up – Down – Left - Right<br />
»»<br />
Power On = “Power On”<br />
»»<br />
Power Off = “Power Off”<br />
Switching Commands<br />
Switching Video / HDMI Output to Input<br />
»»<br />
To Switch Output and Input cards by numeric keypad:<br />
“R1 – XX – Video Mode – YY”<br />
»»<br />
Example: To switch Input 3 to Output 2 press; “R1–02–VideoMode–03<br />
»»<br />
Note: For basic systems utilizing the HDMI input connections for Video & Audio, the above<br />
switching command applies can be used to switch Video & Audio together.<br />
Switch Audio Input Source Location<br />
»»<br />
To Switch Audio source of Output Card by numeric keypad:<br />
“R1 – XX – Audio Mode – ZZ”<br />
»»<br />
Where ZZ is: 01 = HDMI<br />
02 = RCA COAX SPDIF<br />
03 = RCA ANALOG<br />
»»<br />
Example: To switch the audio source for output 2 to RCA Analog press:<br />
“R1–02–AudioMode–02”<br />
Front Panel Commands Using Remote<br />
The Remote can be used to navigate through the front LCD display options.<br />
½½<br />
Use the Left and Right Arrow keys to choose options normally made by rotating the Left Selector.<br />
½½<br />
Use the Up and Down Arrow keys to choose options normally made by rotating the Right Selector.<br />
½½<br />
Use the ‘R2’ button to enter choices normally made by pushing the Right Selector.<br />
½½<br />
Use the ‘R4’ button to enter choices normally made by pushing the Left Selector.<br />
11. RS-232 Control Codes<br />
»»<br />
Baud Rate: 57600<br />
»»<br />
Data Bits: 8<br />
»»<br />
Parity: None<br />
»»<br />
Stop Bits: 1<br />
»»<br />
Flow Control: None<br />
»»<br />
Carriage Return: Required<br />
»»<br />
Line Feed: Required<br />
Initial Setup & Operation via RS-232<br />
Familiarize yourself with RS-232 help “H” and status “STA” commands to maximize product<br />
understanding. A complete list of RS-232 Commands can be found at <strong>Key</strong> <strong>Digital</strong>s website:<br />
www.keydigital.com<br />
1. Insert HDMI cables into card slots 1 through 8<br />
»»<br />
Slots 1-8 are labeled Rx, and are Input Card Slots.<br />
»»<br />
Slots 9-16 are labeled Tx, and are Output Card Slots.<br />
2. If integrating your output via <strong>KD</strong>-CATHD500Rx CAT6/STP Receiver Balun(s)<br />
»»<br />
Both HDMI and CAT6/STP Outputs are active on Output Card Slots, therefore no<br />
configuration is necessary to active the CAT6/STP Output for each Tx Card Slot.<br />
3. Establish an HDMI Handshake for Each Source<br />
»»<br />
Copy EDID to Rx Card (xx) from Tx Card (yy) using ‘SP C EDID xx H/C/D yy’<br />
»»<br />
Where xx = Card Slot # of desired Input (01-08)<br />
»»<br />
Where H = HDMI, C = CAT6/STP or D = Default EDID Library (01-12)<br />
»»<br />
Where yy = Card Slot of # of desired Output (if H or C) (01-08)<br />
»»<br />
-------------------OR---------------------<br />
»»<br />
Where yy = Default EDID library # (01-12) (if D) *see Default EDID list pg.10<br />
4. Matrix Switching via RS-232<br />
»»<br />
Use RS-232 command “SP Oxx SI yy”<br />
»»<br />
xx = Card Slot # of desired Output<br />
»»<br />
yy = Card Slot # of desired Input<br />
½½<br />
NOTE: Spaces between RS-232 commands are shown for clarity only.<br />
Actual RS-232 commands do not need any spaces between characters.<br />
RS-232 Commands<br />
RS-232 cable pin out<br />
Pin 5 – Ground<br />
Pin 3 – Receive<br />
Pin 2 – Transmit<br />
Command<br />
Name<br />
Command Value Description<br />
Status STA Gives full listing of Unit’s Status<br />
Help H Gives full listing of RS-232 Commands<br />
Power Off<br />
Power On<br />
PF<br />
PN