
You also want an ePaper? Increase the reach of your titles
YUMPU automatically turns print PDFs into web optimized ePapers that Google loves.
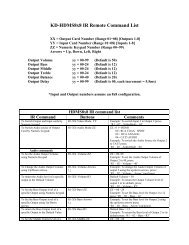
30 31<br />
Set RCA Audio<br />
Input type<br />
Set Output to<br />
Video Input<br />
Set Audio Input<br />
Source Location<br />
Set Output<br />
Volume<br />
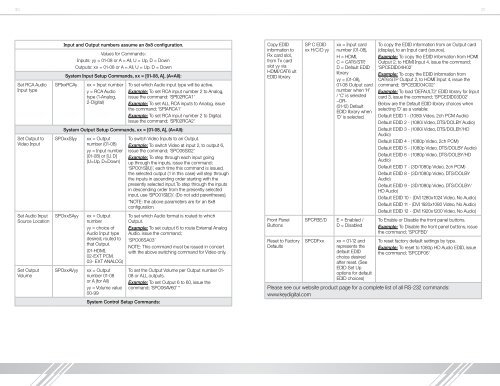
Input and Output numbers assume an 8x8 configuration.<br />
Values for Commands:<br />
Inputs: yy = 01-08 or A = All, U = Up, D = Down<br />
Outputs: xx = 01-08 or A = All, U = Up. D = Down<br />
System Input Setup Commands, xx = [01-08, A], (A=All):<br />
SPIxxRCAy<br />
xx = Input number<br />
y = RCA Audio<br />
type (1-Analog,<br />
2-<strong>Digital</strong>)<br />
To set which Audio input type will be active.<br />
Example: To set RCA input number 2 to Analog,<br />
issue the command: ‘SPI02RCA1’<br />
Example: To set ALL RCA inputs to Analog, issue<br />
the command; ‘SPIARCA1’<br />
Example: To set RCA input number 2 to <strong>Digital</strong>,<br />
issue the command; ‘SPI02RCA2’<br />
System Output Setup Commands, xx = [01-08, A], (A=All):<br />
SPOxxSIyy<br />
SPOxxSAyy<br />
SPOxxAVyy<br />
xx = Output<br />
number (01-08)<br />
yy = Input number<br />
(01-08) or [U, D]<br />
(U=Up, D=Down)<br />
xx = Output<br />
number<br />
yy = choice of<br />
Audio Input type<br />
desired, routed to<br />
that Output.<br />
(01-HDMI,<br />
02-EXT PCM,<br />
03- EXT ANALOG)<br />
xx = Output<br />
number 01-08<br />
or A (for All)<br />
yy = Volume value<br />
00-99<br />
System Control Setup Commands:<br />
To switch Video Inputs to an Output.<br />
Example: To switch Video at input 2, to output 6,<br />
issue the command; ‘SPO06SI02’<br />
Example: To step through each input going<br />
up through the inputs, issue the command;<br />
‘SPO01SI(U)’, each time this command is issued,<br />
the selected output (1 in this case) will step through<br />
the inputs in ascending order starting with the<br />
presently selected input.To step through the inputs<br />
in descending order from the presently selected<br />
input, use ‘SPO01SI(D)’. (Do not add parentheses).<br />
*NOTE: the above parameters are for an 8x8<br />
configuration.<br />
To set which Audio format is routed to which<br />
Output.<br />
Example: To set output 6 to route External Analog<br />
Audio, issue the command;<br />
‘SPO06SA03’<br />
NOTE: This command must be issued in concert<br />
with the above switching command for Video only.<br />
To set the Output Volume per Output number 01-<br />
08 or ALL outputs.<br />
Example: To set Output 6 to 60, issue the<br />
command; ‘SPO06AV60’ “<br />
Copy EDID<br />
information to<br />
Rx card slot,<br />
from Tx card<br />
slot yy via<br />
HDMI/CAT6 ult<br />
EDID library<br />
Front Panel<br />
Buttons<br />
Reset to Factory<br />
Defaults<br />
SP C EDID<br />
xx H/C/D yy<br />
xx = Input card<br />
number (01-08),<br />
H = HDMI,<br />
C = CAT6/STP,<br />
D = Default EDID<br />
library<br />
yy = (01-08),<br />
01-08 Output card<br />
number when ‘H’<br />
/ ‘C’ is selected<br />
–OR-<br />
(01-12) Default<br />
EDID library when<br />
‘D’ is selected.<br />
SPCFBE/D E = Enabled /<br />
D = Disabled<br />
SPCDFxx<br />
xx = 01-12 and<br />
represents the<br />
default EDID<br />
choice desired<br />
after reset. (See<br />
EDID Set Up<br />
options for default<br />
EDID choices)<br />
To copy the EDID information from an Output card<br />
(display), to an Input card (source).<br />
Example: To copy the EDID information from HDMI<br />
Output 2, to HDMI Input 4, issue the command;<br />
‘SPCEDID04H02’<br />
Example: To copy the EDID information from<br />
CAT6/STP Output 2, to HDMI Input 4, issue the<br />
command; ‘SPCEDID04C02’<br />
Example: To load ‘DEFAULT2’ EDID library for Input<br />
card 3, issue the command; ‘SPCEDID03D02’<br />
Below are the Default EDID library choices when<br />
selecting ‘D’ as a variable:<br />
Default EDID 1 - (1080i Video, 2ch PCM Audio)<br />
Default EDID 2 - (1080i Video, DTS/DOLBY Audio)<br />
Default EDID 3 - (1080i Video, DTS/DOLBY/HD<br />
Audio)<br />
Default EDID 4 - (1080p Video, 2ch PCM)<br />
Default EDID 5 - (1080p Video, DTS/DOLBY Audio)<br />
Default EDID 6 - (1080p Video, DTS/DOLBY/HD<br />
Audio)<br />
Default EDID 7 - (3D/1080p Video, 2ch PCM)<br />
Default EDID 8 - (3D/1080p Video, DTS/DOLBY<br />
Audio)<br />
Default EDID 9 - (3D/1080p Video, DTS/DOLBY/<br />
HD Audio)<br />
Default EDID 10 - (DVI 1280x1024 Video, No Audio)<br />
Default EDID 11 - (DVI 1920x1080 Video, No Audio)<br />
Default EDID 12 - (DVI 1920x1200 Video, No Audio)<br />
To Enable or Disable the front panel buttons.<br />
Example: To Disable the front panel buttons, issue<br />
the command; ’SPCFBD’<br />
To reset factory default settings by type.<br />
Example: To reset to 1080p HD Audio EDID, issue<br />
the command; ‘SPCDF06’<br />
Please see our website product page for a complete list of all RS-232 commands:<br />
www.keydigital.com