Introduction to TopTurn CNC simulator turning Version 7.1
Introduction to TopTurn CNC simulator turning Version 7.1
Introduction to TopTurn CNC simulator turning Version 7.1

You also want an ePaper? Increase the reach of your titles
YUMPU automatically turns print PDFs into web optimized ePapers that Google loves.
MTS – <strong>Introduction</strong> <strong>to</strong> <strong>TopTurn</strong> <strong>Version</strong> <strong>7.1</strong><br />
4.0 The “<strong>turning</strong>” set-up dialog<br />
Four simple steps <strong>to</strong> create a setup sheet<br />
The set-up dialog assists you <strong>to</strong> create a setup sheet for a new programming task quickly. First, the clamping<br />
device - e.g a chuck and jaws - is selected. Then the workpiece - a cylinder or a pipe - is defined, the workpiece<br />
origin is specified and the new program is completed by adding a suitable set of <strong>to</strong>ols. After the procedure is<br />
finished, the controls read in the setup sheet in the form of a program header, and the user can immediately<br />
start <strong>to</strong> key in the new program.<br />
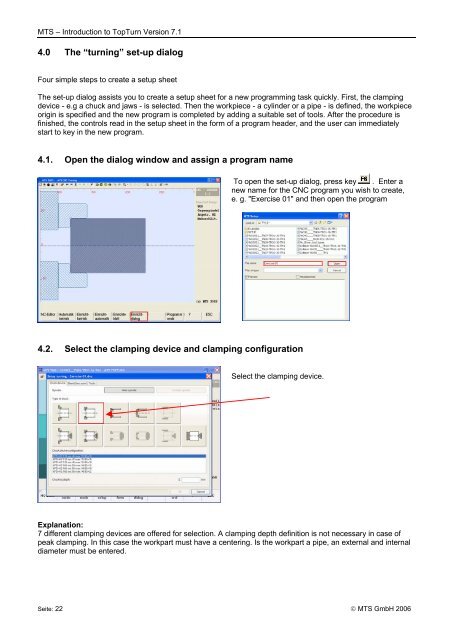
4.1. Open the dialog window and assign a program name<br />
To open the set-up dialog, press key . Enter a<br />
new name for the <strong>CNC</strong> program you wish <strong>to</strong> create,<br />
e. g. "Exercise 01" and then open the program<br />
4.2. Select the clamping device and clamping configuration<br />
Select the clamping device.<br />
Explanation:<br />
7 different clamping devices are offered for selection. A clamping depth definition is not necessary in case of<br />
peak clamping. In this case the workpart must have a centering. Is the workpart a pipe, an external and internal<br />
diameter must be entered.<br />
Seite: 22 © MTS GmbH 2006