Shanks Owners manual (10 Build) 30, 30H, 35, 35H, 40 ... - EP Barrus
Shanks Owners manual (10 Build) 30, 30H, 35, 35H, 40 ... - EP Barrus
Shanks Owners manual (10 Build) 30, 30H, 35, 35H, 40 ... - EP Barrus

You also want an ePaper? Increase the reach of your titles
YUMPU automatically turns print PDFs into web optimized ePapers that Google loves.
engine, along with the <strong>10</strong>mm packing plate supplied. The larger pair of mounts must<br />
be fitted to the rear.<br />
• Ensure that the engine has been installed for at least 24 hours before shaft alignment<br />
is checked, to allow the mounts time to settle under the engine weight.<br />
• Ensure that the anti-vibration mount centre screw is sufficiently raised so as not to<br />
touch the engine bed. If this occurs, excessive engine vibration will be experienced<br />
through the hull.<br />
• For best results, fit the front anti-vibration mounts into the front holes in the engine<br />
rails. If engine room space is a problem the mounts can be fitted slightly further back<br />
in the alterative holes, and the front of the rail cut off – leaving 50mm of material to<br />
retain strength (measuring from the centre of the mount hole to the front end of the<br />
rail).<br />
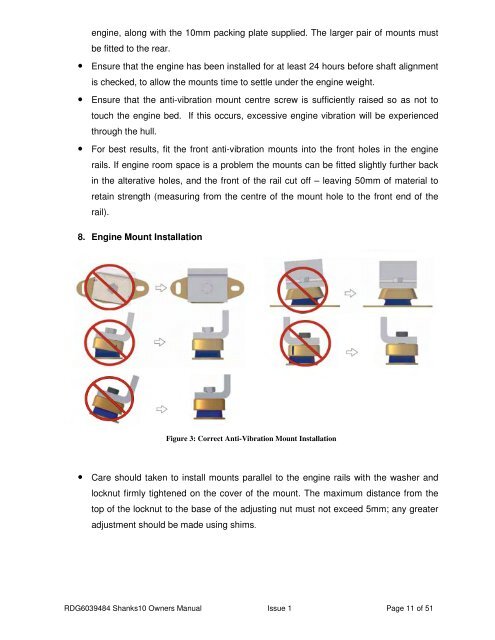
8. Engine Mount Installation<br />
Figure 3: Correct Anti-Vibration Mount Installation<br />
• Care should taken to install mounts parallel to the engine rails with the washer and<br />
locknut firmly tightened on the cover of the mount. The maximum distance from the<br />
top of the locknut to the base of the adjusting nut must not exceed 5mm; any greater<br />
adjustment should be made using shims.<br />
RDG6039484 <strong>Shanks</strong><strong>10</strong> <strong>Owners</strong> Manual Issue 1 Page 11 of 51