Kerio Exchange Migration Tool - Kerio Software Archive
Kerio Exchange Migration Tool - Kerio Software Archive
Kerio Exchange Migration Tool - Kerio Software Archive

Create successful ePaper yourself
Turn your PDF publications into a flip-book with our unique Google optimized e-Paper software.
<strong>Kerio</strong> <strong>Exchange</strong> <strong>Migration</strong> <strong>Tool</strong><br />
Version: 8.0<br />
© 2013 <strong>Kerio</strong> Technologies s.r.o. All Rights Reserved.<br />
1 Introduction<br />
This document provides guidelines for migration of user accounts and public folders from Microsoft<br />
® <strong>Exchange</strong> Server to the <strong>Kerio</strong> Connect store. For transition from Microsoft ® <strong>Exchange</strong><br />
Server to <strong>Kerio</strong> Connect, data migration is inevitable. The main reason is the difference in<br />
formats used for data storing.<br />
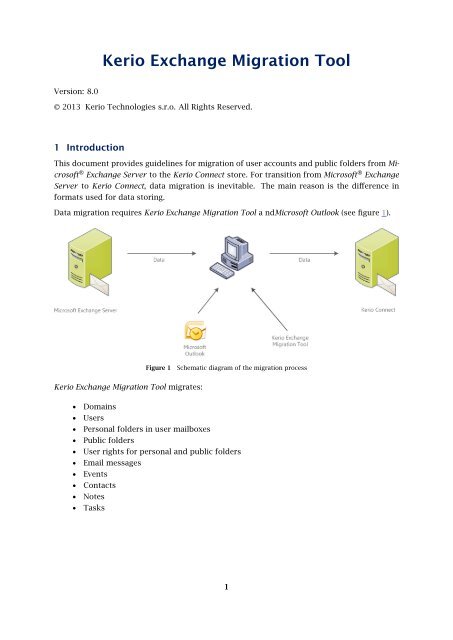
Data migration requires <strong>Kerio</strong> <strong>Exchange</strong> <strong>Migration</strong> <strong>Tool</strong> a ndMicrosoft Outlook (see figure 1).<br />
Figure 1<br />
Schematic diagram of the migration process<br />
<strong>Kerio</strong> <strong>Exchange</strong> <strong>Migration</strong> <strong>Tool</strong> migrates:<br />
• Domains<br />
• Users<br />
• Personal folders in user mailboxes<br />
• Public folders<br />
• User rights for personal and public folders<br />
• Email messages<br />
• Events<br />
• Contacts<br />
• Notes<br />
• Tasks<br />
1
Supported systems<br />
Versions from which user accounts can be migrated are listed at the <strong>Kerio</strong> Connect product<br />
pages.<br />
User accounts can be migrated to <strong>Kerio</strong> Connect (<strong>Kerio</strong> MailServer) 6.5.2 and higher.<br />
2 Before you start<br />
Before you start migrating, consider the following aspects:<br />
Duration of the migration process<br />
Before starting a migration, bear in mind that time consumed by the migration process<br />
depends on size on accounts involved. See the following migration speed test as an example:<br />
Number of migrated accounts<br />
Duration<br />
1 account (1,5 GB, 50800 items, 75 folders) 1 h 37 min.<br />
4 accounts (6 GB, 203177 items, 300 folders) 4 h 13 min.<br />
Table 1<br />
<strong>Migration</strong> speed test<br />
Time consumed by migration shortens with increasing number of accounts migrated<br />
concurrently, since the migration runs in up to six threads at a time.<br />
It is recommended to get the network and all users involved ready for outage of email services<br />
and for migration in low-load time. <strong>Migration</strong> can be also performed by batches of users,<br />
optimally these batches should be divisible by six.<br />
The migration tool will not remove accounts on the <strong>Exchange</strong> Server server, but for security<br />
reasons it uses them just in the read-only mode, so that it is possible to interrupt the migration<br />
process and keep using the server until migration of other users.<br />
The scenario is likewise in <strong>Kerio</strong> Connect. The migration will not result in removal of the<br />
existing data or settings in <strong>Kerio</strong> Connect. Migrated data will be added as extra data. For this<br />
reason, it is necessary to bear in mind possible duplication of data and try to avoid it.<br />
Administration passwords<br />
<strong>Migration</strong> requires:<br />
• entering administration username and password for the Microsoft <strong>Exchange</strong> Server.<br />
• username and password of the <strong>Kerio</strong> Connect’s primary administrator (i.e. the<br />
username and password set in the Initial Configuration Wizard).<br />
2
User passwords<br />
For security reasons, user passwords cannot be migrated along with user accounts. However,<br />
there are some solutions available:<br />
Mapping accounts from Active Directory — recommended<br />
Data will be migrated after setting mapping of users from the Active Directory to <strong>Kerio</strong><br />
Connect. Passwords do not have to be changed in this case.<br />
For details on user accounts mapping, refer to the administrator’s guide.<br />
Automatic generating of new passwords<br />
Data can be migrated to the <strong>Kerio</strong> Connect if empty (i.e. no user accounts have been<br />
created there yet). <strong>Migration</strong> includes creating accounts in <strong>Kerio</strong> Connect and generating<br />
of new passwords which will be recorded in the Report log (for details, see section 5).<br />
Importing accounts from Active Directory<br />
Data will be migrated after setting importing of users from the Active Directory to <strong>Kerio</strong><br />
Connect. Passwords do not have to be changed either in this case.<br />
For details on import of user accounts and its settings, refer to the administrator’s guide.<br />
Individual options will be focused in the following sections of this document. If you use Active<br />
Directory, it is recommended to use the option of user accounts mapping.<br />
Microsoft <strong>Exchange</strong> Server 5.5<br />
Problem description:<br />
Microsoft <strong>Exchange</strong> Server 5.5 does not support UNICODE. Special characters (diacritics, etc.)<br />
in names of accounts, folders and email recipients will not be displayed correctly.<br />
Solution:<br />
The computer where <strong>Kerio</strong> <strong>Exchange</strong> <strong>Migration</strong> <strong>Tool</strong> would be installed, must include:<br />
• Windows in the corresponding localization,<br />
• localized version of Microsoft Outlook.<br />
Another option is change of language from English to your native language for applications<br />
which do not support UNICODE. To do this, go to Start → Settings → Control Panel → Local<br />
and Language Settings → Advanced.<br />
Data conversion<br />
<strong>Migration</strong> may come up against items which are saved in unsupported formats. <strong>Kerio</strong> <strong>Exchange</strong><br />
<strong>Migration</strong> <strong>Tool</strong> does not support conversion of these formats. In any of these cases, the item<br />
will be saved as an attachment in the MSG format in a new message with the subject of the<br />
original message. These attachments can then be opened in Microsoft Outlook.<br />
All RTF email will be converted to plain text within the migration. Images included in RTF<br />
emails will be removed.<br />
3
3 Preparation<br />
Before you start migrating, prepare the following items:<br />
• <strong>Kerio</strong> <strong>Exchange</strong> <strong>Migration</strong> <strong>Tool</strong> installation package (it is available for free download<br />
from <strong>Kerio</strong> Technologies product pages).<br />
• Installation package of <strong>Kerio</strong> Connect 7.0.0 or higher (trial version can also be used for<br />
this purpose).<br />
• Installation package of the Microsoft Outlook ® 2003 (with Service Pack 3 or higher) or<br />
2007 (with Pack 1 or higher).<br />
• (Optionally) the <strong>Kerio</strong> Active Directory Extension installation package — if users are<br />
managed through Active Directory ® , it is possible to map user accounts to <strong>Kerio</strong><br />
Connect first (see <strong>Kerio</strong> Connect 7, Administrator’s Guide), before the very migration,<br />
so users keep authenticating against Active Directory.<br />
1. Install <strong>Kerio</strong> Connect and run it. Make sure that the IMAP protocol on port 143 is enabled<br />
in Configuration → Services in the administration interface.<br />
2. On the computer available both for the <strong>Kerio</strong> Connect and for the <strong>Exchange</strong> Server,<br />
install the Microsoft Outlook installation package as well as <strong>Kerio</strong> <strong>Exchange</strong> <strong>Migration</strong> <strong>Tool</strong>.<br />
Operating systems supported by <strong>Kerio</strong> <strong>Exchange</strong> <strong>Migration</strong> <strong>Tool</strong> are listed on the <strong>Kerio</strong><br />
Connect product pages.<br />
Warning:<br />
Never install <strong>Kerio</strong> <strong>Exchange</strong> <strong>Migration</strong> <strong>Tool</strong> on a computer hosting Microsoft <strong>Exchange</strong><br />
Server, otherwise migration will fail.<br />
4
3. Optional but recommended settings: Map or import user accounts to be involved in the<br />
migration process. In case of setting of mapping of user accounts, follow these additional<br />
guidelines:<br />
After completion of mapping settings, go to section Users in the <strong>Kerio</strong> Connect’s<br />
administration interface and click on Add. This opens a dialog asking whether<br />
the user would be mapped or a local one would be created. Choose the option<br />
of mapping and in the list opened, select all users to be migrated to <strong>Kerio</strong> Connect. For<br />
detailed guidelines for password change, refer to <strong>Kerio</strong> Connect 7, Administrator’s Guide.<br />
4. Before starting the migration, it is recommended to guarantee that Microsoft <strong>Exchange</strong><br />
Server does not accept any emails and that no user whose account is involved in the<br />
5
migration could connect to it (obviously except the administrator’s account which is used<br />
for connection of the migration tool to the server). Otherwise, migrated data might be<br />
inconsistent.<br />
5. If connection between Microsoft <strong>Exchange</strong> Server and <strong>Kerio</strong> Connect goes through<br />
a firewall, make sure before migration that the following ports are open at the firewall:<br />
• TCP protocol on port 143,<br />
• TCP/UDP protocol on port 44337.<br />
The migration requires that both Microsoft <strong>Exchange</strong> Server and <strong>Kerio</strong> Connect are running.<br />
4 <strong>Migration</strong> process<br />
Connection test<br />
Create a new profile in MS Outlook on the computer where the <strong>Kerio</strong> <strong>Exchange</strong> <strong>Migration</strong> <strong>Tool</strong> is<br />
installed. This profile will include an account with administration rights for Microsoft <strong>Exchange</strong><br />
Server. Try to use the account to connect to Microsoft <strong>Exchange</strong> Server. If the connection was<br />
successful, the migration is ready to start.<br />
Launching migration<br />
Check the following example:<br />
1. If MS Outlook is running, close it.<br />
2. Run <strong>Kerio</strong> <strong>Exchange</strong> <strong>Migration</strong> <strong>Tool</strong> for example from the Start → Programs → <strong>Kerio</strong> →<br />
<strong>Exchange</strong> <strong>Migration</strong> <strong>Tool</strong> menu.<br />
Warning:<br />
Never start the migration tool if it is already running.<br />
3. The migration tool is opened as a wizard where administration usernames and passwords<br />
for the Microsoft <strong>Exchange</strong> Server and then for <strong>Kerio</strong> Connect are required.<br />
4. For connection to both servers, check user accounts to migrate in the Select Users dialog<br />
(see figure 2).<br />
The migration process may be time-consuming. Therefore, it is recommended to migrate<br />
data by parts (see section 2).<br />
5. At the start of migration, the <strong>Migration</strong> Status window (see figure 3) is opened, showing<br />
the current status of the migration progress.<br />
If the migration process is interrupted (finished without being completed) deliberately, the<br />
following results take effect:<br />
6
Figure 2<br />
User selection dialog<br />
Figure 3<br />
Dialog displaying status of migration of particular mailboxes<br />
• Data of users whose migration has been completed will be saved in <strong>Kerio</strong> Connect.<br />
• In case of users whose migration was just being in progress in the time of the<br />
interruption, only part of the data (data having been migrated completely at the<br />
moment) is migrated. If the user is migrated again, the data already migrated<br />
gets duplicate. For this reason, it is recommended to remove the partly migrated<br />
users in the <strong>Kerio</strong> Connect’s administration interface before executing another<br />
migration. To find out which users were involved in an interrupted migration, see<br />
the migration report (for details, see section 5).<br />
7
• Users which, according to the status displayed in the dialog, have not been<br />
migrated yet, have no accounts in <strong>Kerio</strong> Connect created yet.<br />
<strong>Migration</strong> interruption may take several minutes. The time equals to the time needed for<br />
completion of migration of the item currently in progress.<br />
6. When the migration is completed, switch to the <strong>Migration</strong> Result page (see figure 4). This<br />
page sums up information about the migration which has just been completed.<br />
To get migration process details and reports of possible errors, click on the Report link.<br />
If user accounts have not been created, mapped or imported in the <strong>Kerio</strong> Connect,<br />
new user passwords can be found in the Report log. For security reasons, it is highly<br />
recommended that users change them upon their earliest connection to their account.<br />
Figure 4<br />
<strong>Migration</strong> result dialog<br />
Once a migration is completed successfully, it is recommended to create new accounts in<br />
users’ email clients (or profiles, if supported by the applications). This will help you avoid<br />
data inconsistence on the client sides. For information on how to set a profile for example<br />
in MS Outlook or a new account in MS Entourage, refer to <strong>Kerio</strong> Connect 7, User’s Guide.<br />
5 <strong>Migration</strong> process logs<br />
Several logs are created tracing the migration process. All logs are saved in the directory where<br />
<strong>Kerio</strong> <strong>Exchange</strong> <strong>Migration</strong> <strong>Tool</strong> is installed, in the \logs\MMDDYYYY_HHMMSS folder.<br />
Each start of the migration tool generates a new log.<br />
8
Should you contact the <strong>Kerio</strong> Technologies technical support to shoot various migration issues,<br />
please send content of the particular \logs\MMDDYYYY_HHMMSS folder attached to your report.<br />
The Report log<br />
The Report log can be found under \logs\MMDDRRRR_HHMMSS in the report.txt file. After<br />
completion of each migration, it is recommended to read through this file to make sure that<br />
no errors occurred and that all user accounts have been migrated correctly.<br />
If users had not been mapped to <strong>Kerio</strong> Connect before the migration took place, the Report<br />
log includes new user passwords generated by the migration tool.<br />
Debug Log<br />
The Debug log can be found under \logs\MMDDRRRR_HHMMSS in the debug.log file.<br />
Information provided in this log is useful especially for the software developers. Should any<br />
issue arise addressing migration to <strong>Kerio</strong> Connect, this log will help choose the right remedy<br />
in cooperation with <strong>Kerio</strong> Technologies technical support.<br />
9