

PRP1766 Star Trek: Enterprise Phase Pistol ... - Roddenberry.com
PRP1766 Star Trek: Enterprise Phase Pistol ... - Roddenberry.com
PRP1766 Star Trek: Enterprise Phase Pistol ... - Roddenberry.com

You also want an ePaper? Increase the reach of your titles
YUMPU automatically turns print PDFs into web optimized ePapers that Google loves.
4<br />
#<strong>PRP1766</strong> - STAR TREK: En t e r p r is e Ph a s e Pis t o l Pr o p Kit As s e m b l y Ma n u a l<br />
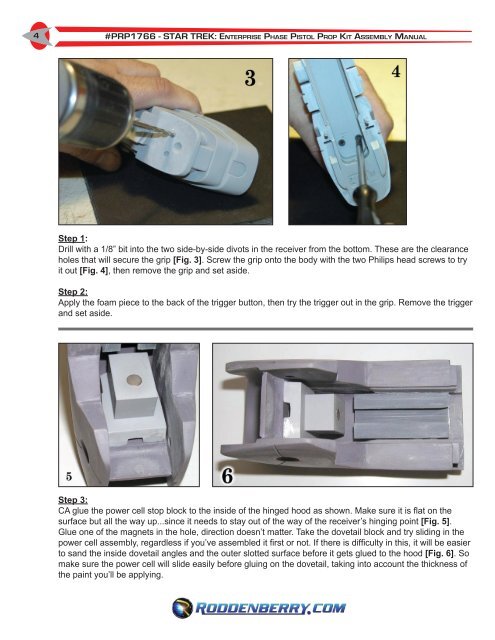
Step 1:<br />
Drill with a 1/8” bit into the two side-by-side divots in the receiver from the bottom. These are the clearance<br />
holes that will secure the grip [Fig. 3]. Screw the grip onto the body with the two Philips head screws to try<br />
it out [Fig. 4], then remove the grip and set aside.<br />
Step 2:<br />
Apply the foam piece to the back of the trigger button, then try the trigger out in the grip. Remove the trigger<br />
and set aside.<br />
Step 3:<br />
CA glue the power cell stop block to the inside of the hinged hood as shown. Make sure it is flat on the<br />
surface but all the way up...since it needs to stay out of the way of the receiver’s hinging point [Fig. 5].<br />
Glue one of the magnets in the hole, direction doesn’t matter. Take the dovetail block and try sliding in the<br />
power cell assembly, regardless if you’ve assembled it first or not. If there is difficulty in this, it will be easier<br />
to sand the inside dovetail angles and the outer slotted surface before it gets glued to the hood [Fig. 6]. So<br />
make sure the power cell will slide easily before gluing on the dovetail, taking into account the thickness of<br />
the paint you’ll be applying.


