FS-1118MFP KM-1820 - kyocera
FS-1118MFP KM-1820 - kyocera
FS-1118MFP KM-1820 - kyocera
You also want an ePaper? Increase the reach of your titles
YUMPU automatically turns print PDFs into web optimized ePapers that Google loves.
2GM<br />
Maintenance<br />
item No.<br />
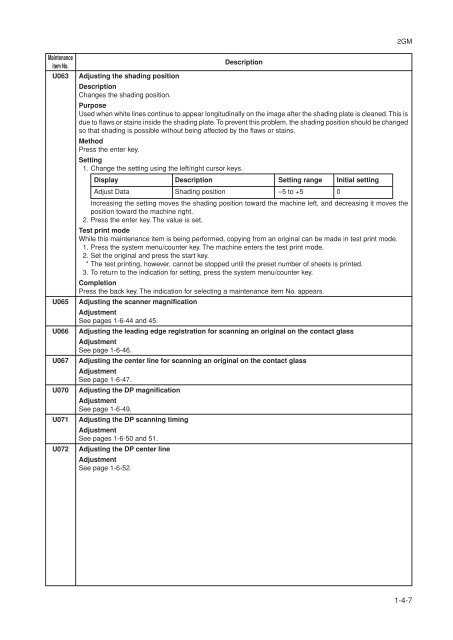
U063<br />
U065<br />
U066<br />
U067<br />
U070<br />
U071<br />
U072<br />
Description<br />
Adjusting the shading position<br />
Description<br />
Changes the shading position.<br />
Purpose<br />
Used when white lines continue to appear longitudinally on the image after the shading plate is cleaned. This is<br />
due to flaws or stains inside the shading plate. To prevent this problem, the shading position should be changed<br />
so that shading is possible without being affected by the flaws or stains.<br />
Method<br />
Press the enter key.<br />
Setting<br />
1. Change the setting using the left/right cursor keys.<br />
Display Description Setting range Initial setting<br />
Adjust Data Shading position –5 to +5 0<br />
Increasing the setting moves the shading position toward the machine left, and decreasing it moves the<br />
position toward the machine right.<br />
2. Press the enter key. The value is set.<br />
Test print mode<br />
While this maintenance item is being performed, copying from an original can be made in test print mode.<br />
1. Press the system menu/counter key. The machine enters the test print mode.<br />
2. Set the original and press the start key.<br />
* The test printing, however, cannot be stopped until the preset number of sheets is printed.<br />
3. To return to the indication for setting, press the system menu/counter key.<br />
Completion<br />
Press the back key. The indication for selecting a maintenance item No. appears.<br />
Adjusting the scanner magnification<br />
Adjustment<br />
See pages 1-6-44 and 45.<br />
Adjusting the leading edge registration for scanning an original on the contact glass<br />
Adjustment<br />
See page 1-6-46.<br />
Adjusting the center line for scanning an original on the contact glass<br />
Adjustment<br />
See page 1-6-47.<br />
Adjusting the DP magnification<br />
Adjustment<br />
See page 1-6-49.<br />
Adjusting the DP scanning timing<br />
Adjustment<br />
See pages 1-6-50 and 51.<br />
Adjusting the DP center line<br />
Adjustment<br />
See page 1-6-52.<br />
1-4-7


