THE COLOR CONNECTION BOOK SERIES - Xerox
THE COLOR CONNECTION BOOK SERIES - Xerox
THE COLOR CONNECTION BOOK SERIES - Xerox

You also want an ePaper? Increase the reach of your titles
YUMPU automatically turns print PDFs into web optimized ePapers that Google loves.
Word tip 18<br />
Create a simple calendar using Tables<br />
There are plenty of calendar-creation programs on the market today,<br />
but you can create one right in Word. Choose Table, Insert Table, and<br />
select the number of columns (seven if you’re creating a regular weeklong<br />
calendar) and rows (however many weeks you want to include).<br />
After you create the basic table, select it and choose Table, Cell Height<br />
and Width to adjust the size of your calendar.<br />
To position the dates in the upper right corner of each calendar cell,<br />
use the text alignment buttons on the Formatting toolbar and the<br />
Tables and Borders toolbar. To access the toolbar, choose View,<br />
Toolbars, Tables and Borders.<br />
To add art to the cells of your calendar, place the cursor in the cell<br />
in which you wish to position the art. Choose Insert, Picture, and specify<br />
the art. Word will attempt to size the image you choose to fit the<br />
cell. (Note: If you have trouble inserting images from Word’s Clip Art<br />
gallery, choose Insert, Picture, From File, and use an image from the<br />
clip art included with the Value Pack instead.) Occasionally, you may<br />
have trouble when inserting an image into a cell. Try cutting and pasting<br />
the image elsewhere in your document, size it, then cut and paste<br />
back into the calendar cell.<br />
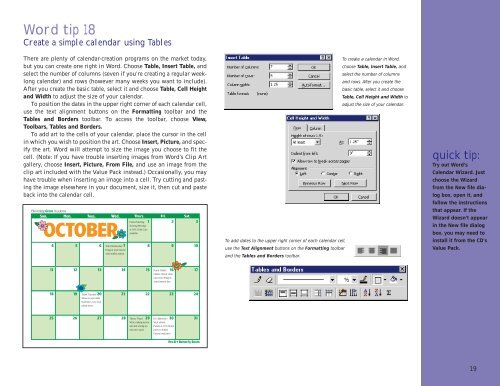
To create a calendar in Word,<br />
choose Table, Insert Table, and<br />
select the number of columns<br />
and rows. After you create the<br />
basic table, select it and choose<br />
Table, Cell Height and Width to<br />
adjust the size of your calendar.<br />
To add dates to the upper right corner of each calendar cell,<br />
use the Text Alignment buttons on the Formatting toolbar<br />
and the Tables and Borders toolbar.<br />
quick tip:<br />
Try out Word’s<br />
Calendar Wizard. Just<br />
choose the Wizard<br />
from the New file dialog<br />
box, open it, and<br />
follow the instructions<br />
that appear. If the<br />
Wizard doesn’t appear<br />
in the New file dialog<br />
box, you may need to<br />
install it from the CD’s<br />
Value Pack.<br />
19