Clarity Margay II Quick Start Guide - Planar
Clarity Margay II Quick Start Guide - Planar
Clarity Margay II Quick Start Guide - Planar

You also want an ePaper? Increase the reach of your titles
YUMPU automatically turns print PDFs into web optimized ePapers that Google loves.
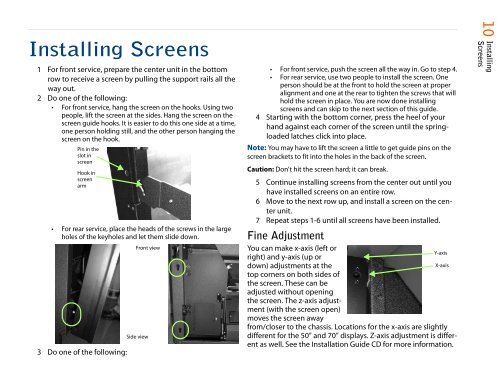
Installing Screens<br />
1 For front service, prepare the center unit in the bottom<br />
row to receive a screen by pulling the support rails all the<br />
way out.<br />
2 Do one of the following:<br />
• For front service, hang the screen on the hooks. Using two<br />
people, lift the screen at the sides. Hang the screen on the<br />
screen guide hooks. It is easier to do this one side at a time,<br />
one person holding still, and the other person hanging the<br />
screen on the hook.<br />
Pin in the<br />
slot in<br />
screen<br />
Hook in<br />
screen<br />
arm<br />
• For rear service, place the heads of the screws in the large<br />
holes of the keyholes and let them slide down.<br />
3 Do one of the following:<br />
Front view<br />
Side view<br />
• For front service, push the screen all the way in. Go to step 4.<br />
• For rear service, use two people to install the screen. One<br />
person should be at the front to hold the screen at proper<br />
alignment and one at the rear to tighten the screws that will<br />
hold the screen in place. You are now done installing<br />
screens and can skip to the next section of this guide.<br />
4 <strong>Start</strong>ing with the bottom corner, press the heel of your<br />
hand against each corner of the screen until the springloaded<br />
latches click into place.<br />
Note: You may have to lift the screen a little to get guide pins on the<br />
screen brackets to fit into the holes in the back of the screen.<br />
Caution: Don’t hit the screen hard; it can break.<br />
5 Continue installing screens from the center out until you<br />
have installed screens on an entire row.<br />
6 Move to the next row up, and install a screen on the center<br />
unit.<br />
7 Repeat steps 1-6 until all screens have been installed.<br />
Fine Adjustment<br />
You can make x-axis (left or<br />
right) and y-axis (up or<br />
down) adjustments at the<br />
top corners on both sides of<br />
the screen. These can be<br />
adjusted without opening<br />
the screen. The z-axis adjustment<br />
(with the screen open)<br />
moves the screen away<br />
Y-axis<br />
X-axis<br />
from/closer to the chassis. Locations for the x-axis are slightly<br />
different for the 50” and 70” displays. Z-axis adjustment is different<br />
as well. See the Installation <strong>Guide</strong> CD for more information.<br />
10 Installing<br />
Screens