Clarity Margay II Quick Start Guide - Planar
Clarity Margay II Quick Start Guide - Planar
Clarity Margay II Quick Start Guide - Planar

You also want an ePaper? Increase the reach of your titles
YUMPU automatically turns print PDFs into web optimized ePapers that Google loves.
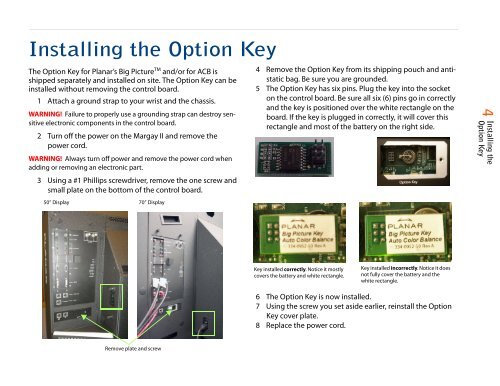
Installing the Option Key<br />
The Option Key for <strong>Planar</strong>’s Big Picture TM and/or for ACB is<br />
shipped separately and installed on site. The Option Key can be<br />
installed without removing the control board.<br />
1 Attach a ground strap to your wrist and the chassis.<br />
WARNING! Failure to properly use a grounding strap can destroy sensitive<br />
electronic components in the control board.<br />
2 Turn off the power on the <strong>Margay</strong> <strong>II</strong> and remove the<br />
power cord.<br />
WARNING! Always turn off power and remove the power cord when<br />
adding or removing an electronic part.<br />
3 Using a #1 Phillips screwdriver, remove the one screw and<br />
small plate on the bottom of the control board.<br />
4 Remove the Option Key from its shipping pouch and antistatic<br />
bag. Be sure you are grounded.<br />
5 The Option Key has six pins. Plug the key into the socket<br />
on the control board. Be sure all six (6) pins go in correctly<br />
and the key is positioned over the white rectangle on the<br />
board. If the key is plugged in correctly, it will cover this<br />
rectangle and most of the battery on the right side.<br />
4<br />
Installing the<br />
Option Key<br />
50” Display 70” Display<br />
Key installed correctly. Notice it mostly<br />
covers the battery and white rectangle.<br />
Key installed incorrectly. Notice it does<br />
not fully cover the battery and the<br />
white rectangle.<br />
6 The Option Key is now installed.<br />
7 Using the screw you set aside earlier, reinstall the Option<br />
Key cover plate.<br />
8 Replace the power cord.<br />
Remove plate and screw