Clarity Margay II Quick Start Guide - Planar
Clarity Margay II Quick Start Guide - Planar
Clarity Margay II Quick Start Guide - Planar

Create successful ePaper yourself
Turn your PDF publications into a flip-book with our unique Google optimized e-Paper software.
Adjust Levels for<br />
Analog Sources<br />
15<br />
Adjusting Levels for Analog Sources<br />
This page applies to analog RGB (computer) pictures only. Levels<br />
are best adjusted semi-automatically. For analog RGB pictures,<br />
levels for black and white vary from one computer to<br />
another, or from one video processor to another. They even vary<br />
between video outputs from a multiple-output video card in a<br />
computer.<br />
Your pictures will not look their best on the <strong>Margay</strong> <strong>II</strong> until you<br />
adjust for these differences. This is not about adjusting color or<br />
contrast. It’s about telling the <strong>Margay</strong> <strong>II</strong> what the computer or<br />
processor means by black and by white.<br />
Note: Thermal effects of the projection lens can shift 1-2 pixels. Wait at<br />
least 15-30 minutes before completing a final color balance or<br />
alignment. If the units are turned off and are cold, they could be<br />
misaligned until they have warmed up.<br />
Semi-Automatic Level Adjustment<br />
1 Select a source in the PICTURE menu. Display an all-white<br />
picture from the source computer. This must come from the<br />
computer source that will be used for the program.<br />
Note: We suggest displaying a white screen using Windows® Paint.<br />
2 To open the INPUT LEVELS menu, press LEVEL.<br />
3 Select AUTO WHITE LEVEL and press ENTER. This menu line<br />
says “Working…” until the process is complete.<br />
Note: When doing Auto White with an interlaced analog input, the<br />
color of the picture will change while it is working, and then will<br />
change back to normal.<br />
4 Display an all-white picture from the source computer.<br />
5 In the INPUT LEVELS menu, select AUTO WHITE LEVEL and<br />
press ENTER. Wait for “Working…” to disappear.<br />
6 The <strong>Margay</strong> <strong>II</strong> is now adjusted to the white levels of this<br />
computer using this video card.<br />
Note: Because the <strong>Margay</strong> <strong>II</strong> continually adjusts the black level for<br />
optimum display, there is no need to adjust it.<br />
7 Save the configuration to a memory slot.<br />
Manual Level Adjustment<br />
1 Select a source in the PICTURE menu. Display an all-black<br />
picture from the source computer.<br />
2 In the INPUT LEVELS menu, Press LEVEL on the remote.<br />
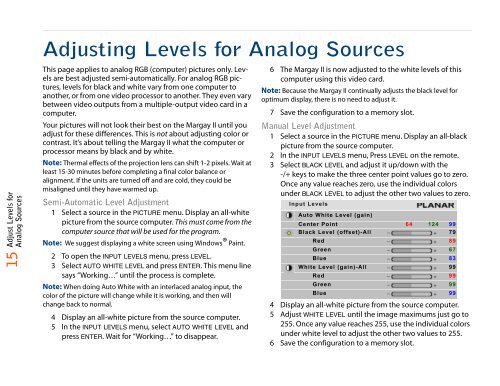
3 Select BLACK LEVEL and adjust it up/down with the<br />
-/+ keys to make the three center point values go to zero.<br />
Once any value reaches zero, use the individual colors<br />
under BLACK LEVEL to adjust the other two values to zero.<br />
Input Levels<br />
Auto White Level (gain)<br />
Center Point 64 124 99<br />
Black Level (offset)-All 79<br />
Red 89<br />
Green 67<br />
Blue 83<br />
White Level (gain)-All 99<br />
Red 99<br />
Green 99<br />
Blue 99<br />
4 Display an all-white picture from the source computer.<br />
5 Adjust WHITE LEVEL until the image maximums just go to<br />
255. Once any value reaches 255, use the individual colors<br />
under white level to adjust the other two values to 255.<br />
6 Save the configuration to a memory slot.