CommandCenter Secure Gateway - Deployment Guide - v4.1 - Raritan
CommandCenter Secure Gateway - Deployment Guide - v4.1 - Raritan
CommandCenter Secure Gateway - Deployment Guide - v4.1 - Raritan

You also want an ePaper? Increase the reach of your titles
YUMPU automatically turns print PDFs into web optimized ePapers that Google loves.
Chapter 3: Prepare <strong>Raritan</strong> Devices<br />
Dominion KSX II Initial Configuration<br />
The first time you power up the Dominion KSX II unit, there is some initial<br />
configuration that you need to perform through the Dominion KSX II Local<br />
Console:<br />
• Change the default password.<br />
• Assign the IP Address.<br />
Assign an IP Address<br />
These procedures describe how to assign an IP Address using the<br />
Network Settings page. For complete information about all of the fields<br />
and the operation of this page, see Network Settings in the <strong>Raritan</strong><br />
Dominion KSX II User <strong>Guide</strong>.<br />
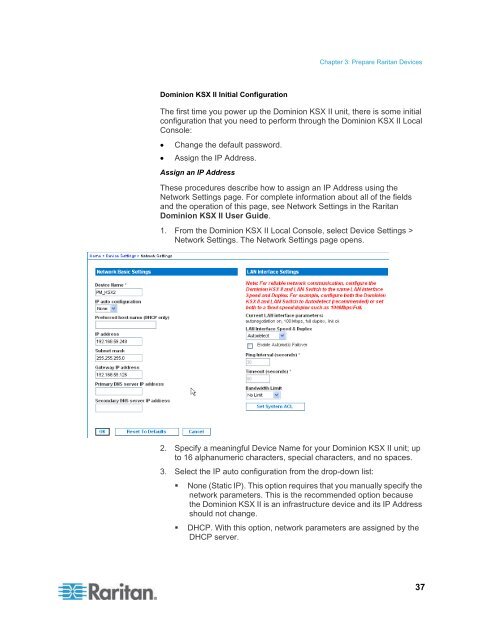
1. From the Dominion KSX II Local Console, select Device Settings ><br />
Network Settings. The Network Settings page opens.<br />
2. Specify a meaningful Device Name for your Dominion KSX II unit; up<br />
to 16 alphanumeric characters, special characters, and no spaces.<br />
3. Select the IP auto configuration from the drop-down list:<br />
• None (Static IP). This option requires that you manually specify the<br />
network parameters. This is the recommended option because<br />
the Dominion KSX II is an infrastructure device and its IP Address<br />
should not change.<br />
• DHCP. With this option, network parameters are assigned by the<br />
DHCP server.<br />
37