Star Trek - Roddenberry.com
Star Trek - Roddenberry.com
Star Trek - Roddenberry.com

You also want an ePaper? Increase the reach of your titles
YUMPU automatically turns print PDFs into web optimized ePapers that Google loves.
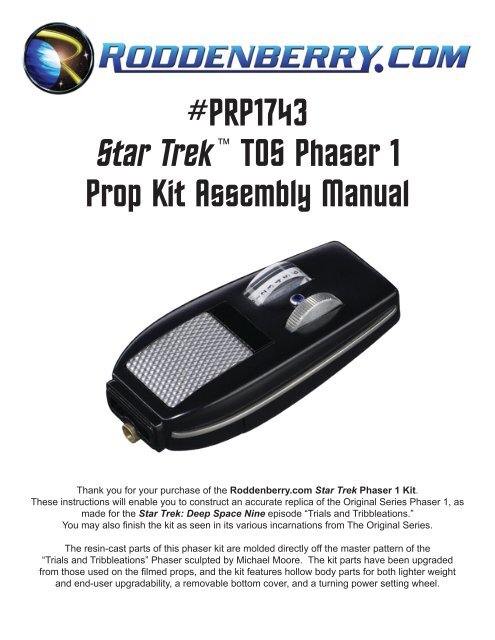
#PRP1743<br />
<strong>Star</strong> <strong>Trek</strong> TOS Phaser 1<br />
Prop Kit Assembly Manual<br />
Thank you for your purchase of the <strong>Roddenberry</strong>.<strong>com</strong> <strong>Star</strong> <strong>Trek</strong> Phaser 1 Kit.<br />
These instructions will enable you to construct an accurate replica of the Original Series Phaser 1, as<br />
made for the <strong>Star</strong> <strong>Trek</strong>: Deep Space Nine episode “Trials and Tribbleations.”<br />
You may also finish the kit as seen in its various incarnations from The Original Series.<br />
The resin-cast parts of this phaser kit are molded directly off the master pattern of the<br />
“Trials and Tribbleations” Phaser sculpted by Michael Moore. The kit parts have been upgraded<br />
from those used on the filmed props, and the kit features hollow body parts for both lighter weight<br />
and end-user upgradability, a removable bottom cover, and a turning power setting wheel.
2<br />
#PRP1743 - STAR TREK: TOS Ph a s e r 1 Pr o p Kit As s e m b l y Ma n u a l<br />
BASIC LAYOUT AND INVENTORY
#PRP1743 - STAR TREK: TOS Ph a s e r 1 Pr o p Kit As s e m b l y Ma n u a l 3<br />
Notes on making a TOS First Season ''Black and White'' Phaser:<br />
Read all of the instructions first. If you wish to make a TOS First Season “Black and White” Phaser, then<br />
make the following modifications as you assemble your kit....<br />
Paints needed:<br />
Semi-Flat or Gloss Black spray paint<br />
Phaser 1 Modifications:<br />
Take the aspirator grill and bend it the other way -- the smooth side is out. Glue this with epoxy to the<br />
body, do not fill in the seams. Leave off the clear plex targeting lens for now and glue this on with the<br />
black vinyl underneath like for the standard Phaser 1 after painting.<br />
Glue on the side rails (the adjustment wheel can be installed later, or masked before painting) and the<br />
front before painting, then sand flush with the surface so it all appears as one piece, putty and sand<br />
smooth.<br />
Fill in and sand the power meter hole.<br />
Paint semi-gloss or gloss black, including the side rails and the aspirator grill area.<br />
After curing, glue on the clear targeting lens, and add the emitter tube and trigger button.<br />
The power meter graphics consists of cutting out numbers 1 and 10 in white squares and affixing them<br />
in place at either end of the surface where the plastic meter would go. The half-round meter is not used,<br />
and the graphic numbers are exposed.<br />
The rhinestone is not used with the B/W phaser.<br />
Good luck with your kit!
4<br />
#PRP1743 - STAR TREK: TOS Ph a s e r 1 Pr o p Kit As s e m b l y Ma n u a l<br />
Parts List:<br />
1 Upper Body<br />
1 Front<br />
1 Bottom Cover<br />
1 Aspirator Grill<br />
1 Clear Plex Targeting Lens<br />
1 Black Vinyl Strip<br />
1 Adjustment Wheel<br />
1 Power Meter with power level graphic<br />
1 Emitter<br />
1 Trigger Button<br />
1 Left Side Rail<br />
1 Right Side Rail<br />
1 Blue Rhinestone<br />
1 Rhinestone Mount<br />
1 4-40 x 3/8” Screw<br />
1 4-40 x 1/2” Screw<br />
1 Grommet Insert<br />
1 180 grit sandpaper<br />
1 320 grit sandpaper<br />
1 “Scotchbrite” pad<br />
Tools and supplies needed:<br />
All of these can be found in your local<br />
hardware store...<br />
Epoxy glue -- 5 minute curing<br />
Fine sandpaper -- 400 to 600 grit<br />
Small jeweler’s file (flat or half-round)<br />
Automotive spot putty<br />
Hobby knife (X-Acto brand or similar)<br />
Small brass wire brush (resembles a<br />
large toothbrush)<br />
Hand drill with 1/8” drill bit<br />
Some sort of hand saw (fine hobby saw or<br />
hacksaw)<br />
Cyanoacrylate glue (medium “gap-filling”<br />
type re<strong>com</strong>mended)<br />
Masking tape<br />
Toothpicks<br />
Spray Paints:<br />
Spray primer (sandable scratch-filler type)<br />
Krylon “Shadow Gray” (for Trials and Tribbleations)<br />
Zynolyte Dark Gray Primer (for TOS)<br />
Krylon Matte Finish or Testors Dullcote<br />
(if you’re using a primer as the color coat)<br />
Semi-Flat or Gloss Black (for TOS)<br />
Optional Tools and supples:<br />
Automotive body filler (Bondo brand or similar)<br />
Dremel brand moto tool or similar<br />
Metal polish (Simichrome or other)<br />
Velcro<br />
Wash your resin parts with soap and water to remove any lingering traces of mold<br />
release before you begin.
#PRP1743 - STAR TREK: TOS Ph a s e r 1 Pr o p Kit As s e m b l y Ma n u a l 5<br />
Step 1: <strong>Star</strong>t by cutting off the sprues (if present) with your saw and<br />
sanding the flashing and mold lines from the three main resin body<br />
parts. Then fill any objectionable scratches and holes with the spot<br />
putty. While the resin parts were pressure-cast to minimize bubbles<br />
and voids, there may still be small bubbles present in the castings that<br />
will need to be filled and sanded.
6<br />
#PRP1743 - STAR TREK: TOS Ph a s e r 1 Pr o p Kit As s e m b l y Ma n u a l<br />
Step 2: While the putty is drying, sand the edges and mold lines off of the cast metal parts. As you work,<br />
continually check the fit of your parts and sand or file away any resin or metal that interferes with proper fit<br />
and function.<br />
Step 3: The aspirator grill finish is achieved by wire brushing the top surface with your small brass brush.<br />
Brush with the diamond pattern in both directions to give it the desired finish.<br />
Step 4: Sand the outer edges of the two side rails until smooth (down to 400-600 grit). Be careful, as they<br />
are easily bent. Rubbing them with the Scotchbrite pad will give the rails a nice brushed look, or they can<br />
be polished with metal polish.<br />
The rails and the aspirator grill can be bent slightly for a more even fit -- be careful not to over-bend.
#PRP1743 - STAR TREK: TOS Ph a s e r 1 Pr o p Kit As s e m b l y Ma n u a l 7<br />
Step 5: Try the fit of the clear plex targeting lens and the aspirator grill, sand either or both parts until they<br />
fit. The targeting lens may not appear to be even to the surface of the body. You may add material to the<br />
low end or cut away material from the high end on the body until it looks good to you.<br />
Step 6: Drill a 1/8” hole into the end of the bottom cover, enough for the grommet insert to fit in. The<br />
grommet may be installed before or after painting.<br />
Step 7: Clean the hole in the front where the emitter tube fits in.
8<br />
#PRP1743 - STAR TREK: TOS Ph a s e r 1 Pr o p Kit As s e m b l y Ma n u a l<br />
Step 8: Install the adjustment wheel onto the left side rail using the 4-40 x 3/8” screw. You will want this<br />
slightly loose so the wheel spins freely. Fit this assembly onto the phaser, and file away the slot in the body<br />
if it interferes with the smooth spinning of the wheel (see next photo below). Be sure to file at an angle<br />
to avoid filing away any of the visible slot. Try the fit again to be sure it works; once satisfied as to the<br />
function, glue the end of the screw with cyanoacrylate glue so it can’t work its way loose.<br />
Step 9: Once again, continue to test fit your parts!
#PRP1743 - STAR TREK: TOS Ph a s e r 1 Pr o p Kit As s e m b l y Ma n u a l 9<br />
Step 10: Make yourself some small hangers so you can hang your resin parts for painting. It may help to<br />
slightly roughen up your surfaces with 320-400 grit sandpaper before you spray your first coat of primer.<br />
You may mask off the areas that you’ll be gluing parts to before you paint, as glued parts do not adhere<br />
well to painted surfaces.<br />
After your first coat of primer dries, check the finish of the surfaces. The primer coat may reveal scratches<br />
and other flaws that were not visible to you before, use the spot putty and sand those spots. Primer again<br />
and repeat if needed -- it may take several putty, sanding, and primer steps before you get a surface that<br />
you’re pleased with.<br />
When the final primer coat is dried enough, spray on your first coat of color. ”Trials and Tribbleations”<br />
phasers were painted Krylon Shadow Gray, or you have the choice of using Zynolyte Dark Gray Primer or<br />
similar, or a semi-flat or gloss black color coat if you want to paint a color used on TOS.<br />
If you’re using a primer as your color, give your phaser a final coat of clear Krylon Matte Finish, Testor’s<br />
Dullcote, or another brand of clear finish.<br />
You may if you wish wet sand in between coats with 600 grit or finer sandpaper for an ultimate smooth<br />
finish.<br />
Allow your painted body parts to dry and cure before you handle them again, allow several hours or<br />
overnight before you begin final assembly. If you’ve masked any areas before painting, remove the<br />
masking tape carefully so you don’t lift your freshly painted surfaces. You may need to score the tape<br />
edges with a hobby knife before lifting the tape off.
10<br />
#PRP1743 - STAR TREK: TOS Ph a s e r 1 Pr o p Kit As s e m b l y Ma n u a l<br />
Step 11: Before gluing your parts on, roughen up any surfaces you’re gluing together. This is also<br />
necessary to remove paint from your joints since resin glues better to resin and metal than it does to paint.<br />
Be very careful you do not damage any visible surfaces. While gluing, try to avoid handling the phaser any<br />
more than necessary to keep glue fingerprints off. Allow sufficient cure time in between installing parts.<br />
Step 12: <strong>Star</strong>t by gluing the side rails to the upper body, one at a time. You can wipe away excess<br />
“outside” glue while it’s still wet, or you can leave it alone without touching it and pick away at the glue with<br />
toothpicks when it starts to cure but before full hardness -- there is a small window of opportunity when you<br />
can do this without damaging finished surfaces. When the glue is soft without being sticky and stringy is<br />
best for this; it will get progressively harder to remove glue this way the more it is curing.
#PRP1743 - STAR TREK: TOS Ph a s e r 1 Pr o p Kit As s e m b l y Ma n u a l 11<br />
Step 13: You may use your own preference for the order in which the rest of the parts assemble. Glue<br />
the front on using cyanoacrylate on the resin-to-resin joint, or epoxy if you want to have the convenience<br />
of moving the parts slightly for final positioning. Look at the front of the phaser and make sure you’re<br />
putting it on straight and even; once in place it will be hard to correct a visual mistake. Spread epoxy inside<br />
where the front butts up on the rails. Install the emitter either before or after gluing the front, it sticks out<br />
approximately 1/16 of an inch (see photos on the bottom). Spread epoxy around the emitter on the inside;<br />
it is not necessary to put glue in before pushing the emitter in the hole.<br />
Glue on the aspirator grill with epoxy. You may spread glue inside the body for greater strength; this also<br />
applies for all the other parts.
12<br />
#PRP1743 - STAR TREK: TOS Ph a s e r 1 Pr o p Kit As s e m b l y Ma n u a l<br />
Step 14: Put the black vinyl tape on one surface of the clear plex targeting lens, this helps to keep from<br />
seeing into the interior of the phaser. Glue the taped targeting lens onto the phaser, tape side down. You<br />
may want to add a piece of support plastic at the joint of the targeting lens and aspirator grill, or at least add<br />
extra glue there inside the phaser.<br />
Step 15: Epoxy the power meter onto the graphic. You may use your choice of power number ranges;<br />
there is enough length on the graphic so if you make a mistake with your gluing, you can peel off the<br />
graphic and try again. When the glue has been curing for a few minutes, cut away the excess graphic with<br />
your hobby knife before it achieves full cured hardness.<br />
The “Trials and Tribbleations” Phaser 1 had a blue rhinestone in between the meter and adjustment wheel.<br />
Many of the TOS phasers didn’t have the rhinestone or used a red one, so its installation is purely a matter<br />
of preference as well as what color you use (he Blue “Trials and Tribbleations” rhinestone is the only one<br />
supplied).
#PRP1743 - STAR TREK: TOS Ph a s e r 1 Pr o p Kit As s e m b l y Ma n u a l 13<br />
Step 16: To install the rhinestone, scrape away a very small patch of paint where the rhinestone goes.<br />
There is no specific place imprinted on the casting for this; you’ll have to eyeball its placement. Sand<br />
the metal rhinestone mount until flat. Place a tiny drop of epoxy on this patch then very carefully put the<br />
rhinestone mount in place, using tweezers if needed. The rhinestone may be glued onto the plate either<br />
before or after it goes on the phaser.<br />
Step 17: Epoxy on the power meter assembly; make sure it fits in the hole before you glue it.<br />
Step 18: Glue the trigger button onto the bottom cover.
14<br />
#PRP1743 - STAR TREK: TOS Ph a s e r 1 Pr o p Kit As s e m b l y Ma n u a l<br />
Step 19: Secure the bottom cover with the 4-40 x 1/2” screw. If you wish, you may affix a piece of Velcro<br />
to the cover to carry your phaser with a costume.<br />
Enjoy your new Phaser 1!<br />
IMPORTANT NOTES:<br />
The reproduction of the <strong>Roddenberry</strong>.<strong>com</strong> <strong>Star</strong> <strong>Trek</strong> TOS Phaser 1 Kit or any of its parts by any means<br />
known or yet to be invented (including molding and recasting, reverse-engineering, or 3D scanning/SLA<br />
printing) is expressly prohibited by United States and international copyright and product protection laws.<br />
Copyright © 2009 <strong>Roddenberry</strong> Productions.<br />
<strong>Star</strong> <strong>Trek</strong> and related marks and logos are Trademarks of CBS Studios Inc. All rights reserved.