Star Trek: First Contact Phaser Rifle - Roddenberry.com
Star Trek: First Contact Phaser Rifle - Roddenberry.com
Star Trek: First Contact Phaser Rifle - Roddenberry.com

Create successful ePaper yourself
Turn your PDF publications into a flip-book with our unique Google optimized e-Paper software.
#PRP1769BU<br />
<strong>Star</strong> <strong>Trek</strong>: <strong>First</strong> <strong>Contact</strong> <strong>Phaser</strong> <strong>Rifle</strong><br />
Battery Replacement and<br />
Operating Instructions<br />
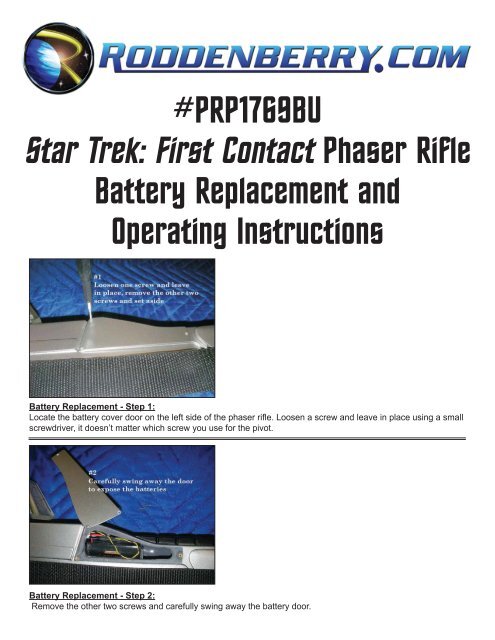
Battery Replacement - Step 1:<br />
Locate the battery cover door on the left side of the phaser rifle. Loosen a screw and leave in place using a small<br />
screwdriver, it doesn’t matter which screw you use for the pivot.<br />
Battery Replacement - Step 2:<br />
Remove the other two screws and carefully swing away the battery door.
2<br />
#PRP1769BU - STAR TREK: Fir s t Co n t a c t Ph a s e r <strong>Rifle</strong> Battery Replacement a n d Op e r a t i n g Ma n u a l<br />
Battery Replacement - Step 3:<br />
Pull out the battery pack and replace with 3 @ AAA cells (1.5V each, 4.5V total). Re-insert the pack into the<br />
rifle and screw the cover on.<br />
Operating Instructions:<br />
The rearward switch on the left side below the target scope turns on main<br />
power, including the force-setting bargraph, the red LEDs on the side, and<br />
the target light; this also allows sound and emitter LED firing of the rifle by<br />
pressing the trigger button. The forward switch turns on the white flashlight<br />
LED, this does not operate on its own unless the main power on.