

#PRP1787 Star Trek TOS Wall Communicator ... - Roddenberry.com
#PRP1787 Star Trek TOS Wall Communicator ... - Roddenberry.com
#PRP1787 Star Trek TOS Wall Communicator ... - Roddenberry.com

You also want an ePaper? Increase the reach of your titles
YUMPU automatically turns print PDFs into web optimized ePapers that Google loves.
<strong>#PRP1787</strong> - St a r Tr e k <strong>TOS</strong> Wa l l Co m m u n ic a t o r Pr o p Kit As s e m b l y Ma n u a l 3<br />
Step 1: Wash all the resin parts (not the clear or acrylic parts, or the cast gloss white inter<strong>com</strong> button!) with<br />
chlorine based cleaner like Comet or Ajax to clean off any traces of mold release. Sand the mold lines off<br />
all the resin parts (speaker frame, inter<strong>com</strong> and alert buttons and rings) with 400 grit sand paper. Fill any<br />
imperfections/pinholes with Bondo plastic filler or spot putty where needed and sand until smooth.<br />
Step 2: With masking tape, mask any parts you shouldn’t have paint on; these mostly consist of the insides<br />
of the large and small button rings -- if you are adding light effects to your wall-<strong>com</strong>m, it is important you<br />
have freedom of movement for the buttons to push in on your switch without scraping the eventual paint<br />
finish off the sides of the buttons.<br />
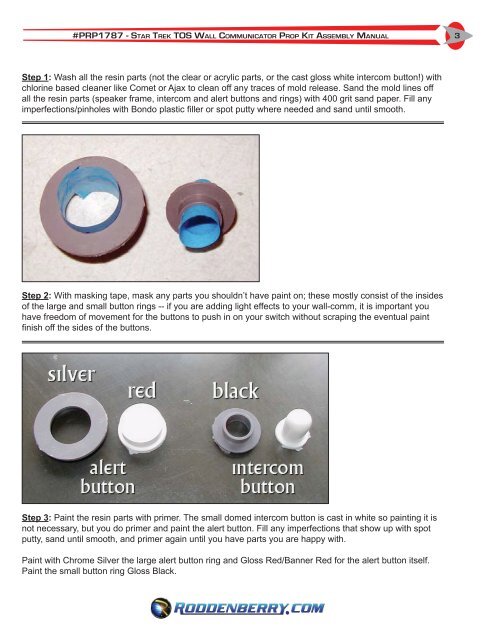
Step 3: Paint the resin parts with primer. The small domed inter<strong>com</strong> button is cast in white so painting it is<br />
not necessary, but you do primer and paint the alert button. Fill any imperfections that show up with spot<br />
putty, sand until smooth, and primer again until you have parts you are happy with.<br />
Paint with Chrome Silver the large alert button ring and Gloss Red/Banner Red for the alert button itself.<br />
Paint the small button ring Gloss Black.


