#PRP1781 Federation Mark X Medical Tricorder ... - Roddenberry.com
#PRP1781 Federation Mark X Medical Tricorder ... - Roddenberry.com
#PRP1781 Federation Mark X Medical Tricorder ... - Roddenberry.com

You also want an ePaper? Increase the reach of your titles
YUMPU automatically turns print PDFs into web optimized ePapers that Google loves.
2<br />
<strong>#PRP1781</strong> - <strong>Federation</strong> Ma r k X Me d i c a l Tr i c or d e r Pr o p Kit As s e m b l y Ma n u a l<br />
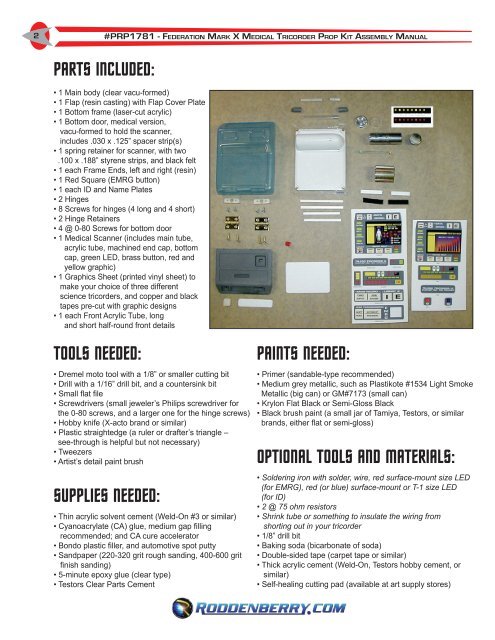
PARTS INCLUDED:<br />
• 1 Main body (clear vacu-formed)<br />
• 1 Flap (resin casting) with Flap Cover Plate<br />
• 1 Bottom frame (laser-cut acrylic)<br />
• 1 Bottom door, medical version,<br />
vacu-formed to hold the scanner,<br />
includes .030 x .125” spacer strip(s)<br />
• 1 spring retainer for scanner, with two<br />
.100 x .188” styrene strips, and black felt<br />
• 1 each Frame Ends, left and right (resin)<br />
• 1 Red Square (EMRG button)<br />
• 1 each ID and Name Plates<br />
• 2 Hinges<br />
• 8 Screws for hinges (4 long and 4 short)<br />
• 2 Hinge Retainers<br />
• 4 @ 0-80 Screws for bottom door<br />
• 1 <strong>Medical</strong> Scanner (includes main tube,<br />
acrylic tube, machined end cap, bottom<br />
cap, green LED, brass button, red and<br />
yellow graphic)<br />
• 1 Graphics Sheet (printed vinyl sheet) to<br />
make your choice of three different<br />
science tricorders, and copper and black<br />
tapes pre-cut with graphic designs<br />
• 1 each Front Acrylic Tube, long<br />
and short half-round front details<br />
Tools Needed:<br />
• Dremel moto tool with a 1/8” or smaller cutting bit<br />
• Drill with a 1/16” drill bit, and a countersink bit<br />
• Small flat file<br />
• Screwdrivers (small jeweler’s Philips screwdriver for<br />
the 0-80 screws, and a larger one for the hinge screws)<br />
• Hobby knife (X-acto brand or similar)<br />
• Plastic straightedge (a ruler or drafter’s triangle –<br />
see-through is helpful but not necessary)<br />
• Tweezers<br />
• Artist’s detail paint brush<br />
Supplies Needed:<br />
• Thin acrylic solvent cement (Weld-On #3 or similar)<br />
• Cyanoacrylate (CA) glue, medium gap filling<br />
re<strong>com</strong>mended; and CA cure accelerator<br />
• Bondo plastic filler, and automotive spot putty<br />
• Sandpaper (220-320 grit rough sanding, 400-600 grit<br />
finish sanding)<br />
• 5-minute epoxy glue (clear type)<br />
• Testors Clear Parts Cement<br />
Paints Needed:<br />
• Primer (sandable-type re<strong>com</strong>mended)<br />
• Medium grey metallic, such as Plastikote #1534 Light Smoke<br />
Metallic (big can) or GM#7173 (small can)<br />
• Krylon Flat Black or Semi-Gloss Black<br />
• Black brush paint (a small jar of Tamiya, Testors, or similar<br />
brands, either flat or semi-gloss)<br />
Optional Tools and Materials:<br />
• Soldering iron with solder, wire, red surface-mount size LED<br />
(for EMRG), red (or blue) surface-mount or T-1 size LED<br />
(for ID)<br />
• 2 @ 75 ohm resistors<br />
• Shrink tube or something to insulate the wiring from<br />
shorting out in your tricorder<br />
• 1/8” drill bit<br />
• Baking soda (bicarbonate of soda)<br />
• Double-sided tape (carpet tape or similar)<br />
• Thick acrylic cement (Weld-On, Testors hobby cement, or<br />
similar)<br />
• Self-healing cutting pad (available at art supply stores)