#PRP1781 Federation Mark X Medical Tricorder ... - Roddenberry.com
#PRP1781 Federation Mark X Medical Tricorder ... - Roddenberry.com
#PRP1781 Federation Mark X Medical Tricorder ... - Roddenberry.com

Create successful ePaper yourself
Turn your PDF publications into a flip-book with our unique Google optimized e-Paper software.
6<br />
<strong>#PRP1781</strong> - <strong>Federation</strong> Ma r k X Me d i c a l Tr i c or d e r Pr o p Kit As s e m b l y Ma n u a l<br />
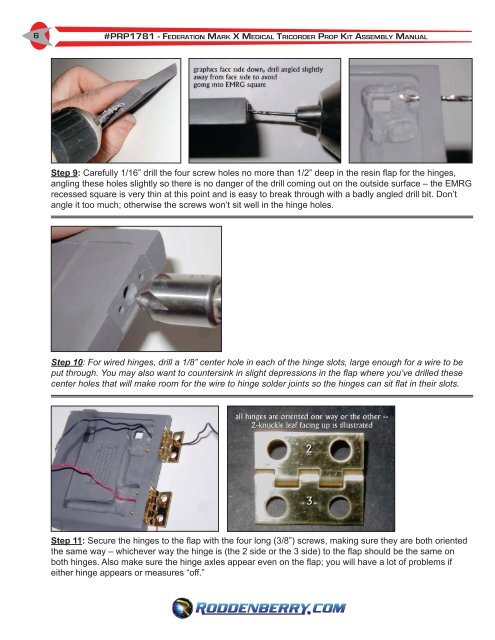
Step 9: Carefully 1/16” drill the four screw holes no more than 1/2” deep in the resin flap for the hinges,<br />
angling these holes slightly so there is no danger of the drill <strong>com</strong>ing out on the outside surface – the EMRG<br />
recessed square is very thin at this point and is easy to break through with a badly angled drill bit. Don’t<br />
angle it too much; otherwise the screws won’t sit well in the hinge holes.<br />
Step 10: For wired hinges, drill a 1/8” center hole in each of the hinge slots, large enough for a wire to be<br />
put through. You may also want to countersink in slight depressions in the flap where you’ve drilled these<br />
center holes that will make room for the wire to hinge solder joints so the hinges can sit flat in their slots.<br />
Step 11: Secure the hinges to the flap with the four long (3/8”) screws, making sure they are both oriented<br />
the same way – whichever way the hinge is (the 2 side or the 3 side) to the flap should be the same on<br />
both hinges. Also make sure the hinge axles appear even on the flap; you will have a lot of problems if<br />
either hinge appears or measures “off.”