Star Trek: The Motion Picture Tricorder - Roddenberry.com
Star Trek: The Motion Picture Tricorder - Roddenberry.com
Star Trek: The Motion Picture Tricorder - Roddenberry.com

You also want an ePaper? Increase the reach of your titles
YUMPU automatically turns print PDFs into web optimized ePapers that Google loves.
2<br />
#PRP1786E - St a r Tr e k: Th e Mo t i o n Pi c t ur e Tr i c or d e r El e c t r o n i c Up g r a d e Ma n u a l<br />
Tools Required:<br />
• Dremel and/or Drill w bits<br />
• Hobby knife<br />
• Hot glue gun<br />
EXAMINE ALL PARTS AND READ THIS MANUAL COMPLETELY<br />
BEFORE HOOKING ANY POWER TO ELECTRONICS:<br />
<strong>The</strong>se instructions have been written so that when followed correctly, your electronics upgrade will go<br />
smoothly and your tricorder will look and sound just like the prop in the show upon <strong>com</strong>pletion.<br />
Do NOT solder or modify the electronic circuit board in any way!<br />
<strong>The</strong> wires are color coded in order to minimize any confusion. Always match up wire colors (i.e. black/black,<br />
red/red, etc.) unless otherwise stated.<br />
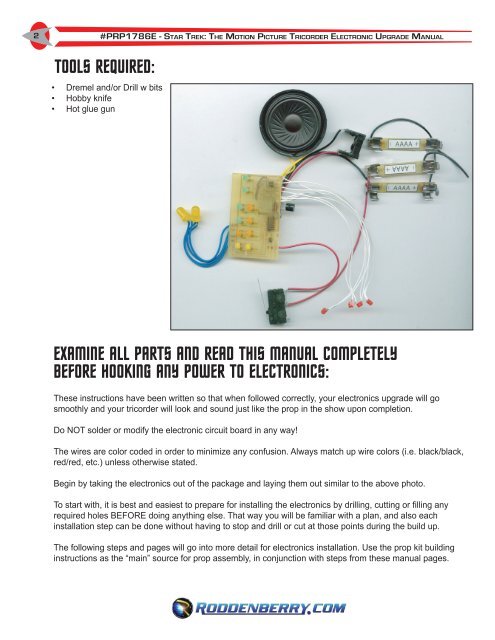
Begin by taking the electronics out of the package and laying them out similar to the above photo.<br />
To start with, it is best and easiest to prepare for installing the electronics by drilling, cutting or filling any<br />
required holes BEFORE doing anything else. That way you will be familiar with a plan, and also each<br />
installation step can be done without having to stop and drill or cut at those points during the build up.<br />
<strong>The</strong> following steps and pages will go into more detail for electronics installation. Use the prop kit building<br />
instructions as the “main” source for prop assembly, in conjunction with steps from these manual pages.