The Search for Spock Phaser Prop Kit - Roddenberry.com
The Search for Spock Phaser Prop Kit - Roddenberry.com
The Search for Spock Phaser Prop Kit - Roddenberry.com

You also want an ePaper? Increase the reach of your titles
YUMPU automatically turns print PDFs into web optimized ePapers that Google loves.
8<br />
#PRP1764 - STAR TREK III Ph a s e r Pr o p <strong>Kit</strong> As s e m b l y Ma n u a l<br />
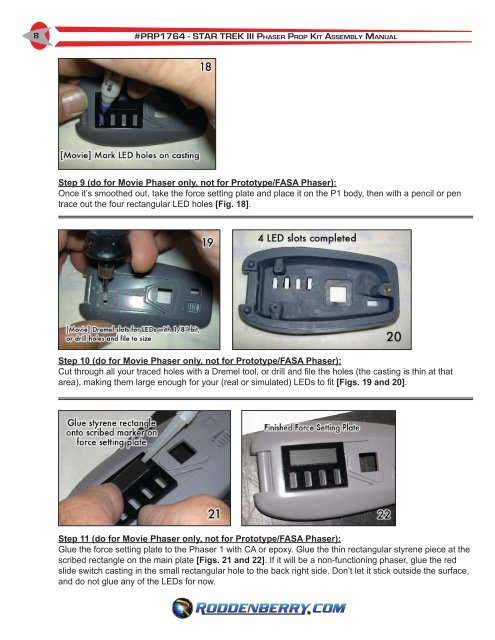
Step 9 (do <strong>for</strong> Movie <strong>Phaser</strong> only, not <strong>for</strong> Prototype/FASA <strong>Phaser</strong>):<br />
Once it’s smoothed out, take the <strong>for</strong>ce setting plate and place it on the P1 body, then with a pencil or pen<br />
trace out the four rectangular LED holes [Fig. 18].<br />
Step 10 (do <strong>for</strong> Movie <strong>Phaser</strong> only, not <strong>for</strong> Prototype/FASA <strong>Phaser</strong>):<br />
Cut through all your traced holes with a Dremel tool, or drill and file the holes (the casting is thin at that<br />
area), making them large enough <strong>for</strong> your (real or simulated) LEDs to fit [Figs. 19 and 20].<br />
Step 11 (do <strong>for</strong> Movie <strong>Phaser</strong> only, not <strong>for</strong> Prototype/FASA <strong>Phaser</strong>):<br />
Glue the <strong>for</strong>ce setting plate to the <strong>Phaser</strong> 1 with CA or epoxy. Glue the thin rectangular styrene piece at the<br />
scribed rectangle on the main plate [Figs. 21 and 22]. If it will be a non-functioning phaser, glue the red<br />
slide switch casting in the small rectangular hole to the back right side. Don’t let it stick outside the surface,<br />
and do not glue any of the LEDs <strong>for</strong> now.