vim 101 hacks

You also want an ePaper? Increase the reach of your titles
YUMPU automatically turns print PDFs into web optimized ePapers that Google loves.
Buyer: xiujuan lu (luxiujuan@gmail.com)<br />
Transaction ID: 85W16630AD8515549<br />
Vim <strong>101</strong> Hacks<br />
www.thegeekstuff.com<br />
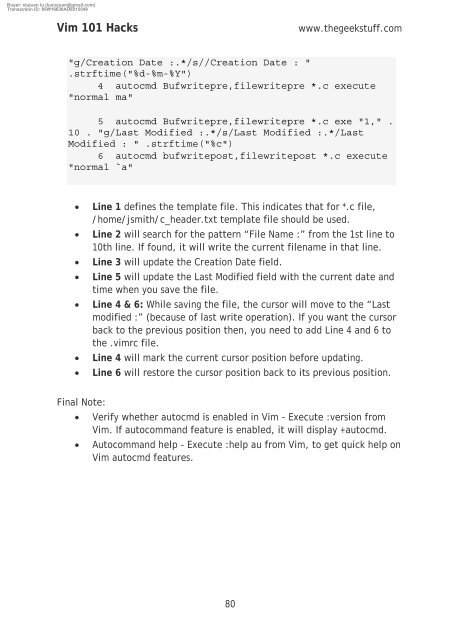
"g/Creation Date :.*/s//Creation Date : "<br />
.strftime("%d-%m-%Y")<br />
4 autocmd Bufwritepre,filewritepre *.c execute<br />
"normal ma"<br />
5 autocmd Bufwritepre,filewritepre *.c exe "1," .<br />
10 . "g/Last Modified :.*/s/Last Modified :.*/Last<br />
Modified : " .strftime("%c")<br />
6 autocmd bufwritepost,filewritepost *.c execute<br />
"normal `a"<br />
• Line 1 defines the template file. This indicates that for *.c file,<br />
/home/jsmith/c_header.txt template file should be used.<br />
• Line 2 will search for the pattern “File Name :” from the 1st line to<br />
10th line. If found, it will write the current filename in that line.<br />
• Line 3 will update the Creation Date field.<br />
• Line 5 will update the Last Modified field with the current date and<br />
time when you save the file.<br />
• Line 4 & 6: While saving the file, the cursor will move to the “Last<br />
modified :” (because of last write operation). If you want the cursor<br />
back to the previous position then, you need to add Line 4 and 6 to<br />
the .<strong>vim</strong>rc file.<br />
• Line 4 will mark the current cursor position before updating.<br />
• Line 6 will restore the cursor position back to its previous position.<br />
Final Note:<br />
• Verify whether autocmd is enabled in Vim – Execute :version from<br />
Vim. If autocommand feature is enabled, it will display +autocmd.<br />
• Autocommand help – Execute :help au from Vim, to get quick help on<br />
Vim autocmd features.<br />
80