General Sewing Instructions - Leena's.com
General Sewing Instructions - Leena's.com
General Sewing Instructions - Leena's.com

You also want an ePaper? Increase the reach of your titles
YUMPU automatically turns print PDFs into web optimized ePapers that Google loves.
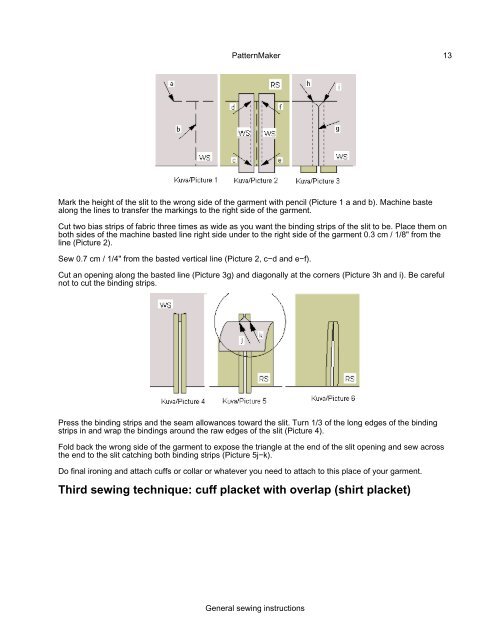
PatternMaker 13<br />
Mark the height of the slit to the wrong side of the garment with pencil (Picture 1 a and b). Machine baste<br />
along the lines to transfer the markings to the right side of the garment.<br />
Cut two bias strips of fabric three times as wide as you want the binding strips of the slit to be. Place them on<br />
both sides of the machine basted line right side under to the right side of the garment 0.3 cm / 1/8" from the<br />
line (Picture 2).<br />
Sew 0.7 cm / 1/4" from the basted vertical line (Picture 2, c−d and e−f).<br />
Cut an opening along the basted line (Picture 3g) and diagonally at the corners (Picture 3h and i). Be careful<br />
not to cut the binding strips.<br />
Press the binding strips and the seam allowances toward the slit. Turn 1/3 of the long edges of the binding<br />
strips in and wrap the bindings around the raw edges of the slit (Picture 4).<br />
Fold back the wrong side of the garment to expose the triangle at the end of the slit opening and sew across<br />
the end to the slit catching both binding strips (Picture 5j−k).<br />
Do final ironing and attach cuffs or collar or whatever you need to attach to this place of your garment.<br />
Third sewing technique: cuff placket with overlap (shirt placket)<br />
<strong>General</strong> sewing instructions