General Sewing Instructions - Leena's.com
General Sewing Instructions - Leena's.com
General Sewing Instructions - Leena's.com

You also want an ePaper? Increase the reach of your titles
YUMPU automatically turns print PDFs into web optimized ePapers that Google loves.
PatternMaker 21<br />
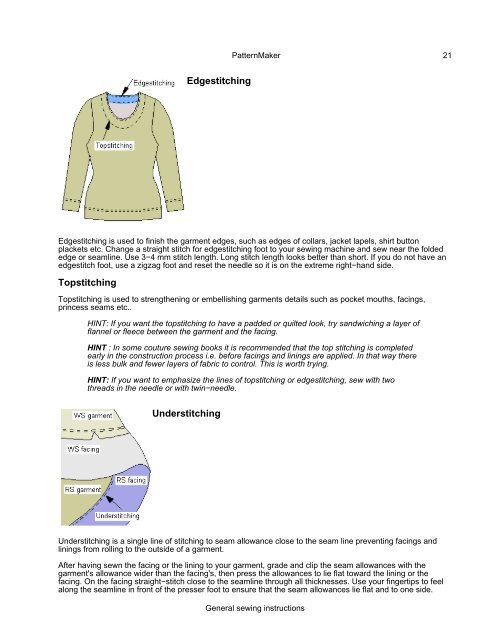
Edgestitching<br />
Edgestitching is used to finish the garment edges, such as edges of collars, jacket lapels, shirt button<br />
plackets etc. Change a straight stitch for edgestitching foot to your sewing machine and sew near the folded<br />
edge or seamline. Use 3−4 mm stitch length. Long stitch length looks better than short. If you do not have an<br />
edgestitch foot, use a zigzag foot and reset the needle so it is on the extreme right−hand side.<br />
Topstitching<br />
Topstitching is used to strengthening or embellishing garments details such as pocket mouths, facings,<br />
princess seams etc..<br />
HINT: If you want the topstitching to have a padded or quilted look, try sandwiching a layer of<br />
flannel or fleece between the garment and the facing.<br />
HINT : In some couture sewing books it is re<strong>com</strong>mended that the top stitching is <strong>com</strong>pleted<br />
early in the construction process i.e. before facings and linings are applied. In that way there<br />
is less bulk and fewer layers of fabric to control. This is worth trying.<br />
HINT: If you want to emphasize the lines of topstitching or edgestitching, sew with two<br />
threads in the needle or with twin−needle.<br />
Understitching<br />
Understitching is a single line of stitching to seam allowance close to the seam line preventing facings and<br />
linings from rolling to the outside of a garment.<br />
After having sewn the facing or the lining to your garment, grade and clip the seam allowances with the<br />
garment's allowance wider than the facing's, then press the allowances to lie flat toward the lining or the<br />
facing. On the facing straight−stitch close to the seamline through all thicknesses. Use your fingertips to feel<br />
along the seamline in front of the presser foot to ensure that the seam allowances lie flat and to one side.<br />
<strong>General</strong> sewing instructions