Tata Indica - V2 - Electromanuals.org
Tata Indica - V2 - Electromanuals.org
Tata Indica - V2 - Electromanuals.org

Create successful ePaper yourself
Turn your PDF publications into a flip-book with our unique Google optimized e-Paper software.
MAINTENANCE & CAR CARE<br />
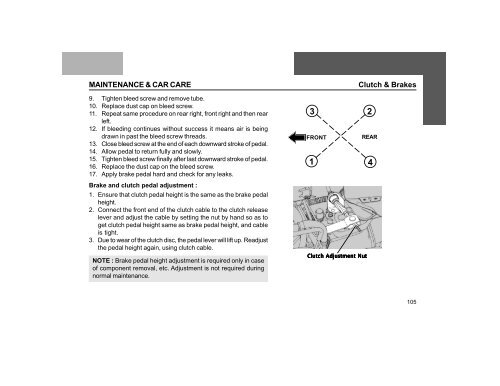
9. Tighten bleed screw and remove tube.<br />
10. Replace dust cap on bleed screw.<br />
11. Repeat same procedure on rear right, front right and then rear<br />
left.<br />
12. If bleeding continues without success it means air is being<br />
drawn in past the bleed screw threads.<br />
13. Close bleed screw at the end of each downward stroke of pedal.<br />
14. Allow pedal to return fully and slowly.<br />
15. Tighten bleed screw finally after last downward stroke of pedal.<br />
16. Replace the dust cap on the bleed screw.<br />
17. Apply brake pedal hard and check for any leaks.<br />
3<br />
FRONT<br />
1<br />
Clutch & Brakes<br />
2<br />
REAR<br />
4<br />
Brake and clutch pedal adjustment :<br />
1. Ensure that clutch pedal height is the same as the brake pedal<br />
height.<br />
2. Connect the front end of the clutch cable to the clutch release<br />
lever and adjust the cable by setting the nut by hand so as to<br />
get clutch pedal height same as brake pedal height, and cable<br />
is tight.<br />
3. Due to wear of the clutch disc, the pedal lever will lift up. Readjust<br />
the pedal height again, using clutch cable.<br />
NOTE : Brake pedal height adjustment is required only in case<br />
of component removal, etc. Adjustment is not required during<br />
normal maintenance.<br />
Clutch Adjustment Nut<br />
105