

Brian Kinwald XXX BK2 - Team Losi Racing
Brian Kinwald XXX BK2 - Team Losi Racing
Brian Kinwald XXX BK2 - Team Losi Racing

Create successful ePaper yourself
Turn your PDF publications into a flip-book with our unique Google optimized e-Paper software.
BAG D (Continued)<br />
Step D-14<br />
Slipper Clutch Assembly:<br />
107 108 109 110<br />
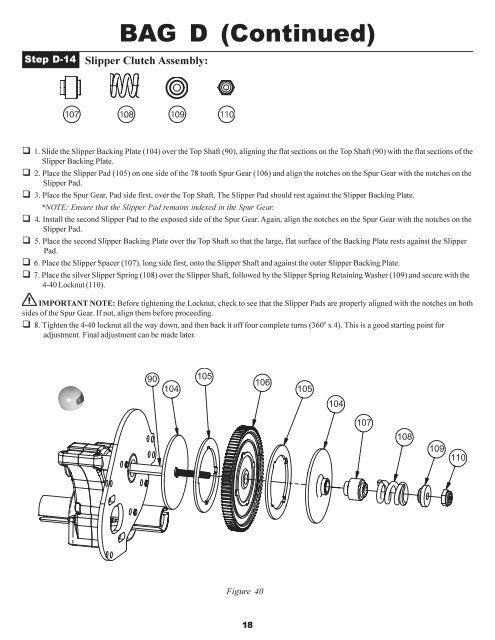
q 1. Slide the Slipper Backing Plate (104) over the Top Shaft (90), aligning the flat sections on the Top Shaft (90) with the flat sections of the<br />
Slipper Backing Plate.<br />
q 2. Place the Slipper Pad (105) on one side of the 78 tooth Spur Gear (106) and align the notches on the Spur Gear with the notches on the<br />
Slipper Pad.<br />
q 3. Place the Spur Gear, Pad side first, over the Top Shaft. The Slipper Pad should rest against the Slipper Backing Plate.<br />
*NOTE: Ensure that the Slipper Pad remains indexed in the Spur Gear.<br />
q 4. Install the second Slipper Pad to the exposed side of the Spur Gear. Again, align the notches on the Spur Gear with the notches on the<br />
Slipper Pad.<br />
q 5. Place the second Slipper Backing Plate over the Top Shaft so that the large, flat surface of the Backing Plate rests against the Slipper<br />
Pad.<br />
q 6. Place the Slipper Spacer (107), long side first, onto the Slipper Shaft and against the outer Slipper Backing Plate.<br />
q 7. Place the silver Slipper Spring (108) over the Slipper Shaft, followed by the Slipper Spring Retaining Washer (109) and secure with the<br />
4-40 Locknut (110).<br />
IMPORTANT NOTE: Before tightening the Locknut, check to see that the Slipper Pads are properly aligned with the notches on both<br />
sides of the Spur Gear. If not, align them before proceeding.<br />
q 8. Tighten the 4-40 locknut all the way down, and then back it off four complete turns (360 o x 4). This is a good starting point for<br />
adjustment. Final adjustment can be made later.<br />
90<br />
104<br />
105<br />
106<br />
105<br />
104<br />
107<br />
108<br />
109<br />
110<br />
Figure 40<br />
18


