Solar controller XTDC - Sorel
Solar controller XTDC - Sorel
Solar controller XTDC - Sorel

You also want an ePaper? Increase the reach of your titles
YUMPU automatically turns print PDFs into web optimized ePapers that Google loves.
Operation<br />
E.1. - Display and input<br />
(2)<br />
(1)<br />
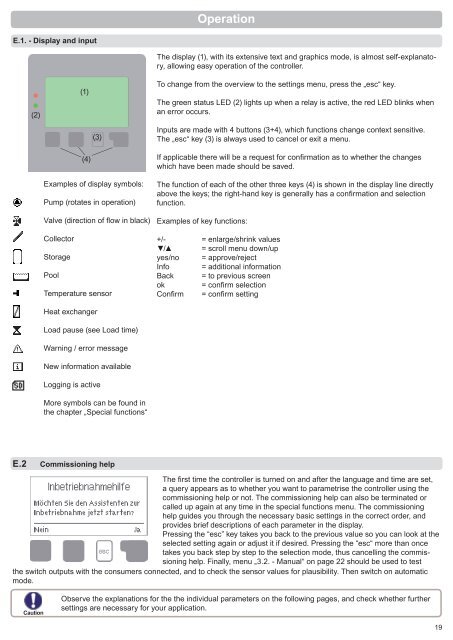
The display (1), with its extensive text and graphics mode, is almost self-explanatory,<br />
allowing easy operation of the <strong>controller</strong>.<br />
To change from the overview to the settings menu, press the „esc“ key.<br />
The green status LED (2) lights up when a relay is active, the red LED blinks when<br />
an error occurs.<br />
(3)<br />
Inputs are made with 4 buttons (3+4), which functions change context sensitive.<br />
The „esc“ key (3) is always used to cancel or exit a menu.<br />
(4)<br />
Examples of display symbols:<br />
Pump (rotates in operation)<br />
Valve (direction of fl ow in black)<br />
Collector<br />
Storage<br />
Pool<br />
Temperature sensor<br />
If applicable there will be a request for confi rmation as to whether the changes<br />
which have been made should be saved.<br />
The function of each of the other three keys (4) is shown in the display line directly<br />
above the keys; the right-hand key is generally has a confi rmation and selection<br />
function.<br />
Examples of key functions:<br />
+/- = enlarge/shrink values<br />
▼/▲ = scroll menu down/up<br />
yes/no = approve/reject<br />
Info = additional information<br />
Back = to previous screen<br />
ok = confi rm selection<br />
Confi rm = confi rm setting<br />
Heat exchanger<br />
Load pause (see Load time)<br />
Warning / error message<br />
New information available<br />
Logging is active<br />
More symbols can be found in<br />
the chapter „Special functions“<br />
E.2 Commissioning help<br />
The fi rst time the <strong>controller</strong> is turned on and after the language and time are set,<br />
a query appears as to whether you want to parametrise the <strong>controller</strong> using the<br />
commissioning help or not. The commissioning help can also be terminated or<br />
called up again at any time in the special functions menu. The commissioning<br />
help guides you through the necessary basic settings in the correct order, and<br />
provides brief descriptions of each parameter in the display.<br />
Pressing the “esc” key takes you back to the previous value so you can look at the<br />
selected setting again or adjust it if desired. Pressing the “esc“ more than once<br />
takes you back step by step to the selection mode, thus cancelling the commissioning<br />
help. Finally, menu „3.2. - Manual“ on page 22 should be used to test<br />
the switch outputs with the consumers connected, and to check the sensor values for plausibility. Then switch on automatic<br />
mode.<br />
Caution<br />
Observe the explanations for the the individual parameters on the following pages, and check whether further<br />
settings are necessary for your application.<br />
19